1
EPSON
UPDATE FOR SD PRODUCTS
8/01
This package provides a POS printer product section to be added to the EPSON
System Device Product Information Guide. The table of contents of this section is
listed below.
EPSON TM-U230
Accessories . . . . . . . . . . . . . . . . . . . . . . . . . . . . . . . . . . . . . . . . . . . . . . . . . . . . . . . . . . . . . . . . . . 1
Printer Specifications . . . . . . . . . . . . . . . . . . . . . . . . . . . . . . . . . . . . . . . . . . . . . . . . . . . . . . . . . . 1
Reliability . . . . . . . . . . . . . . . . . . . . . . . . . . . . . . . . . . . . . . . . . . . . . . . . . . . . . . . . . . . . . . . . . . . . 1
Environmental Conditions . . . . . . . . . . . . . . . . . . . . . . . . . . . . . . . . . . . . . . . . . . . . . . . . . . . . . . 1
Safety . . . . . . . . . . . . . . . . . . . . . . . . . . . . . . . . . . . . . . . . . . . . . . . . . . . . . . . . . . . . . . . . . . . . . . . 1
DIP Switches . . . . . . . . . . . . . . . . . . . . . . . . . . . . . . . . . . . . . . . . . . . . . . . . . . . . . . . . . . . . . . . . . 2
Control Panel . . . . . . . . . . . . . . . . . . . . . . . . . . . . . . . . . . . . . . . . . . . . . . . . . . . . . . . . . . . . . . . . 2
Buffer Sizes . . . . . . . . . . . . . . . . . . . . . . . . . . . . . . . . . . . . . . . . . . . . . . . . . . . . . . . . . . . . . . . . . . . 2
Electrical Characteristics . . . . . . . . . . . . . . . . . . . . . . . . . . . . . . . . . . . . . . . . . . . . . . . . . . . . . . . 2
Loading Paper . . . . . . . . . . . . . . . . . . . . . . . . . . . . . . . . . . . . . . . . . . . . . . . . . . . . . . . . . . . . . . . 2
Installing a Ribbon . . . . . . . . . . . . . . . . . . . . . . . . . . . . . . . . . . . . . . . . . . . . . . . . . . . . . . . . . . . . 3
Testing the Printer . . . . . . . . . . . . . . . . . . . . . . . . . . . . . . . . . . . . . . . . . . . . . . . . . . . . . . . . . . . . . 3
Removing a Paper Jam . . . . . . . . . . . . . . . . . . . . . . . . . . . . . . . . . . . . . . . . . . . . . . . . . . . . . . . . 3
Related Documentation . . . . . . . . . . . . . . . . . . . . . . . . . . . . . . . . . . . . . . . . . . . . . . . . . . . . . . . 4
8/01
EPSON TM-U230
Characters per line 9 × 9:
9 × 9:
7 × 9:
7 × 9:
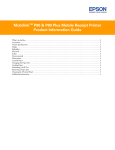
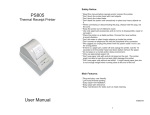
cutter cover
paper roll
Print speed
3.5 lps {at 40 columns per line, 16 cpi}
6.4 lps {at 16 columns per line, 16 cpi}
(single-color printing)
Paper-feed speed
4.17"/s {10.59 cm/s}
25 lps, continuous feeding
Character sets
alphanumeric: 95 characters;
international: 37 characters:
extended graphics: 128 characters × 12
pages (including a space page)
cover
control panel
35 (including 2 half dots spacing)
33 (including 3 half dots spacing)
42 (including 2 half dots spacing)
40 (including 3 half dots spacing)
power supply connector
Paper dimensions width: 3 ± 0.02" {76 ± 0.5 mm}
maximum diameter: 3.27" {83 mm}
interface connector drawer kick-out connector
Interfaces
power
Standard
RS-232 or IEEE-1284
Options
RS-485, USB, 10Base-T, Connect-It™ *
* To find out more about our line of Connect-It interfaces, contact your
EPSON Sales Representative
control panel
Reliability
Life:
mechanism
head
autocutter
Accessories
MTBF:
180,000 hours
Ribbons
MCBF:
18 million lines
Model
Color
ERC-38 (P)
Purple
ERC-38 (B)
Black
ERC-38 (B/R)
Black/Red
Environmental Conditions
Temperature range:operating
Other options
Option
Model
Part number
Wall hanging bracket
WH-10
C32C845010
External power supply
PS-180
PS-170
7.5 million lines
150 million characters
1 million cuts
storage
C32C825321
Humidity range:
operating
storage
32 to 122°F {0 to 50°C}
(Allowable humidity
decreases above 93°F {34°C}
to 65% at 104°F {40°C} and
35% at 122°F {50°C}.)
14 to 122°F {–10 to 50°C}
10 to 90% RH
{(no
condensation)
Printer Specifications
Safety
Printing
Printing method
9-pin serial impact dot matrix
Printing direction
Bidirectional printing (logic-seeking)
Print width
2.5" {63.34 mm}, 200 dots
EMI
FCC Class A
Safety standards UL 1950
CSA C22.2 No. 950
(Tested using the EPSON’s AC adapter.)
8/01
EPSON TM-U230 - 1
EPSON TM-U230
ERROR
Steadily on when the printer is offline, except during paper
feeding and the self-test. See if the cover is open.
Flashing if the head is too hot or there is an error. Turn the
printer off, let the head cool, and turn it back on. If still
flashing, contact a dealer or qualified service person.
DIP Switches
Serial interface
Bank 1 Function
ON
OFF
1
Data reception error.
Ignored.
Prints “?”
2
Receive buffer capacity.
1KB
16KB
3
Handshaking.
XON/XOFF
DTR/DSR
4
Word length.
7 bits
8 bits
5
Parity check.
Yes
No
6
Parity selection.
Even
Odd
7
Baud rate selection.
4800 bps
9600 bps
8
Busy condition.
Buffer full.
Offline and
buffer full.
Bank 2 Function
ON
OFF
1
Characters per line.
42 cpl/35 cpl
40 cpl/33 cpl
2
Reserved. Do not change. Fixed to ON.
—
3
Pin 6 reset signal.
Not used.
4
Pin 25 reset signal.
Used.
Not used.
5
PAPER OUT LED.
Flashes.
Light is on.
Current consumption (approximate, using the PS-180)
Operating
Mean:
Peak:
1.0 A
2.5 A
Standby
Mean:
90 mA (internal buzzer is off)
100 mA (internal buzzer is on)
Button
FEED
This button feeds paper or starts a self-test.
Buffer Sizes
Receive
Used.
6, 7
Reserved. Do not change. —
Fixed to OFF.
8
Internal buzzer.
Enabled.
Disabled.
Electrical Characteristics
Supply voltage
Parallel interface
Bank 1 Function
ON
OFF
1
Auto line feed.
Enabled.
Disabled.
2
Receive buffer capacity.
1KB
16KB
3—7
Undefined.
—
—
8
Busy condition.
Buffer full.
Offline and
buffer full.
Bank 2 Function
ON
OFF
1
Characters per line.
42 cpl/35 cpl
40 cpl/33 cpl
2
Reserved. Do not change. —
Fixed to OFF.
3
Undefined.
—
—
4
Pin 31 reset.
Used.
Not used.
5
PAPER OUT LED.
Flashes.
Light is on.
6, 7
Reserved. Do not change. —
Fixed to OFF.
8
Internal buzzer.
Enabled
Disabled.
1KB or 16KB, selectable by DIP switch.
+24 V ± 10% (using an EPSON
power supply)
Loading Paper
Use only paper rolls that meet specifications.
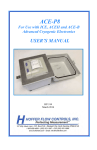
1. Be sure the printer is not receiving data. Open the roll paper
cover, and then turn on the printer.
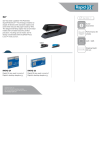
2. Remove any used roll paper core. Insert the roll paper; then
hold both edges of the paper and insert it straight into the
paper insert slot until the paper is fed automatically. The
correct direction is shown below.
paper insertion slot
Control Panel
LEDs
POWER
On when the power is on.
3. Cose the roll paper cover.
4. When the PAPER OUT light flashes, press the FEED
button to bring the printer online.
PAPER OUT
On or flashing when the printer is out, or nearly out, of roll
paper. (Set with DIP switch 2-5.)
2 - EPSON TM-U230
8/01
EPSON TM-U230
Installing a Ribbon
Removing a Paper Jam
CAUTION:The print head becomes hot during printing. Perform
this procedure only after the head has cooled.
CAUTION:Use only the EPSON ERC-38 ribbon. Use of any ribbon
cassette other than the one approved by EPSON may
damage the printer and will void the warranty.
Do not pull paper against the paper feed direction.
1. Turn on the printer.
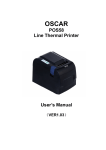
1. Turn the printer off, and open the roll paper cover.
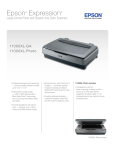
2. Turn the knob on the ribbon cassette, as shown below.
2. Take out the roll paper and cut the paper along the area
shown by the dotted line shown in the figure below.
3. Open the paper roll cover and cutter cover.
cut
roll paper cover
knob
tab
3. Open the cutter cover.
4. Raise the autocutter tab and open the autocutter.
5. If possible, pull out jammed paper in the direction of the
paper exit.
4. Lift the autocutter using the tab, and insert the new ribbon.
5. Turn the knob again 2 or 3 times and check if the ribbon
cassette is in the right position.
Testing the Printer
With the ribbon cassette and roll paper inserted in the printer,
follow these steps to run a self-test:
6. If you cannot pull out the paper, try the following:
❏ Take the ribbon cassette out of the printer.
❏ Loosen the screw that secures the print head cover until
the screw tilts, as shown in the illustration. (Do not
remove the screw.)
❏ Remove the print head cover.
1. Be sure the printer is off and the printer cover closed
properly.
2. Hold down the FEED button, and turn on the printer.
3. The self-test starts printing status information. Then it
prints the following and the PAPER OUT LED flashes to
indicate that the printer is in standby.
SELF-TEST printing. Please press PAPER FEED
button.
print head cover
4. Press the FEED button to continue printing. The printer
prints a pattern using the built-in character set.
5. The self-test automatically ends and cuts the paper after
printing “*** completed ***.” The printer is ready to
receive data as soon as it completes the self-test.
Note:
7. Remove the jammed paper.
8. Reinstall the head, secure the screw, and reinstall the ribbon
cassette.
To pause the self-test manually, press the FEED button. Press
FEED again to continue the self-test.
8/01
EPSON TM-U230 - 3
EPSON TM-U230
Removing an Autocutter Jam
1. If the blade is visible through the slit in the autocutter,
paper may have jammed in the autocutter.
2. Insert a screwdriver into the hole in the side of the
autocutter to turn the gear and return the blade to where it
cannot be seen from the slit in the autocutter. (This
position is shown by the dotted line in the illustration
below.)
slit
Error LED Codes
LED pattern
Solution
Autocutter error
Check for paper jam in the
autocutter. If problem continues,
contact your servicer.
Home position detection
error
Home position cannot be detected
because of a paper jam or other
problem.
High-voltage error
Replace power supply unit. If
problem continues, contact your
servicer.
Low-voltage error
Replace power supply unit. If
problem continues, contact your
servicer.
CPU execution error
Contact your servicer.
Head high-temperature
error
If you exceed the printer duty cycle,
the head overheats. When it cools,
the error clears. If this error occurs
and you have not been printing very
long, check that the ambient
temperature is within specifications.
Print head temperature
error
Print head termperature is out of
range.
Related Documentation
EPSON TM-U230 Service Manual
EPSON TM-U230 Parts Price List
EPSON TM-U230 User’s Manual
EPSON TM-U230 Specification
4 - EPSON TM-U230
8/01