1
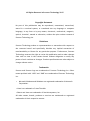
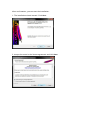
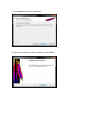
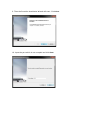
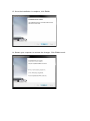
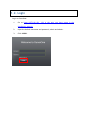
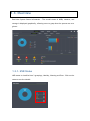
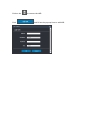
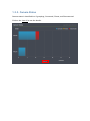
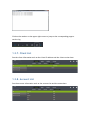
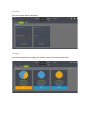
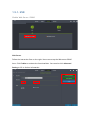
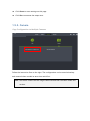
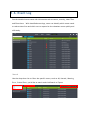
SurveOne User Manual Release 1.0 About This Document This manual introduces SurveOne, the Web-based Easy System Management Tool and describes how to use it, providing an overview of SurveOne functionality for monitoring the health of the NVR and the cameras. Version History Ver Version 1.0 Description Date Initial release Oct. 2015 All Rights Reserved © Surveon Technology 2015 Copyright Statement No part of this publication may be reproduced, transmitted, transcribed, stored in a retrieval system, or translated into any language or computer language, in any form or by any means, electronic, mechanical, magnetic, optical, chemical, manual or otherwise, without the prior written consent of Surveon Technology Inc. Disclaimer Surveon Technology makes no representations or warranties with respect to the contents hereof and specifically disclaim any implied warranties of merchantability or fitness for any particular purpose. Furthermore, Surveon Technology reserves the right to revise this publication and to make changes from time to time in the content hereof without obligation to notify any person of such revisions or changes. Product specifications are also subject to change without notice. Trademarks Surveon and Surveon logo are trademarks of Surveon Technology Inc. Other names prefixed with “NVR” and “SMR” are trademarks of Surveon Technology Inc. Microsoft Windows and Windows are registered trademarks of Microsoft Corporation. Linux is a trademark of Linux Torvalds. Solaris and Java are trademarks of Sun Microsystems, Inc. All other names, brands, products or services are trademarks or registered trademarks of their respective owners. Table of Contents Copyright Statement ................................................................ 3 Disclaimer ............................................................................ 3 Trademarks........................................................................... 3 Table of Contents .............................................................................. 4 Chapter 1. SurveOne .......................................................................... 5 1.1. Installation ........................................................................... 5 1.2. Login ................................................................................ 14 1.3. Overview ........................................................................... 15 1.4. Monitor ............................................................................. 22 Device ............................................................................... 22 Network............................................................................. 23 Storage.............................................................................. 23 1.5. Workflow ........................................................................... 25 Enable Web Server / DDNS ....................................................... 26 Back Up Configuration ............................................................ 29 NVR Multiple IP Setup ............................................................ 30 Copy Configuration to Multiple Cameras....................................... 31 Backup Configuration ............................................................. 32 1.6. Event Log ........................................................................... 34 Search ............................................................................... 34 Export ............................................................................... 35 Chapter 1. SurveOne SurveOne is a smart web-based system health check tool. The health of the overall systems, including NVRs, cameras, and storage is constantly monitored to achieve the system stability. SurveOne can also simplify setup allowing users to copy the hardware configurations and apply them to other devices to save time and efforts. For easy maintenance, the 3 level-classified real-time event logs, critical errors, errors and warnings, help users to take action efficiently, and thus mitigate risks and reduce losses. 1.1. Installation Once you have the software file, click to install and follow the installation steps. The system will warn you that you’ll need to have the administrator privilege as install on Window 7. After confirmation, you can start the installation. 1. The installation wizard started. Click Next. 2. Accept the terms in the license agreement and click Next. 3. Accept and click Next. 4. See if there’s any information you’d like to change, if not click Next. 5. Select the setup type, typical or custom and click Next. If you are not sure which one to select, it is recommended to select Typical. 6. See if you’d like to change the destination folder, click Change, if not click Next. 7. Click Install to start the installation. 8. When the installation wizard completed, click Finish. 9. Then the SurveOne Installation Wizard will start. Click Next. 10. Input the port which is not occupied and click Next. 11. Select the setup type, Typical or Advanced and then click Next. If you are not sure which one to select, it is recommended to select Typical. 12. Start to install the SurveOne. 13. Once the installation is complete, click Finish. 14. Restart your computer to activate the changes. Click Finish to exit. 15. After the installation is done and your computer is restarted. On your desktop you’ll find an IE browser icon with SurveOne on it. Double click this icon to log in to the SurveOne and start monitor the overall system status. 1.2. Login Log in to SurveOne: 1. Go to http://127.0.0.1:XX (XX is the port you have setup in the installation wizard.) 2. Input the default username and password, admin and admin. 3. Click LOGIN. 1.3. Overview Real-time System Status Information - The overall status of NVRs, cameras, and storage is displayed graphically, allowing users to grasp how the systems are at a glance. 1.3.1. NVR Status NVR status is classified into 3 groupings, Healthy, Warning and Error. Click on the status to see the details. 1.3.2. NVR List After clicking on the status, the system will take you to the NVR List to see the detailed NVR status with information such as NVR name, model, IP address, channels and status. Click on the to see the details of the NVR, including name, model, IP address, channels, status, version, record days, and VI counts. Click on the Click to remove the NVR. and fill out the pop-up form to add NVR. 1.3.3. Camera Status Camera status is classified into 3 groupings, Connected, Events, and Disconnected. Click on the view all to see the details. 1.3.4. Camera List After clicking on the view all, the system will take you to the Camera List to see the detailed Camera status with information such as camera name, model, IP address, and status. Cameras under different NVR will be listed separately. 1.3.5. Events Status NVR and camera event logs are presented in real-time and classified into 3 groups: critical error, error, and warning, for easy management. 1.3.6. Event Log After clicking on the Latest Events, the system will take you to the Event Log to see the detailed event status with information such as source, severity, date/Time and Event. With classified event logs, users can identify which event needs to take actions first and which not to respond to the situations more quickly and efficiently. Use the drop-down list to filter the specific event, such as All, Normal, Warning, Error, Critical Error, you’d like to search and click Search or Export. Click Export, the log you’re looking for will be copied to the notebook as shown below. Click on the number on the upper right corner to jump to the corresponding page to see the log. 1.3.7. Client List See the client information such as the client IP address and the client version here. 1.3.8. Account List See the account information such as the account list and the status here. 1.4. Monitor As long as there is network connectivity, users can easily monitor the system status locally or remotely and ensure the consistent stability. 1.4.1. NVR Device See the connected NVR information including CPU, memory, and disk throughput graphically. Click on the to bring out the following chart to learn the details. Network See the network status graphically. Storage See the storage status including disk volume, space information graphically. 1.4.2. Camera See the connected camera information including camera name, model, IP address, resolution, frame rate, bit rate, and status here. Click on the to see more details, such as camera name, model, IP address, resolution, frame rate, bit rate, codec, and firmware version. 1.5. Workflow Designed for easy configuration, deployment and maintenance, SurveOne allows users to do one-time setup. Users can simply copy the NVR or camera configurations and apply them to new devices to ease the complicated setup process. The configurations can also be saved as backup and restored when needed. 1.5.1. NVR Enable Web Server / DDNS Web Server Follow the instruction flow on the right. Users can set up the Web server/DDNS here. Click Enable to activate the functionalities. You can also click Advanced Setting to fill in further information. Enable the Web Server and click Advanced setting to fill in the following information for the Web Server settings to use the Web Client/Mobile Client. Note: (1) User may just keep the default settings in the Web Server. (2) Do not set the Web Server Port as these port numbers – 8080 (Web Stream Port), 9090 (NVR Stream Port), 2809 (NVR Server Login Port), 7735 (TV Wall Port (2.5.0)), 7734, 1024, 9010 (Domain Broadcast Port), 9030 (Domain Client Message Port), 9040 (Domain Console Message Port), 9050 (Domain Local Communication Port), 9020 (Domain Remote Communication Port), 9080 (Domain Local Log Data Download Port), 9081 (Domain Remote Log Data Download Port), 9060 (Domain Local Data Port), 9061 (Domain Remote Data Port), 15507 (Domain Local Log Message Download Port), 15503 (Domain Remote Log Message Download Port), 15501 (Domain Remote Log Upload port), 15505 (Domain Local Log Upload Port), 40000 (NVR Broadcast Port), 50000 (NVR Message Port). DDNS DDNS (Dynamic Domain Name Server) is a protocol that enables the device to maintain a static connection address, even when its IP changes. Access using this feature is disabled by default. Connecting using DDNS requires registration on third-party websites for DDNS services. Check the Enable DDNS option and click Advanced setting to fill in valid user name and password. You can then access the device through the registered domain name. Click Back to Workflow Selection to go back to the previous setting page. Click Reset to reset settings on this page. Click Run to execute the setups now. Back Up Configuration Follow the instruction flow on the right. The configurations can be saved as backup and restored when needed to save time and effort. 1. Select Backup or Restore. 2. Select path to save the configurations. 3. Select which device you’d like to save its configurations. Click Back to Workflow Selection to go back to the previous setting page. Click Reset to reset settings on this page. Click Run to execute the setups now. NVR Multiple IP Setup Follow the instruction flow on the right. Multiple IP addresses are supported. You can select the Obtain IP Address Automatically or Assign the following IP Address and input detailed information for each NVR. Click Back to Workflow Selection to go back to the previous setting page. Click Reset to reset settings on this page. Click Run to execute the setups now. 1.5.2. Camera Copy Configuration to Multiple Cameras Follow the instruction flow on the right. The configurations can be saved as backup and restored when needed to save time and effort. Note: The source camera and the target camera should bear the same model and version. 1. Select the source NVR and the cameras under this NVR. 2. Select the target NVR and the cameras under this NVR. Click Back to Workflow Selection to go back to the previous setting page. Click Reset to reset settings on this page. Click Run to execute the setups now. Backup Configuration Follow the instruction flow on the right. The configurations can be saved as backup and restored when needed to save time and effort. 1. Select Backup or Restore. 2. Select path to save the configurations. 3. Select which device you’d like to save its configurations. Click Back to Workflow Selection to go back to the previous setting page. Click Reset to reset settings on this page. Click Run to execute the setups now. 1.6. Event Log See the detailed event status with information such as source, severity, date/Time and Event here. With classified event logs, users can identify which event needs to take actions first and which not to respond to the situations more quickly and efficiently. Search Use the drop-down list to filter the specific event, such as All, Normal, Warning, Error, Critical Error, you’d like to search and click Search or Export. Export Click Export, the log you’re looking for will be copied to the notebook as shown below. Click on the number on the upper right corner to jump to the corresponding page to see the log.