1
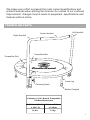
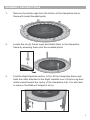
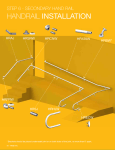
36” TRAMPOLINE WITH HANDRAIL
User Manual
Read this entire manual before using the product.
For assistance, please contact Radio Road at
www.radioroadtoys.com
DO NOT RETURN TO STORE
Ages 6+
Max Weight: 165 lbs. (75 kg.)
We make every effort to present the most current specifications and
product features when printing this manual. As a result of our continual
improvement, changes may be made to equipment, specifications and
features without notice.
TRAMPOLINE PARTS
Center Handrail
Right Handrail
Trampoline Skirt
Left Handrail
Trampoline Mat
Frame Leg
Fastening Knob
Rubber Footpad
Contains (1) 36" Round Trampoline
Product Dimensions
36.3” L x 36.3” W 92.2cm x 92.2cm
x 29.5” H
x 74.9cm
16 lbs.
7.3 kg.
1
SAFETY
Be sure to read and follow the assembly instructions before assembling and
using the product.
1.
This trampoline is intended for users ages 6+.
2.
Max 165 lbs. (75 kg.)
3.
Only for indoor use.
4.
The trampoline shall be assembled by an adult in accordance
with the assembly instructions and thereafter checked before
the first use.
5.
Only one user. Collision hazard.
6.
Jump with shoes.
7.
Do not use the mat when it is wet.
8.
Empty pockets and hands before jumping.
9.
Always jump in the middle of the mat.
10.
Do not eat while jumping.
11.
Do not exit by a jump.
12.
Limit the time of continuous usage and make regular stops.
REPLACEABLE PARTS
PART#
TM003-FP
TM003-SKT
TM003-MAT
TM003-SPR
TM003-LHR
TM003-RHR
TM003-CHR
TM003-FK
DESCRIPTION
Rubber Footpad
Trampoline Skirt
Trampoline Mat
Springs
Left Handrail
Right Handrail
Center Handrail
Fastening Knob
QUANTITY
8
1
1
32
1
1
1
2
2
ASSEMBLY INSTRUCTIONS
1.
Remove the plastic caps from the bottom of the trampoline frame;
these will reveal threaded posts.
2.
Locate the six (6) Frame Legs and attach them to the trampoline
frame by screwing them onto the revealed posts.
3.
Find the Right Handrail section. Lift or tilt the trampoline frame and
slide the collar attached to the Right Handrail over a Frame Leg then
rotate inward toward the center of the trampoline mat. You will need
to remove the Rubber Footpad to do so.
3
4.
Repeat step 3 with the Left Handrail and rotate both to face one
another. See the diagram below for reference.
5.
Locate the Center Handrail section. With the bent portion facing
away from the trampoline, slide the left side of the Center Handrail
over the exposed end of the Left Handrail section and repeat with
the right side. Make sure that both spring buttons on the left and
right sections are engaged and pop through the holes at the ends
of the center section.
6.
Put the Rubber Footpads back on and tighten the Fastening Knobs
until the handrail is secure.
7.
Check that all parts are properly fastened and secured before using.
4
MAINTENANCE
Keep this manual for future reference of assembly and product care.
For general safety and maintenance, prior to each use the product should
always be inspected for damaged or defective parts including:
- checking all nuts and bolts for tightness and tightened as needed
- checking that all spring-loaded joints are still intact and cannot become
dislodged during play
- checking all coverings and sharp edges to be replaced when required
- checking that the mat, skirt/padding, and handle are without defects
USING THE TRAMPOLINE
Your trampoline is intended for indoor use only. It should not be used
outdoors and is not intended to be buried in the ground or used without the
included Frame Legs.
We strongly recommend that:
- the trampoline is always used on a level surface
- the trampoline is at least 6 ft. (2m) from any structure or obstruction such
as furniture, walls, tables, lamps, etc.
- the trampoline is not installed over concrete, asphalt, or any other hard
surfaces nor within proximity of other play structures
- when moving the trampoline, pick up and carry by the frame and not
the handrail
For maximum safety and fun, follow the tips below!
1.
Always step onto and off of the trampoline from the side opposite
the handrail.
2.
When jumping, stay in the center of the mat and jump straight up
and down.
3.
The handrail should always be used when jumping for added balance.
It should not be pulled on, hung on, or used for any stunts or maneuvers.
4.
Never jump onto the trampoline from any other surface higher than
the ground.
5
WARRANTY
1 YEAR
Limited Warranty
Radio Road Limited Warranty:
Radio Road warrants that this product shall be free from defects in workmanship for one year
from the day of purchase. If the product is defective, Radio Road’s sole obligation under this
warranty shall be at its election, subject to the terms of this warranty, to repair or replace any
parts deemed defective. This warranty is for the exclusive benefit of the original purchaser and is
not assignable or transferable. THIS WARRANTY IS MADE IN LIEU OF ALL OTHER WARRANTIES,
EXPRESSED OR IMPLIED, AND ANY IMPLIED WARRANTIES, INCLUDING THE IMPLIED
WARRANTIES OF MERCHANTABILITY AND FITNESS FOR A PARTICULAR PURPOSE, ARE
LIMITED TO THE TERMS OF THIS WARRANTY, UNLESS OTHERWISE PROHIBITED BY LAW.
Exclusions
To the fullest extent permitted by law, Radio Road expressly disclaims and excludes from this
warranty any liability for damages, including but not limited to general, special, indirect, incidental,
consequential, aggravated, punitive or exemplary damages, and economic loss (even if Radio Road
is informed of their possibility), third party claims against you, including for any loss or damages,
and claims or damages related to loss of, or, damage to, your records or data. This warranty
does not apply to any product the exterior of which has been damaged or defaced. This warranty
will be voided by misuse, improper physical environment, improper repair, acts of God, war or
terror, commercial use, and improper service, operation or handling.
Return Merchandise for Service
Any claim under this warranty must be made in writing to Radio Road, at the address provided by
our technician, within 30 days after the owner discovers the circumstances giving rise to any such
claim, and must include a copy of this warranty document, a receipt or copy of your invoice marked
with the date of purchase and the original packaging. You may obtain service by calling the technician
for a Return Merchandise Authorization (RMA) number. The RMA number must be prominently displayed
on the outside of the shipping carton and the package must be mailed to Radio Road postage prepaid.
Radio Road
4720 Radio Road
Naples, Florida 34104
877-818-4221
www.radioroadtoys.com
6