1
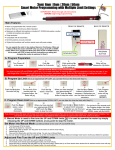
Using the Miscellaneous Print Designer
Copy an Existing Print
Click the Miscellaneous Print Designer button, located on
the Setup sidebar.
1.
Click the New Print button
, located at the top lefthand side of the window.
3. Click the Print radio button.
4. Click on the title of the print you would like to work with.
5. Click OK.
6. Type a title for your print, and then press [Enter].
7. Click the Edit Header button (top right-hand side of the
screen).
8. Click the down arrow to the right of a field if you would
like to select an alternate option.
9. Click into the checkboxes located on the far right-hand
side of the print to prevent certain sections from
appearing on the print.
10. Click the Preview button, located at the top of the screen.
Note: You must have an event open in Event Manager in
order to preview your print.
2.
3.
4.
1.
2.
In Print Designer or Miscellaneous Print Designer, click on the
title of the print you want to copy.
Note: Available only in the Professional version.
Right-click and choose Copy Print.
Click Yes at the confirmation message.
Type a name for the new copy, and press [Enter].
Additional Resources
Editing Miscellaneous Prints
Adding a New Prospect Manager Proposal
Custom Email Attachments
Creating Custom Event Prints User Manual
See Miscellaneous Prints Designer.
This section applies to the Event Sub-prints section of the
Prints menu in Event Manager.
a product of
Horizon Business Services, Inc.
Naples, FL 34102
T: 239.261.6617
F: 239.261.0067
www.caterease.com
[email protected]
Add a New Print
Customize and Suppress General Information
Customize Top Notes and Bottom Notes
1.
1.
Click the Print Designer button from the Setup sidebar.
1.
2.
Click the Add Print button
, located at the top left-hand
side of the Print Designer window.
Click Yes at the confirmation message.
Click on the desired design Layout, and then click OK.
Type a title over the words New Print, and then press [Enter].
Click the down arrow to the right of the Print Type field,
located at the bottom right-hand side of the screen.
Select, from the lower right-hand side of the screen, the
desired Print Type: Contact, Invoice, BEO, None.
2.
3.
4.
5.
6.
7.
Click the down arrow to the right of a field to select an alternate
option.
Click into the checkboxes located on the far right-hand side of
the print to keep certain sections from appearing on the print.
For example, you might opt to suppress financial information if
your print is meant for your chef; similarly, you might suppress
Ingredients for prints you send to your customers.
2.
3.
4.
5.
Click the Edit Top Notes button (upper left-hand side of
the screen) or Edit Bottom Notes button (lower lefthand side of the screen).
Click into the desired panel, and then click the Insert
button, located at the top of the window, to browse to a
logo or image. (See image below.)
Click the Fields button, located above the Insert button,
to add merge fields.
Format the font as desired, by using the Format toolbar
on the upper left-hand side of the window.
When finished, click Close.
See Adding a New Event Print in Print Designer.
Customize the Header/Footer
1.
2.
3.
4.
5.
Click the Edit Header button (top right-hand side of the
screen) or the Edit Footer button (lower left-hand side of the
screen).
Click into one of the panels on the Header window, then click
the Insert button, located at the top of the window, to browse
to a logo or image. (See image below.)
Click the Fields button, located above the Insert button, to
add merge fields.
[Optional] Add a link to your company website by typing into
the Hyperlink field.
When finished, click Close.
See Editing the Header or Footer of a Print.
Using your mouse, hover over the checkboxes to view the
tooltips.
Customize the Menu Section
1.
2.
3.
4.
Click the down arrow to the right of the Format field, located
towards the middle of the window.
Click into the boxes of the features you would like to display on
your print. For example, click into the Picture checkbox if you
would like to display any images you have uploaded.
Click the Filter button
, located on the right-hand side of the
Print Designer screen, towards the middle.
Select desired Type, Category, and Prep Area options by clicking
the down arrow to the right of each field.
Preview and Print
1.
2.
Click the Preview button, located at the top of the Print
Designer screen.
Note: You must have an event open in Event Manager in
order to preview your print.
Click the Print button, located at the upper left-hand
side of the print. (See image below.)
E-mail a Print
1.
2.
3.
4.
5.
Click the Email button, located on the upper left-hand
side of the print preview.
Note: The print will be attached as a .PDF.
Type en e-mail subject into the Subject field.
Type the e-mail body or select a custom merge letter.
Attach additional prints/files as desired.
Click the Send button.