1
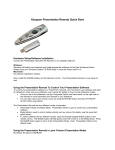
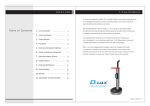
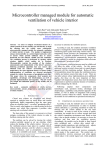
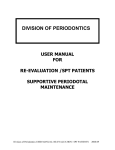
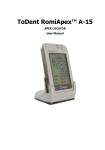
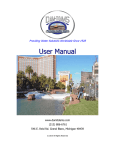
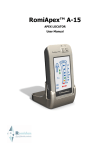
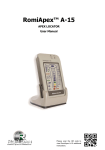
4
6
5
1
2
1 Main lead wires
2 Mini file holder
3 Lip hook
4 Apron clasp
5 On button
6 Flashing LEDs
2
3
Digital Apex Locator
The Digital Apex Locator is designed to meet international
safety and performance standards. Personnel operating the
instrument must have a thorough understanding of the proper
operation of the instrument. These instructions have been
prepared to aid medical and technical personnel to understand
and operate the instrument. Do not operate the instrument
before reading this manual and gaining a clear understanding
of the operation of the instrument. If any part of this manual is
not clear, please contact your representative for clarification.
The Digital Apex Locator calculates the distance from the tip of
your endodontic file to the foramen by measuring the signals
between two electrodes. The first electrode is the lip hook The
second is the mini file holder which makes contact with a file or
plugger that has been inserted into the root canal.
The Digital Apex Locator monitors the changes in the canal's
response as the file probe approaches the apex.
Technologically Advanced:
• There are 8 LEDs to mark the advancement of the file,
for precise working length measurement.
• The use of DSP allows a much higher level of accuracy
and control of the process with measurement results
accurate to 0.1 mm in the apical region and a display
resolution of 0.25 mm in the critical measurement range.
• The Digital Apex Locator provides precise measurements
of the canal under all conditions, including wet, dry and
bleeding canals. You can immediately measure another
canal without any special preparation.
• Calibration is automatic. NO manual calibration is required.
3
Initial Setup
1.Insert the two main lead wires into the outlets at the top of the Digital Apex
Locator (Pic.B).
2.Insert the file clip and lip hook into the sockets located at the end of the main
plug cable (either left or right) (Pic.C+D).
Pic.B
Pic.C
Pic.D
Pic.E
Pic.F
Pic.G
3.Attach the apron clasp to the lead wires by inserting them into the two wire
holders on the clasp handles (Pic.E).
4.Insert the Digital Apex Locator into a disposable sleeve (Pic. F).
5.Place the Digital Apex Locator near the mouth of the patient and attach the
clasp to the apron. (Pic.G)
6.Place the lip hook located at the end of the cable to the lower lip, preferably
on the opposite side of the tooth being treated.
7.Place the file at the entrance to the canal (pic.H) and then connect it to the
mini file holder located at the end of the file clip cable (pic.I).
The Digital Apex Locator is now ready for operation.
4
Pic.H
Pic.I
Directions For Use
NOTE: The Digital Apex Locator should be used only as an adjunct to normal
endodontic procedures. While the unit can reduce the number of radiographs
necessary, an initial radiograph must be taken to estimate working length.
Clinical judgment, including knowledge of root canal anatomy, is paramount
when interpreting results.
1.Activate the Digital Apex Locator by pressing the
“ON” button on the face of the unit or by making
contact between the lip hook and the mini file
holder (pic J). Once activated, the LEDs will flash
in sequence as a “self-check”.
2.Following this check, the green LED will blink,
indicating the Digital Apex Locator is in stand-by
mode.
Pic.j
3.When the file reaches the “2.00” mm point, the green LED will stay lit.
4.Work the file towards the apex in a clockwise and counter-clockwise filing
motion until the “0.50” mm orange LED turns on and the alarm sounds (slow
pitch).
NOTE: In order to gain the maximum advantage of this advanced DSP
technology, the file must be manipulated in slow movements towards the
apical constriction (0.0) in clockwise and counterclockwise motions. This
is due to the extremely high accuracy and rapidity of measurement of each
minute movement of the file. This is especially important in the critical
area between 0.5 to the apical constriction (0.0). Swift movement of the file
may cause an unsteady LED display.
5.Before reaching the biological apex, you will reach the “0.25” mm and the
orange LED will light.
6. When the file reaches the biological apex, the “Apex” red LED will light and the
alarm sound changes to a faster pitch.
7. Mark the depth of the canal with the file rubber stop.
Measure the length of the file and prepare the rest of the
files for the treatment according to this length. If you pass
the biological apex, the “-0.0” mm red LED will begin to
flash and the alarm will sound (fastest pitch). At this stage,
gently pull file back out of the canal until the “Apex” mm red
LED lights and the alarm sound slows its pitch.
Please refer to our recommendations for a successful
treatment (page 8) and our troubleshooting guide (page
10) for more information.
5
Device Power Off
As an energy-conservation feature, the Digital Apex Locator will turn off after
approximately 90 seconds of inactivity.
Battery Power
When the Digital Apex Locator recognizes low battery power, upon turning on
the unit, three intermittent LED lights will light simultaneously along with beeping
sounds. This is a warning to change the battery soon (still functional). If after an
additional period of time the operator has not changed the battery, the unit will
turn off automatically upon being turned on and will not allow the operator to use
the unit. Replace the battery immediately. There are no other user serviceable
items within the unit.
Warning! Low battery power affects accuracy.
Battery Replacement
1.Turn over the device so the back side is facing you.
2.Remove the battery by gently pulling out the battery drawer at the bottom of
the Digital Apex Locator (pic.K).
3.Remove the battery from the drawer (pic.L) and replace with a fresh battery
(type CR2450).
4.Be sure to insert the battery with the + sign facing upwards, to the rear of the
device (pic.M)
5.Slide the drawer back into the battery housing with the + sign to the REAR of
the device.
Dispose of depleted battery in accordance to local regulations.
Pic.K
6
Pic.L
Pic.M
Note: When storing the Digital Apex Locator for an extended period of time
without use, it is recommended to remove the battery from the device in order
to lengthen the battery life.
Sterilization
Warning! Do not place the Digital Apex Locator into the Autoclave!!
Do not submerge the device or allow liquid to enter the unit enclosure!
Attention! The Digital Apex Locator is not supplied in a sterile state. All surfaces
of the device and its accessories should be disinfected when the unit is initially
received and thereafter between procedures, to prevent cross-infection. Wipe
the surface of the unit with a clean cloth moistened in 70% ethyl alcohol solution.
The main lead wires (1), mini file holder (2), lip hook (3) and apron clasp (4) can
be sterilized in the autoclave at 121ºC for 20 minutes or at 134ºC for 5 minutes.
Only accessories specifically mentioned as autoclave save may be sterilized in
the autoclave.
For your convenience After the length of
the canal has been defined and marked on
all of the files, the compact and convenient
Sensor Probe can be used to confirm
the depth of the entering file during the
procedure.
The result of the momentary contact with
the file will be shown on your apex locator
immediately.
Please note: Contact should be made increasingly often when
approaching the biological apex, in order to prevent perforation. The
location of the file will be shown on the apex locator only during direct
contact with the sensor probe.
7
RECOMMENDATIONS for a successful treatment
Prior to measuring root canal length with your
Digital Apex Locator:
1. Make sure that the pulp chamber 1 is dry before
inserting the measuring file. It is recommended to dry
the pulp chamber with a cotton pellet or by a slight
aspiration of the moisture with an aspiration syringe.
Also ensure that all canals are isolated from each other.
Excessive fluids in the pulp chamber or canals may
form a conductive bridge between canals or with a
metallic restoration or crown. Drying the canal with a
paper point may help increase accuracy.
2. When the walls of the pulp chamber are damaged
2 , or there are damaged fillings 3 , saliva leakage
can occur from the oral cavity, which will prevent drying of the chamber. A moist
chamber may cause the immediate formation of a closed electrical circuit, i.e.,
a short circuit. In this event, the apex locator will issue a warning (flashing red
LED and audible alarm) as if it reached the apex (false positive reading). In such
cases the missing chamber wall should be temporarily restored, but only with
nonconductive materials such as Composite, IRM, GI (glass iononer), etc. After
restoration, a dry chamber can be achieved and accurate measurement can be
reached.
3. Continuous contact with metal or amalgam fillings will ground the device,
so take special care to prevent contact between the file and any existing
metal-based restoration of the tooth by amalgam filing or metal crown. In such
instances, an adequate insulation of the file from the metallic environment can be
achieved by fitting 2-3 rubber stoppers onto the part of the file that may contact
the metal of the restoration.
4. A preliminary extirpation is recommended before beginning measurement.
Residual tissue may result in a premature and erroneous reading.
5. When using a rubber dam, make sure that it is properly sealed around the
insertion area. Any aperture between the rubber dam and tooth can be sealed
with a temporary restoration. Leading endodontists recommend the use of
rubber dams during every root canal treatment.
6. Ensure the lip hook fully contacts the patient’s moist mucosa. The lip hook
should not make contact with any adjacent teeth, which may have metal fillings.
7. Check all connections.
8
8. While some of the accessories are autoclavable, if any accessory seems
damaged after a number of autoclave cycles, please replace with a new part.
Particularly check the lead wire cables. (see the section on "sterilization" for a full
list of the autoclavable items).
Recommendations for the measurement process
Prepare a wide canal orificium and prepare the first 2/3 in a tapered way to
prevent contact with premature constrictions in the canal.
1. The file should be inserted into the canal in a filing motion (clockwise and
counter-clockwise). Rotation of the file in one direction may cause the file to
break inside the canal!
2. Take care to ensure continuous contact between the file and the root canal
wall. It is recommended to use the largest possible file that will reach the
estimated working length. A loose file that does not make continuous contact
with the canal wall will be unable to perform accurate measurements.
3. Ensure continuous and strong contact between the file and its holder (this may
be problematic with the thinner files 6, 8, 10 mm).
4. In excessively desiccated canals, moistening is recommended to improve
conductivity. This can be performed by slight irrigation and/or by slight lubrication
of the file.
5. If the canal is too dry, introduce NaOCl to the apical third of the canal.
Exceptions
1. In a very wide canal, the Digital Apex Locator may be able to read the
measurement only at the tip where the canal constricts toward the apical
foramen. In such cases only a depth of 0.5 mm and apical foramen, will be
identified. Reading may be improved by using a larger file and making definite
contact with the canal wall.
2. The apex locator reading may be unstable in the following tooth pathology
situations: decay (caries in the pulp chamber), strong bleeding in the canal,
metallic restoration, periapical lesion, open apex 4 , excessively wide canal.
3. Bone or periodontal ligament loss (indicated by a radiolucency on the film) can
cause inaccurate readings.
4. A worn out battery will reduce the accuracy of the reading. The battery should
be replaced as soon as the instrument's warning signal appears, as detailed in
the user manual. Take care to follow the instructions for connecting the cables to
the instrument as specified in the user manual.
In all instances of erroneous readings as described above only a premature
reading situation is possible, due to ostensible recognition of the apex. However,
the Digital Apex Locator will not show a delayed reading that may endanger the
periapical tissues.
The Digital Apex Locator is a digital electronic device and as such requires
a minimum residual battery voltage to drive the circuitry. It therefore requires
replacement when this point has been reached even thought there may be
sufficient power left for the LEDs to turn on.
9
Troubleshooting
Question
10
Solution
Unit shows that the file is at the
apex when instrument has only
just been introduced to the canal.
Either pulp chamber floor is not
completely dry or the file has contacted
a metallic restoration. In either case, the
inaccurate readings are due to shorting
the circuit. Dry the pulp chamber if it is
wet.
Reading on unit is not steady.
File is in intermittent contact with the canal
walls. Either place a curve at the tip of
the file or try a larger size file so the tip
touches the wall near the apex.
No lights show.
Battery is flat or has not been replaced
correctly (see below).
3 LEDs illuminate simultaneously
Warning to replace battery as soon as
possible.
The reading on the device does
not coincide with the result of the
X-ray.
The X-ray is a two-dimensional image that
cannot accurately find the biological apex.
Therefore, the result of the apex locator
should be relied upon for determining the
correct working length. In addition, bone
or periodontal ligament loss (indicated
by a radiolucency on the film) can cause
inaccurate readings.
The unit will not switch off.
Battery is low. Replace battery.
Unit does not work when battery
has been replaced.
Please check each of the following points:
• The battery has been placed upside
down.
• The battery was not fresh. Please ensure
you are replacing with a new battery.
• Please make sure you are using a
CR2450 type battery.
Included in box
• Digital Apex Locator (1 unit)
• Lead Wires (4 units) - autoclave safe
• Apron Clasp (2 units) - autoclave safe
• Lip Hook (2 units) - autoclave safe
• Traditional File Clip - autoclave safe
• Mini File Holder (3 units) - autoclave safe
• Disposable Sleeves (20 units)
• Battery (type CR2450)
• Mini Sensor Probe (1 unit)- autoclave safe
Accessories
In order to facilitate your operating area, MedicNRG has developed a wide range
of accessories that are fully compatible with the Digital Apex Locator
• Mini Sensor Probe - autoclave safe (included!)
• Long Sensor Probe - autoclave safe
Classification
• Type BF applied part.
• IEC 601-1 Compliant Medical Equipment
Technical Specifications
• Power Supply: Single CR2450 battery
• Power input: 2.4 – 3.0 V
• Maximum current: 12mA
• Operating temperature: +10ºC - +40ºC
• Humidity: 10% - 90% without condensation.
WARNING: The Digital Apex Locator should NOT be used on a patient with a
pacemaker.
11