1
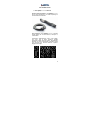
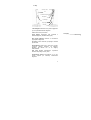
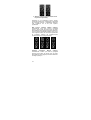
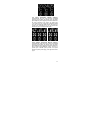
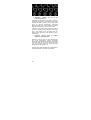
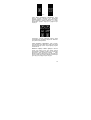
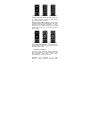
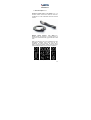
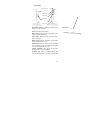
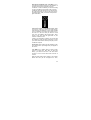
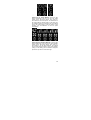
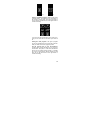
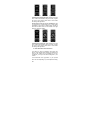
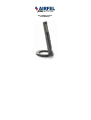
penremote
KULLANIM KLAVUZU
USER MANUAL
2
İÇİNDEKİLER / CONTENT
Airfel kalemkumanda hakkında
Giriş
Kumanda ayarları ile ilgili genel bilgiler
Kumandayı ilk kez açmak
“Manual” sekmesi
“Automatic” sekmesi
“Program” sekmesi
Bazı bilgi ve talimatlar
kalemkumanda üretici firma
5
7
7
8
10
12
12
14
15
About Airfel penremote
Introduction
General instruction about the settings
Turning on your remote for the first time
“Manual” position
“Auto” position
“Program” position
Some information and instructions
penremote production company
17
19
19
20
22
24
24
26
27
3
4
kalemkumanda
KULLANIM KILAVUZU
1- Airfel kalemkumanda hakkında
Üniversal klima kumandası: Airfel kalemkumanda,
birçok Airfel kumandasının bir üründe toplandığı bir
üniversal klima kumandasıdır.
Hava istasyonu: Airfel kalemkumanda, kumanda
özelliği dışında bir oda termometresi, nemölçeri ve
masa saatidir.
Kumandanızı kullanmadığınız sürece oda sıcaklığı,
nem oranı, saat ve klima ayarlarınız aşağıda
gördüğünüz şekilde ekranda görünür. Kumandanızın
herhangi bir tuşuna bastığınızda kumandanız klima
ayarı ekranına geri dönerek klimanızın ayarlarını
değiştirmenizi sağlar.
Oda sıc.
Nem oranı
Saat
Klima ayarı
5
Kumandanızın hava istasyonu, klimanızdan bağımsız
çalışır. Başka bir değişle, klimanız kapalı olsa dahi,
kumandanızı bir termometre, nem ölçer ve masa saati
olarak masanızın üstünde kullanabilirsiniz.
Hava istasyonu özelliği herhangi bir ayar gerektirmez.
Kumandanızı tamamen kapatmak istiyorsanız arkadaki
power (güç) düğmesine uzun süreli basınız. Ekranınız
ve kumandanız tamamen kapanacaktır.
Kumandanızı ya da klimanızı yeniden açmak
isterseniz power (güç) düğmesine yeniden basınız.
kalemkumanda,
Kolay
anlaşılır
arayüz:
düğmelerden arındırılmış basit bir arayüze sahiptir.
Ürün ekranında, teknik terimler yerine kolay anlaşılır,
yaşlı insanların da görmekte güçlük çekmeyeceği
büyüklükte, basit simgeler kullanılmıştır. Ürün, gözü
görmeyen ya da az gören insanların da kullanabileceği
şekilde tasarlanmıştır. Detaylı bilgi için 6. bölümü
okuyunuz.
Anti-bakteriyel malzeme: kalemkumanda ’ nın
üretiminde bakterilerin yüzey üzerinde tutunamayacağı
anti-bakteriyel
bir
malzeme
kullanılmıştır.
Kumandanıza güvenle dokunabilirsiniz.
İyi günlerde kullanmanız dileği ile…
6
2- Giriş
Kızıl ötesi vericisi
LCD
Havalandırma ızgarası
Güç düğmesi
4 yönlü düğme
Kayar düğme
Pil kapağı
4 Yönlü düğme: Klimanızın tüm ayarlarını değiştirmek
ya da onaylamakta kullanılan düğmedir.
LCD: Ürünün ekran penceresidir.
Pil kapağı
Kayar düğme: Kumandanın arka yüzündeki
kademeli düğmedir (Auto/Manual/Program).
3
Güç (power) düğmesi: Klimanızı ve kumandanızı
açıp kapatma düğmesidir.
Pil yuvası: Ürünün arkasında, pil kapağının altındaki
pil haznesidir.
Reset düğmesi: Klima kodu ve saat ayarını yeniden
yapmanızı sağlayan düğmedir. Pil kapağının
altındadır. Bir kalemin ucu ile bu düğmeyi
kullanabilirsiniz.
Kızıl ötesi vericisi: Kumandanızın
klimanıza ulaştırıldığı vericinin yeridir.
sinyallerinin
Havalandırma ızgarası: Kumandanızın ısı ve nem
ölçümü yapması için bırakılmış havalandırma
bölgesidir.
7
3- Kumanda ayarları ile ilgili genel bilgiler
Ekran görüntüsü: Ekranın ince uzun bir yapısı vardır.
Ekrandaki simgeler yukardan aşağı doğru sıralanır.
Ekrandaki görüntü, yazılar yerine herkesin algılayacağı
basit simgeler ve rakamlardan oluşur. Görüntünün
basit bir mantığı vardır. Ekranın alt kısmında hangi
değeri değiştirdiğinize ait bir simge ve ekranın üst
kısmında değiştirilen değer görünür.
Ekrandaki sabit ve yanıp sönen değerler:
Kumandanın tüm ayarları için, ekrandaki yanıp sönen
tüm simge ya da sayılar sizden bilgi istenildiğini,
durağan tüm simge ya da sayılar size bilgi verildiğini
sembolize eder.
Ayarları değiştirmek ve onaylamak: Kumandanın
tüm ayarları için yukarı-aşağı düğmesi ayar
değiştirmenizi, sağ-sol düğmesi ayarı onaylayıp, başka
ayara geçmenizi sağlar.
Ayarların klimanıza iletilmesi: Yaptığınız ayarlar
klimanıza gözle görünmeyen, kızıl ötesi bir ışık
içerisindeki kodlar halinde iletilir. Yaptığınız ayarın
klimanız tarafından algılanabilmesi için ayarı yaparken
kumandanızı klimanıza doğru yönlendirin ve klimanız
ile kumandanızın arasında herhangi bir cisim
olmadığına dikkat ediniz.
4- Kumandayı ilk kez açmak
Pili, pil yuvasına takın: Pil, ürünle birlikte gelir. Ürünü
aldığınızda pili, pil yuvasına “+” kutbu yukarı gelecek
şekilde takın.
Her pil takışınızdan sonra sizden iki farklı ayar
girmeniz beklenir. Bunlar klima kodu ve saat ayarıdır.
Klima kodunu girin : Airfel kalemkumanda birden
fazla klimayı destekleyen bir kumandadır. Bu sebeple
kumandanızın, klimanıza göre ayarlanması için, her
klimaya bir kod numarası verilmiştir. “ Kod seçim
ekranı”nı gördüğünüzde (aşağıdaki ekran) yukarı-
8
aşağı düğmelerini kullanarak bu kodu kumandanıza
girmeniz gerekmektedir. Klima kodunu ekranınızda
ayarladıktan sonra onay için sağ ya da sol düğmesine
basınız.
Eğer klima kodunu bilmiyorsanız; Kod ekranı
göründüğünde
kumandanızı
kızılötesi
vericisi
klimanıza yöneltilmiş şekilde tutarak 01 den başlayıp
yukarıya doğru kod numarasını değiştirin. Doğru kod
numarası girdiğiniz anda klimanız sinyal sesi
verecektir. Bu durumda iken ekrandaki kodu sağ veya
sol tuşu ile onaylayın.
Eğer bahsi geçen kod ile klimanızın ayarları arasında
uyumsuzluk yaşarsanız aynı işlemi tekrarlayarak,
klimanızın, kumandanıza cevap verdiği başka bir kod
numarası ile kumandanızı kullanın.
Saati ayarlayın: Klima kodunu girdikten sonra
karşınıza “saat ayar ekranı” (aşağıdaki görüntü)
gelecektir.
Airfel kalemkumanda, klima kumandası özelliği
dışında bir masa saatidir. Pili her takışınızda kod
ekranını girdikten sonra saat ayarını yapmanız
gerekmektedir. Ekranın üzerinde görünen değer, saati,
altında görünen değer dakikayı simgeler.
“Saat ayar ekranı” ilk göründüğünde önce “saat” yanıp
söner, saati ayarladıktan sonra “dakika” yanıp söner,
dakikayı da ayarladıktan sonra saat ayarınızı yapmış
olursunuz.
9
5- “Manual” sekmesi ( mode,sıcaklık,fan hızı ve
fan yönünün ayarlanması )
Klimanızda en sık kullandığınız ayarlar “manual”
sekmesinde toplanmıştır. Kumandanızın arkasındaki
kayar düğmeği “manual” a getirdiğinizde klimanızın
mod, sıcaklık,fan hızı ve fan yönü ayarlarını
yapabilirsiniz.
Mod ayarının yapılması (Manual sekmesi):
Kumandanızda “mod seçim ekranı”nı (aşağıdaki
görüntü ) görene kadar sağ tuşuna basın. Bu ekran
göründüğünde yukarı-aşağı tuşuna basarak klimanızın
“mod”unu seçiniz. Klimanızda genellikle 4 farklı “mod”
vardır. Soğutma, ısıtma, fan ve nem alma. (Klimanızda
bu modlardan herhangi biri desteklenmiyorsa
kumandanızda da bu modu göremezsiniz)
Soğutma
Fan
Nem alma
Isıtma
Sıcaklığın
ayarlanması
(Manual
sekmesi):
Kumandanızda “sıcaklık ayar ekranı”nı (aşağıdaki
görüntü) görene kadar sağ tuşuna basın. Bu ekran
göründüğünde yukarı-aşağı tuşuna basarak klimanızın
sıcaklığını ayarlayınız.
10
…….
…….
degree23
degree24
degree25
…….
…….
Fan hızının ayarlanması (Manual sekmesi):
Kumandanızda “fan hızı ayarı” ekranını (aşağıdaki
görüntü) görene kadar sağ tuşuna basın. Bu ekran
göründüğünde yukarı-aşağı tuşuna basarak klimanızın
fan hızını ayarlayınız. Fan hızının en düşük ayarı
“uyku modu” dur. Bu “mod”da iken makineniz kendini
en az fan sesi üretecek şekilde ayarlar. Fan hızının en
yüksek ayarı “otomatik fan hızı” dır. Bu ayarda iken
klimanız fan hızını otomatik olarak ayarlar.
uyku modu
fan hızı 1
fan hızı 2
fan hızı 3
fan auto
Panel yönünün ayarlanması (Manual sekmesi):
Kumandanızda “panel yönü ayarı ekranı”nı (aşağıdaki
görüntü) görene kadar sağ tuşuna basın. Bu ekran
göründüğünde yukarı-aşağı tuşuna basarak klimanızın
panel yönünü ayarlayabilirsiniz. Panel yönünün en
yüksek ayarı “otomatik panel yönüdür”. Bu ayarda
klimanızın paneli yukarı-aşağı ya da sağa-sola salınım
yapar.
11
pnl.yönü1
pnl.yönü2
pnl.yönü3
6- “Automatic” sekmesi
yönünün ayarlanması )
pnl.yönü4
(fan
hızı
pnl.auto
ve
fan
Kumandanızın arkasındaki kayar düğme “Automatic”
sekmesinde iken klimanız, oda sıcaklığını 24 dereceye
sabitleyecek şekilde, sıcaklık ayarını otomatik olarak
yapar. Bu durumda kumandanızın yukarı-aşağı
düğmesi sadece panel yönünü değiştirir ve Sağ-sol
düğmesi kumandanızın fan hızının arttırıp azaltır.
“automatic” ayarı özellikle gözü görmeyen insanlar ve
yaşlılar için uygundur çünkü kumandanız bu durumda
iken 4 yönlü düğme her biri bir özelliğe sahip olur.
Böylece ekranı görmeseniz dahi klimanızın ayarını
yapabilirsiniz.
7- “Program” sekmesi (açılış
saatlerinin programlanması )
ve
kapanış
Klimanızın ne zaman açılıp ne zaman kapanacağına
dair ayarlar kumandanızın program sekmesinde
toplanmıştır. Airfel klimalarında iki farklı program şekli
vardır. Bunlardan biri geri sayım mantığı ile çalışan
“geri sayım programı”, diğeri ise verilen saate göre
açılıp kapanan “saat programı” dır.
Klimanız hangi özelliği destekliyorsa, kumandanızda o
özellik aktif olacaktır ve ekranda o görünecektir.
12
Geri sayım prgrm
Saat prgrm
“Geri sayım programı”nın ayarlanması: Kayar
düğmeyi program sekmesine alın. Ekranınızda
aşağıdaki program ayar ekranı görünecektir. Yukarıaşağı düğmesine basarak klimanızın ne zaman
kapanacağını ayarlayın. Sağ tuş ile yaptığınız ayarı
onaylayın.
Timer on
Timer off
Kumandanız açık iken, klimanızın kapanış saatini
ayarlayabilirsiniz, kumandanız kapalı iken klimanızın
açılış saatini ayarlayabilirsiniz.
“Saat program”ın ayarlanması: “Saat program”
ayarı klimanızın tam olarak hangi saatte açılıp hangi
saatte kapanacağını ayarlar. Kayar düğmeyi program
sekmesine alın.
Klimanızın kapanış saatini ayarlayın: Klimanız
açıksa önce kapanış sonra açılış saatini girmeniz
gerekmektedir. Aşağıdaki program ayarı ekranınızda
görülecektir. Saat simgesinin içerindeki “-“ işareti
klimanızın kapanış saatini simgeler. Bu durumda önce
kapanış saatini sonra kapanış dakikasını kumandaya
girin. Sağ tuş ile yaptığınız ayarı onaylayın.
13
Prgrm off iptal
Prgrm off saat
Prgrm off dakika
Kapanış saatini iptal etmek için: Saat ayarına gelin
ve yukarda belirtilen “program off” iptal ekranını
görene kadar aşağı tuşuna basın.
Klimanızın açılış saatinin ayarlayın: Kapanış saatini
onayladığınızda karşınıza aşağıdaki açılış ayar ekranı
gelecektir. Saat simgesinin içerisindeki “+” simgesi
klimanızın açılışını simgeler. Kapanış ayarına benzer
şekilde açılış ayarını yapın ve sağ tuş ile yaptığınız
ayarı onaylayın.
Prgrm on iptal
Prgrm on saat
Prgrm off dakika
Açılış saatini iptal etmek için: Saat ayarına gelin ve
yukarda belirtilen “program on” iptal ekranını görene
kadar aşağı tuşuna basın.
8- Bazı bilgi ve talimatlar
Her klimanın kodu içerisindeki ayarlar birbirlerinden
farklıdır. Bu kılavuzda tüm ayarlar anlatılmıştır. Eğer
sizin klimanızda bahsi geçen ayarlar yoksa,
kumandanızda da bu ayarı görmezsiniz.
Ürününüzün oda termometresi
klimanızın sıcaklık ayarından
14
ve nem
bağımsız
ölçeri,
olarak
kumandanızın bulunduğu yerin sıcaklığını ve nemini
ölçer. Kumandanız ve klimanızın bulunduğu yerler
farklı olduğu için ayar sıcaklığı ile ölçüm sıcaklığı
arasında fark olabilir.
Ürün termometre ve nem ölçerinin hassas ölçüm
yapabilmesi
için
kumandanızın
arkasındaki
havalandırma ızgarasının üstünün kapalı olmamasına
dikkat ediniz.
(Kumandanızın arkasındaki kayar düğme (slider)
“program”da iken kumandanızın hava istasyonu
özelliği çalışmaz)
Ürünü bir adet AA pil ile ( kalem pil ) kullanın. Üründen
yüksek verim almak için, ürünü uzun ömürlü kaliteli
piller ile kullanın.
Ürünü doğrudan güneş ışığı altında bırakmayın.
9- kalemkumanda, tasarımcı ve üretici firma
kalemkumanda,
Airfel
bünyesinde
tasarlanıp
konusunda uzman bir ekip tarafından üretilmiştir.
Ürünün tüm hakları Airfel firmasına aittir. Ürünün
geneli ya da detayı ile ilgili alıntı yapılamaz.
© Copyright 2007 by AIRFEL
Genel Merkez:
Airfel Isıtma ve Soğutma Sistemleri
Hürriyet Mah. E5 yanyol üzeri No:57
34876 Kartal Istanbul / TURKEY
www.airfel.com
Tel: +90 216 453 27 00
Fax: +90 216 671 06 00-01
15
16
penremote
USER MANUAL
1- About Airfel penremote
Universal remote control: Airfel penremote is a
universal remote control that control all Airfel airconditioners. It is the combination all remote controls
of Airfel.
Weather station function: Airfel penremote,
besides having the function of a remote control, it
works as a room thermometer, hygrometer and a table
clock.
When your remote is out of use, it displays the room
temperature, humidity level, time and the airconditioner set value onscreen, as shown below.
When you press any button, remote, turns back to the
remote settings and lets you set your air-conditioner.
Room tmp. Humidity
Time
Set values
17
Weather station function of your remote can work
independently. In other word, even your air-conditioner
is turned off, you can use your remote as a
thermometer, hygrometer or as a table clock on your
desktop.
Weather station function does not require any
calibration.
Push the power button and hold for a few seconds if
you want to turn off your remote completely. The
screen and your remote will be off completely.
Push the power button again, if you want to turn on
your remote or air-conditioner again.
User friendly interface: penremote has a purified
interface with its minimum number of buttons. Instead
of complex technical terms, basic symbols that
everyone can perceive, as large as even old people
can easily see were used onscreen. penremote is
also user friendly for blind and long sighted people.
Detailed information can be found in Chapter 6.
Anti-bacterial material: Anti-bacterial material was
used in your product to avoid bacteria hang on and
survive on the surface on the surface. You can touch it
with confidence.
Hope you enjoy it…
18
2- Introduction
Infrared transmitter
LCD
Ventilation grill
Power button
4way button
Battery cover
4way button: Button for making and confirming the
setting of your air-conditioner.
Slider switch
LCD: Screen display of the remote.
Pil kapağı
Slider switch: 3 step switch on the backside of your
remote. (Auto/Manual/Program)
Power button: Button for tuning on/off your remote
and air-conditioner.
Battery socket: Place for the battery, on back of the
remote, behind the battery cover.
Reset button: Button for entering the air-conditioner
code and setting the time. It is behind the battery lid.
You can use it with the edge of a pen.
Infrared Transmitter: Place where the Infra Red
signals are sent to your air-conditioner.
Ventilation grill: Place for ventilation where your
remote make temperature and humidity measurement.
19
3- General instruction about the remote
settings.
About the screen display: Screen has a slim
structure. The symbols on the screen are aligned from
top to bottom. Instead of words and technical terms,
the image on the screen is consist of primitive symbols
and numbers that everyone can understand. The
display interface has a basic logic. Below the screen
there is a symbol about the title of your setting, and
above the screen there will be the set value. (It can be
a number or it can be a symbol).
The flashing and stable values on the screen: For
all settings, flashing values symbolize the information
that is required to be entered. And all stable values
symbolize the information that is given to you.
To make change in the settings and approving it:
For all settings, Up-down buttons are used for making
change in the settings and left-right buttons are used
to approve that setting and pass to another one.
Transmitting the set value to your air-conditioner:
The set values are transmitted to the air-conditioner as
codes in an invisible infra red light. While using your
remote, orient your remote towards the airconditioners in order it to be recognized. And make
sure that there is no object between your remote and
air-conditioner.
4- Turning on your remote for the first time.
Place the battery into the battery socket: Battery is
included in the package. When you buy the product,
place the battery into the battery socket as shown in
the figure.
Right after each time you place the battery, two
settings are required to be entered. These are remote
code settings and clock settings.
20
Enter the air-conditioner code: Airfel penremote is
a remote that controls more than one air-conditioner. A
number (code) has been assigned to each airconditioner. In order to calibrate your remote according
to your air-conditioner, the number (code) of your airconditioner should be entered into your remote. Enter
the 2-digit code when you see the “code entry screen”
(the image below). After you enter the code push the
right or left button.
If you don’t now the “air-conditioner code”: When
you see the “code entry screen” (the image above),
orient the infra red transmitter of your remote towards
your air-conditioner and change the number one by
one from 01 to the end. Ones you enter the correct
code, your air-conditioner will respond with a “beep”
sound. In this case push the right button of your
remote to confirm the code.
If there is any discrepancy between your remote and
air-conditioner, repeat the same procedure. And use
your remote with another number (code) that your airconditioner responds.
Set the time: After entering the air-conditioner code,
“time setting screen” (the image below) will appear on
the screen.
Airfel penremote, besides being a remote control,
works as a table clock. Each time you place the
battery, you should set the time. The value above
onscreen is “hour” and the value below onscreen is
“minute”.
When the time setting screen appears, “hour setting”
flashes first. After you set and approve the “hour”,
21
“minute setting” flashes, after you set the “minute” your
time setting is complete.
5- “Manual” position on the slider( setting the
mode, temperature, fan speed and panel
direction )
Most used settings are grouped under the manual
position of your slider switch. When you slide the slider
to the manual, you can set mode, temperature, fan
speed and panel direction.
Setting the mode (Manual): Push the right button
until you see the “mode selection screen” (the image
below). After you see that screen, you can select the
mode by pressing up-down button. Generally there are
4 modes in your air-conditioner, namely cooling,
heating, fan and dry mode. (If one of those modes is
unavailable in your air-conditioner, it won’t be shown in
your remote control either)
Cooling
Fan
Dry
Heating
Setting the temperature (Manual): Press the right
button continuously until you see the “temperature
setting screen” (the image below). Then press updown button to set the temperature.
22
…….
…….
degree23
degree24
degree25
…….
…….
Setting the fan speed (Manual): Press the right
button continuously until you see the “fan speed
setting screen” (the image below). Then press updown button to set the fan speed. The lowest level of
fan speed setting is sleeping mode. In this mode your
air-conditioner works in a most silent way. The highest
level of fan speed setting is “auto fan speed”. In this
situation your air-conditioners set the fan speed
automatically.
Sleep md.
fn.spd.1
fn.spd.2
fn.spd.3
fn.auto
Setting the panel direction (Manual): Press the right
button continuously until you see the “panel direction
setting screen” (the image below). Then press updown button to set the panel direction. The highest
level of panel direction setting is “auto panel direction
(swing)”. In this setting your air-conditioner swings the
panel from up to down or from left to right.
23
pnl.dir.1
pnl.dir.2
pnl.dir.3
pnl.dir.4
pnl.auto
6- “Auto” position (setting the fan speed and
panel direction)
Air-conditioner
sets
the
temperature
setting
automatically and keeps the room temperature
constant in 24°C when the slider switch of your remote
is in auto position. In this case the up-down button sets
the panel direction and left-right button sets the fan
speed.
“Automatic” position is suitable especially for blind or
long sighted people because in this case 4 buttons of
4way button are used for 4 different functions. As a
result it is not required to look at the screen while
making the setting.
7- “Program” position (setting the automatic
on/off time)
The setting about automatic on/off is grouped under
the program position of the slider switch. There are
two types of program in Airfel air-conditioners. One is
“countdown program” the other is “exact time
program”.
Generally in air-conditioners there will only be one type
of these two programs. If your air-conditioner does not
support the other type, it will not be visible in your
remote also.
24
Countdown prg.
Exact time prg.
Setting “countdown program”: Slide the slider to the
program position. The program screen will appear on
the screen as shown below. Push up-down button to
set the program countdown time. Push right button to
confirm the setting.
Timer on
Timer off
You can set the turn-off time when your remote is on.
And you can set the turn-on time when your remote is
off.
Setting the “Time program”: This type of program
set your air-conditioner to turn on/off in the exact time.
Slide your slider switch to the program position.
Set the turn-off time of your air-conditioner:
Program setting screen will appear on your screen as
shown below. The symbol “-“ in the clock, indicates the
off time of your program and the symbol “+” indicates
the on time of your program. Set the off time hour first
than set the off time minute. Push right button to
confirm the setting.
25
Prgrm off cancel
Prgrm off hour
Prgrm off minute
Canceling the program off: While setting the off time
hour. Push the down button until you see the “program
off cancel” screen that is shown above. Then confirm
the setting with right button.
Set the turn-on time of your air-conditioner: After
you approve the off time setting, the on time setting
will appear on the screen as shown below. Set the on
time hour first than set the on time minute. Push right
button to confirm the setting.
Prgrm on cancel
Prgrm on hour
Prgrm off minute
Canceling the program on: While setting the on time
hour. Push the down button until you see the “program
off cancel” screen that is shown above. Then confirm
the setting with right button.
8- Some information and instructions
The setting in each air-conditioner may differ from
others. In this manual all the settings are explained. If
some of the settings are not available in your airconditioner, you may not see those setting also in your
remote.
The thermometer and hygrometer of your product
does not work depending on your temperature setting.
26
Those functions work individually. Because the
locations of your remote and air-conditioner are
generally different, there may be difference between
your set temperature and thermometer temperature.
Make sure that the ventilation grill of your remote is
open in order to make accurate measurement.
If the slider switch of your remote is on the program
position, the weather station function of your product
does not work.
Product works with one AA battery. To obtain high
efficiency, use the product with long-life high quality
battery.
Keep the product out of direct sunlight.
9-
penremote, design and production company
penremote, was designed in Airfel and produced by
an expert group in China. All rights of the product are
reserved by Airfel, it can not be copied partially or in
detail.
© Copyright 2007 by AIRFEL
Central Office:
Airfel Isitma ve Sogutma Sistemleri
Hurriyet Mah. E5 yanyol uzeri No:57
34876 Kartal Istanbul / TURKEY
www.airfel.com
Tel: +90 216 453 27 00
Fax: +90 216 671 06 00-01
27