1
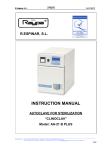
SF Combi Ultra FMi 20/72/32 T - 543 Operator Manual Technical Manual 00000676 © SIDEL. All illustrations and photos are for information only th Revision 03, May 30 , 2006 Sidel Filling SRL, Via Enzo Ferrari 1, 43058 Ramoscello di Sorbolo, Parma, ITALY SF FMi Operator Manual / Revisions Management Information present in this manual is purely indicative in nature and should not be considered as a commitment on part of SIDEL, which reserves the right to modify them without prior notice. SIDEL declines any responsibility in case of wrong interpretation of information present in this documentation. The information contained within this document remains the property of SIDEL. Unless expressly agreed by contract, no part of this document can be reproduced, given out, saved on a storage device or transmitted by any means or in any form (electronic, mechanical, recorded or any other), without prior written authorisation from SIDEL. SIDEL 2006. REVISION © SIDEL. Revision Date March 20, 2007 Print Date March 20, 2007 Revision 03 Revision 04 Page 1/1 SF FMi Operator Manual / Table of Contents TABLE OF CONTENTS PRESENTATION OF MANUAL ........................................................................................................................... 1 Description of the technical manual .............................................................................................................. 1.1 General information ........................................................................................................................................ 1.2 INTRODUCTION TO SUPERVISION INTERFACE............................................................................................. 2 Operator-level Access Flow Chart.................................................................................................................. 2.1 STARTING THE MACHINE ................................................................................................................................. 3 Turning on the machine.................................................................................................................................. 3.1 Filler Command & Control Position (P.C.C) ................................................................................................... 3.2 Touch Screen ................................................................................................................................................. 3.3 Keyboard ........................................................................................................................................................ 3.4 Launching the P.C.C. Application .................................................................................................................. 3.5 INTRODUCTION TO INTERFACE ELEMENTS.................................................................................................. 4 Interface Elements.......................................................................................................................................... 4.1 Upper Screen Band ........................................................................................................................................ 4.2 Central Panel .................................................................................................................................................. 4.3 Lower Screen Band ........................................................................................................................................ 4.4 FILLING Banner..…………………………………………………………………………………… ................. 4.4.1 THERMO Banner ..................................................................................................................................... 4.4.2 MISC. Banner ........................................................................................................................................... 4.4.3 SURFACE TREATMENT Banner............................................................................................................. 4.4.4 ISOLATOR Banner................................................................................................................................... 4.4.5 LOGIFACE Banner................................................................................................................................... 4.4.6 FOAM UNIT Banner ................................................................................................................................. 4.4.7 STATION DESINFECTANT Banner......................................................................................................... 4.4.8 NITROGEN INERTING Banner................................................................................................................ 4.4.9 Alarm Display Band ........................................................................................................................................ 4.5 Access Levels................................................................................................................................................. 4.6 User Identification ........................................................................................................................................... 4.7 © SIDEL. DESCRIPTION OF THE MENU TREE STRUCTURE ......................................................................................... 5 General Menu ................................................................................................................................................. 5.1 OPERATION Sub-menu........................................................................................................................... 5.1.1 PROCESS Sub-menu .............................................................................................................................. 5.1.2 ISOLATOR Sub-menu.............................................................................................................................. 5.1.3 FILLING Sub-menu .................................................................................................................................. 5.1.4 THERMO Sub-menu ................................................................................................................................ 5.1.5 ALARMS Sub-menu ................................................................................................................................. 5.1.6 LOGS Sub-menu ...................................................................................................................................... 5.1.7 Revision 03 Page 1/2 SF FMi Operator Manual / Table of Contents © SIDEL. MACHINE CONTROL .......................................................................................................................................... 6 Overview......................................................................................................................................................... 6.1 Production Overview ...................................................................................................................................... 6.2 External Devices....................................................................................................................................... 6.2.1 Initial State ................................................................................................................................................ 6.2.2 Positioning ...................................................................................................................................................... 6.3 Cycle Control Assistance.......................................................................................................................... 6.3.1 Cleaning Positioning Principals ................................................................................................................ 6.3.2 Starting Control Cycles............................................................................................................................. 6.3.3 Example of Isolator Positioning for Cleaning ..................................................................................... 6.3.3.1 Preparations ................................................................................................................................................... 6.4 Disinfectant Station................................................................................................................................... 6.4.1 Manually Starting the Cleaning and Sterilisation Cycles ................................................................................ 6.5 Overview................................................................................................................................................... 6.5.1 Cleaning and Sterilisation of the Internal Product Circuits (CIP & SIP) ............................................. 6.5.1.1 Cleaning and Sterilisation of the Internal Surfaces of the Isolator (COP & SOP).............................. 6.5.1.2 COP .......................................................................................................................................................... 6.5.2 CIP............................................................................................................................................................ 6.5.3 SIP ............................................................................................................................................................ 6.5.4 SOP .......................................................................................................................................................... 6.5.5 Machine Awaiting Sterilisation.................................................................................................................. 6.5.6 Supplementary Surface Cleaning................................................................................................................... 6.6 Overview................................................................................................................................................... 6.6.1 Starting Production ......................................................................................................................................... 6.7 Positioning in Production Mode................................................................................................................ 6.7.1 Production Stand-by ................................................................................................................................. 6.7.2 Production....................................................................................................................................................... 6.8 Production Recipes .................................................................................................................................. 6.8.1 Managing Recipes.............................................................................................................................. 6.8.1.1 Sterile Production ..................................................................................................................................... 6.8.2 No-Sterile Production ............................................................................................................................... 6.8.3 Stopping Production ....................................................................................................................................... 6.9 Automatically Stopping Production........................................................................................................... 6.9.1 Stopping Production on Operator Request .............................................................................................. 6.9.2 Finishing Production ........................................................................................................................... 6.9.2.1 Aborting Production ............................................................................................................................ 6.9.2.2 Isolator .......................................................................................................................................................... 6.10 Managing Alarms.......................................................................................................................................... 6.11 Logs .............................................................................................................................................................. 6.12 Revision 03 Page 2/2 SF FMi Operator Manual / Presentation of Manual 1. 1.1. PRESENTATION OF MANUAL Description of the technical manual "Hygiene & Safety" Manual Emergency stops Different dangers (chemical, electrical, mechanical) Hygiene around the machine Concerns: All categories Installation Specifications Installation information Power and utility requirements Unpacking and handling Concerns: Engineering (Building) / Installation Manager / Client Manager You are here "Operator" Manual Describes the "man/machine" interface hardware and software Basic parameters for machine operation and control Procedure to be followed in the case of anomalies Concerns: Operator/Technicians (mechanical/Electrical/Process)/Production manager/Management "Supervisor - Maintenance" Manual Describes the "man/machine" interface at upper levels Machine control parameters Machine production set-up Concerns: Technicians (mechanical/Electrical/Process)/Production manager "Maintenance & Operating Systems" Manual Maintenance guide: General and lubrication schedule Tool list System description and operation Item change Concerns: Technicians (Mechanical/Electrical/Process)/Production manager Servicing Procedure Catalog Inspection/Cleaning Setting Removal/Refit Lubrication Operating procedure Concerns: User/Technicians (Mechanical/Electrical/Process)/Production Manager © SIDEL. Documentation Appendix Mechanical equipment Electrical equipment Auxiliary equipment File Controler User’s Manual Revision 02 Chapter 1. Page 1/1 SF FMi Operator Manual / Presentation of Manual 1.2. General Information The Operator Manual describes how to use the functionalities of the P.C.C. It contains information necessary to use and control the machine, and specifies the production functioning conditions. Any member of personnel working on the machine must be aware of the official safety precautions described in the “Safety and Hygiene” manual. On certain pages of this manual, an icon at the right of a title indicates that a procedure sheet is available; you can find this procedure sheet in the Servicing Procedure Catalog. The number under the icon is the number of the procedure sheet. A number such as 4xx indicates that the procedure sheet is listed under procedure sheets in the 400 category. Icon Procedure type: Mechanical Inspection/Cleaning 1xx Mechanical Removal/Refit 2xx Mechanical Setting 3xx Mechanical Greasing/Lubrication 4xx Electrical Inspection/Cleaning 5xx Electrical Removal/Refit 6xx 7xx Electrical Setting This manual uses the following conventions: Indicates a warning. Always read carefully. Indicates a cross-reference to another chapter or to another manual in the documentation set. © SIDEL. Italics: Revision 02 Chapter 1.2. Page 1/1 SF FMi Operator Manual / Introduction to Supervision Interface 2. 2.1. INTRODUCTION TO SUPERVISION INTERFACE Operator-level Access Flow Chart Organisation chart for access to application families and pop-ups at operator level: 00000073 GENERAL VIEW Legend: If no screen appears after 5 seconds, the screen for one of these modes appears. OPERATION STATIC SCREEN PRODUCTION POSITIONING SURFACE CLEANING PROCESS LOGIFACE FOAM UNIT STATION DISINFECTANT © SIDEL. ISOLATOR Organisation chart contd. on next page ISOLATOR SCREEN Revision 03 Chapter 2. Page 1/3 SF FMi Operator Manual / Introduction to Supervision Interface Organisation chart contd. from previous page FILLING RECIPE PARAMETER SETTINGS MEASUREMENT STATISTICS CORRECTIONS SELECTION AUX. RECIPES INHIBIT NOZZLES NOZZLES CONFIGURATION THERMO Thermo Diagnostic © SIDEL. ALARMS Organisation chart contd. on next page LIST OF CURRENT ALARMS Revision 03 VIEW EMERGENCY STOP AND DOOR FAULTS Chapter 2. Page 2/3 SF FMi Operator Manual / Introduction to Supervision Interface Organisation chart contd. from previous page LOGS CONSULTATION/ PRINTOUT SORTED LIST © SIDEL. HISTORICAL PREVIEW Revision 03 Chapter 2. Page 3/3 SF FMi Operator Manual / Starting the Machine 3. 3.1. STARTING THE MACHINE Turning on the Machine The ventilation and lighting of the cabinets are connected to the main disconnecting switch; the P.C.C. is connected to an UPS, which is supplied by the main disconnecting switch. If an electricity outage occurs, the P.C.C. UPS allows for 20 minutes of autonomous operation. After 20 minutes, the P.C.C. stops, having first closed all application files. 1 00000360 • Plug in the machine before turning on the main disconnecting switch • Close the main disconnecting switch (1) on the electric cabinet. © SIDEL. The P.C.C. desk, the ventilation, and the cabinet lightning are now turned on. Revision 02 Chapter 3. Page 1/1 SF FMi Operator Manual / Starting the Machine 3.2. Filler Command & Control Position (P.C.C) The P.C.C is an industrial PC with a touch screen that enables you to command and control the machine using a H.M.I. (Human Machine Interface) in the P.C.C. You must quit the P.C.C. application before switching off the machine. If you do not do so, there is a risk that the application will not start when it is switched on again. User actions are transmitted using the touch screen (1) which is used as the main device for selecting and pointing. You can use the alphanumeric and numeric keyboards, as well as the "Up" et "Down" arrows displayed on the screen. Avoid using the keyboard keys (2). END HOME 2 \ 7 1 ; 4 : 5 = 6 Pg Dn @ ? 0 . BACK SPACE F2 F3 F4 F5 F6 F7 F8 F9 F10 9 Pg Up 1 F1 / * 8 2 ENTER SPACE DEL CNTRL ALT F11 3 + - F12 ESC SHIFT F13 MOUSE KYBD 00000256 3.3. Touch Screen The touch panel on the screen is fragile. Do not clean it with abrasive products or put objects on it that may cut or scratch the surface permanently. In the P.C.C. application, the touch screen can be used as a pointing device (using a finger) and enables users to select elements and perform tasks. To select an element or execute a command, press it twice (double-click) with your finger. © SIDEL. Note: “Double-clicking” is used to send commands (in order to avoid issuing commands accidentally). Revision 02 Chapter 3.2. Page 1/1 SF FMi Operator Manual / Starting the Machine 3.4. Keyboard 1 END HOME \ 8 9 ; 4 : 5 = 6 Pg Up Pg Dn @ ? 0 1 . BACK SPACE F1 F2 F3 F4 F5 F6 F7 F8 F9 F10 / * 7 2 3 + - ENTER SPACE DEL CNTRL ALT F11 2 F12 ESC 3 SHIFT F13 4 MOUSE KYBD 00000257 The keyboard consists of keys which enable you to execute commands and select elements of the P.C.C. application. The keyboard is divided into four sub-categories of keys: - Direction keys (1): you should mostly use the Up and Down functions of the touch screen. Numeric keypad (2): you should mostly use the numeric keyboard on the touch screen Shortcut keys (3): do not use; these keys are used to stop and quit the boot screen. Function keys F1 to F13 (4): not used. The principal keys on the keyboard are indicated below: To Confirm or execute an action. Cancel an action. Enter numeric values. To move on the screen or within entry screens or to scroll through the contents of a list. © SIDEL. Press ENTER ESC Keys 0 to 9 The keys Í, Î, Ï, Ð. Revision 02 Chapter 3.4. Page 1/1 SF FMi Operator Manual / Starting the Machine 3.5. Launching the P.C.C. Application When the P.C.C. is switched on: - There is an exchange of data between the automaton and the monitoring service. - The monitoring service is launched automatically. - The application’s parameters are set automatically. - The Filling PC is switched on. The machine mode is displayed. © SIDEL. The user now has to enter his password to access the application’s functions (see Chapter 4.7). Revision 03 Chapter 3.5. Page 1/1 SF FMi Operator Manual / Introduction to Interface Elements 4. INTRODUCTION TO INTERFACE ELEMENTS Definition of the terms used in this manual: Menu Sub-menu Screen Window (pop-up) P.C.C. PCDO CIP COP SIP SOP : List of several commands for the operation, settings, and displaying of parameters for the machine. : List of commands displayed after you have selected a command on the main menu. : The view that is displayed on the P.C.C. : A screen that is displayed underneath another. : Filler Command&Control Position. : Filling Computer. : Cleaning in Place. : Cleaning Outside in Place. : Sterilization Input in Place. : Sterilization Output in Place. The P.C.C. application is based on a number of different control screens, which are controlled by the system and displayed according to the machine status. For example: STATIC SCREEN (sterilisation, CIP, process) POSITIONING SCREEN SURFACE STERILISATION SCREEN, SURFACE CLEANING SCREEN DYNAMIC SCREEN, (production mode). © SIDEL. In addition, pop-up menus are available to the user to enable him, according to his level, to access selection, configuration, settings, and parameter screens and windows. Revision 03 Chapter 4 Page 1/1 SF FMi Operator Manual / Introduction to Interface Elements 4.1. Interface Elements The screen consists of three distinct parts: - - Upper screen band (1) (this appears on every page): an information and navigation band A central panel (2) which changes with each screen. Lower screen band (3) (this appears on every page): Press the button (4) on each display page to access the different machine control bands. 1 2 3 © SIDEL. 4 Revision 03 Chapter 4.1. Page 1/1 SF FMi Operator Manual / Introduction to Interface Elements 4.2. Upper Screen Band On the upper part of the screen, a band displays various information to the user. 20 19 2 21 3 9 1 4 5 18 1 13 14 22 15 16 6 17 12 FILLING PC absent: The FILLING PC has not started or cannot be accessed by the monitoring service. 2 Today’s date. 3 The machine’s function mode : (Production, cleaning, etc.). 13 FILLING PC configured: A configuration was sent to the FILLING PC, but filling is not possible as the filling post has not been validated. 4 The current time. 14 FILLING PC configured with errors: A configuration sent to the FILLING PC contained an error. 15 FILLING PC under control of the automaton WITHOUT reported errors: A validation of the filling post was carried out without any communication problem with the cards: Ready to fill in production. 5 The total number of bottles produced. 6 The instantaneous rate of the machine (bottles/hours). 16 FILLING PC under control of the automaton WITH reported errors: A validation of the filling post was carried out, but a communication error with one or more filling cards occurred. 7 The user level. 17 FILLING PC not configured: No configuration was sent to the FILLING PC. An error occurred. 8 The name of the current recipe. 9 The access time remaining. 18 Number of bottles ejected from the machine by the deflector. 22 Time remaining before loss of sterilisation. 10 © SIDEL. The screen title 8 11 10 12 7 11 The number of bottles fed into the machine. Indicates the state of P.C.C. communication. Automaton: Yellow, communication ok, Orange, communication error. Revision 03 Chapter 4.2. Page 1/2 SF FMi Operator Manual / Introduction to Interface Elements 4.3. Press To 19 Display the General menu and it’s categories. 20 Identify the current user (password, see chapter 4.7.). 21 Display the application release windows (only at level 3). Central Panel Shown below is the central panel of the “Production” screen. This panel changes for each of the different control screens. 1 3 2 1 Real-time view of the machine status 2 Area showing recipes with changes, loads, etc. 3 Area showing current actions In the central panel, the user can perform the following actions (depending on the active control screen): - © SIDEL. - Open and close the configuration and consultation windows. Review the machine’s function settings (view variables). Configure the machine’s functional settings (modify settings or restrictions). Fill in entry fields. Display graphics. Display measurements (temperature, pressure, flow, etc.) Revision 03 Chapter 4.2. Page 2/2 SF FMi Operator Manual / Introduction to Interface Elements 4.4. Lower Screen Band The lower screen band is mainly used to control the machine. By pressing the button (1), which displays a pop-up menu for each of the bands, the user can change the lower screen band, as seen in the example below. 1 Certain buttons may not be accessible, depending on the active control mode. These are greyed out. For example: In dynamic mode, the buttons “Logiface” are greyed out. The buttons can have a number of different states. Invalid, cannot be used. 00000308 Valid, the cycle can be executed if the operator requests it. 00000314 The operator requests that the cycle be launched. 00000456 The operator’s request has been accepted. (indicated by a green light in the bottom right square) © SIDEL. 00000457 Revision 03 Chapter 4.4. Page 1/1 SF FMi Operator Manual / Introduction to Interface Elements 4.4.1. Double-click the key Confirmation ON F2 Do you want to load the bottles? F4 Do you want to validate the filler post? F5 Do you want to prime the bottles? F6 Do you want to force filling? Double-click the key Confirmation OFF F2 Do you want to block the bottles? F4 Devalidate filling post? F5 Finish priming the bottles ? F6 Finish force filling? Thermo banner Double-click the key Confirmation ON F5 Do you want to start the heatsealing? F7 Do you want to start the press? F8 Do you want to confirm the press in setting mode? F9 Do you want to confirm heatsealing in setting mode? Double-click the key Confirmation OFF F5 Stop thermoseal? F7 Stop press? F8 Deselect press in setting? F9 Deselect thermoseal in setting? © SIDEL. 4.4.2. Filling banner Revision 03 Chapter 4.4.1. Page 1/1 SF FMi Operator Manual / Introduction to Interface Elements MISC. banner Double-click the key Confirmation ON F2 Do you want to start the sampling? F3 Do you want to start the lighting? F4 Do you want to start spraying the table? F6 Do you want to start the conveyor? F8 Do you want to validate piston ascent? F9 Do you want to start the GEBO conveyors? Double-click the key Confirmation OFF F2 Stop sampling? F3 Stop lighting? F4 Stop table spraying? F6 Do you want to stop the conveyor? F8 Do you want to validate piston descent? F9 Do you want to stop the GEBO conveyors? © SIDEL. 4.4.3. Revision 02 Chapter 4.4.3. Page 1/1 SF FMi Operator Manual / Introduction to Interface Elements 4.4.4. 4.4.5. Surface Treatment Banner Double-click the key Confirmation ON F2 Do you want to start a short COP cycle? F3 Do you want to start a long COP cycle? F4 Do you want to start a soda PAA cycle? F5 Do you want to start an SOP cycle? F9 Do you want to stop the current cycle? Isolator Banner Double-click the key Confirmation ON F2 Do you want to start forced ventilation? F3 Do you want to start regulated ventilation? Caution. If you open the doors the machine will no longer be sterile! Do you want to continue? F4 Logiface Banner Double-click the key Confirmation ON F2 Do you want to start a short COP cycle with a linked SIP cycle? F3 Do you want to start a cooling cycle only ? F4 Do you want to start a sterilisation cycle? F5 Do you want to start a rinsing cycle only ? F6 Do you want to start a short cleaning cycle? F7 Do you want to start a long cleaning cycle? F8 Do you want to stop the Logiface? © SIDEL. 4.4.6. Revision 03 Chapter 4.4.4. Page 1/1 SF FMi Operator Manual / Introduction to Inteface Elements 4.4.7. Foam Unit Banner Double-click the key Confirmation ON F2 Do you want to start the foam unit in manual mode? F3 Do you want to select sterilised water? F4 Do you want to select Filtered water? F6 Do you want to select the acid? F7 Do you want to select the foam product? 4.4.8. Station Disinfectant Banner Confirmation ON F2 Starting preparation Vortex station F7 Starting draining cycle F8 Stop Vortex station Nitrogen Inerting Banner Double-click the key Confirmation ON F2 Do you want to start the bottle pressurization? F3 Do you want to carry out a sterilization phase? F4 Do you want to carry out a maintenance operation? F5 Do you want to switch the inerting system in production? © SIDEL. 4.4.9. Double-click the key Revision 03 Chapter 4.4.7. Page 1/1 SF FMi Operator Manual / Introduction to Interface Elements 4.5. Alarm Display Band The alarm display band indicates to the user that one or more machine errors have occurred. 1 White Red Blue Orange 3 4 2 : Display (operator info) : Immediate stop : SRA stop (with automatic restart) : Bottle loading stop : Stop with synchronisation outage : Clearance stop Underlined text in italics: indicates that there is a screen associated with this alarm line. To Scroll up by 3 Scroll down by 3 Scroll up message by message Scroll down message by message © SIDEL. Press 1 2 3 4 Revision 02 Chapter 4.5. Page 1/1 SF FMi Operator Manual / Introduction to Interface Elements 4.6. Access Levels The access to different functions of the P.C.C is controlled by the following authorisation levels: – LEVEL 1: Operator. – LEVEL 2: Supervisor/Lab technician. – LEVEL 3: Customer Service. – LEVEL 4: SIDEL Technician. – LEVEL 5: SIDEL Development. These access levels are protected by passwords defined when the machine is installed. We recommend that you change them as soon as you receive the machine. Level 4 and 5 passwords are rotating, and are only known to SIDEL technicians and development. To access the password definition view: F12 Î Options Î Passwords. 2 1 3 4 In this display page, a window shows the five levels of access. The user level determines their accessibility. This window contains a field for the password and a field for the session duration (in minutes). To change either, press the white field (1) to display the alphanumeric keyboard, then enter a new password or session duration. Note : If a session of level 1, 2, or 3 runs out, the user can open a new session by pressing the button (2) of the upper screen band. Press To 3 Save and close. 4 Close without saving. © SIDEL. These buttons have the same function in every screen. Revision 02 Chapter 4.6. Page 1/1 SF FMi Operator Manual / Introduction to Interface Elements 4.7. User Identification When the application opens, no user is identified (1), so none of the application functions are available. It is essential to enter your ID, as soon as the application is launched, before you open a user session. To identify yourself to the application, press the button (2). 1 2 The ID Entry window is displayed. 3 Enter the access code using the alphanumeric keyboard that appears when you’re in the white field (3), then press button (4). 00000053 © SIDEL. 4 Revision 02 Chapter 4.7. Page 1/1 SF FMi Operator Manual / Description of the Menu Tree Structure 5. 5.1. DESCRIPTION OF THE MENU TREE STRUCTURE General Menu Press the F12 button at the top of the keyboard to display the General menu. The General menu consists of 10 families (that are not all accessible at every level): Accessible at level 1 Accessible at level 1 Accessible at level 1 Accessible at level 1 Accessible at level 1 Accessible at level 1 Accessible at level 1 Accessible at level 1 Modifiable at level 3 Modifiable at level 3 Accessible at level 1 Close menu 5.1.1. OPERATION Sub-menu From the General menu, press the button (1) to display the machine control sub-menu on top of the current screen (production, positioning, etc.): It consists of the following 7 buttons: Starts sterilised or non-sterilised production, if the required conditions are met. Starts sterilised or non-sterilised production, if the required conditions are met. Opens the positioning screen 1 Opens the positioning screen Opens the Settings sub-menu (for level 3) © SIDEL. Opens the surface cleaning screen Revision 03 Chapter 5. Page 1/1 SF FMi Operator Manual / Description of the Menu Tree Structure 5.1.2. PROCESS Sub-menu From the General menu, press the button (2) to display the machine control sub-menu on top of the current screen (production, positioning, etc.). It consists of the following 3 buttons: 2 Open the Logiface screen Open the Foam Unit screen Open Station Disinfectant screen 5.1.3. Isolator Sub-menu From the General menu, press the button (3) to display the Isolator menu. Open the Isolator screen © SIDEL. 3 Revision 03 Chapter 5.1.2. Page 1/1 SF FMi Operator Manual / Description of the Menu Tree Structure 5.1.4. FILLING Sub-menu From the General menu, press the button (4) to display the Filling sub-menu on top of the current screen (production, positioning, etc.). It consists of the following 9 buttons: 4 Open the Recipe Management screen Open the Filling Check screen Open the Nozzles Configuration screen Open the Fault Mask screen (for level 3) Open the Time Filter screen (for level 3) Open the Registration screen (for level 3) Open Element inhibition parameters screen 5.1.5. THERMO Sub-menu From the General menu, press the button (5) to display the Thermo menu. Open the Thermo diagnostic screen © SIDEL. 5 Revision 03 Chapter 5.1.4. Page 1/1 SF FMi Operator Manual / Description of the Menu Tree Structure 5.1.6. ALARMS Sub-menu From the General menu, press the button (6) to display the Alarms screen. 6 5.1.7. Open the List of Alarms screen LOGS Sub-menu From the General menu, press the button (7) to display the machine control sub-menu on top of the current screen (dynamic mode, static mode, etc.). It consists of the following 2 buttons: 7 Open the Faults and Warnings screen © SIDEL. Open the Configuration sub-menu (level 5) Revision 03 Chapter 5.1.6. Page 1/1 SF FMi Operator Manual / Machine Control 6. 6.1. MACHINE CONTROL Overview Before you start the filler, you must perform the following steps: – – – Prepare all the equipment. Follow the safety precautions (See the Safety and Hygiene manual). Follow the recommendations described in “Before Starting” and “Recommendations Before Switching On” (See the Safety and Hygiene manual). The system guides you through the Control menu. If the machine has not been used for a prolonged period (i.e. more than 5 days), it must be thoroughly cleaned and sterilised (COP, CIP, SIP, SOP). Putting the machine on the cleaning setting prepares it for the COP and VORTEX. Putting the machine on the static setting prepares it for the SOP and CIP cycles. The different cycles are: - - COP: cleans the internal surfaces of the insulator by spraying foam and then rinsing with sterilised water. CIP: cleans the internal circuits of Logiface and of the filler with a solution of soda (Short CIP) or of soda and acid (Long CIP) SIP: uses a heat treatment to sterilise the internal circuits of Logiface and the filler. SOP: the SOP cycle sterilises the internal surfaces of the isolator by spraying VORTEX on the sides. When all the proceedings cycles have been completed and validated, the Logiface remains in the “Awaiting Sterilisation” state, and the vat is kept covered with nitrogen. If all the proceeding conditions have been validated, the operator can then request that the machine is dynamically positioned for production. © SIDEL. If one of the conditions has not been fulfilled, the operator can restart the cycle that has not been validated. Revision 03 Chapter 6. Page 1/1 SF FMi Operator Manual / Machine Control 6.2. Production Overview 6.2.1. External Devices The user should first familiarise himself with the main components of the machine, their settings and their purpose. LOGIFACE : - Heat sterilisation of the production circuits (SIP). - Supplying of sterilised product. - Production of sterilised air and water for the system. - Preparation of cleaning solutions. - Cleaning of their circuits after production (CIP) - Cleaning of the isolator surfaces (COP) - Nitrogen. Process Control Panel Spray Gun Station Heat sealing Carrousel Filling Carrousel - Production - Positioning - Recipe Isolator (red outline) - Glove supply - Doors - Flaps - Joints - Ventilators 00000677 Control Panel UV Treatment Fords press Laminar Flow (blue outline) Illustration is for information only © SIDEL. 6.2.2. Initial State - The whole machine is clean. - The Logiface is stopped. - The caps decontamination module is stopped. - The operator is logged in. Revision 03 Chapter 6.2. Page 1/1 SF FMi Operator Manual / Machine Control 6.3. Positioning 6.3.1. Cycle Control Assistant 1 The cycle control assistant helps the operator to execute all of the cycles, in the correct order (1). This assistant is available for both static positioning cycles and for the sequence of cleaning cycles, COP, CIP, SIP, and SOP. 3 If a cycle cannot be launched because the launch requirements have not been met, the function key is greyed out (2) and the unmet requirements are listed in a dialog box (3). 2 This dialog box explains the possible risk (for example: Risk of loosing the sterility on Logiface. Isolator is not sterile. Do you however wish to continue the positioning?) The operator can then confirm or cancel his choice. During the positioning cycles, for example, the operator is prompted to perform manual actions (positioning the sealing flaps (4), checking the trunking position (5)…). For each of these manual actions, a dialog box is displayed on the HMI to describe the action the operator should take. The operator must then validate the action to continue the cycle (6). © SIDEL. 4 5 6 6 Revision 03 Chapter 6.3. Page 1/1 SF FMi Operator Manual / Machine Control 6.3.2. Cleaning Positioning Principals The machine must be in "Cleaning Positioning" mode for every cleaning or sterilisation operation. The cleaning positioning steps are as follows: – – – – – – Slow speed rotation of the filler module (A) Reference search after setting the blades in cleaning position and the isolator in cleaning configuration. Withdrawal and checking of the drawers (B) Withdrawal and checking of the pistons (B) Stopping the carousel Liaison between the cleaning collector and the Logiface (CIP shanks) The filler carousel is set to surface cleaning position: – Search tower 1 top by slowly rotating the carousel. – – Supervision of piston entry. Drawers (2) for retrieving cleaning product are withdrawn. Reference search by slowly rotating the carousel (1). Supervision of slide trays' withdrawal. Piston withdrawal. Reference search. Supervision of piston withdrawal. – – – – – A 1 B C 2 00000337 The dummy bottles (drawer (2) & Piston (3)) are in place. 3 2 – Search tower top 1 – Stop. – Search position for mobile collector cleaning positioning. 00000258 – The carousel stops. The mobile collector is set in position facing the fixed collector to perform the liaison. The cleaning circuit has been completed (4). The static positioning is complete. – 00000260 Control blocking and powering of the engine brake. © SIDEL. 4 Revision 02 Chapter 6.3.2. Page 1/1 SF FMi Operator Manual / Machine Control 6.3.3. Starting Control Cycles You can start the cycles: – Damaged production – Sterile production – Setting – Positioning for cleaning – Positioning for production …using the function keys in the Control menu. When you start a cycle using these function keys, if the cycle requirements are not met, a dialog box is displayed to alert you that the requested cycle cannot be started. All the unmet requirements are listed in this dialog box. After noting the information in this dialog box, you must validate the requirements using this same dialog box. If a dialog box is already displayed, and you try to start another cycle whose requirements are also unmet, the dialog box is updated with information related to the new cycle. 6.3.3.1. Example of Isolator Positioning for Cleaning 2 1 The Positioning screen shows the current stages (1) and a description of the steps in the current stages (2). • You can follow the actions of the machine in the section on the right (2) showing the current steps. The sequence of steps is performed automatically. However, you may be required to perform an action if a step cannot be started because of unmet requirements, or if a manual action has to be performed. 4 3 During the “masks and marking head positioning" phase (3), if the flaps are not closed or the marking head is not in cleaning position, a dialog box is displayed to prompt you to position the flaps and marking head correctly. © SIDEL. Once you have done this, the validation button become active, and you can validate the operation (4). Revision 03 Chapter 6.3.3. Page 1/3 SF FMi Operator Manual / Machine Control 6 5 During the “Gloves checking" phase (5): • Check that the gloves are in cleaning position. If they are: • Validate the operation (6). If a glove is not in the required position: • Open the double doors. • Take a cuff support and turn it towards the shoulder socket, so the "arm" side faces the cuff and the support faces the piercing in the shoulder socket. • Pinch the support spring band and insert it into the shoulder socket. • Turn the "arm" of the cuff support so that it will not retain any of the sterilised product or collide with any of the moving components of the filler line. • Turn the screw to tighten the "arm". • Close the double doors. • When you have finished, click Validate in the dialog box (6). 8 9 7 During the “Manual Cleaning" phase (7): • Check that the actions listed in the dialog box (8) have been performed. Click Validate (9). Remove any bottles or caps in the machine. • When you have finished, click Validate in the dialog box (9). © SIDEL. • Revision 03 Chapter 6.3.3. Page 2/3 SF FMi Operator Manual / Machine Control 11 12 10 During the “Plates and grips spraying" phase (10): • Check that the actions listed in the dialog box (11) have been performed. The Validation button (12) becomes active. • Click YES if you wish to spray the platforms and tongs, otherwise click NO. © SIDEL. Once the green display light reaches the "Isolator in cleaning configuration" step, the isolator enclosure has been cleaned. Revision 03 Chapter 6.3.3. Page 3/3 SF FMi Operator Manual / Machine Control 6.4. Preparations Before starting production, the “disinfectant station” must be prepared for the production of different solutions. 6.4.1. Disinfectant station Startup: • Select the “Disinfectant” window (1). Or • Press the F12 icon to open the General menu. • Select the Process family. • Press the “Disinfectant Station” button. 1 The disinfectant station screen is displayed. • Press the button (2) on the lower screen band. • Select the DISINFECTANT STATION band (3). 3 2 At the beginning of a week or following an extended stop, it will be required to drain the circuit. In the Disinfectant Station band: • Press the “Draining” button (4) on the lower screen band. A confirmation window opens. Validate your choice to start the drain cycle. © SIDEL. The green square to the right of the button turns green to indicate that the cycle has begun. 4 Revision 03 Chapter 6.4. Page 1/2 SF FMi Operator Manual / Machine Control When the drain cycle is finished: In the Disinfectant Station band: • Press the “preparation” button (5) on the lower screen band. A confirmation window opens. Validate your choice to start the preparation cycle. The green square to the right of the button turns green to indicate that the cycle has begun. When the product preparation is done, the station is ready to supply the Vortexx required for the cleaning and sterilization of the machine’s surfaces and circuits. © SIDEL. 5 Revision 03 Chapter 6.4. Page 2/2 SF FMi Operator Manual / Machine Control 6.5. Manually Starting the Cleaning and Sterilisation Cycles 6.5.1. Overview The aim of sterilisation is to kill the micro-organisms present in foodstuff, packaging, and the environment. It is performed by heat and/or chemical treatment. The two main types of contamination are: - Chemical contamination (pollution residue, corrosion, wear and tear of the equipment,…) Biological contamination (bacteria, fungus, parasites, animals,…) Cleaning the filler requires the following detergent products: - Soda, to clean the circuits in contact with the filler product. Nitric Acid, to demineralise the circuits. PAA, to decontaminate the surfaces and some of the circuits. Foam to clean the surfaces. The machine is thermally sterilised via the Logiface using pressurised water at 140°C. The elements to be cleaned can be categorised as follows: - © SIDEL. - The production circuit (Logiface, the filler, the nozzle) The Isolator surfaces (grouped by module, filler…) The sterilisation circuits (rinsing and treatment area) Revision 03 Chapter 6.5. Page 1/1 SF FMi Operator Manual / Machine Control 6.5.1.1. Cleaning and Sterilisation of the Internal Product Circuits (CIP & SIP) The internal product circuit (vat, tubes, filling nozzle,…) is cleaned in closed circuit with the aid of the retractable "drawer – piston" system on each filler nozzle, and linked using an intermediary system (CIP shank) between the cleaning collector and the Logiface. The different cleaning cycles are: - Soda cleaning (80°C for 20 min) à 2% Acid cleaning (60°C for 15 min) à 1% Circuit sterilisation (140°C under 3 pressure bars) for a duration of 20 minutes. These different cleaning cycles are managed by the Logiface, which uses valves to disassociate the customer product circuit and the machine process circuit. CIP Logifaces: The CIP steps are as follows: - Opening of the CIP circuit st 1 water rinsing Draining of the Logiface Filling Circulation Heating to 80°C Soda injection Cooling to 40°C Draining Water rinsing Emptying of the Logiface Filling Circulation Acid injection Heating to 60°C Cooling to 40°C Draining nd 2 Water rinsing Final rinsing Closing of the CIP circuit Simultaneous Short CIP Simultaneous nd water rinsing, and the final draining do not take place. © SIDEL. Note: In the short CIP, the acid injection, the 2 Long CIP Revision 02 Chapter 6.5.1.1. Page 1/2 SF FMi Operator Manual / Machine Control SIP Logiface: The SIP steps are as follows: - Opening of the SIP circuit st 1 water rinsing Vat filling to 45% Boosting the vat (circulation). Heating by stages to 142°C Sterilisation for 20 minutes Cooling to 40°C Draining, (nitrogen shot) Setup preparation awaiting sterilisation 6.5.1.2. Cleaning and Sterilisation of the Internal Surfaces of the Isolator (COP &SOP) Cleaning and sterilisation of the isolator walls is performed by fixed and rotating nozzles attached to rails in the sterile enclosure. The cleaning stages are: - Positioning of the gloves, flaps, pistons, and drawers during the positioning for cleaning configuration Water projection, the machine rotates Active foam projection, the machine rotates Foam activation, the machine stops Rinsing with sterile water, the machine rotates The sterilisation phase consists of projecting a hot PAA solution, while the machine is rotating, on to the surfaces and in the rinsing treatment circuits. COP: The different stages of COP are: - Opening of the COP circuit Machine operation Spraying water on the surfaces Spraying active foam on the surfaces Stopping the machine A pause while the foam is activated The machine recommences rotating Rinsing with sterile water heated to 29°C SOP: The different stages of SOP are: - © SIDEL. - Opening of the SOP circuit The machine starts rotating PAA spraying Closing of the SOP circuit Revision 03 Chapter 6.5.1.1. Page 2/2 SF FMi Operator Manual / Machine Control 6.5.2. COP Cleans the internal surfaces of the isolator by spraying foam and then rinsing with sterilised water. CAUTION! In Assisted Control, this action is not necessary as a dialog box is displayed to perform the operation automatically. Requirements: - No cycle must be in progress on the isolators area - The sterile water station must be sterile. - The foam station must be in automatic mode. - The doors must be closed. - Acid and soda must be available. - The heat-sealing heads temperature must be under 80°C - The filler/isolator area must be in cleaning position mode During the COP cycle, check: - Correct rotation and flow of the nozzles. - The correct composition of the foam. - That all the surfaces have been covered with foam. - That the foam is properly rinsed away at the end of the cycle. 1 Procedure: In static mode: • Select the “Foam Unit” window (1). Or • Press the F12 icon to open the General menu. • Select the Process family. • Press the “Foam Unit” button. The Foam Unit screen is displayed. • Press the button (2) on the lower screen banner. • Select the Surface Treatment banner (3). 3 © SIDEL. 2 Revision 03 Chapter 6.5.2. Page 1/2 SF FMi Operator Manual / Machine Control In the Surface Treatment banner: • or - Press to select the type of COP you require the “Short COP” button (4) on the lower screen banner. the “Long COP” button (5) on the lower screen banner. A confirmation window opens. Validate your choice to start the cycle. 4 5 © SIDEL. If cycle requirements are not met, a dialog box opens to inform you. When you have fulfilled the required conditions, select Validation to start the COP cycle. Revision 03 Chapter 6.5.2. Page 2/2 SF FMi Operator Manual / Machine Control 6.5.3. CIP Cleans the internal circuits of Logiface and of the filler with a solution of soda (Short CIP) or of soda and acid (Long CIP) CAUTION! In Assisted Control, this action is not necessary as a dialog box is displayed to perform the operation automatically. Requirements: - The isolator filler/enclosure must be in a static state. - There must be no errors on the Logiface. - There must be no cycle active on the Logiface. - The TTL21 temperature must be lower than the safety temperature. - There must be no cycle active in the isolator enclosure. - No blocking errors: inflated joint pressure, air pressure, E-Stop, spool piece in cleaning position, door(s) open. - The pistons must have descended. Checks before starting the cycle: - 1 full tin of soda for the short CIP. - 1 tin of soda and 1 tin of acid for the long CIP. - Steam pressure on the Logiface at 6-7 bars/160°C. - Cooling water available, no valve manually closed. - Check that the pump has been primed at the start of the injection. During the CIP cycle, check: - Correct circulation, without errors - Correct TTL21 (1) temperature (Logiface Temperature Transmitter) at 80°C for soda and 60°C for acid. - Correct CTL21 (2) concentration (Logiface Conductivity Transmitter) for soda and acid. - The flow FTL21 (3) (Logiface Flowmetric Transmitter) during the circulation phases. 3 4 1 2 © SIDEL. When you start a cleaning cycle, check the cycle times (4) for each of the stages. (20 min at 80°C for a soda clean, 10 min at 60°C for an acid clean…). Revision 03 Chapter 6.5.3. Page 1/3 SF FMi Operator Manual / Machine Control Procedure: In static mode: • Select the “Logiface” window (1). Or • Press the F12 icon to open the General menu. • Select the Process family. • Press the "Logiface" button. 1 The Logiface screen is displayed. • Press the button (2) on the lower screen banner. • Select the Logiface banner (3). 3 2 • Select the CIP type in the lower Logiface banner: For a short CIP, press (4). If mineral deposits are detected, press the button (5) to perform a long CIP. A confirmation window opens. Validate your choice to start the CIP cycle. The green square to the right of the button turns green to indicate that the cycle has begun. 5 © SIDEL. 4 Revision 03 Chapter 6.5.3. Page 2/3 SF FMi Operator Manual / Machine Control If it becomes necessary to stop the cycle: • Press the “Stop” button (7). A confirmation window opens. Validate your choice to start the cycle. The green square to the right of the button turns green to indicate that the cycle has begun. • Press the “Cool” button (8). A confirmation window opens. Validate your choice to start the cycle. The green square to the right of the button turns green to indicate that the cycle has begun. • Press the “Rinse” button (9). A confirmation window opens. Validate your choice to start the cycle. The green square to the right of the button turns green to indicate that the cycle has begun. 9 7 In case of non-critical error, the cycle stops in its currently active phase. When the error has been resolved, the cycle restarts automatically. If it is necessary to empty the machine (after rinsing) to resolve an error, the CIP cycle must be restarted from the beginning. © SIDEL. Note: 8 Revision 03 Chapter 6.5.3. Page 3/3 SF FMi Operator Manual / Machine Control 6.5.4. SIP Uses a heat treatment to sterilise the internal circuits of Logiface and the filler. CAUTION! In Assisted Control, this action is not necessary as a dialog box is displayed to perform the operation automatically. Requirements: - The isolator filler/enclosure must be in a static state. - There must be no errors on the Logiface. - There must be no cycle active on the Logiface. - The TTL21 temperature must be lower than the safety temperature. - There must be no cycle active in the isolator enclosure. - The Logiface must be clean. - The pistons must have descended. - No blocking errors: inflated joint pressure, air pressure, E-Stop, spool piece in cleaning position, door(s) open Checks before starting the cycle: - Steam pressure on the Logiface at 6-7 bars/160°C - Cooling water available, no valve manually closed During the SIP cycle, check: - Correct circulation, without errors - The temperatures TTL21 and TTL31 > 140°C (1) for 20 minutes. - The temperatures of the steam barriers (2) TTL06, TTL51, TTL22 > 130°C. 2 2 3 1 2 1 © SIDEL. When you start a sterilisation cycle, check the cycle times (3) for each of the stages. (Sterilisation of the circuit takes approximately 20 minutes…) Revision 03 Chapter 6.5.4. Page 1/3 SF FMi Operator Manual / Machine Control Procedure: In static mode: • Select the “Logiface” window (1). Or • Press the F12 icon to open the General menu. • Select the Process family. • Press the "Logiface" button. 1 The Logiface screen is displayed. • Press the button (2) on the lower screen banner. • Select the Logiface banner (3). 3 2 Before starting the SIP cycle: • Press the button "Steriliz" (4) on the lower banner. A confirmation window opens. Validate your choice to start the SIP cycle. The green square to the right of the button turns green to indicate that the cycle has begun. © SIDEL. 4 Revision 03 Chapter 6.5.4. Page 2/3 SF FMi Operator Manual / Machine Control If it becomes necessary to stop the cycle: • Press the Stop button (5) on the lower screen banner. A confirmation window opens. Validate your choice to start the cycle. The green square to the right of the button turns green to indicate that the cycle has begun. • Press the button "Cool” (6) on the lower banner. A confirmation window opens. Validate your choice to start the cycle. The green square to the right of the button turns green to indicate that the cycle has begun. 5 © SIDEL. 6 Revision 03 Chapter 6.5.4. Page 3/3 SF FMi Operator Manual / Machine Control 6.5.5. SOP Sterilisation of the internal surfaces of the isolator by spraying VORTEX on the walls (SOP). CAUTION! In Assisted Control, this action is not necessary as a dialog box is displayed to perform the operation automatically. Requirements: - The isolator filler/enclosure must be in sterilization state. - The VORTEX Station must be in production. - The doors must be closed. - The fillers/isolators area must be clean. - The Logiface must be in sterile wait or in cooling mode. SIP<60°C. - Pistons must be out. If the Logiface is not sterile, it is not possible to run an SOP cycle. 1 Procedure: In static mode: • Select the “Foam Unit” window (1). Or Press the F12 icon to open the General Manu • Select the operation family • Press the “Production positioning” button • Pressure in the tank is decreased and the sleeve is retracted in order to enable the machine rotation. Once the machine is in sterilization position. • Press the F12 icon to open the General menu. • Select the Process family. • Press the "Foam Unit" button. The Foam generator screen is displayed. • Press the button (2) on the lower screen banner. • Select the Surface Treatment banner (3). 3 © SIDEL. 2 Revision 03 Chapter 6.5.5. Page 1/2 SF FMi Operator Manual / Machine Control In the Surface Treatment banner: • Press the “SOP” button (4) on the lower screen banner. A confirmation window opens. Validate your choice to start the cycle. 4 © SIDEL. If cycle requirements are not met, a dialog box opens to inform you. When you have fulfilled the required conditions, select Validation to start the SOP cycle. Revision 03 Chapter 6.5.5. Page 2/2 SF FMi Operator Manual / Machine Control 6.5.6. Machine Awaiting Sterilisation Once all the preliminary stages (COP, CIP, SIP, SIP-SOP) have been completed and validated, the machine switches to "Awaiting Sterilisation" mode. The nitrogen circuit stays in the production vat, and the steam barriers stay in the Logiface valves and pump. 6.6. Supplementary Surface Cleaning 6.6.1. Overview The machine is maintained by the operator in addition to the COP. This ensures the continuous cleanliness of the surfaces in every production cycle. Procedure: Frequency Manual cleaning of the containers and hopper. Once a week or as necessary Manual cleaning of the bottle outlet conveyor At the end of every production Cleaning of the machine roof Once or twice a year Manual cleaning of the isolator surfaces in addition to COP After COP if a visual check is unsatisfactory Systematically if the system was opened during the last production, during Cleaning and sterilisation of the area around the double doors maintenance work, or after a long of the DPTE system. maintenance stoppage (1 week) even if the system was not opened. © SIDEL. Note: These procedures are described in the "Hygiene & Safety Manual”. Revision 02 Chapter 6.5.6. Page 1/1 SF FMi Operator Manual / Machine Control 6.7. Starting Production 6.7.1. Positioning in Production Mode Requirements: - The filler/isolators area must be in static mode - No cycle must be running neither on the Logiface or on the isolators area - The machine mustn’t be in rotation - The Logiface must be sterile or in controlled stop - Pistons must be out 1 2 Procedure: • Press the icon (1) to open the General menu. • Select the Operation family (2). • Press the “Positioning for production” button (3). 3 4 The Positioning screen appears with the dynamically positioning phase lit in green (4). This puts the CIP shafts into production positions and deactivates the motor engine. 5 © SIDEL. If a requirement to start the cycle is unmet during the request for positioning for production, a dialog box alerts the operator that positioning is not possible. He should fulfil the requirements (5) to validate the positioning. Revision 03 Chapter 6.7. Page 1/1 SF FMi Operator Manual / Machine Control 6.7.2. Production Stand-by Once dynamic positioning has been completed, the production screen appears. The machine is now in dynamic stand-by mode. © SIDEL. From here, you can perform the following actions: start a production, start a static positioning, return to settings mode, or start a between-productions cleaning mode. Revision 03 Chapter 6.7.2. Page 1/1 SF FMi Operator Manual / Machine Control 6.8. Production 6.8.1. Production Recipes The operator can select and display recipe settings, before or during production. 1 6.8.1.1. Managing Recipes • Press the icon (1) to open the General menu. • Select the Filling family (2). • Press the “Recipe Management” button (3). 2 3 The Recipe Management screen appears. It contains 4 tabs. - - RECIPE SETTINGS CORRECTIONS SELECTION © SIDEL. The operator can also access Recipe Management from the Awaiting Production or Production screen. Revision 03 Chapter 6.8. Page 1/7 SF FMi Operator Manual / Machine Control ο Machine Rate Procedure: Before starting production, the operator needs to enter a rate. • Press (1) to restore the default values (if they have been defined). • Press the button (2) to set the nominal rate. 2 1 If you want to set a rate that is different from the nominal rate, but higher than the minimum rate, doubleclick the setpoint box (3). 4 3 This displays the numeric keypad (4). • 6 5 7 Enter the setpoint between the minimum (5) and maximum (6) values indicated. 8 10 9 © SIDEL. 00000069 Press 7 8 9 10 11 11 To Erase the displayed value Display the last confirmed value Cancel the entry and close the window Erase the displayed value figure by figure Confirm the value displayed and close the window Revision 03 Chapter 6.8. Page 2/7 SF FMi Operator Manual / Machine Control ο Recipe Tab 1 Procedure: The operator can view the active recipe from the Production or Awaiting Production screen, in a window on the left. The “RECIPE” tab (1) must be pressed. At this level, the operator can only view the active recipe data and can only adjust the filler volume. To do this, click in “Volume to be filled” checkbox (2). 2 A numeric keypad is displayed. • • • Press “Clear” (3). Enter the new fill volume value. Press “Enter” (5). The value is changed, and the numeric keypad disappears. 3 4 5 © SIDEL. 00000069 Revision 03 Chapter 6.8. Page 3/7 SF FMi Operator Manual / Machine Control ο Selection Tab The operator can load a recipe even when the machine is stopped. 1 2 3 4 Procedure: From the Awaiting Production or Production screen: • Press the Selection tab (1) in the window on the left of the screen. • When the recipe list appears, select the recipe to be loaded (2). • Press the “Load the selected recipe” button (3). The following message appears: The loading button is greyed out, and the text changes as follows: Waiting … The recipe has been loaded. If there is a problem with one or more nozzles, a window with the message "problem with X nozzles” is displayed. Press the button (4) to close the window. © SIDEL. If the problem persists as the recipe is loaded, you should continue the production without using the faulty nozzle(s) or call the maintenance service. Revision 03 Chapter 6.8. Page 4/7 SF FMi Operator Manual / Machine Control ο Parameters Settings tab The Settings tab allows you to check recipe settings. 1 Procedure: From the Awaiting Production or Production screen: • Press the PARAMETERS tab (1) in the window on the left of the screen. © SIDEL. The recipe settings are displayed. Revision 03 Chapter 6.8. Page 5/7 SF FMi Operator Manual / Machine Control ο Corrections tab This tab enables you to make general or individual changes to the filler nozzles if an error occurs after weighing a bottle. The filler correction is done using grams. The filler volume is therefore calculated using the mass volume of the product. Individual Corrections: This correction enables you to change the nozzles one by one. Procedure: From the Awaiting Production or Production screen: • 1 Press the Corrections tab (1) in the window on the left of the screen. To correct a nozzle: • 2 Double-click in the appropriate checkbox (2) to select the number of the nozzle. Note: By default, the coefficient for water is 0.997. This may change depending on the product. A numeric keypad is displayed. • • • Press “Clear” (3). Enter the margin of error in grams. Press “Enter” (5). 3 The numeric keypad disappears and the new coefficient is automatically calculated. 4 Note: The active coefficient is corrected. Thus, for each new correction, the modification is calculated using the last coefficient, and not the original coefficient. 5 © SIDEL. 00000069 Revision 03 Chapter 6.8. Page 6/7 SF FMi Operator Manual / Machine Control Group Corrections: A group correction enables you to change all the filler nozzles by the same value. Procedure: 1 From the Awaiting Production or Production screen: • Press the Corrections tab (1) in the window on the left of the screen. To make a group correction: • Press “Change corrections” (2). 2 This displays the Change Corrections pop-up window. To enter the correction value: • 3 Double-click in the Correction column to select a nozzle (3). copy the correction 7 Close apply the corrections A numeric keypad is displayed. • • • Press “Clear” (4). Enter the margin of error (5). Press “Enter” (6). 4 The numeric keypad disappears. 5 Before applying the correction to all the nozzles: • Press “Copy the correction” (7). 6 © SIDEL. 00000069 Revision 03 Chapter 6.8. Page 7/7 SF FMi Operator Manual / Machine Control 6.8.2. Sterile production You should watch over the stability of the parameters set in the settings pane and be alert to detect the following anomalies: - Incorrect bottle filling Incorrect bottle quality Incorrect printing on the bottles (according to the machine configuration) Incorrect supply (product, bottles). Unsynchronised work stations Etc. Requirements: - Logiface must be sterile - A recipe must be load. - The sterile water station must be sterile. - The VORTEX station must be sterile - The customer process line must be sterile. - The filler/isolators area must be sterile. - The customer product must be available. 1 2 3 4 Procedure: • Press the icon (1) to open the General menu. • Select the Operation family (2). • Press the “Sterile Production” button (3). • Follow the action in the section (4) showing the current stages. 5 If a requirement to start the cycle is unmet during the request for positioning for production, a dialog box alerts the operator that it is not possible to start production. He should fulfil the requirements (5) to start production. If all the requirements for a standard aseptic production are met, a dialog box is displayed to prompt the operator to automatically start the FMi. © SIDEL. If he selects Yes, the following components are started: - Machine - Output conveyor - Filling validation Revision 03 Chapter 6.8.2. Page 1/2 SF FMi Operator Manual / Machine Control - Capsule flow (depending on machine configuration) - Supervision mode (depending on machine configuration) - Print mode (depending on machine configuration) - Inert mode (depending on machine configuration) - Thermo sealing (depending on machine configuration) If he selects No, the components listed above have to be started manually using the lower screen banners. If a loss of sterilisation error occurs in the isolator area during a sterile production stage, responding to the displayed message "Do you want to empty the vat on the table or in the bottles?" means that production is brought to a close. © SIDEL. Note: Revision 03 Chapter 6.8.2. Page 2/2 SF FMi Operator Manual / Machine Control 6.8.3. No Sterile Production This mode enables you to fill a product even though the setup has not been sterilised. It is intended for customer run-throughs with water, or a no-sterilised product. Requirements for starting a damaged or autonomous production: - The filler/isolator area must be in a dynamic mode. - The Logiface must be in stop. - The degraded product must be available. - A recipe must be loaded (see Chapter 6.8.1.1). 1 2 3 Procedure: • Press the icon (1) to open the General menu. • Select the Operation family (2). • Press the “No-sterile Production” button (3). A dialog box prompts the operator to select the type of no-sterile production required. The operator must fulfil the requirements (4) to start a no-sterile in one of the modes. 4 Autonomous mode performs run-throughs in "closed circuits" without connecting to the customer line. The Logiface supplies the water. © SIDEL. Damaged mode involves connecting to the customer line, opening the product barrier, and a send request to the process. The filler waits for information from the process system about the availability of damaged product. If damaged product is available, the filler switches to damaged production. If damaged product is not available, the filler switches to damaged production, but remains fixed in the awaiting vat filling stage. Revision 03 Chapter 6.8.3. Page 1/1 SF FMi Operator Manual / Machine Control 6.9. Stopping Production 6.9.1. Automatically Stopping Production Production is automatically stopped if the vat of prepared product reaches a low level. The automaton calculates the amount of product remaining in the vat, then, depending on the volume of bottles to be filled, orders the filling of X amount of bottles to finish the production and empty the vat. 6.9.2. Stopping Production on Operator Request When stopping a production, there are two methods of stopping the filler: - Finishing production. - Abandoning production. 6.9.2.1. Finishing Production This method stops the machine after having emptied the buffer tub and draining the bottles. 1 © SIDEL. • Press the button (1) to stop production normally The dynamic screen remains open. The system checks: - The volume of product remaining upstream of Logiface. - The volume remaining in the Logiface. - The volume remaining between the Logiface and the filler. The automaton calculates the number of bottles to allow through to empty the vat and the tubes of the remaining product. It lets the necessary number of bottles through. It reduces the speed of the carousel by half. (Switch to double filling if option selected in the recipe settings) It dumps the filled and closed bottles. It then rechecks the level of product remaining in the vat. If there is enough left, the automate calculates and authorises the necessary amount of bottles. The machine fills and dumps the closed bottles. This cycle is performed until there rests a minimum level of product. When this happens, the machine switches to the end of effective production. Once the machine is emptied of product…, production mode is quit, and the Awaiting Production screen reappears. Revision 03 Chapter 6.9. Page 1/1 SF FMi Operator Manual / Machine Control 6.9.2.2. Aborting Production This stoppage ceases production immediately in its current state. • - Press the button (1) to stop production immediately in its current state. Active bottle filling is stopped. Bottle feeding in the filler is stopped. The machine stops. The dynamic screen remains open. © SIDEL. 1 Revision 03 Chapter6.9.2.2. Page 1/1 SF FMi Operator Manual / Machine Control 6.10. Isolator You can view the Isolator settings at any time during production. 1 • Press the icon (1) to open the General menu. • Press the “Isolator” button (2). The Isolator screen is displayed. 2 5 The two sections of the Isolator (4, 5) are represented in different colours. Each one has a window that shows information about the pressurisation levels in the PA pump. 4 © SIDEL. Select each section to view additional information (6). The following information is displayed: - Frequency drive frequency (HZ). - Frequency drive current (A) - Frequency drive status 6 Revision 03 Chapter 6.10. Page 1/2 SF FMi Operator Manual / Machine Control The display (7) shows the status of the Isolator (inactive, forced ventilation, regulated ventilation). • Select the button (8) to quit the current screen and return to the Production screen. Red = Warning Orange = Fault Green = OK 7 8 © SIDEL. Clogging : - White = OK - Red = clogged Revision 03 Chapter 6.10. Page 2/2 SF FMi Operator Manual / Machine Control 6.11. Managing Alarms 3 1 You can access the Alarms screen in two ways: • Press the icon (1) to open the General menu, then select Alarms (2). Or • Press the button (3). 2 5 The List of Alarms Present screen is displayed. Each alarm is displayed in a colour corresponding to its level (see Chapter 4.5). 6 If you select an alarm that is underlined, a Help screen appears. • You can view the error (emergency stop initiated, door open...), and the effect this has on the machine. • Press (5) to close the error window, then press F1 (6). • Press (4) to return to the Alarms screen, press (4). © SIDEL. 4 Revision 03 Chapter 6.11. Page 1/1 SF FMi Operator Manual / Machine Control 6.12. Logs 1 You can access the Logs screen during or outside of production. • Press the icon (1) to open the General menu. • Select Logs (2). • Press the “Consultation/printout” button (3). 2 3 You can take any of 4 actions: - Print directly. View the logs page before printing. Search by category. Close the Logs page. • To print, press (4). 4 6 Printing The printing status is displayed (5). 5 Cancel 7 • To see the page before printing, select (6). © SIDEL. A display window opens. You can navigate through the list of logs using the directional keys (7), zoom in (8), print (9), save the logs file to a floppy disc (10), or return to the previous screen (11). 9 Revision 03 10 11 8 Chapter 6.12. Page 1/2 SF FMi Operator Manual / Machine Control • To search by category, press (12). 12 The “Sorted List” window opens. • • Select the start and end dates in the appropriate fields. You can also select the start and end times in the appropriate fields. • If you want to search by category, select it in the appropriate field (13), or enter a message number (14). • Press the button (15) to start the search and return to the logs screen. 14 13 • 15 To close the Logs window, click (16). © SIDEL. 16 Revision 03 Chapter 6.12. Page 2/2