1
SCCM DASH Plug-in
User’s Guide
Issue Date:
January 2009
Copyright (c) 2006, 2007, 2008 Advanced Micro Devices, Inc., GNHSoft Inc., 1E Ltd
All rights reserved.
Redistribution and use in any form of this material and any product thereof including
software in source or binary forms, along with any related documentation, with or
without modification ("this material"), is permitted provided that the following
conditions are met:
Redistributions of source code of any software must retain the above copyright notice
and all terms of this license as part of the code.
Redistributions in binary form of any software must reproduce the above copyright
notice and all terms of this license in any related documentation and/or other materials.
Neither the names nor trademarks of Advanced Micro Devices, Inc. or any copyright
holders or contributors may be used to endorse or promote products derived from this
material without specific prior written permission.
Notice about U.S. Government restricted rights: This material is provided with
RESTRICTED RIGHTS. Use, duplication or disclosure by the U.S. Government is
subject to the full extent of restrictions set forth in FAR52.227 and DFARS252.227 et
seq., or any successor or applicable regulations. Use of this material by the U.S.
Government constitutes acknowledgment of the proprietary rights of Advanced Micro
Devices, Inc. and any copyright holders and contributors.
In no event shall anyone redistributing or accessing or using this material commence or
participate in any arbitration or legal action relating to this material against Advanced
Micro Devices, Inc. or any copyright holders or contributors. The foregoing shall survive
any expiration or termination of this license or any agreement or access or use related to
this material.
ANY BREACH OF ANY TERM OF THIS LICENSE SHALL RESULT IN THE
IMMEDIATE REVOCATION OF ALL RIGHTS TO REDISTRIBUTE, ACCESS OR
USE THIS MATERIAL.
THIS MATERIAL IS PROVIDED BY ADVANCED MICRO DEVICES, INC. AND
ANY COPYRIGHT HOLDERS AND CONTRIBUTORS "AS IS" IN ITS CURRENT
CONDITION AND WITHOUT ANY REPRESENTATIONS, GUARANTEE, OR
WARRANTY OF ANY KIND OR IN ANY WAY RELATED TO SUPPORT,
INDEMNITY, ERROR FREE OR UNINTERRUPTED OPERATION, OR THAT IT IS
FREE FROM DEFECTS OR VIRUSES. ALL OBLIGATIONS ARE HEREBY
DISCLAIMED - WHETHER EXPRESS, IMPLIED, OR STATUTORY - INCLUDING,
BUT NOT LIMITED TO, ANY IMPLIED WARRANTIES OF TITLE,
MERCHANTABILITY, FITNESS FOR A PARTICULAR PURPOSE, ACCURACY,
COMPLETENESS, OPERABILITY, QUALITY OF SERVICE, OR NONINFRINGEMENT. IN NO EVENT SHALL ADVANCED MICRO DEVICES, INC. OR
ANY COPYRIGHT HOLDERS OR CONTRIBUTORS BE LIABLE FOR ANY
DIRECT, INDIRECT, INCIDENTAL, SPECIAL, PUNITIVE, EXEMPLARY, OR
CONSEQUENTIAL DAMAGES (INCLUDING, BUT NOT LIMITED TO,
PROCUREMENT OF SUBSTITUTE GOODS OR SERVICES; LOSS OF USE,
REVENUE, DATA, OR PROFITS; OR BUSINESS INTERRUPTION) HOWEVER
CAUSED OR BASED ON ANY THEORY OF LIABILITY ARISING IN ANY WAY
RELATED TO THIS MATERIAL, EVEN IF ADVISED OF THE POSSIBILITY OF
SUCH DAMAGE. THE ENTIRE AND AGGREGATE LIABILITY OF ADVANCED
MICRO DEVICES, INC. AND ANY COPYRIGHT HOLDERS AND
CONTRIBUTORS SHALL NOT EXCEED TEN DOLLARS (US $10.00). ANYONE
REDISTRIBUTING OR ACCESSING OR USING THIS MATERIAL ACCEPTS THIS
ALLOCATION OF RISK AND AGREES TO RELEASE ADVANCED MICRO
DEVICES, INC. AND ANY COPYRIGHT HOLDERS AND CONTRIBUTORS FROM
ANY AND ALL LIABILITIES, OBLIGATIONS, CLAIMS, OR DEMANDS IN
EXCESS OF TEN DOLLARS (US $10.00). THE FOREGOING ARE ESSENTIAL
TERMS OF THIS LICENSE AND, IF ANY OF THESE TERMS ARE CONSTRUED
AS UNENFORCEABLE, FAIL IN ESSENTIAL PURPOSE, OR BECOME VOID OR
DETRIMENTAL TO ADVANCED MICRO DEVICES, INC. OR ANY COPYRIGHT
HOLDERS OR CONTRIBUTORS FOR ANY REASON, THEN ALL RIGHTS TO
REDISTRIBUTE, ACCESS OR USE THIS MATERIAL SHALL TERMINATE
IMMEDIATELY. MOREOVER, THE FOREGOING SHALL SURVIVE ANY
EXPIRATION OR TERMINATION OF THIS LICENSE OR ANY AGREEMENT OR
ACCESS OR USE RELATED TO THIS MATERIAL.
NOTICE IS HEREBY PROVIDED, AND BY REDISTRIBUTING OR ACCESSING
OR USING THIS MATERIAL SUCH NOTICE IS ACKNOWLEDGED, THAT THIS
MATERIAL MAY BE SUBJECT TO RESTRICTIONS UNDER THE LAWS AND
REGULATIONS OF THE UNITED STATES OR OTHER COUNTRIES, WHICH
INCLUDE BUT ARE NOT LIMITED TO, U.S. EXPORT CONTROL LAWS SUCH AS
THE EXPORT ADMINISTRATION REGULATIONS AND NATIONAL SECURITY
CONTROLS AS DEFINED THEREUNDER, AS WELL AS STATE DEPARTMENT
CONTROLS UNDER THE U.S. MUNITIONS LIST. THIS MATERIAL MAY NOT BE
USED, RELEASED, TRANSFERRED, IMPORTED, EXPORTED AND/OR REEXPORTED IN ANY MANNER PROHIBITED UNDER ANY APPLICABLE LAWS,
INCLUDING U.S. EXPORT CONTROL LAWS REGARDING SPECIFICALLY
DESIGNATED PERSONS, COUNTRIES AND NATIONALS OF COUNTRIES
SUBJECT TO NATIONAL SECURITY CONTROLS. MOREOVER, THE
FOREGOING SHALL SURVIVE ANY EXPIRATION OR TERMINATION OF ANY
LICENSE OR AGREEMENT OR ACCESS OR USE RELATED TO THIS MATERIAL.
This license forms the entire agreement regarding the subject matter hereof and
supersedes all proposals and prior discussions and writings between the parties with
respect thereto. This license does not affect any ownership, rights, title, or interest in, or
relating to, this material. No terms of this license can be modified or waived, and no
breach of this license can be excused, unless done so in a writing signed by all affected
parties. Each term of this license is separately enforceable. If any term of this license is
determined to be or becomes unenforceable or illegal, such term shall be reformed to the
minimum extent necessary in order for this license to remain in effect in accordance with
its terms as modified by such reformation. This license shall be governed by and
construed in accordance with the laws of the State of Texas without regard to rules on
conflicts of law of any state or jurisdiction or the United Nations Convention on the
International Sale of Goods. All disputes arising out of this license shall be subject to the
jurisdiction of the federal and state courts in Austin, Texas, and all defenses are hereby
waived concerning personal jurisdiction and venue of these courts.
Trademarks
AMD, the AMD Arrow logo, and combinations thereof, are trademarks of Advanced Micro Devices, Inc.
GNHSoft , the GNHSoft logo, and combinations thereof are trademarks of GNHSoft, Inc.
Microsoft and Windows are registered trademarks of Microsoft Corporation.
Other product names used in this publication are for identification purposes only and may be trademarks of their
respective companies.
Rev. 1.9 January 2009
SCCM DASH Plug-in User’s Guide
Table of Contents
Table of Contents ..........................................................................................................................5
List of Figures...................................................................................................................................8
List of Tables .................................................................................................................................11
Abbreviations .................................................................................................................................12
Revision History.............................................................................................................................13
Chapter 1Introduction....................................................................................................................14
1.1 Architecture Overview...........................................................................................................14
1.2 System Requirements.............................................................................................................16
1.3 Installation.............................................................................................................................16
1.4 Starting the SCCM DASH plug-in.........................................................................................19
1.5 Icons
.................................................................................................................................22
Chapter 2DASH Management Node .............................................................................................23
2.1 General Tab...........................................................................................................................24
2.1.1 Enabling DASH Wakeup.................................................................................................24
2.1.2 Enabling DASH Automatic Discovery............................................................................24
2.2 Access Tab .............................................................................................................................25
2.2.1 DASH Accounts...............................................................................................................25
2.2.1.1 Creating an Account................................................................................................25
2.2.1.2 Modifying an Existing Account................................................................................27
2.2.1.3 Deleting an Existing Account...................................................................................27
2.2.2 DASH Ports.....................................................................................................................28
2.2.2.1 Adding Ports............................................................................................................28
2.2.2.2 Deleting Ports..........................................................................................................28
2.3 Inventory Tab.........................................................................................................................29
2.3.1 Enabling/Disabling DASH Inventory Collection............................................................29
2.3.1.1 Adding a New Schedule...........................................................................................30
Contents
5
SCCM DASH Plug-in User’s Guide
Rev. 1.9 January 2009
2.3.1.2 Modifying schedules.................................................................................................30
2.3.1.3 Deleting a schedule..................................................................................................31
2.4Serial Redirection Tab............................................................................................................32
Chapter 3 DASH Collection Node..................................................................................................33
Chapter 4 Discover..........................................................................................................................34
4.1 Discovering a Collection ......................................................................................................34
4.2 Discovering a Client..............................................................................................................35
Chapter 5 DASH Access Account...................................................................................................37
5.1 Configuring an Access Account for a Collection..................................................................37
5.2 Configuring an Access Account for a Client.........................................................................38
Chapter 6 Provisioning...................................................................................................................41
6.1 Collection Provisioning.........................................................................................................41
6.1.1 Creating user account....................................................................................................41
6.2 Provisioning a Client............................................................................................................43
6.2.1 Creating user account.....................................................................................................43
6.2.2 Creating New Role..........................................................................................................44
6.2.3 View User........................................................................................................................46
6.2.4 Delete User.....................................................................................................................48
6.2.5 Delete Role......................................................................................................................49
Chapter 7 Power control.................................................................................................................51
7.1 Powering On or Off a Collection..........................................................................................51
7.1.1 Start Execute Query Button............................................................................................52
7.1.2 Stop Execute Query Button.............................................................................................52
7.1.3 Available Power State Options.......................................................................................52
7.2 Powering On or Off a Client.................................................................................................53
Chapter 8 Alert ...............................................................................................................................55
8.1 Alert Subscription for a Collection........................................................................................56
8.2 Alert Unsubscription for a Collection...................................................................................58
8.3 Alert Subscription for a Client...............................................................................................60
6
Contents
Rev. 1.9 January 2009
SCCM DASH Plug-in User’s Guide
8.4 Alert Unsubscription for a Client..........................................................................................65
Chapter 9 Serial Redirection.........................................................................................................67
Chapter 10 DASH Explorer...........................................................................................................69
10.1 DASH Explorer for Client...................................................................................................69
Chapter 11 DASH Queries Node....................................................................................................77
Chapter 12 DASH Reporting Node...............................................................................................79
Contents
7
SCCM DASH Plug-in User’s Guide
Rev. 1.9 January 2009
List of Figures
Figure 1. SCCM DASH plug-in Architectural Overview...........................................................15
Figure 2. Plug-in Setup Dialog......................................................................................................16
Figure 3. License Agreement Dialog ............................................................................................17
Figure 4. Select Installation Folder Dialog...................................................................................17
Figure 5. Confirm Installation Dialog..........................................................................................18
Figure 6. SCCM DASH Plug-in Configuration Dialog...............................................................18
Figure 7. Installation Completion Dialog.....................................................................................19
Figure 8. SCCM Administrator Console Overview....................................................................21
Figure 9. SCCM DASH Management Node................................................................................23
Figure 10. SCCM DASH Management General Tab..................................................................24
Figure 11. Access Tab.....................................................................................................................25
Figure 12. Create New Access Account Dialog Box.....................................................................26
Figure 13. Modify Access Account Dialog Box............................................................................27
Figure 14. Add New DASH Access Port Dialog Box...................................................................28
Figure 15. Inventory Tab...............................................................................................................29
Figure 16. Create Schedule Dialog Box........................................................................................30
Figure 17. Modify Schedule Dialog Box.......................................................................................31
Figure 18. Serial Redirection Tab.................................................................................................32
Figure 19. All DASH Capable Systems Collection Node............................................................33
Figure 20. Discover Context Menu for Collection.......................................................................34
Figure 21. Discover Dialog Box for Collection.............................................................................35
Figure 22. Discover Context Menu for Client..............................................................................36
Figure 23. Discover Dialog Box for Client...................................................................................36
8
Contents
Rev. 1.9 January 2009
SCCM DASH Plug-in User’s Guide
Figure 24. Set DASH Access Account Context Menu for Collection.........................................37
Figure 25. Set DASH Access Account Dialog Box for Collection...............................................38
Figure 26. Set DASH Access Account Context Menu for Client................................................39
Figure 27. Set DASH Access Account Dialog Box for Client......................................................39
Figure 28. Collection Provisioning................................................................................................42
Figure 29. Create DASH Account Dialog Box for Collection.....................................................42
Figure 30. Client Provisioning.......................................................................................................43
Figure 31. Create DASH Account Dialog Box for Client ..........................................................44
Figure 32. Provisioning Create New Role Context Menu...........................................................45
Figure 33. Create New Role Dialog Box.......................................................................................45
Figure 34. Add Activity Dialog Box..............................................................................................46
Figure 35. Provisioning View User Context Menu......................................................................47
Figure 36. View User Dialog Box..................................................................................................47
Figure 37. Delete User Dialog Box................................................................................................48
Figure 38. Delete User Dialog Box................................................................................................49
Figure 39. Delete Role Context Menu.........................................................................................50
Figure 40. Delete Role Dialog Box................................................................................................50
Figure 41. Power Control Context Menu for Collection............................................................51
Figure 42. Power Control Dialog Box for a Collection...............................................................52
Figure 43. Power Control Context Menu for Client...................................................................54
Figure 44. Power Control Dialog Box for Client........................................................................54
Figure 45. Status Message Queries Node.....................................................................................55
Figure 46. Alert Subscription Context Menu for Collection......................................................56
Figure 47. Alert Subscription Dialog Box for Collection............................................................57
Figure 48. Alert Unsubscription Context Menu for Collection..................................................59
Contents
9
SCCM DASH Plug-in User’s Guide
Rev. 1.9 January 2009
Figure 49. Alert Unsubscription Dialog Box for Collection.......................................................60
Figure 50. Alert Subscription Context Menu for Client.............................................................61
Figure 51. Alert Subscription Dialog Box for Client Using Dynamic Filter.............................62
Figure 52. Alert Subscription Dialog Box for Client Using Static Filter...................................63
Figure 53. Alert Subscription Dialog Box for Client Using Filter Collection...........................64
Figure 54. Alert Unsubscription Context Menu for Client.........................................................65
Figure 55. Alert Unsubscription Dialog Box for Client..............................................................66
Figure 56. Serial Redirection Context Menu...............................................................................67
Figure 57. Serial Redirection Dialog Box.....................................................................................68
Figure 58. View DASH Explorer Context Menu for Client........................................................69
Figure 59. DASH Explorer............................................................................................................70
Figure 60. DASH Explorer Menu.................................................................................................71
Figure 61. Computers Node in the DASH Explorer...................................................................71
Figure 62. Processor Node in the DASH Explorer......................................................................72
Figure 63. Memory Node in the DASH Explorer........................................................................72
Figure 64. Physical Memory Node in the DASH Explorer.........................................................73
Figure 65. Boot Configuration Node in the DASH Explorer.....................................................73
Figure 66. Software Node in the DASH Explorer.......................................................................74
Figure 67. Fan Node in the DASH Explorer................................................................................74
Figure 68. Chassis Node in the DASH Explorer..........................................................................75
Figure 69. Card Node in the DASH Explorer..............................................................................75
Figure 70. Slot Node in the DASH Explorer................................................................................76
Figure 71. DASH Queries Node....................................................................................................77
Figure 72. DASH Reporting Node................................................................................................79
Figure 73. Report Result................................................................................................................80
10
Contents
Rev. 1.9 January 2009
SCCM DASH Plug-in User’s Guide
List of Tables
Table 1. Icons used in the SCCM DASH Plug-in .......................................................................22
Table 2. Create Access Account Fields..........................................................................................27
Table 3. Configure Alert Properties Fields .................................................................................58
Table 4. Queries Table....................................................................................................................78
Table 5. Reporting table.................................................................................................................80
Contents
11
SCCM DASH Plug-in User’s Guide
Rev. 1.9 January 2009
Abbreviations
12
•
MC: Management controller.
•
DASH: Desktop Mobile Architecture for System Hardware, the new DMTF
Commercial Client management standard produced by the DMTF DMWG.
Specifies the transport, management protocol (WS-Man), and DMTF CIM profiles
used to manage desktop/mobile PC. A “Dash Capable System is a computer system
that conforms to the DMTF DASH standard.
•
DASH MC: The MC that implements the external DASH protocol stack. It
interfaces with other platform components (BIOS, SB, IMDs, …) to get needed
information or control the platform.
•
SCCM: System Center Configuration Manager.
•
DMTF: Distributed Management Task Force , the industry organization developing
system management standards such as DASH and WS-Management.
•
DASH: Desktop and mobile Architecture for System Hardware is the DMTF
standard for client management. DASH is the industry standard for remote, out-ofband management.
•
Out-of-band management: Management tasks that are performed independent of the
power or OS state on the managed client or system.
Contents
Rev. 1.9 January 2009
SCCM DASH Plug-in User’s Guide
Revision History
Date
Revision
th
Description
June 20 2008
1.0
First draft
June 28th 2008
1.1
Added new screen images after provisioning is completed.
Additional modifications and enhancements
th
1.2
Incorporated input from AMD teams
th
August 19 2008
1.3
Added new images and Incorporated inputs from AMD teams
September 18th 2008
1.4
Added new screen shots and Incorporated inputs from AMD teams
1.5
Added new screen shots
November 6 2008
1.6
Screen shots updated for new revision
November 25th 2008
1.7
Added 1.1 feature and new screen shots
1.8
Updated screen shots and Incorporated inputs from AMD teams
1.9
Updated screen shots
July 14 2008
st
October 21 2008
th
th
December 30 2008
th
January 22 2009
Contents
13
SCCM DASH Plug-in User’s Guide
Chapter 1
Rev. 1.9 January 2009
Introduction
This document describes features and usages of the System Center Configuration Manger
(SCCM) DASH plug-in. This document is divided into the following chapters:
Chapter 1 - Introduction
Chapter 2 - DASH Management Node
Chapter 3 - DASH Collection Node
Chapter 4 - Provisioning
Chapter 5 - Discover
Chapter 6 - Power Control
Chapter 7 - Alert
Chapter 8 - DASH Access Account
Chapter 9 - Serial Redirection
Chapter 10 - DASH Explorer
Chapter 11 - DASH Queries Node
Chapter 12 - DASH Reporting Node
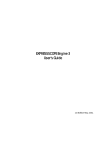
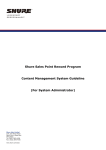
1.1
Architecture Overview
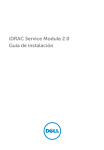
The Microsoft System Center Configuration Manager (SCCM) DASH plug-in allows SCCM
users to remotely manage client systems that support the DMTF DASH standard. The plug-in uses
the DASH standard to enable out-of-band management of these clients. The plug-in supports the
following DASH 1.0 capabilities: Discovery, Basic Asset Inventory, Remote Power Control
(On/Off), Provisioning, Subscribe to DASH events, Wake on DASH, Boot Device Selection and
Serial Redirection. Figure1 below shows an architectural overview of the SCCM DASH plug-in.
14
Introduction
Chapter 1
Rev. 1.9 January 2009
SCCM DASH Plug-in User’s Guide
Figure 1. SCCM DASH plug-in Architectural Overview.
Chapter 1
Introduction
15
SCCM DASH Plug-in User’s Guide
1.2
Rev. 1.9 January 2009
System Requirements
The following are the system requirements to install and use the SCCM DASH plug-in:
1. System Center Configuration Manager 2007 must be installed properly on the target
system. For more information on installing Microsoft SCCM 2007, refer to the following
URL for hardware and software requirements.
http://technet.microsoft.com/en-us/library/cc161860(TechNet.10).aspx
2. 28 MB of Free Hard Disk Space.
3. Putty.exe
1.3
Installation
Use the SCCMDASHPlugin.msi installer to install the DASH plug-in for both the SCCM site
server and SCCM administrator console only mode.
To install the SCCMDASHPlugin, follow the steps outlined below:
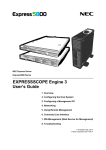
1. Double click on the SCCMDASHPlugin.msi windows installer file.
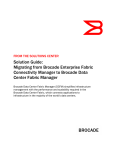
2. The “SCCM DASH plug-in setup” wizard appears as shown in Figure 2 below and then
Click on the “Next” button to continue the installation.
Figure 2. Plug-in Setup Dialog
3. The “license agreement” dialog appears as shown in Figure 3 below. Select “I Agree”
radio button to accept the license terms and click on the “Next” button to continue.
16
Introduction
Chapter 1
Rev. 1.9 January 2009
SCCM DASH Plug-in User’s Guide
Figure 3. License Agreement Dialog
4. The “ Select installation folder” dialog appears as shown in Figure 4 below.
Figure 4. Select Installation Folder Dialog
5.
Specify the destination folder and click “Next” button.
6. The “Confirm installation” dialog appears as shown in Figure 5 below.
Chapter 1
Introduction
17
SCCM DASH Plug-in User’s Guide
Rev. 1.9 January 2009
Figure 5. Confirm Installation Dialog
7. Click “Next” Button.
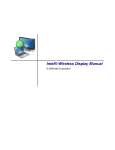
8. In SCCM DASH Plug-in Configuration Wizard enter the DASH discovery port , Event
listener portnumber and the directory where you have installed putty (Ex: C:\Program
Files\Putty\) and click “Next” button and click "OK".
Note:
If port values are not supplied then default value for DASH discovery port 623
and DASH event listener port 8080 will be taken
If putty.exe path is not supplied then you have to manually set the environmental
variable PUTTY_INSTALL_DIR to point putty.exe and Restart the console
Figure 6. SCCM DASH Plug-in Configuration Dialog
18
Introduction
Chapter 1
Rev. 1.9 January 2009
SCCM DASH Plug-in User’s Guide
9. The “Installation complete” dialog appears as shown in Figure 7 below.
Figure 7. Installation Completion Dialog.
10. Click “Close” button to exit the wizard.
11. Congratulations, you have successfully installed the SCCM DASH plug-in.
1.4
Starting the SCCM DASH plug-in
The SCCM DASH plug-in extends the SCCM Administrator console to support out-of-band
management using DASH. The SCCM DASH plug-in installer adds the following nodes to the
SCCM console:
•
Collections -> All DASH Capable Systems
•
Reports
-> All DASH Capable Systems
•
Reports
-> All DASH Capable Systems that are not Clients
•
Queries
-> All DASH Capable Systems
•
Queries
-> All DASH Capable Systems that are not Clients
•
Tools
-> DASH Management
When you right click on collection or individual client, the following menu items will be
displayed
•
DASH -> Provision -> Create New User (Only in DASH client)
•
DASH -> Provision -> Create New Role (Only in DASH client)
•
DASH -> Provision -> View User (Only in DASH client)
•
DASH -> Provision -> Delete User (Only in DASH client)
Chapter 1
Introduction
19
SCCM DASH Plug-in User’s Guide
•
DASH -> Provision -> Delete Role (Only in DASH client)
•
DASH -> Discover
•
DASH -> Power Control
•
DASH -> Alert -> Subscribe
•
DASH -> Alert ->Unsubscribe
•
DASH -> Set Access Account
•
DASH -> Serial Redirection (Only in DASH client)
•
DASH -> View DASH Explorer (Only in DASH client)
Rev. 1.9 January 2009
Figure 8 shows an overview of the SCCM console.
20
Introduction
Chapter 1
Rev. 1.9 January 2009
SCCM DASH Plug-in User’s Guide
Figure 8. SCCM Administrator Console Overview
Chapter 1
Introduction
21
SCCM DASH Plug-in User’s Guide
1.5
Rev. 1.9 January 2009
Icons
The standard SCCM DASH plug-in icons are listed in table 1 below:
Icons
Descriptions
Create
The Create icon allows you to create a new user account, a new DASH port
or a new inventory schedule.
Modify
The Modify icon allows you to modify existing user accounts or inventory
schedules.
Delete
The Delete icon allows you to delete existing user accounts, DASH ports or
inventory schedules.
Execute
The Execute icon allows you to retrieve the current power State or current
boot device.
Stop Execution
Refresh
Mandatory
The Stop Execution icon allows you to stop the current query.
The refresh icon allows you to retrieve the current status.
The Mandatory icon indicates a field that must be filled in.
Table 1. Icons used in the SCCM DASH Plug-in
22
Introduction
Chapter 1
Rev. 1.9 January 2009
Chapter 2
SCCM DASH Plug-in User’s Guide
DASH Management Node
The DASH Management node allows you to configure the plug-in and select specific actions
such as wake-up, auto discovery, access levels, periodic schedules, etc... It contains the DASH
Management property sheet which consists of the following three tabs:
1. General Tab – Allows you to configure wakeup and auto discovery of DASH Capable
system.
2. Access Tab – Allows you to configure default user accounts and port numbers that are used
to access DASH capable system.
3. Inventory Tab – Allows you to configure periodic schedules to collect inventories of DASH
capable system.
4. Serial Redirection Tab – Allows you to set putty path
To access the DASH management properties, follow the steps outlined below:
•
Traverse to System Center Configuration Manager -->Site Database -->Tools.
•
Expand the Tools node.
•
Select the “DASH Management” node.
•
Right click and select the “Properties” menu item as shown in Figure 9 below.
Figure 9. SCCM DASH Management Node
Chapter 2
DASH Management Node
23
SCCM DASH Plug-in User’s Guide
2.1
Rev. 1.9 January 2009
General Tab
The general tab allows you to configure the DASH wakeup function and set auto discovery for
DASH Capable systems. This tab includes the following check-boxes:
1. DASH Wakeup – Once this check-box is checked, SCCM will use DASH to perform the
remote wakeup functionality.
2. DASH Discovery – Enables automatic discovery of newly added DASH capable systems.
The General Tab is shown in Figure 10 below.
Figure 10. SCCM DASH Management General Tab
2.1.1
Enabling DASH Wakeup
Check the “Use DASH Commands to Wake up Systems” check-box in the general tab as shown
in Figure 10 above to enable DASH Wakeup.
2.1.2
Enabling DASH Automatic Discovery
Check the “Enable Automatic Discovery for DASH Devices” check-box in the general tab as
shown in Figure 10 above to enable the discovery.
24
DASH Management Node
Chapter 2
Rev. 1.9 January 2009
2.2
SCCM DASH Plug-in User’s Guide
Access Tab
The Access tab allows you to configure default user accounts and port numbers that are used to
access DASH capable devices. Default accounts are used to access all DASH capable systems that
do not have the system access account set. Once system access is completed successfully, the
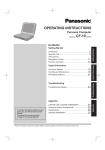
default account is saved as a new system access account. Figure 11 shows the Access Tab.
Figure 11. Access Tab
2.2.1
DASH Accounts
This allows you to create a default account with credentials in order to access DASH systems
that do not have individual accounts. Once an account with proper credentials is found the account
is stored as the System Access Account for future operations until the user overrides explicitly be
setting a system Access Account.
2.2.1.1
Creating an Account
Follow the steps outlined below to create a new account:
1. Go to “Access” tab in the DASH Management property sheet.
Chapter 2
DASH Management Node
25
SCCM DASH Plug-in User’s Guide
Rev. 1.9 January 2009
2. Click the "Create" button
3. The “Add Default DASH Access Account” dialog box appears as shown in Figure
12 below.
Figure 12. Create New Access Account Dialog Box
4. Enter the user-name, password and connection type and click OK. Refer Table 2
shown below for more information on authentication types.
Field/Option
26
Description
HTTP
Hypertext Transfer Protocol (HTTP) is a communications protocol. It
is used for retrieving inter-linked text documents (hypertext) led to the
establishment of the World Wide Web.
HTTPS
Hypertext Transfer Protocol Secure (HTTPS) is a combination of the
Hypertext Transfer Protocol and a network security protocol.
Certificate
Security Certificate used for authentication.
Basic authentication
Basic access authentication is a method to allow a client program to
provide credentials in the form of a user-name and password when
making a request. Before transmission, the user-name and password
are encoded as a sequence of base-64 characters. which can be easily
decoded because it is not encrypted.
Digest authentication
Digest authentication is intended to prevent unencrypted use of the
Basic access authentication, allowing the user identity to be established
securely without having to send a password in plain text over the
network. Digest authentication is basically an application of MD5
cryptographic hashing with usage of nonce values to prevent
cryptanalysis. The MD5 calculations used in HTTP Digest
DASH Management Node
Chapter 2
Rev. 1.9 January 2009
SCCM DASH Plug-in User’s Guide
Authentication is intended to be "one way", meaning that it should be
difficult to determine the original input when only the output is known.
Table 2. Create Access Account Fields
5. Click the "OK" button to apply the changes.
2.2.1.2
Modifying an Existing Account
Follow the below steps to modify an existing account:
1. Go to the “Access” tab in the DASH management property sheet.
2. Select the existing account to be modified and then click on the “Modify” button.
3. The “Modify default DASH Access Account” dialog box appears as shown in Figure 13
below.
Figure 13. Modify Access Account Dialog Box
4.
Change the credentials and click the "OK" button.
2.2.1.3
Deleting an Existing Account
Follow the steps outlined below to delete an existing account:
1. Go to the “Access” tab in the DASH management property sheet.
Chapter 2
DASH Management Node
27
SCCM DASH Plug-in User’s Guide
Rev. 1.9 January 2009
2. Select the existing account to be deleted.
3. Click the "Delete" button.
4. Click the "OK" button to delete the account.
Note: Only one account can be added/modified/deleted at a time.
2.2.2
DASH Ports
This allows you to add the default DASH port number in order to access DASH systems that do
not have individual port number .
2.2.2.1
Adding Ports
Follow the steps outlined below to add a new port:
1. Go to the “Access” tab in the DASH management property sheet.
2. Click the “Add" button.
3. The “Add DASH Port” dialog box appears as shown in Figure 14 below.
Figure 14. Add New DASH Access Port Dialog Box
4. Enter the desired port number.
5. Click the "OK" button to apply the changes.
2.2.2.2
Deleting Ports
Follow the below steps to delete DASH access port:
1. Go to the “Access” tab in the DASH management property sheet.
2. Select the existing port to be deleted.
3. Click the "Delete" button.
4. Click the "OK" button to apply the changes.
28
DASH Management Node
Chapter 2
Rev. 1.9 January 2009
SCCM DASH Plug-in User’s Guide
Note: Port number can not be modified.
2.3
Inventory Tab
This allows you to enable/disable DASH information collection then it allows you to set
periodic schedules that are used to collect inventories of DASH capable system. Collected
inventory information is stored in the hardware inventory database. Inventory collection can be
scheduled on a daily, weekly and monthly basis. Using the “Inventory” tab, one can create a new
schedule, modify or delete an existing schedule. Figure 15 shows the Inventory Tab.
Figure 15. Inventory Tab
2.3.1
Enabling/Disabling DASH Inventory Collection
Follow the steps outlined below to enable or disable DASH inventory collection.
1. Go to the “Inventory” tab in the DASH management property sheet.
2. Enable/Disable “Enable DASH Information Collection" check-box.
3. Click the “OK" button to apply the changes.
Chapter 2
DASH Management Node
29
SCCM DASH Plug-in User’s Guide
2.3.1.1
Rev. 1.9 January 2009
Adding a New Schedule
Follow the steps outlined below to add a new schedule.
1. Go to the “Inventory” tab in the DASH management property sheet.
2. Click the "Add" button.
3. The “Schedule” dialog box appears as shown in Figure 16 below.
Figure 16. Create Schedule Dialog Box
4. Enter the start date, time, duration and recurrence pattern.
5. Click the “OK" button to apply the changes.
2.3.1.2
Modifying schedules
Follow the steps outlined below to modify an existing schedule:
1. Go to the “Inventory” tab in the DASH management property sheet.
2. Select the schedule that is to be modified.
3. Click the "Modify" button
4. The “schedule” dialog box appears as shown in Figure 17 below.
30
DASH Management Node
Chapter 2
Rev. 1.9 January 2009
SCCM DASH Plug-in User’s Guide
Figure 17. Modify Schedule Dialog Box
5. Enter new start date, time, duration and recurrence type.
6. Click the “OK" button to apply the changes.
2.3.1.3
Deleting a schedule
Follow the steps outlined below to delete any schedule:
1. Go to the “Inventory” tab in the DASH management property sheet.
2. Select the schedule to be deleted.
3. Click the "Delete" button.
4. Click the "OK" button to delete the selected schedule.
Chapter 2
DASH Management Node
31
SCCM DASH Plug-in User’s Guide
2.4
Rev. 1.9 January 2009
Serial Redirection Tab
This allows you to set putty path if you have not supplied during SCCM Plug-in
installation. The Serial Redirection Tab is shown in Figure 18 below.
Figure 18. Serial Redirection Tab
32
DASH Management Node
Chapter 2
Rev. 1.8 December 2008
Chapter 3
SCCM DASH Plug-in User’s Guide
DASH Collection Node
The SCCM DASH plug-in creates a collection node that contains “All DASH capable systems”.
Follow the below steps to view DASH capable systems.
1. Traverse to System Center Configuration Manager -->Site Database -->Computer
Management -->Collections.
2. Click the “All DASH Capable Systems" collection.
3. DASH capable systems are displayed in the result pane as shown in Figure 19 below.
Figure 19. All DASH Capable Systems Collection Node
Chapter 2
DASH Collection Node
33
SCCM DASH Plug-in User’s Guide
Chapter 4
Rev. 1.9 January 2009
Discover
The SCCM DASH plug-in discover feature allows the discovery of DASH capable systems
within a collection or the discovery of an individual system.
4.1
Discovering a Collection
The SCCM DASH Plug-in discover feature allows you to automatically discover DASH
capable systems within a collection.
Follow the steps below to discover DASH capable system in a collection.
1. Traverse to Start System Center Configuration Manager -->Site Database-->
Computer Management ->Collections.
2. Right click on the collection in which you want to discover all the DASH capable
systems.
3. Select DASH -->Discover context menu as shown in Figure 20 below.
Figure 20. Discover Context Menu for Collection
34
Discover
Chapter 4
Rev. 1.9 January 2009
SCCM DASH Plug-in User’s Guide
4. The “Discover Collection” dialog box appears as shown in Figure 21 below.
Figure 21. Discover Dialog Box for Collection
5. Click on the "OK" button to discover DASH capable systems in the collections.
4.2
Discovering a Client
You can use this feature to discover a single DASH capable system.
Follow the steps below to discover the individual DASH capable system.
1. Traverse to System Center Configuration Manager -->Site Database -->Computer
Management-->Collections.
2. Select the Collection that contains the DASH capable system that needs to be discovered.
3. Select the system and right click to display the context menu.
4. Traverse to DASH --> Discover menu item as shown in Figure 22 below.
Chapter 4
Discover
35
SCCM DASH Plug-in User’s Guide
Rev. 1.9 January 2009
Figure 22. Discover Context Menu for Client
5. The “Discover System” dialog box appears as shown in Figure 23 below.
Figure 23. Discover Dialog Box for Client
6. Click the "OK" button to discover the system’s DASH capability.
After discovery is completed, the following two properties in the system properties are populated.
1. Dash Capable <yes/no>
2. Dash Port<Port Number>
36
Discover
Chapter 4
Rev. 1.9 January 2009
Chapter 5
SCCM DASH Plug-in User’s Guide
DASH Access Account
Managing access control for managed resources and management operations is an important
aspect of the secure management for DASH. Authorization and access control is based on the roles
assigned and privileges associated with the user accounts. The SCCM DASH plug-in provides the
mechanism to configure DASH access accounts for both a collection and an individual system.
This is used by the DASH Plug-in when performing DASH operations.
5.1
Configuring an Access Account for a Collection
Follow the steps outlined below to configure DASH Access Account for a collection.
1. Traverse to System Center Configuration Manager -->Site Database -->Computer
Management -->Collections.
2. Right click on the collection for which the DASH access account is to be set
3. Select DASH --> Set DASH Access Account context menu as shown in Figure 24 below.
Figure 24. Set DASH Access Account Context Menu for Collection
Chapter 5
DASH Access Account
37
SCCM DASH Plug-in User’s Guide
Rev. 1.9 January 2009
4. The “Set DASH Access Account Collection” dialog box appears as shown in Figure 25
below.
Figure 25. Set DASH Access Account Dialog Box for Collection
5. Enter the user-name, password and connection type . Refer Table 2 for more information
about authentication types.
6. Click the "OK" button to create the new account.
5.2
Configuring an Access Account for a Client
Follow the steps outline below to configure DASH Access Account.
1. Traverse to System Center Configuration Manager -->Site Database --> Computer
Management-->Collections.
2. Select the collection which contains the desired DASH client
3. Select the DASH capable system and right click to display the context menu.
4. Select DASH --> Set DASH Access Account context menu as shown in Figure 26 below.
38
DASH Access Account
Chapter 5
Rev. 1.9 January 2009
SCCM DASH Plug-in User’s Guide
Figure 26. Set DASH Access Account Context Menu for Client
5. The “Set System DASH Access Account” dialog box appears as shown in Figure 27 below.
Figure 27. Set DASH Access Account Dialog Box for Client
Chapter 5
DASH Access Account
39
SCCM DASH Plug-in User’s Guide
Rev. 1.9 January 2009
6. Enter the user-name, password and connection type . Refer Table 2 for more information
about authentication types.
7. Click the “OK” button to create the new account
(Note:The "Set DASH Access Account " is used for an individual system only. This
account is used by the SCCM DASH plug-in for DASH related operations.)
40
DASH Access Account
Chapter 5
Rev. 1.9 January 2009
Chapter 6
SCCM DASH Plug-in User’s Guide
Provisioning
The SCCM DASH plug-in provisioning feature allows you to setup the security credentials
in the DASH MC (management controller) for a client system. Setting these credentials allows you
to securely manage the system out-of-band using DASH. You can configure security credentials
for the following:
1. A group of DASH systems in a collection.
2. An individual DASH system.
6.1
Collection Provisioning
The SCCM DASH plug-in allows you to create a DASH access account for a group of DASH
capable systems in a collection.
More information on collection provisioning is included in the following sections.
6.1.1
Creating user account
1. Traverse to System Center Configuration Manager -->Site Database --> Computer
Management -->Collections.
2. Right click on the collection for which you want to create DASH accounts.
3. Select DASH--> Provision --> Create New User menu item as shown in Figure 28 below.
Chapter 6
Provisioning
41
SCCM DASH Plug-in User’s Guide
Rev. 1.9 January 2009
Figure 28. Collection Provisioning
4. The “Create DASH Account” dialog box appears as shown in Figure 29 below.
Figure 29. Create DASH Account Dialog Box for Collection
5. Enter the user-name and password.
6. Click the "OK” button to create the new account.
42
Provisioning
Chapter 6
Rev. 1.9 January 2009
6.2
SCCM DASH Plug-in User’s Guide
Provisioning a Client
The SCCM DASH plug-in allows you to create a DASH account for an individual system.
Follow the steps outlined in the following section to create a new account.
6.2.1
Creating user account
1. Traverse to System Center Configuration Manager -->Site Database --> Computer
Management-->Collections.
2. Select the collection that contains the desired DASH capable system.
3. Select the DASH capable system and right click to display the context menu.
4. Select DASH-->Provision -->Create New User menu item as shown in Figure 30 below.
Figure 30. Client Provisioning
5. The “Create DASH Account” dialog box appears as shown in Figure 31 below.
Chapter 6
Provisioning
43
SCCM DASH Plug-in User’s Guide
Rev. 1.9 January 2009
Figure 31. Create DASH Account Dialog Box for Client
6. Enter the user-name, password and click query button and it will display the list of roles
available.
(Note:You can select and assign any available role for the new account based on the
requirement)
7. Click the "OK" button to create the new account.
(Note:This option allows you to create a new account in the DASH capable system)
6.2.2
Creating New Role
This feature lets you to create new roles with desired permission and activity.
Follow the steps outlined below to create a new roles.
1. Traverse to System Center Configuration Manager -->Site Database --> Computer
Management-->Collections.
2. Select the collection that contains the desired DASH system.
3. Select the DASH capable system and right click to display the context menu.
4. Select DASH-->Provision -->Create New Role menu item as shown in Figure 32 below.
44
Provisioning
Chapter 6
Rev. 1.9 January 2009
SCCM DASH Plug-in User’s Guide
Figure 32. Provisioning Create New Role Context Menu.
5. The “Create Role” dialog box appears as shown in Figure 33 below.
Figure 33. Create New Role Dialog Box
Chapter 6
Provisioning
45
SCCM DASH Plug-in User’s Guide
Rev. 1.9 January 2009
6. Click the "Query" button and it will display the available permission and activity.
7. Enter the Role Name and Select the Permissions which you like to add to that role and
select the activity from the "Add Activity" Dialog as shown in figure 34 Below.
Figure 34. Add Activity Dialog Box
8. By clicking the "Modify" icon you can add or remove the activity to the desired role.
6.2.3
View User
This feature lists all the available user in the system.
Follow the steps outlined in the following section to create a new account.
1. Traverse to System Center Configuration Manager -->Site Database --> Computer
Management-->Collections.
2. Select the collection that contains the desired DASH system.
3. Select the DASH capable system and right click to display the context menu.
4. Select DASH-->Provision -->View User menu item as shown in Figure 35 below.
46
Provisioning
Chapter 6
Rev. 1.9 January 2009
SCCM DASH Plug-in User’s Guide
Figure 35. Provisioning View User Context Menu.
5. The “View User” dialog box appears as shown in Figure 36 below.
Figure 36. View User Dialog Box.
6. Click the "Query" Button and it will displays the Username and their Role.
Chapter 6
Provisioning
47
SCCM DASH Plug-in User’s Guide
6.2.4
Rev. 1.9 January 2009
Delete User
This feature lets you to delete an existing DASH user account.
Follow the steps outlined in the following section to create a new account.
1. Traverse to System Center Configuration Manager -->Site Database --> Computer
Management-->Collections.
2. Select the collection that contains the desired DASH system.
3. Select the DASH capable system and right click to display the context menu.
4. Select DASH-->Provision -->Delete User menu item as shown in Figure 37 below.
Figure 37. Delete User Dialog Box.
5. The “Delete User” dialog box appears as shown in Figure 38 below.
48
Provisioning
Chapter 6
Rev. 1.9 January 2009
SCCM DASH Plug-in User’s Guide
Figure 38. Delete User Dialog Box.
6. Click the "Query" button and it will lists the users available in the system
7. Select the User Name to Delete and Click Ok.
6.2.5
Delete Role
This feature lets you to delete an existing role for a selected user .
Follow the steps outlined in the following section to create a new account.
1. Traverse to System Center Configuration Manager -->Site Database --> Computer
Management-->Collections.
2.
Select the collection that contains the desired DASH system.
3. Select the DASH capable system and right click to display the context menu.
4. Select DASH-->Provision -->Delete Role menu item as shown in Figure 39 below.
Chapter 6
Provisioning
49
SCCM DASH Plug-in User’s Guide
Rev. 1.9 January 2009
Figure 39. Delete Role Context Menu.
5. The “Delete Role” dialog box appears as shown in Figure 40 below.
Figure 40. Delete Role Dialog Box
6. Click the Query button and it will display the list of Roles available in the system.
7. Select the Role to Delete and Click Ok.
50
Provisioning
Chapter 6
Rev. 1.9 January 2009
Chapter 7
SCCM DASH Plug-in User’s Guide
Power control
This feature allows you to control the power state of a DASH capable remote system or
group of systems, including power up, power down, reset, and power cycle. Also, it allows you to
select a boot device before a remote power cycle.
7.1
Powering On or Off a Collection
The SCCM DASH plug-in allows you to control power state and boot device order for a group
of systems in a given collection.
Follow the steps outlined below to control power state and boot device order for a collection.
1. Traverse to System Center Configuration Manager -->Site Database-->Computer
Management-->Collections.
2. Right click on the selected collection.
3. Select DASH -->Power Control as shown in Figure 41 below.
Figure 41. Power Control Context Menu for Collection
Chapter 7
Power control
51
SCCM DASH Plug-in User’s Guide
Rev. 1.9 January 2009
4. The “Power Control Collection” dialog box appears as shown in Figure 42 below.
Figure 42. Power Control Dialog Box for a Collection
5. Click the Query button and it will display the power state of all DASH capable systems.
6. Change the power state and boot device to the desired order
7. Click the “OK” button to apply the changes
7.1.1
Start Execute Query Button
Click the Start Execute Query button to start the power control query process and to retrieve
the current "Power State" and "Boot Device" for DASH capable systems
7.1.2
Stop Execute Query Button
You can use this button to stop the power control querying process.
7.1.3
Available Power State Options
You can select from the following available options:
1. Power On
2. Power Off
3. Power Reset
52
Power control
Chapter 7
Rev. 1.9 January 2009
SCCM DASH Plug-in User’s Guide
4. Power Cycle
Power cycling - Usually a computer turns Off and then On again. Reasons for power cycling
include having an electronic device reinitialize its configuration or recover from an unresponsive
state of its mission critical functionality, such as a crash or hang situation.
Power Reset - In a computer or data transmission system, to reset means is to clear any pending
errors or events and bring a system to normal condition or initial state usually in a controlled
manner.
7.2
Powering On or Off a Client
The SCCM DASH Plug-in allows control of power state and setting boot device of a individual
DASH client.
Follow the steps outlined below to control the system's power state.
1. Traverse to System Center Configuration Manager -->Site Database -->Computer
Management-->Collections.
2. Click on the collection containing the desired DASH client to be controlled.
3. Select and Right click on the DASH client to be controlled.
4. Select DASH-->Power Control as shown in Figure 43 below.
Chapter 7
Power control
53
SCCM DASH Plug-in User’s Guide
Rev. 1.9 January 2009
Figure 43. Power Control Context Menu for Client
5. The “Power Control Client” dialog box appears as shown in Figure 44 below .
Figure 44. Power Control Dialog Box for Client
6. Click the Refresh button to get the instance ID and boot device. Then Configure the power
state and boot device.
7. Click the "OK" button to apply the new configuration.
54
Power control
Chapter 7
Rev. 1.9 January 2009
SCCM DASH Plug-in User’s Guide
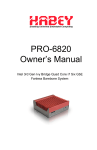
Chapter 8
Alert
This feature provides the capability to subscribe to events, such as CPU temperature, boot
failure, etc...It allows you to subscribe and unsubscribe to DASH events for a single system,
multiple systems or entire collection of systems.
The plug-in service acts as the subscribing agent for the selected DASH client and the client
received events are exposed as status messages. The Figure 45 shows the status message queries
node.
Figure 45. Status Message Queries Node
Supported alerts are:
1.
2.
3.
4.
5.
6.
CPU Temperature
System Temperature
CPU Fan
System Fan
Chassis Intrusion
BIOS boot failure
Chapter 8
Alert
55
SCCM DASH Plug-in User’s Guide
8.1
Rev. 1.9 January 2009
Alert Subscription for a Collection
Follow the steps outlined below to subscribe to DASH alerts.
1. Traverse to System Center Configuration Manager -->Site Database --> Computer
Management -->Collections.
2. Right click on any collection for which you wish to subscribe for DASH alerts
3. Select DASH --> Alert--> subscribe context menu as shown in Figure 46 below.
Figure 46. Alert Subscription Context Menu for Collection
4. The “Alert Subscription Collection” dialog box appears as shown in Figure 47 below.
56
Alert
Chapter 8
Rev. 1.9 January 2009
SCCM DASH Plug-in User’s Guide
Figure 47. Alert Subscription Dialog Box for Collection
5. Configure the alert properties. Refer Table 3 to configure the alert properties.
Field/Option
Description
Resource URI
The WS-MAN resource that processes the subscription.
Ex:http://schemas.dmtf./wbem/wscim/1/*
Heartbeat Interval
Interval to send a heartbeat event. If there is no event for a subscription in
the specified interval, an heartbeat event will be sent to the console.
Expires in
Expiration timeout specifies maximum length of time that client sends the
events to console.
CQL
Plug-in will use CQL as filter dialect
WQL
Plug-in will use WQL as filter dialect
Specify(Filter Dialect)
Plug-in will use the specified text as filter dialect.
Chapter 8
Alert
57
SCCM DASH Plug-in User’s Guide
Rev. 1.9 January 2009
Push
In push mode notifications are pushed to the client. An advantage of the
push model is that notifications are routed to the client as soon as they are
available.
Push with ACK
The push with acknowledgment mode requires acknowledgment from
client.
Batch Push
The batch push mode allows an event client to batch multiple notifications
into a single message. This is an effective way of reducing the number of
notifications from a high volume notification client without sacrificing too
much on timeliness.
Pull
In pull mode, the console is responsible for polling the client at regular
intervals and pulling notifications if any are available. Though the console
may not receive notifications instantly, one advantage of the pull mode is
that the console is always in control of the rate at which it process
notifications.
All Event
Subscribe to all events.
Sensor Events
Subscribe to sensor events only.
Specify(Subscribe to)
Subscribe to a subset of events on the MAP.
Table 3. Configure Alert Properties Fields
6. Click "OK" button to subscribe to DASH alerts.
8.2
Alert Unsubscription for a Collection
Follow the steps outlined below to subscribe to DASH alerts.
1) Traverse to System Center Configuration Manager -->Site Database --> Computer
Management -->Collections.
2) Right click on any collection for which you wish to unsubscribe for DASH alerts
3) Select DASH --> Alert-->Unsubscribe context menu as shown in Figure 48 below.
58
Alert
Chapter 8
Rev. 1.9 January 2009
SCCM DASH Plug-in User’s Guide
Figure 48. Alert Unsubscription Context Menu for Collection
4) The “Alert Unsubscription Collection” dialog box appears as shown in Figure 49
below.
Chapter 8
Alert
59
SCCM DASH Plug-in User’s Guide
Rev. 1.9 January 2009
Figure 49. Alert Unsubscription Dialog Box for Collection
5 .Click the ''Query'' button and it will display all the available subscriptions from DASH
capable systems you have subscribed.
6. Select subscription(s) from the list which you want to unsubscribe.
7. Click "OK" button .
8.3
Alert Subscription for a Client
SCCM DASH plug-in supports the following three types of subscription,
1. Dynamic Filter:
Users can subscribe to events by creating filters dynamically using resource URI,
Query Language and Filter Query.
2. Static Filter:
Users can subscribe using the available filters in the target.
3. Filter collection.
Users can subscribe using available group of filters in the target.
Follow the steps outlined below to subscribe to DASH alerts from an individual DASH capable
system.
1. Traverse to System Center Configuration Manager -->Site Database -->Computer
Management -->Collections.
2. Select any collection that contains the required DASH client.
3. Right click on the desired DASH client to display the DASH context menu.
4. Select DASH -->Alert-->Subscribe as shown in Figure 50 below.
60
Alert
Chapter 8
Rev. 1.9 January 2009
SCCM DASH Plug-in User’s Guide
Figure 50. Alert Subscription Context Menu for Client
5. The “Alert Subscription Client” dialog box appears as shown in Figure 51 below.
Chapter 8
Alert
61
SCCM DASH Plug-in User’s Guide
Rev. 1.9 January 2009
Figure 51. Alert Subscription Dialog Box for Client Using Dynamic Filter
62
Alert
Chapter 8
Rev. 1.9 January 2009
SCCM DASH Plug-in User’s Guide
Figure 52. Alert Subscription Dialog Box for Client Using Static Filter
Chapter 8
Alert
63
SCCM DASH Plug-in User’s Guide
Rev. 1.9 January 2009
Figure 53. Alert Subscription Dialog Box for Client Using Filter Collection
6. Configure alert properties. Refer Table 3 in the previous section for more information.
7. Click "OK" button to subscribe to alerts.
64
Alert
Chapter 8
Rev. 1.9 January 2009
8.4
SCCM DASH Plug-in User’s Guide
Alert Unsubscription for a Client
Follow the steps outlined below to subscribe to DASH alerts from an individual DASH capable
system.
1) Traverse to System Center Configuration Manager -->Site Database -->Computer
Management -->Collections.
2) Select any collection that contains the required DASH client.
3) Right click on the desired DASH client to display the DASH context menu.
4) Select DASH -->Alert-->Unsubscribe as shown in Figure 54 below.
Figure 54. Alert Unsubscription Context Menu for Client
5) The “Alert Unsubscription System” dialog box appears as shown in Figure 55 below.
Chapter 8
Alert
65
SCCM DASH Plug-in User’s Guide
Rev. 1.9 January 2009
Figure 55. Alert Unsubscription Dialog Box for Client
6. Click the Query button and to display all subscribed alerts and Select a subscription(s)
from the list which you want to unsubscribe.
7. Click "OK" button .
66
Alert
Chapter 8
Rev. 1.9 January 2009
Chapter 9
SCCM DASH Plug-in User’s Guide
Serial Redirection
Follow the steps outline below for Serial redirection
1. Traverse to System Center Configuration Manager -->Site Database --> Computer
Management-->Collections.
2. Select the collection which contains the desired DASH client
3. Select the DASH capable system and right click to display the context menu.
4. Select DASH --> Serial Redirection context menu as shown in Figure 56 below.
Figure 56. Serial Redirection Context Menu.
5. The “Serial Redirection” dialog box appears as shown in Figure 57 below.
Chapter 9
Alert
67
SCCM DASH Plug-in User’s Guide
Rev. 1.9 January 2009
Figure 57. Serial Redirection Dialog Box.
6. Select the Serial Redirection Protocol type and Click "OK" to start the serial redirection
and you can also set serial redirection state .
68
Alert
Chapter 9
Rev. 1.9 January 2009
Chapter 10
SCCM DASH Plug-in User’s Guide
DASH Explorer
The DASH Explorer feature allows you to view collected inventory information such as
computers, processors, memory, software and physical assets of the DASH capable systems.
10.1
DASH Explorer for Client
Follow the steps outlined below to view DASH Hardware and Software Inventory.
1. Traverse to System Center Configuration Manager -->Site Database --> Computer
Management -->Collections.
2. Select the collection which contains the desired DASH client.
3. Select the DASH client and right click to display the context menu.
4. Select DASH--> View DASH Explorer menu item as shown in Figure 58 below.
Figure 58. View DASH Explorer Context Menu for Client
Chapter 10
DASH Explorer
69
SCCM DASH Plug-in User’s Guide
Rev. 1.9 January 2009
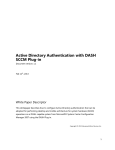
5. The “DASH Explorer” view box appears as shown in Figure 59 below.
Figure 59. DASH Explorer
6. The DASH Explorer Menu is shown in Figure 59 below
Refresh
- This option lets you reload the inventory information from the database.
Sync Inventory - This option lets you to initiate inventory information collection for the
system.
70
DASH Explorer
Chapter 10
Rev. 1.9 January 2009
SCCM DASH Plug-in User’s Guide
Figure 60. DASH Explorer Menu
7. Example views of different inventory nodes are shown below
Figure 61. Computers Node in the DASH Explorer
Chapter 10
DASH Explorer
71
SCCM DASH Plug-in User’s Guide
Rev. 1.9 January 2009
Figure 62. Processor Node in the DASH Explorer
Figure 63. Memory Node in the DASH Explorer
72
DASH Explorer
Chapter 10
Rev. 1.9 January 2009
SCCM DASH Plug-in User’s Guide
Figure 64. Physical Memory Node in the DASH Explorer
Figure 65. Boot Configuration Node in the DASH Explorer
Chapter 10
DASH Explorer
73
SCCM DASH Plug-in User’s Guide
Rev. 1.9 January 2009
Figure 66. Software Node in the DASH Explorer
Figure 67. Fan Node in the DASH Explorer
74
DASH Explorer
Chapter 10
Rev. 1.9 January 2009
SCCM DASH Plug-in User’s Guide
Figure 68. Chassis Node in the DASH Explorer
Figure 69. Card Node in the DASH Explorer
Chapter 10
DASH Explorer
75
SCCM DASH Plug-in User’s Guide
Rev. 1.9 January 2009
Figure 70. Slot Node in the DASH Explorer
76
DASH Explorer
Chapter 10
Rev. 1.9 January 2009
Chapter 11
SCCM DASH Plug-in User’s Guide
DASH Queries Node
The queries node allows selecting query for "All DASH Capable Systems" and "All DASH
Capable systems that are not clients". This node is available in SCCM Queries.
Follow the steps outlined below to use this feature:
1. Traverse to System Center Configuration Manager -->Site Database --> Computer
Management -->Queries node.
2. Click on the "All DASH Capable Systems" or "All DASH Capable systems that are not
clients" query node.
3. Query result is displayed in result pane as shown in Figure 71 below.
Figure 71. DASH Queries Node
Chapter 11
DASH Queries Node
77
Rev. 1.9 January 2009
SCCM DASH Plug-in User’s Guide
Query
Description
All DASH Capable Systems
Collect the information about All DASH Capable Systems.
This will collect information for those DASH clients that have
the SCCM agent installed.
All DASH Capable Systems that are not
Clients
Collect the information about All DASH Capable Systems that
are not Clients. These are client systems that do not have the
SCCM agent installed.
Table 4. Queries Table
78
DASH Queries Node
Chapter 11
Rev. 1.9 January 2009
Chapter 12
SCCM DASH Plug-in User’s Guide
DASH Reporting Node
The reporting node provides predefined reports that can be used as it is or that can be modified to
meet specialized needs, as well as custom reports and dashboards can be created to meet even
more specific needs.
The DASH plug-in creates the following two reports types:
1. All DASH Capable Systems.
2. All DASH Capable Systems that are not clients.
Follow the steps outlined below to create reports
1. Traverse to System Center Configuration Manager-->Site Database --> Computer
Management --> Reporting.
2. Select the "Reports" node.
3. Right click "All DASH Capable Systems" and "All DASH Capable Systems that are not
clients" report and select "Run" to create the report as shown in Figure 72 below.
Figure 72. DASH Reporting Node
Chapter 12
DASH Reporting Node
79
Rev. 1.9 January 2009
SCCM DASH Plug-in User’s Guide
4. The report result is displayed in the result pane as shown in Figure 73.
Figure 73. Report Result
Reports types are explained in Table 5 below.
Report
Description
All DASH Capable Systems
Create Report for All DASH Capable Systems.
These are clients that have the SCCM agent
installed.
All DASH Capable Systems that
are not Clients
Create Reports for All DASH Capable Systems
that are not Clients. These are clients that do
not have the SCCM agent installed.
Table 5. Reporting table
80
DASH Reporting Node
Chapter 12