1
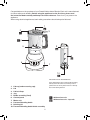
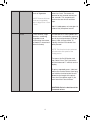
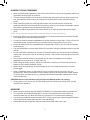
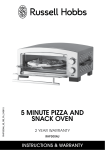
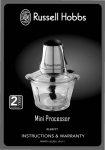
RHBL50_IB_RB_FA_170315
ASTON
BLENDER
2 YEAR WARRANTY
RHBL50
INSTRUCTIONS & WARRANTY
Congratulations on the purchase of your Russell Hobbs Aston Blender. Each unit is manufactured
to ensure safety and reliability. Before using the appliance for the first time, please read
the instruction book carefully and keep it for future reference. Pass it on if you pass on the
appliance.
When using electrical appliances, basic safety precautions should always be followed.
1
2
3
4
9
5
8
Single
Serve
1
6
Stir
2
Chop
3
Mix
4
Liquefy
5
Pulse
Single
Serve
Ice
1
Crush
Stir
2
Chop
3
Mix
4
Liquefy
5
Ice
Crush
7
Pulse
10
IMPORTANT NOTE: DISHWASHERS
1.
2.
3.
4.
5.
6.
7.
8.
9.
10.
Lid cap (and measuring cup)
Lid
Lid lock flaps
Jug
Blade assembly (fixed)
Control panel
Motor unit
Personal blending bottle
Drinking lid
Personal blending bottle blade assembly
2
Some dishwashers have a heating element sitting
directly below the bottom rack. Always ensure
plastic items are never placed close to or directly
above this heating element.
= dishwasher safe
= dishwasher safe - top rack
BEFORE FIRST USE
CAUTION: HANDLE BLADES CAREFULLY.
•
•
Remove all packaging material and any stickers from the product.
As some parts may be packed separately, check to ensure all items have been unpacked
before disposing of the packaging.
Dismantle and clean all parts as instructed in the CARE AND CLEANING section of this
manual on page 8.
•
PRE-PROGRAMMED FUNCTIONS
Your blender has been designed to work in a variety of ways to suit your blending needs.
•
Each speed (from 1 to 5) has a recommended blending function - Single Serve, Stir, Chop,
Mix and Liquefy.
•
Ice crush is a one minute programmed series of short operation bursts and pauses to
optimise ice crushing performance.
•
Use the Pulse function in short bursts for 5 seconds or less to start the blending of a thick
mixture /large batch, or maintain the texture of foods being ground, crushed or chopped.
SPEED
FUNCTION
IDEAL FOR
OPERATION
1
Single Serve
Single serve drinks or
small batches
2
Stir
3
Chop
4
Mix
Cake batter, smooth
dips, purees
5
Liquefy
Smoothies, soups,
milkshakes, nut butters
NOTE: The personal blending bottle
can only be used in conjunction
Salad dressings, chunky with the Single Serve function. Refer
to the PREPARE THE PERSONAL
dips, marinades, thin
BLENDER BOTTLE FOR USE
mixtures
section of this manual on page 6 for
Salsa, salads, herbs
specific instructions.
and spices, nuts
3
Press the On/Off button. The button
will illuminate and flash, as will
the timer (showing 0:00). Select a
function (Single Serve, Stir, Chop,
Mix or Liquefy) to start blending.
The timer will count up to 1 minute
and the motor will stop. To finish the
cycle early, simply press the function
button again.
Ice Crush
Crushing ice or frozen
fruits & vegetables
NOTE: Ensure all frozen
fruits and vegetables
are no larger than 1.5cm
- 2cm
Press the On/Off button and then
select Ice Crush. The motor will
operate for one second and rest for
two seconds. This sequence will
continue for one minute and then
stop.
Add 1-2 tablespoons of water (per 10
cubes of ice) for optimal results.
Pulse
Thick mixtures, large
batches, combining
ingredients and
maintaining the texture
of foods (i.e. bread and
biscuit crumbs)
The blender has a multi-speed Pulse
function that is controlled by pressing
one of the function buttons (1/Single
Serve, 2/Stir, 3/Chop, 4/Mix, 5/
Liquefy) after the Pulse button has
been pressed.
NOTE: The function button selected
will determine the speed of the
Pulsing action.
First press the On/Off button and
then select Pulse. The Pulse button
will illuminate and ‘P’ will flash on the
display.
To pulse, repeatedly press, hold and
release the function button (how long
you hold the function button for will
determine the length of the pulse).
Press the Pulse button again if you
want to exit the Pulse function.
CAUTION: Pulse in short bursts for
5 seconds or less.
4
PREPARE THE BLENDER JUG FOR USE
NOTE: Prior to use, the blender jug should be dismantled and washed as instructed in the CARE
AND CLEANING section on page 8 of this manual. Following cleaning:
•
•
Sit the motor unit on a stable, level, dry surface.
Align the guide ribs inside the jug collar with the guide grooves on the motor unit and lower
the jug securely into place.
NOTE: The jug can be placed in a number of positions on the base.
CAUTION: Do not place hot ingredients in the jug. For your own safety we recommend
you do not process ingredients above 40°C. Do not fill past the 1500ml mark. If you do, the
contents may force the lid off when the motor starts.
• Placefoodstobeblendedintothejug;liquidsfirstthensolids,leavinganyfrozenfruit,
vegetables and ice to last.
• Securethelidbyaligningthelidlockflapsoverthetabsoneithersideofthejug.Press
downfirmlytosnapthelidlockflapsinplace.
• Insert the cap into the opening of the lid. Rotate in a clockwise direction to lock it in place.
NOTE: Further ingredients can be added during the blending process via the lid opening.
However, do not start the blender without the cap as ingredients may be ejected through the hole.
• Plug the cord into a wall power outlet and switch the outlet on.
• PresstheOn/Offbuttontoturnontheblendercontrols.TheOn/Offbuttonwillflash,aswill
0:00 on the timer.
NOTE: The blender will power-off in 2 minutes if no buttons are pressed.
CAUTION: Hold the lid.
•
•
•
Before starting the motor, place and leave your hand on the blender lid to prevent the
possibility of it being dislodged by the sudden movement of ingredients when the motor
starts.
Select the function that best suits your task (see the PRE-PROGRAMMED FUNCTIONS
section of this manual on page 3 for more information).
The function button will illuminate and the timer will count up to one minute and the motor
willstop.Tofinishthecycleearly,simplypressthefunctionbuttonagain.
CAUTION: Wait until the blades come to a complete stop before proceeding further.
•
•
Lift the jug upward to remove it from the motor unit.
Switch the blender off by pressing the On/Off button and disconnect the plug from the wall
power outlet.
5
PREPARE THE PERSONAL BLENDER BOTTLE FOR USE
NOTE: Prior to use, the personal blender bottle should be dismantled and washed as instructed in
the CARE AND CLEANING section on page 8 of this manual. Following cleaning:
• Placetheblenderbottleonaflatsurfacewiththeopenendfacingup.
CAUTION: Do not place hot ingredients into the bottle. For your own safety we recommend
you do not process ingredients above 40°C. Do not fill past the 600ml mark.
• Placeingredientstobeblendedintothebottle;iceandfrozenitemsfirst,solidsseconds
andfinallyliquids.
CAUTION: Handle the sharp blade assembly with care.
•
•
•
Fasten the blade assembly on the open end of the blender bottle and turn it clockwise until
it is tight.
Sit the motor unit on a stable, level, dry surface. Turn the bottle upside down and place it on
the motor unit ensuring it is correctly seated with the recesses of the blade assembly
aligned with the tabs in the motor unit.
Turn the bottle clockwise to lock it into place.
NOTE: The blender bottle may only be used in conjunction with the Single Serve function
• PresstheOn/Offbutton.TheSingleServebuttonandOn/Offbuttonwillflash,aswill0:00
on the display.
CAUTION: Hold the bottle!
•
Before starting the motor, place and leave your hand on top of the bottle to prevent the
possibility of it being dislodged by the sudden movement of ingredients when the motor
starts.
NOTE: You may ‘Pulse’ ingredients when using the blender bottle by pressing and releasing the
Single Serve button repeatedly.
•
Press and hold the Single Serve button to blend. The Single Serve and On/Off button will
glow steadily. The timer will begin counting up and the motor will automatically stop after 1
minute.
CAUTION: Wait until the blades come to a complete stop before proceeding further.
CAUTION: Ensure the bottle does not unscrew from the blade assembly when removing it
from the motor unit. If loose, turn the bottle clockwise again to tighten, then turn anticlockwise to remove the bottle and blade assembly from the motor unit.
•
•
•
•
Turn the bottle anti-clockwise and lift upwards to disengage it from the motor unit.
Standthebottleonaflatsurfacewiththebladeassemblyendfacingupwards.
Unscrew and remove the blade assembly and replace it with the drinking lid.
Switch the blender off by pressing the On/Off button and disconnect the plug from the wall
power outlet.
6
BLENDING TIPS AND TECHNIQUES
•
•
•
•
When pureeing solid ingredients, start with small portions in the jug and gradually add more
ingredients as they begin to combine.
To best circulate foods or fruit that are to be blended with liquid, pour the liquid into the jug
first,thenaddthesolidfoodsorfruit.Adoptthereverseactionwhenusingtheblender
bottle.
When blending liquids into solid ingredients start with a small amount of liquid and
gradually add more liquid through the lid opening. However, do not start the blender without
the cap as ingredients may be ejected through the hole.
Always let cooked ingredients cool before blending. All food and liquid should be below
40°C.
NOTE: Always exercise extreme caution when blending any heated ingredients.
•
For stirring solid or very thick liquid ingredients it is recommended that you use the blender
Pulse setting to avoid overloading the motor.
• Cutallfirm,freshfruitsandvegetablesintosmallerpiecesnolargerthan1.8cmto2.5cmfor
the blender bottle. For the blender jug, food should be no larger than 4cm to 5cm.
• Ensureallfrozenfruitsandvegetablesarenolargerthan1.5cmto2cmforboththeblender
bottle and jug.
• It is recommended you use at least 250ml of liquid when using the blender bottle for optimal
results.
• Do not overload the blender jug or bottle. If the motor stalls, turn the device off immediately,
unplug the unit and let it cool for at least 15 minutes. Then remove a portion of the food and
continue.
• The lid cap holds up to 30ml of liquid and can be used as a measure when adding
ingredients such as olive oil, vinegar, milk, etc.
• When using the Pulse function, use short bursts for a maximum of 5 seconds. Allow the
blades to stop rotating between pulses.
• When using the blender jug, to stop blending at any time press the respective function
button again.
• When ingredients collect on the sides of the jug or the mixture is very thick, turn the
appliance off. Wait for the blades to stop rotating. Remove the lid and use a rubber spatula
to scrape down the sides of the jug, pushing food toward the blades. Replace the lid and
continue blending.
CAUTION: Do not insert utensils of any kind into the blender while it is running.
•
Always place your hand on top of the blender jug lid to hold the jug steady when you are
operating the appliance.
IMPORTANT
•
•
•
•
When using the blender jug the lid MUST ALWAYS be in place before starting the blender.
The motor will automatically stop after 1 minute. To prolong the life of the motor, it is
recommended that you allow the motor to cool down for 1 minute before restarting.
Liquids and ingredients should be below 40°C. Always ensure pre-cooked ingredients have
cooledsufficientlybeforeplacingthemintheblenderjug.
Always disconnect the blender from the wall power outlet when not in use.
7
DO NOT PLACE ANY OF THE FOLLOWING IN THE BLENDER:
•
•
•
•
•
Largepiecesoffrozenfoodabove1.5cmto2cm.
Tough foods such as raw turnips, raw sweet potatoes and raw potatoes
Bones
Hard salami, pepperoni and hard sausages
Hot ingredients/liquids above 40°C
TASKS NOT RECOMMENDED FOR THE BLENDER:
•
•
•
•
Whipping egg whites
Mixing dough
Mashing potatoes
Grinding meats
CARE AND CLEANING
Thisproductcontainsnouserserviceableparts.Referservicetoqualifiedservicepersonnel.
CAUTION: To prevent possible damage to the appliance do not use harsh abrasive or
alkaline cleaning agents.
CLEANING THE BLENDER JUG (QUICK CLEAN)
• Foraquickcleanoftheblenderjug,simplyhalffillthejugwithwarmwaterandaddadrop
ortwoofdishwashingliquid,fitthelidontothejug(withthecapinplace)andrunthemotor
for 30 seconds. The blender uses its own power to clean both the jug and the blade
system.
• Rinse and dry thoroughly.
CLEANING THE BLENDER JUG (THOROUGH CLEAN)
•
•
Before cleaning, turn off and disconnect the appliance from the wall power outlet.
Remove the blender jug from the motor unit.
CAUTION: Handle the jug with care when cleaning as the fixed blades are extremely sharp.
•
•
•
Wash the jug and all other removable parts in hot soapy water.
Rinse well and allow all parts to dry before storing.
Alternatively, the jug, lid and cap may be washed in the dishwasher.
IMPORTANT NOTE: DISHWASHERS
Some dishwashers have a heating element sitting directly below the bottom rack. Always ensure
plastic items are never placed close to or directly above this heating element.
•
Place the jug upside-down on the bottom rack, ensuring it is not placed near any heating
elements. The lid and cap should be placed on the top-rack only.
8
CLEANING THE PERSONAL BLENDER BOTTLE
•
Before cleaning, turn off and disconnect the appliance from the wall power outlet.
CAUTION: Handle the sharp blade assembly with care.
•
•
If assembled, unscrew and separate the blade assembly from the blender bottle.
Wash the bottle, blade assembly and drink bottle lid by hand or alternatively place in the
dishwasher. Place the bottle and all other bottle parts on the top-rack only.
IMPORTANT
•
•
•
Do not place jug or bottle parts in boiling liquids or pour boiling liquids into the jug or
bottle.
Do not immerse the motor unit in liquid. Wipe with a damp cloth and dry thoroughly.
Remove stubborn spots by rubbing with a damp cloth and non-abrasive cleaner.
NOTE: If liquids spill onto the motor unit, immediately switch off and disconnect from the wall
power outlet, wipe with a damp cloth and dry thoroughly. Do not use rough scouring pads or
cleansers on parts or finish.
9
IMPORTANT SAFEGUARDS
When using this appliance, basic safety precautions should always be followed, including the following:
Read all instructions before, and follow whilst using this appliance.
1.
2.
3.
4.
5.
6.
7.
8.
9.
10.
11.
12.
13.
14.
15.
16.
17.
18.
19.
20.
21.
22.
23.
To protect against electric shock DO NOT immerse cord, plug or motor unit in water or any other liquid.
Do not use in the bathroom or near any source of water.
Do not use outdoors.
This product is not intended for use by persons (including children) with reduced physical, sensory or mental
capabilities, or lack of experience and knowledge, unless they have been given supervision or instruction
concerning use of the product by a person responsible for their safety.
This appliance is not a toy. Children must be supervised to ensure they do not play with this appliance.
Always switch off and disconnect this appliance from the wall power outlet when not in use and before
cleaning.
To disconnect, set the controls to off. Turn off the wall power outlet, then grasp the plug and remove from the
wall power outlet. Never pull by the cord.
Do not operate any appliance with a damaged cord or plug or after the appliance has malfunctioned, or has
been dropped or damaged in any manner. Contact customer service for replacement, examination, repair or
adjustment.
There are no user serviceable parts. If the power cord is damaged, it must be replaced by the manufacturer or
similarly qualified person in order to avoid a hazard.
Cutting blades are very sharp. Handle with extreme care and caution when emptying the jug and during
cleaning.
Before switching on, ensure the jug or bottle has been assembled correctly and has been seated onto the
motor unit with the lid attached. The motor will only operate if the jug or bottle has been properly seated onto
the motor unit.
Do not operate the appliance with an empty jug or bottle.
Liquids and ingredients should be below 40°C. Always ensure pre-cooked ingredients have cooled sufficiently
before placing them in the blender jug.
Wait until the blades come to a complete stop before removing the lid from the jug, and before removing the
jug from the motor unit.
Switch off and unplug the appliance before changing accessories or touching parts that move whilst in use.
Do not leave the appliance unattended when in use.
Do not use on an inclined plane or unstable surface.
Do not run the motor for longer than 1 minute. After 1 minute, switch off for at least 2 minutes to allow the
motor to cool down.
Keep the appliance and the power cord away from the edges of benches and countertops.
Do not place on or near any heat sources.
Do not use appliance for other than its intended purpose.
This appliance is not intended to be operated by means of an external timer or separate remote control system.
For added safety, electrical appliances should be connected to a power outlet that is protected by a residual
current device (RCD), also often referred to as a ‘Safety Switch’. Your switchboard may already incorporate an
RCD. If unsure, call an electrician for verification and fitting if necessary.
S
L
V
C
T
E
W
I
A
a
C
G
A
M
S
in
Y
1
2
3
SAVE THESE INSTRUCTIONS. THIS APPLIANCE IS FOR HOUSEHOLD USE ONLY.
I
o
10
Spectrum Brands Australia Pty Ltd
Locked Bag 3004 Braeside
Victoria 3195 Australia
Spectrum Brands New Zealand Ltd
PO Box 9817 Newmarket
Auckland 1149 New Zealand
Customer Service in Australia
Toll Free: 1800 623 118
Email: [email protected]
Website: www.spectrumbrands.com.au
Customer Service in New Zealand
Toll Free: 0800 736 776
Email: [email protected]
Website: www.spectrumbrands.co.nz
W
Spectrum Brands Australia Pty Ltd and Spectrum Brands New Zealand Ltd
Warranty Against Defects
0911
In this warranty:
Australian Consumer Law means the Australian consumer law set out in Schedule 2 to the Competition
and Consumer Act 2010;
CGA means the New Zealand Consumer Guarantees Act 1993;
Goods means the product or equipment which was accompanied by this warranty and purchased in
Australia or New Zealand, as the case may be;
Manufacturer, We or us means:
1. for Goods purchased in Australia, Spectrum Brands Australia Pty Ltd ABN, 78 007 070 573;
or
2. for Goods purchased in New Zealand, Spectrum Brands New Zealand Ltd, as the case may be,
contact details as set out at the end of this warranty;
Supplier means the authorised distributor or retailer of the Goods that sold you the Goods in Australia or
in New Zealand; and
You means you, the original end-user purchaser of the Goods.
1. Our goods come with guarantees that cannot be excluded under the Australian Consumer Law, or
the CGA. You are entitled to a replacement or refund for a major failure and compensation for any
other reasonably foreseeable loss or damage. You are also entitled
to have the goods repaired or replaced if the goods fail to be of acceptable quality and the failure
does not amount to a major failure.
2.
3.
The benefits provided by this Warranty are in addition to all other rights and remedies in respect of
the Goods which the consumer has under either the Australian Consumer Law
or the CGA. The original purchaser of the Goods is provided with the following Warranty subject to
the Warranty Conditions:
We warrant the Goods for all parts defective in workmanship or materials from the date
of purchase (Warranty Period), for the period of:(a) Two (2) years for Russell Hobbs products (see product packaging for details)
(b) Two (2) years with five (5) year motor warranty for Russell Hobbs products (see product
packaging for details)
(c) Limited Lifetime, Ten (10) years for Russell Hobbs cookware.
(d) One (1) year for George Foreman.
If the Goods prove defective within the Warranty Period by reason of improper workmanship
or material, we may, at our own discretion, repair or replace the Goods without charge.
11
W
4
5
6
7
8
9
1
1
1
C
R
I
I
R
A
n
A
or
Warranty Conditions
4.
The Goods must be used in accordance with the manufacturer’s instructions. This Warranty
does not apply should the defect in or failure of the Goods be attributable
to misuse, abuse, accident or non-observance of manufacturer’s instructions on the part of
the user. As far as the law permits, the manufacturer does not accept liability for any direct or
consequential loss, damage or other expense caused by or arising out of any failure to use
the Goods in accordance with the manufacturer’s instructions.
5.
Exhaustible components (such as batteries, filters and brushes) of the Goods are included
under this Warranty only where there is a defect in workmanship or materials used.
6.
The warranty granted under clause 3 is limited to repair or replacement only.
7.
Any parts of the Goods replaced during repairs or any product replaced remain the property
of the manufacturer. In the event of the Goods being replaced during the Warranty Period,
the warranty on the replacement Goods will expire on the same
date as for the Warranty Period on the original Goods which are replaced.
8.
In order to claim under the warranty granted under clause 3 you must:
(a) Retain this warranty with your receipt/proof of purchase; and
(b) Return the Goods to us at the relevant address or to the Supplier by prepaid freight
within the Warranty Period accompanied with (i) the legible and unmodified original
proof of purchase, which clearly indicates the name and address of the Supplier, the date
and place of purchase, the product name or other product serial number and (ii) this
warranty.
9.
This warranty is immediately void if:
(a) Any serial number or appliance plate is removed or defaced;
(b) The Goods have been serviced or otherwise repaired by a person not authorised to do so
by us or where non approved replaced parts are used.
10. The Goods are designed for domestic use only. A limited 90-day Warranty applies to any
industrial or commercial use of the Goods. The Goods must be connected to the electrical
voltage requirements as specified in the ratings label located on the Goods.
11. This warranty does not cover the cost of claiming under the warranty or transport
of the Goods to and from the Supplier or us.
12. This warranty is only valid and enforceable in Australia against Spectrum Brands Australia Pty
Ltd and in New Zealand against Spectrum Brands New Zealand Ltd.
Contact us or the Supplier for further details.
Register your product online
If you live in Australia please visit: www.spectrumbrands.com.au/warranty
If you live in New Zealand Please visit: www.spectrumbrands.co.nz/warranty
Registration of your warranty is not compulsory, it gives us a record of your purchase
AND entitles you to receive these benefits: Product information; Hints and tips; Recipes and
news; Information on special price offers and promotions.
Any questions? Please contact Customer Service for advice.
12
RECIPES
ASTON BLENDER
2 YEAR WARRANTY
RHBL50
1
RECIPES
RECIPES:
PERSONAL BLENDER BOTTLE
RHBL50
2
RECIPES
INSTRUCTIONS FOR ALL PERSONAL BLENDER BOTTLE RECIPES:
PLACE ALL INGREDIENTS IN THE BOTTLE. USING THE SINGLE SERVE FUNCTION, PULSE
TO COMBINE THE INGREDIENTS AND THEN BLEND UNTIL SMOOTH.
SERVES 1
THE WATERSLIDE
1 banana
1 cup orange juice
4 strawberries
1 cup chopped frozen watermelon
COCOMAGIC
1 cup pineapple coconut water
1 banana
½ cup cranberry juice
1 cup frozen raspberries
SUMMER FRUITS SLUSHIE
1 lime, juice only
1 cup orange juice
1 cup red grapes
1 large ripe peach, peeled and diced (or tinned)
½ cup frozen raspberries
BERRIE DELICIOUS SMOOTHIE
6 strawberries
½ cup frozen raspberries
1 cup low fat berry yoghurt
1 cup orange juice
3
BREAKFAST POWER SMOOTHIE
1 cup milk
1 cup frozen raspberries
1 cup natural yoghurt
1 ripe banana
2 tbs *LSA mix (linseeds, sunflower seeds & almonds)
1 tbs honey
*Purchase LSA mix from most supermarkets in the health aisle or your health food shop.
PURPLE PEAR SMOOTHIE
1 cup apple juice
1 cup frozen blueberries
1 pear, cored and halved
PINEAPPLE PASSION SMOOTHIE
1 cup fresh pineapple, chopped
1 cup vanilla yoghurt
1 passion fruit, pulp only
1 cup orange juice
BERRY BERRY SMOOTHIE
1 cup cranberry juice
1 cup frozen mixed berries
4 strawberries, hulled & halved
½ cup low fat strawberry yoghurt
BANANA, SOY & BERRY
1 banana
1 cup soy milk
½ cup frozen mixed berries
1 tsp vanilla extract
1 tsp honey
4
APPLE MAGIC
½ apple, halved
1 cup cloudy apple juice
Juice of half a lemon
1 kiwi fruit, peeled and quartered
BANANA BENDER
1 banana
1 cup low fat milk
½ cup vanilla low fat yoghurt
1 tsp honey
¼ tsp nutmeg
2 ice cubes
5
RECIPES:
BLENDER JUG
RHBL50
6
RECIPES
BERRY N’ BRAN MUFFINS
Preparation Time: 10 minutes
Cooking Time: 20 minutes
Ingredients:
300ml low fat butter milk
1 egg
⅓ cup canola, coconut or olive oil
½ cup maple syrup
⅓ cup brown sugar
1 tsp vanilla essence
1 tsp orange zest
1 cup wholemeal plain flour
1½ cups oat bran
1 tsp baking powder
1 tsp bi-carb soda
1 tsp cinnamon
1 cup blueberries (fresh or frozen)
Method:
1.
Pre-heat oven to 180°C (fan forced). Spray a 12-hole muffin tin generously with cooking oil
spray.
2.
Place the butter milk, egg, oil, maple syrup, brown sugar, vanilla essence and zest in
blender jug and select the Mix function (Speed 4). Blend for 20 seconds.
3.
Place flour, oat bran, baking powder, bi-carb soda and cinnamon in a large bowl. Mix
together with a fork and make a well in the centre. Pour the wet mix into the dry mix and
gently stir with a wooden spoon until just combined. Don’t over mix.
4.
Half fill each muffin hole with the muffin batter then top with a spoonful of blueberries; then
spoon the remaining batter on top to fill to ¾ full.
5.
Bake for 18-20 minutes or until lightly browned. Rest in the muffin tin for 15 minutes before
serving
Makes 12 muffins
7
SPICY MEXICAN MARINADE
Preparation Time: 5 minutes
Ingredients:
½ cup extra virgin olive oil
1 brown onion
4 cloves garlic
2 tbs tomato paste
2 tbs coriander leaves
20ml soy sauce
2 chillies, de-seeded, chopped
½ cup orange juice
25ml white wine vinegar
1 tsp dried oregano
30g brown sugar
1 tsp Worcestershire sauce
1 lime, zest and juice
Method:
1.
Place all marinade ingredients in the blender jug. Pulse to combine. Then select the Stir
(Speed 2) function for 20 seconds. Great for chicken, beef, pork or lamb. Simply marinate
meat overnight before barbecuing.
8
ZUCCHINI SOUP
Preparation Time: 10 minutes
Cooking Time: 45 minutes
Ingredients:
1 tbs olive oil
2 celery stalks, chopped
2 cloves garlic, crushed
4 zucchini, chopped
500ml chicken stock (or vegetable stock)
Salt & black pepper, to taste
Method:
1.
Heat the oil in a large saucepan over medium heat. Add the vegetables and garlic and
sauté over gentle heat for 5 minutes.
2.
Pour the chicken stock into the pan and simmer for 10 minutes. Turn the heat off and let
cool for 30 minutes.
3.
Ladle cooled soup into the blender jug and blend using the Stir function (Speed 2) for 10
seconds. Then select Liquefy (Speed 5) and blend for 10 seconds until smooth. Process
soup in batches and taste before seasoning.
Serves 2-4
9
BERRY KALE BLASTER SMOOTHIE
Ingredients:
1 cup frozen raspberries
Handful of kale, 4 leaves
1 stick of celery, chopped
1 ripe pear, cored & quartered
½ apple, cored & quartered
Juice of half a lemon
1cm piece of ginger
2 cups cold water
Method:
1.
Place all ingredients in the blender. Pulse to combine the ingredients. Then continue to
blend in the Liquefy function (Speed 5) until smooth.
Serves 2-4
APRICOT MANGO MADNESS SMOOTHIE
Ingredients:
2 cups orange juice
1 cup apricot yoghurt
3 ripe apricots, pitted & halved*
4 frozen mango cheeks
Method:
1.
Place all ingredients in the blender. Pulse to combine the ingredients. Continue to blend in
the Liquefy function (Speed 5) until smooth.
Serves 2-4
*You can substitute ripe apricots for 1 cup tinned apricots
10
BREAKFAST POWER SMOOTHIE
Ingredients:
2 cups milk
1 cup frozen raspberries
1 cup natural yoghurt
2 ripe bananas
1 tbs honey
Method:
1.
Place all ingredients in the blender. Pulse to combine the ingredients. Then continue to
blend in the Liquefy (Speed 5) function until smooth.
Serves 2
11
BUTTERMILK RICOTTA PANCAKES
Preparation Time: 5 minutes
Cooking Time: 15 minutes
Ingredients:
1 cup low fat buttermilk
¾ cup low fat milk
200g fresh ricotta cheese
2 tbs caster sugar
1 egg plus 1 egg white
2 cups plain flour
2 tsp baking powder
Cooking oil spray
Fresh fruit and yoghurt to serve
Method:
1.
Place the buttermilk, milk, ricotta cheese, caster sugar, egg and egg white in the blender
jug and blend using the Mix function (Speed 4) for 20 seconds. Add the flour and baking
powder and pulse a few times to just combine.
2.
Heat a non-stick frying pan over medium heat and spray with cooking oil spray. Place ½
cup of mixture in the pan to form a circle and add as many more pancakes as will fit in the
pan. Cook for 1 minute or until small bubbles rise to the surface and are golden brown on
the cooked side. Flip and cook for a further minute. Transfer to a warm plate and cover
with foil. Cook remaining pancakes.
3.
Serve with fresh fruit and yoghurt.
Makes 8-10
www.russellhobbs.com.au
www.russellhobbs.co.nz
Russell Hobbs and Russell Hobbs logo are the registered trademarks of Spectrum Brands Inc., or one of its subsidiaries.
© 2015 SBI.
Recipes are to be used in conjunction with the (RHBL50) Russell Hobbs® Aston Blender.
All rights reserved. No part of this publication may be reproduced, stored in a retrieval system or transmitted in any form or by any means,
electronic, mechanical, photocopying, recording or otherwise, without prior permission of the copyright owner.
12