1
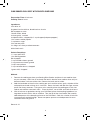
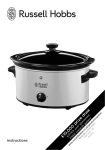
RHSM650_IB&RB_FA_111113
SEARING SLOW COOKER
2 YEAR WARRANTY
RHSC650
INSTRUCTIONS & WARRANTY
Spectrum Brands Australia Pty Ltd
Locked Bag 3004 Braeside
Victoria 3195 Australia
Spectrum Brands New Zealand Ltd
PO Box 9817 Newmarket
Auckland 1149 New Zealand
Customer Service in Australia
Toll Free: 1800 623 118
Email: [email protected]
Website: www.spectrumbrands.com.au
Customer Service in New Zealand
Toll Free: 0800 736 776
Email: [email protected]
Website: www.spectrumbrands.co.nz
W
Spectrum Brands Australia Pty Ltd and Spectrum Brands New Zealand Ltd
Warranty Against Defects
0911
In this warranty:
Australian Consumer Law means the Australian consumer law set out in Schedule 2 to the Competition
and Consumer Act 2010;
CGA means the New Zealand Consumer Guarantees Act 1993;
Goods means the product or equipment which was accompanied by this warranty and purchased in
Australia or New Zealand, as the case may be;
Manufacturer, We or us means:
1. for Goods purchased in Australia, Spectrum Brands Australia Pty Ltd ABN, 78 007 070 573;
or
2. for Goods purchased in New Zealand, Spectrum Brands New Zealand Ltd, as the case may be,
contact details as set out at the end of this warranty;
Supplier means the authorised distributor or retailer of the Goods that sold you the Goods in Australia or
in New Zealand; and
You means you, the original end-user purchaser of the Goods.
1. Our goods come with guarantees that cannot be excluded under the Australian Consumer Law, or
the CGA. You are entitled to a replacement or refund for a major failure and compensation for any
other reasonably foreseeable loss or damage. You are also entitled
to have the goods repaired or replaced if the goods fail to be of acceptable quality and the failure
does not amount to a major failure.
2.
3.
The benefits provided by this Warranty are in addition to all other rights and remedies in respect of
the Goods which the consumer has under either the Australian Consumer Law
or the CGA. The original purchaser of the Goods is provided with the following Warranty subject to
the Warranty Conditions:
We warrant the Goods for all parts defective in workmanship or materials from the date
of purchase (Warranty Period), for the period of:(a) Two (2) years for Russell Hobbs products (see product packaging for details)
(b) Two (2) years with five (5) year motor warranty for Russell Hobbs products (see product
packaging for details)
(c) Limited Lifetime, Ten (10) years for Russell Hobbs cookware.
(d) One (1) year for George Foreman.
If the Goods prove defective within the Warranty Period by reason of improper workmanship
or material, we may, at our own discretion, repair or replace the Goods without charge.
2
W
4.
5.
6.
7.
8.
9.
10
11
12
Co
Re
If y
If y
Re
AN
ne
An
Warranty Conditions
4.
The Goods must be used in accordance with the manufacturer’s instructions. This Warranty
does not apply should the defect in or failure of the Goods be attributable
to misuse, abuse, accident or non-observance of manufacturer’s instructions on the part of
the user. As far as the law permits, the manufacturer does not accept liability for any direct or
consequential loss, damage or other expense caused by or arising out of any failure to use
the Goods in accordance with the manufacturer’s instructions.
5.
Exhaustible components (such as batteries, filters and brushes) of the Goods are included
under this Warranty only where there is a defect in workmanship or materials used.
6.
The warranty granted under clause 3 is limited to repair or replacement only.
7.
Any parts of the Goods replaced during repairs or any product replaced remain the property
of the manufacturer. In the event of the Goods being replaced during the Warranty Period,
the warranty on the replacement Goods will expire on the same
date as for the Warranty Period on the original Goods which are replaced.
8.
In order to claim under the warranty granted under clause 3 you must:
(a) Retain this warranty with your receipt/proof of purchase; and
(b) Return the Goods to us at the relevant address or to the Supplier by prepaid freight
within the Warranty Period accompanied with (i) the legible and unmodified original
proof of purchase, which clearly indicates the name and address of the Supplier, the date
and place of purchase, the product name or other product serial number and (ii) this
warranty.
9.
This warranty is immediately void if:
(a) Any serial number or appliance plate is removed or defaced;
(b) The Goods have been serviced or otherwise repaired by a person not authorised to do so
by us or where non approved replaced parts are used.
on
a or
or
y
10. The Goods are designed for domestic use only. A limited 90-day Warranty applies to any
industrial or commercial use of the Goods. The Goods must be connected to the electrical
voltage requirements as specified in the ratings label located on the Goods.
of
11. This warranty does not cover the cost of claiming under the warranty or transport
of the Goods to and from the Supplier or us.
o
12. This warranty is only valid and enforceable in Australia against Spectrum Brands Australia Pty
Ltd and in New Zealand against Spectrum Brands New Zealand Ltd.
Contact us or the Supplier for further details.
Register your product online
If you live in Australia please visit: www.spectrumbrands.com.au/warranty
If you live in New Zealand Please visit: www.spectrumbrands.co.nz/warranty
Registration of your warranty is not compulsory, it gives us a record of your purchase
AND entitles you to receive these benefits: Product information; Hints and tips; Recipes and
news; Information on special price offers and promotions.
Any questions? Please contact Customer Service for advice.
3
INSTRUCTIONS
Congratulations on the purchase of your new Russell Hobbs Searing Slow Cooker. Each unit is
manufactured to ensure safety and reliability.
Before using the appliance for the first time, please read this instruction booklet carefully
and keep it for future reference. Pass it on if you pass on the appliance.
When using this appliance, basic safety precautions should always be followed.
1
3
4
2
7
5
LO
RM
W
WA
HIGH
6
SELECT
8
TIME
THE CONTROL PANEL
1.
5.
Display screen
2. Cooking pot (suitable for searing and
sautéing on gas and electric stovetops)
6.
SELECT - temperature control button
7.
Indicator lights (LOW, HIGH, WARM)
3.
Control panel
8.
TIME button
4.
Slow cooker
Lid
4
THE BENEFITS OF SLOW COOKING
Whether you prefer a hearty beef casserole, a chicken curry or a minestrone soup, slow
cooking is not only a flavoursome and time-saving cooking process, it can save you money.
Hours of slow cooking means flavour intensity and cheaper cuts of meat transform into melt in
your mouth meals.
Health - The gentle cooking action helps retain more of the nutrients and flavours in food.
Economy - Long slow cooking can tenderise the cheaper, tougher cuts of meat and uses
significantly less power than an oven.
Convenience - Sear and sauté ingredients on the stove top and transfer straight into the slow
cooker saving you time and clean-up.
BEFORE FIRST USE
• Remove all packaging material from the product.
• As some parts may be packed separately, check to ensure all items have been unpacked
before disposing of the packaging.
• Remove all accessories and components.
• Wash all removable parts as instructed in “CARE AND CLEANING” section of this manual.
• Select a level, dry countertop where the appliance is to be used, allowing air space on all
sides to provide proper ventilation and a safe distance from hot surfaces of the slow cooker.
• To prevent damage from steam and heat, ensure the slow cooker is not placed directly under
cupboards when in use.
• Ensure the slow cooker is always disconnected from the wall power outlet when not in use.
SEARING & COOKING IN YOUR SEARING SLOW COOKER
For recipes requiring ingredients to be seared, browned or sautéed
Note: Always use silicone, heatproof plastic or wood utensils to avoid scratching nonstick surface. Never use metal spoons, spatulas, tongs, forks or knives as these will
damage the non-stick surface.
• Sit the slow cooker on a stable, level, heat-resistant surface and out of reach of children.
• If your recipe calls for searing, browning or sautéing ingredients prior to slow cooking, remove
the cooking pot from the slow cooker and place it directly on the burner of your stovetop to
cook ingredients as per a normal frypan.
NOTE: Stovetop use is only suitable for gas and electric stovetops. Not suitable for
induction stovetops.
NOTE: Do not leave the cooking pot unattended when cooking on the stove.
NOTE: Do not use the lid when searing on the stove top, otherwise ingredients will not
sear or brown.
• Once food is seared or browned as required, add other ingredients and stir though.
• Using oven mitts grasp both handles and carefully place the cooking pot back into the slow cooker.
5
• Connect the plug to the wall power outlet and switch the power on. The display screen will flash
“
” 4 times along with all 3 indicator lights.
• The display screen will then flash “----“ indicating that the searing slow cooker is in standby mode.
• Select LOW or HIGH temperature by pressing the SELECT button on the control panel until
the red indicator light is illuminated on the desired setting.
• Once the setting has been selected, set the cooking time by pressing the TIME button. Time
can be set from 30 minutes up to 10 hours. Repeatedly press the TIME button to adjust the
time in 30 minute increments.
NOTE: The default time is 6 hours. Repeatedly pressing the TIME button will increase
time up to a maximum of 10 hours then go back to 30 minutes, and continue to increase
in 30 minute increments.
• Once the desired cooking time is selected, the set time will flash 3 times on the display
screen then become solid and begin to count down. Cooking has now commenced.
NOTES:
-
If the time button is not pressed, the cooking time that appears on the display screen
will be the time selected and cooking will commence.
-
During cooking, time can be changed at any stage by pressing the TIME button.
-
To cancel the setting or time selected, press the SELECT button until none of the
indicator lights are illuminated. After the time flashes 4 times, the display screen
will then flash “----“ indicating that the searing slow cooker has returned to standby
mode.
• At the end of the cooking time the slow cooker will automatically switch to the WARM setting
(light will flash) and the display screen will begin to count down from 10 minutes.
• After 10 minutes has elapsed, the slow cooker will automatically remain on WARM and the
display screen will begin to count down for 10 hours. Once 10 hours has elapsed the slow
cooker will automatically switch to standby mode.
NOTE: Some food will deteriorate if kept in “WARM” mode for extended periods of time.
• When ready to serve, switch off the wall power outlet and remove the plug from the socket.
• Using oven mitts remove the lid from the slow cooker and set it on a heat proof surface.
• Serve the food.
TIP: Cleaning can be made much easier if you immediately remove all the cooked food from
the cooking pot, then fill it with warm water (see ‘Care and Cleaning’ section on page 9).
6
COOKING IN YOUR SEARING SLOW COOKER
For recipes that do not require ingredients to be seared, browned or sautéed
Note: Always use silicone, heatproof plastic or wood utensils to avoid scratching nonstick surface. Never use metal spoons, spatulas, tongs, forks or knives.
• Sit the slow cooker on a stable, level, heat-resistant surface and out of reach of children.
• Connect the plug to the wall power outlet and switch the power on. The display screen will flash
“
” 4 times along with all 3 indicator lights.
• The display screen will then flash “----“, indicating that the searing slow cooker is in standby mode.
• Press the SELECT button on the control panel twice to select the HIGH setting, the light
above “HIGH” will illuminate.
• Remove the lid and place the food in the cooking pot.
• Replace the lid.
• Select LOW or HIGH by pressing the SELECT button on the control panel until the indicator
light is illuminated on the desired setting.
• Once the setting has been selected, set the cooking time by pressing the TIME button. Time
can be set from 30 minutes up to 10 hours. Repeatedly press the TIME button to adjust the
time in 30 minute increments.
NOTE: The default time is 6 hours. Repeatedly pressing the TIME button will increase
time up to a maximum of 10 hours then go back to 30 minutes, and continue to increase
in 30 minute increments.
• Once the desired cooking time is selected, the set time will flash 3 times on the display
screen then become solid and begin to count down. Cooking has now commenced.
NOTE: During cooking, time can be changed at any stage by pressing the TIME button.
NOTE: To cancel the setting or time selected, press the SELECT button until none of the
indicator lights are illuminated. After the time flashes four times the display screen will
then flash “----“, indicating that the searing slow cooker has returned to standby mode.
• At the end of the cooking time the slow cooker will automatically switch to the WARM setting
(light will flash) and the display screen will begin to count down from 10 minutes.
• After 10 minutes has elapsed, the slow cooker will automatically remain on WARM and the
display screen will begin to count down for 10 hours. Once 10 hours has elapsed the slow
cooker will automatically switch to standby mode.
NOTE: Some food will deteriorate if kept in “WARM” mode for extended periods of time.
• When ready to serve, switch off the wall power outlet and remove the plug from the socket.
• Using oven gloves remove the lid from the slow cooker and set it on a heat proof surface.
• Serve the food.
TIP: Cleaning can be made much easier if you immediately remove all the cooked food from
the cooking pot, then fill it with warm water (see ‘Care and Cleaning’ section on page 9).
7
SLOW COOKING TIPS
Your Searing Slow Cooker is designed so that you can brown meat or sauté vegetables in
the removable cooking pot on the stovetop, then transfer the pot into your slow cooker.
• Thaw frozen meat, poultry, fish and seafood completely before cooking. Keep raw meat and
poultry separate from cooked foods.
• Slow cookers cook food at much lower temperatures than conventional cooking, always
ensure that cooking times are adjusted for raw and chilled foods such as meat and poultry to
ensure they are cooked until piping hot throughout.
• To check whether meat, particularly poultry is cooked, use a temperature probe or pierce the
flesh with a skewer or fork; the juices should run clear.
• Trim excess fat from meat, as the cooking method does not allow the fat to drain away.
• Searing works best in batches, do not overcrowd the cooking pot otherwise ingredients will
not sear or brown sufficiently.
• Anything to be sautéed could be tossed in seasoned flour beforehand, to thicken the gravy/
sauce.
• Cut food into similar sized pieces to ensure food is evenly cooked.
• Soak dried peas and beans for 8 hours (or overnight) before cooking, to soften them.
• WARNING: Dried beans (e.g. red kidney beans) must be boiled for at least 10 minutes before
being added to the slow cooker. They are poisonous if eaten raw or undercooked.
• Do not put the slow cooker or the cooking pot in the refrigerator.
• Root vegetables (potatoes, carrots, onions etc) can take longer to cook than meat. Cut them
into 5mm slices, sticks or dice and sauté gently for 2-3 minutes.
• Dried vegetables must be immersed in the cooking liquid.
• Avoid lifting the glass lid during the cooking process as this breaks the seal formed around
the lid and adds time to the cooking process.
• When adding liquid or stock to the slow cooker is recommended that hot liquid is added
to reduce the cooking time and to ensure that the slow cooker reaches the higher cooking
temperatures more quickly.
• When cooking with rice, use at least 150ml of cooking liquid for each 100g of rice.
• If adding fresh milk or yoghurt, this should be done in the final half hour of cooking.
Evaporated milk may be added at the start of cooking.
• Pasta is not suitable for slow cooking – it will become too soft. If your recipe requires pasta, it
should be stirred in 30-40 minutes before the end of the cooking time.
• Cream or egg yolk may be added just before serving.
• Use the low setting for recipes calling for 6+ hours cooking time.
• Use the high setting for recipes calling up to 6 hours cooking time.
8
RECIPES
Along with the recipes in this book, there are also additional slow cooker recipes available at:
www.russellhobbs.com.au or www.russellhobbs.co.nz
To adapt your own recipes for the slow cooker, we suggest you find a recipe which uses similar
ingredients and use that as a guide for timing and liquid quantity.
Be careful with quantities – once all the initial ingredients are put in the cooking pot, it shouldn’t
be more than ¾ full, to allow for expansion.
CARE AND CLEANING
• Switch off the wall power outlet and remove the plug from the socket.
• Using oven mitts remove the lid and cooking pot and place them on a heatproof surface.
• Even if you do not intend to wash up right away, fill the cooking pot with warm water,
otherwise the residual heat may bake any food debris in the cooking pot, making its eventual
removal more difficult.
• If ingredients have built up and stuck at the bottom of the cooking pot, soak the cooking pot
in warm water before cleaning.
• Wash the lid and cooking pot in hot soapy water using a cloth or sponge, then rinse and dry
thoroughly. Do not use a scouring pad.
IMPORTANT: The lid and cooking pot SHOULD NOT BE washed in the dishwasher.
• All other surfaces, internal and external, should be wiped with a damp cloth. You may use
a little mild household detergent (washing up liquid) if necessary. These surfaces should be
completely dry before re-using the slow cooker or storing it away.
• Do not immerse the body of the slow cooker in water or any other liquid.
• Do not use harsh or abrasive cleaners.
• When cooking, cleaning and caring for your slow cooker, be certain to use utensils that will
not scratch the cooking surface of the cooking pot.
9
IMPORTANT SAFEGUARDS
1.
To protect against electrical hazards, do not immerse the slow cooker main body in water
or any liquid.
2.
Do not use it in a bathroom or near any source of water.
3.
Do not use outdoors.
4.
This appliance is not intended for use by persons (including children) with reduced
physical, sensory or mental capabilities, or lack of experience and knowledge, unless they
have been given supervision or instruction concerning use of the appliance by a person
responsible for their safety.
5.
This appliance is NOT a toy. Children should be supervised to ensure they do NOT play
with this appliance.
6.
Always follow the instructions when using this appliance.
7.
Do not operate on an inclined plane.
8.
Place the slow cooker on a stable, level, heat resistant surface and out of reach of children.
9.
Do not use the slow cooker near or below curtains or other combustible materials.
10. Route the power cord so it does not overhang, and cannot be caught accidentally.
11. Leave a clear space of at least 75mm (3 inches) around the slow cooker when in use.
12. Do not touch hot surfaces (including the outside of the slow cooker). Use oven gloves, and
touch only the handles and the lid handle.
13. Keep clear of steam escaping around the lid area.
14. Do not touch any internal surfaces until the slow cooker has fully cooled.
15. Do not use the slow cooker to re-heat food that has already been cooked.
16. Dried beans (e.g. red kidney beans) must be boiled for at least 10 minutes before being
added to the slow cooker. They are poisonous if eaten raw or undercooked.
17. Always switch off and disconnect the appliance from the wall power outlet when not in
use, before moving and before cleaning. Let it cool down fully before cleaning and storing
away.
18. To disconnect, set the controls to off. Switch off the wall power outlet, then grasp the plug
and remove from wall socket. Never pull by the cord.
19. There are no user serviceable parts. If the power cord is damaged, it must be replaced by
the manufacturer or similarly qualified person in order to avoid hazard.
20. Do not operate this appliance with a damaged cord/plug or after the appliance has
malfunctioned, or been dropped or damaged in any manner. Contact Customer Service for
examination, adjustment, repair or replacement.
21. Do not try to cook in the slow cooker without using the supplied cooking pot.
22. Do not cover or place anything on top of the slow cooker while in use.
23. Keep the power cord and the slow cooker away from hotplates, cook-tops and burners.
24. The removable bowl may be damaged by sudden temperature changes. Always ensure
the bowl is at room temperature before adding hot or cold items.
25. Do not use the cooking pot in an oven or microwave oven.
26. Do not use accessories or attachments other than those supplied as specifically for use
with the slow cooker.
10
27. Do not use the slow cooker for any purpose other than that described in these instructions.
28. Do not connect this slow cooker to an external timer or remote control system.
29. For added safety, electrical appliances should be connected to a power outlet that is
protected by a residual current device (RCD), also often referred to as a ‘Safety Switch’.
Your switchboard may already incorporate an RCD. If unsure, call an electrician for
verification and fitting if necessary.
SAVE THESE INSTRUCTIONS
THIS APPLIANCE IS FOR HOUSEHOLD USE ONLY
11
RECIPE BOOK
SEARING SLOW COOKER
RHSC650
INSTRUCTIONS & WARRANTY
HEARTY BEEF STEW
Preparation Time: 5 minutes
Cooking Time: 5 hours
Ingredients:
800g beef chuck, cut into 2cm pieces
¼ cup plain flour
2 tbs olive oil
1 garlic clove, crushed
1 green chilli, seeded and chopped
1 cup water
2 x 400g tins diced tomatoes
10 baby potatoes
2 carrots, peeled and chopped
1 cup continental parsley, finely chopped
1 tsp black pepper
½ tsp salt
1 cup frozen peas
Method:
1.
Remove the cooking pot from your Searing Slow Cooker and place it on the stovetop.
Heat the oil in the cooking pot over medium-heat. Add the beef chuck and sprinkle with
plain flour. Brown the beef for a few minutes, stirring constantly.
2.
Stir in the garlic and chilli, followed by the water. Stir well to lift the flavours from the
bottom of the cooking pot.
3.
Add the rest of the ingredients (except the frozen peas) and using oven mitts carefully
place the cooking pot in the slow cooker with the lid on and set to HIGH. Cook for 5
hours, stirring every now and then. Add the frozen peas, stir through and let sit for 10
minutes before serving.
Serves 4
www.russellhobbs.com.au
www.russellhobbs.co.nz
RUSSELL HOBBS and logo are Trade Marks of Spectrum Brands, Inc., or one of its subsidiaries.
©2013 Spectrum Brands, Inc.
Recipes are to be used in conjunction with the RHPC1000 Pressure Cooker by Russell Hobbs. All rights reserved. No part of this
publication may be reproduced, stored in a retrieval system or transmitted in any form or by any means, electronic, mechanical,
photocopying, recording or otherwise, without prior permission of the copyright owner.
2
SLOW COOKED ITALIAN BAKED BEANS
Preparation Time: 10 minutes
Cooking Time: 2 hours
Ingredients:
1 tbs extra virgin olive oil
250g short cut bacon, sliced into long strips
1 brown onion, finely sliced
1 garlic clove, crushed
¼ tsp dried chilli flakes
Salt & pepper
400g diced tomatoes
1 tsp dried oregano
1 bay leaf
400g cannellini beans, drained and rinsed
400g kidney beans, drained and rinsed
2 tbs tomato paste
1 tbs balsamic vinegar
¼ bunch Continental parsley, finely chopped
Method:
1.
Remove the cooking pot from your Searing Slow Cooker and place it on the stovetop.
Heat the oil in the cooking pot over medium-heat and sauté bacon, onion, garlic, chilli
flakes, salt and pepper for 5 minutes. Stir in the diced tomatoes, simmer for 1 minute and
then transfer to the slow cooker.
2.
Stir in oregano, bay leaf, beans, tomato paste, balsamic vinegar and parsley and cook on
LOW for 2 hours.
Serves 6-8
3
POACHED PEARS
Preparation Time: 10 minutes
Cooking Time: 2 hours
Ingredients:
4 ripe pears, peeled and left whole
1 cinnamon stick
5 cloves
1 knob of ginger, 1cm
1 tsp lemon zest
¼ cup brown sugar
1 star anise
1 vanilla pod
2 cups water
Pouring cream to serve
Method:
1.
Remove the cooking pot from your Searing Slow Cooker and add the sugar, spices, lemon
zest, vanilla pod, ginger and water. Place it over medium-heat on your stovetop and stir
until it comes to a boil. Simmer gently for 5 minutes and then using oven mitts carefully
return the cooking pot to the slow cooker.
2.
Add pears, place the lid on and set to LOW and cook for 2 hours. Turn the pears halfway
through cooking. Serve warm with a ladle of syrup and pouring cream.
Serves 4
4
SLOW COOKED CHILLI BEEF WITH POLENTA DUMPLINGS
Preparation Time: 20 minutes
Cooking Time: 8 hours
Ingredients:
2 tbs olive oil
2kg beef chuck or brisket, diced into 2cm chunks
Salt & pepper to taste
1 brown onion, diced
3 cloves garlic, crushed
3 chipotle chillies, chopped (or ¼ cup chopped jalapeno peppers)
1 tbs sweet smoked paprika
¼ cup brown sugar
2 tbs tomato paste
2 x 400g cans cherry or diced tomatoes
300ml beef stock
Polenta Dumplings:
1 ½ cups plain flour
1 tbs baking powder
Salt & pepper
½ cup cheddar cheese, grated
½ cup parmesan cheese, grated
1 cup instant polenta
½ cup coriander leaves, chopped
1 green chilli, chopped
Method:
1.
Remove the cooking pot from your Searing Slow Cooker and place it over medium-heat
on your stovetop. Add 1 tbs oil and cook the beef in batches over medium-heat until just
browned; about 2 minutes either side. Remove the beef and set aside.
2.
Add the remainder of the oil to the cooking pot and sauté the onion, garlic, chipotle chillies
and paprika and cook stirring, for 2-3 minutes. Return the beef and add the sugar, tomato
paste and cherry tomatoes. Using oven mitts carefully place the cooking pot in the slow
cooker and add the warm beef stock. Place the lid on, set to HIGH and cook for 8 hours.
3.
With 30 minutes to go before serving your Chilli Beef, place the dumpling ingredients in a
large bowl and mix with a fork to combine. Take the lid off the slow cooker and carefully
add tablespoons of the dumpling mixture to the Chilli Beef. Cook for a further 20 minutes
uncovered until cooked through. Serve over penne pasta or mashed potato with extra
coriander leaves for garnish.
Serves 8-10
5
SLOW COOKED MOROCCAN LAMB SHANKS
Preparation Time: 20 minutes
Cooking Time: 6 hours
Ingredients:
Spice paste:
4 garlic cloves
2 brown onions, roughly chopped
1 red chilli, seeded and chopped
Stalks from bunch of coriander, reserve leaves
1 tsp ground white pepper
½ tsp salt
Lamb shanks:
3 tbs Moroccan seasoning*
4 lamb shanks, trimmed of excess fat
3 tbs olive oil
4 carrots, peeled and cut into chunks
1 red onion, sliced
4 small potatoes, quartered
1 sweet potato, peeled and cut into chunks,
same size as potatoes
1 punnet cherry tomatoes
½ cup dried apricots
1tbs honey
3 bay leaves
500ml chicken stock, warmed
1 tsp salt
Natural yoghurt to serve
Mashed potato to serve
Lemon juice to serve
Coriander to serve
Method:
1.
Mix together half the olive oil and Moroccan seasoning in a bowl. Rub mix over lamb
shanks and leave to marinate for 20 minutes.
2.
Meanwhile, place spice paste ingredients in your food processor and blend to a smooth
paste.
3.
Remove the cooking pot from your Searing Slow Cooker and place it on the stovetop.
Heat the cooking pot over medium-heat and brown the shanks on each side. Remove the
browned shanks and set aside.
4.
Add the spice mix and remaining oil and sauté for 2 minutes. Stir in carrots, onion,
potatoes, sweet potatoes, tomatoes and apricots. Using oven mitts carefully place the
cooking pot in the slow cooker and set to HIGH. Place the lamb on top and add honey
and enough warm stock to not quite cover the meat. Add bay leaves and salt and place
the lid on.
5.
Cook for 6 hours on HIGH, turning the shanks over every now and then.
6.
Serve with mashed potato and garnish with fresh coriander, a dollop of natural yoghurt and
a squeeze of lemon juice
Serves 4
*If you can’t locate Moroccan spice mix from your supermarket, mix up a blend of 1tsp of
each of cinnamon, ground allspice, ground coriander, ground nutmeg, turmeric, ground black
pepper, cayenne pepper or paprika.
6
APPLE RELISH
Preparation Time: 10 minutes
Cooking Time: 2 hours
Ingredients:
1.2kg Granny Smith Apples, peeled, cored & chopped
2 brown onions, finely diced
¾ cup apple cider vinegar
¾ cup raw sugar
¼ tsp salt
1 tbs lemon juice
½ tsp ground cinnamon
¼ tsp ground cloves
¼ tsp ground allspice
Method:
1.
Place all ingredients in your Searing Slow Cooker cooking pot and stir to combine.
2.
Place the lid on and select HIGH and cook for 2 hours. Stir halfway through cooking.
3.
Cool completely in the slow cooker before storing in sterilised jars in the refrigerator.
Makes 3 cups of relish
7