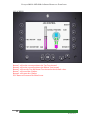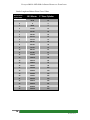
1
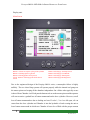
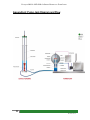
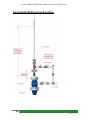
OPERATING MANUAL FOR
ECOQUIP SERIES 9000-6
AND 9000-6x HYDRAULIC
PUMP JACKS
Patent US # 5,996,688
Patent CDN #2,255,603
ECOQUIP 9000-6 AND 9000-6X SERIES HYDRAULIC PUMP JACKS
Table of Contents
1 - Pump Jack Features
2 - Pump Jack Specifications
3 - Operating Manual
4 - Notes for Completion Crew
5 - Installation of Slave Cylinders
6 - System Oil Fill and Startup
7 – Balancing the Unit
8 – Setting the Stroke Length and Turnaround Positions
9 – Starting the Unit
10 – Bleeding the Unit
11 – Shutdown and Draining of System
12 – Removal of Slave Cylinders
Appendix A: Pump Jack Diagram and Flow Sheet
Appendix B: Wellhead Configuration
Appendix C: Wellhead Mounting Procedure
6235A – 86th Avenue S.E. - Calgary, Alberta T2C 2S4
Phone: 403.255.5207 – Fax: 403.255.9150 – Email: [email protected] ECOQUIP 9000-6 AND 9000-6X SERIES HYDRAULIC PUMP JACKS
1.
Pump Jack Features
The ECOQUIP Series 9000-6 and 9000-6x Pump Jacks are a Canadian development in
hydraulic pump jacks for the operation of sucker rod pumps. Distinctive features of this pump
jack include:
o Due to the versatility and portability of the 9000 series pump jacks they are suited for well
testing and permanent pumping solutions. A single Ecoquip unit covers a wide range of
conventional pump jacks.
o The unit is lightweight and easily transported. It is moved to the field as a complete unit and
is completely set up and pumping the well in less than 3 hours.
o The unit does not require any site preparations or foundations. The slave cylinder assembly
mounts directly on the wellhead and does not require additional braces or supports. The power
unit can be set on grade – preferably on a gravel base or on a pair of short planks.
o Ecoquip’s pump jacks have minimal environmental, visual and noise impact.
o The 9000-6 series can lift up to 35,000 pounds polished rod load, has fully independent
stroke controls capable of less than 1 and up to 8 strokes per minute, stroke lengths up to 158”
(9000-6x), pumping speed can be adjusted to match well inflow rates, the unit can be set on a
timer for pumping in time intervals, up and down stroke speeds can be set independently
including a bottom turnaround pause to achieve the best pump efficiency.
o The motor is started without load. Therefore, the unit does not require high torque – slow
speed motors, clutches or gearboxes. Motors are normally operated at 1750 to 2000 RPM. The
unit can be powered by electric motor or piston engine (fueled by gasoline, diesel, LPG, clean
wellhead gas or natural gas).
o The Ecoquip pump jack is balanced with nitrogen which stores energy substantially
increasing efficiency as less power is required to operate the unit, as well as reducing the wear
on pumps, rods and equipment as it eliminates shock loading. The operator accurately balances
the unit by changing the pressure in the nitrogen gas accumulator.
3
Revised 1/15/14
ECOQUIP 9000-6 AND 9000-6X SERIES HYDRAULIC PUMP JACKS
o There are no open limit or proximity switches on the unit. The controls for the motion of
the sucker rod, including the stroke length, accelerations and decelerations, and stroke speed
are conveniently and safely located on the power unit. The unit has no exposed moving parts
to create a safety hazard.
o The Ecoquip pump jack series is field proven since 2000, operates in diverse environments
from -40º to +50º and has run continuously for 5 years with just routine field maintenance.
2. Pump Jack Specifications
This specification describes the primary features and capacities of an ECOQUIP Series 90006 Pump Jack. The unit consists of a skid mounted power unit and a slave cylinder assembly
that are combined into a single shipping unit. The slave cylinder assembly bolts to the wellhead
and strokes the polished rod. The power unit is placed about 20' from the well and powers and
controls the movement of the slave cylinders. All controls are mounted on the power unit.
Capacities
Maximum polished rod load: 35,000 lbs
Stroke length variable to: Maximum 144” on the 9000-6 unit and 158” on the 9000-6x unit
Pump Speed
The operator can adjust the pump speed over a range of less than 1 to 8 strokes per minute. Up
and down stroke velocities can be set independently.
Skid Size and Weight
The power unit is mounted on a 4' 6" wide x 10' long skid that is equipped with horns for lifting.
Estimated shipping weight of the power unit is 6,500 pounds and 2,000 pounds for the slave
cylinders.
Balancing
The unit is balanced with a nitrogen ballast. This ballast pressure is sufficient to hold the static
rod weight. During the down stroke of the polished rod, energy from rod downfall is recovered
4
Revised 1/15/14
ECOQUIP 9000-6 AND 9000-6X SERIES HYDRAULIC PUMP JACKS
and combined with energy from the hydraulic pump. This energy is fully recovered during the
polished rod up stroke. Nitrogen bottles are used to charge the gas accumulator. The unit can
be finely balanced to equalize loads on the motor in both the up and down strokes.
Slave Cylinders
The slave cylinder assembly is mounted to the wellhead by means of an adaptor plate. It permits
mounting of the slave cylinders on the wellhead directly above the tubing bonnet flange. Every
other stud is removed for flush, even mounting which guarantees the rod is always pulled direct
centre.
Hose Length
Standard 20' long hydraulic hoses connect the power unit to the slave cylinders. All electrical
and power equipment is approximately 20' from the well.
Lubricants
The hydraulic fluid is synthetic and has been selected to provide lubrication and suitable
viscosity for operation from -45º C to 82º C. The unit is delivered fully charged with hydraulic
fluids.
Motor
Motors are sized to suit the application. Motors may be electric, LPG, wellhead gas or diesel
fueled. Standard Type B, TEFC, 1750 RPM electric motors are suitable, as motors are not
started under load. Engine operating RPM can be from 1750 to 2000 RPM and a clutch is not
required.
5
Revised 1/15/14
ECOQUIP 9000-6 AND 9000-6X SERIES HYDRAULIC PUMP JACKS
3. Operating Manual
Principles of Operation
A simplified flow sheet of the Series 9000-6 unit is shown below (enlarged as Appendix A).
There are two primary components to this unit - a slave cylinder assembly, which mounts on
the wellhead above the tubing flange and a skid mounted power unit, which is placed about 20
feet from the well. There are two closed loop hydraulic systems, one between Chamber A and
the slave cylinders and a second one between the swash plate hydraulic pump and Chambers B
and C.
6
Revised 1/15/14
ECOQUIP 9000-6 AND 9000-6X SERIES HYDRAULIC PUMP JACKS
Power Unit
The power unit consists of the master cylinder, a hydraulic pump, motor and a control panel.
i. Master Cylinder
The master cylinder has four chambers, “A, B, C and D”, which are created by a free floating
piston inside the master cylinder. At the top of the master cylinder (open end) is an accumulator
which is used to store energy during the sucker rod downward movement and which releases
energy during the sucker rod upstroke. The piston moves vertically within the cylinder in the
opposite direction to the polished rod.
Chamber A is connected to the slave cylinders by means of a pair of hoses. The operating
principle of chamber A and the slave cylinders is comparable to the hydraulic brake system on
an automobile. Oil is moved from the master brake cylinder to the wheel cylinders to apply the
brakes when the brake pedal is depressed. As the brake pedal pressure is removed oil flows from
the wheel cylinders back to the master brake cylinder. The Series 9000-6 hydrostatic pump uses
this same principle. Oil is displaced from chamber A to the slave cylinders causing them to rise
when the piston in the master cylinder moves downward. The piston will rise when the polished
rod moves down because oil is moved from the slave cylinders back to chamber A of the master
cylinder.
Chamber D of the master cylinder is the accumulator. It is a closed chamber that is filled with
pressurized nitrogen. It acts to store energy during the down stroke of the polished rod for use
in moving the polished rod upward.
Chambers B and C are where energy is added to the system. Chamber B is pressurized with oil
from the hydraulic pump during the polish rod up stroke. The hydraulic pump pressurizes
chamber C during the polished rod down stroke. Chambers B and C are in a closed loop with
the pump. The pump draws oil from Chamber C and discharges into Chamber B when the
master piston is moving down. The direction of oil flow is reversed when the set limit of travel
is reached.
7
Revised 1/15/14
ECOQUIP 9000-6 AND 9000-6X SERIES HYDRAULIC PUMP JACKS
ii. Hydraulic Pump
A positive displacement swash plate-type pump provides the energy required for pumping. The
volume of fluid passing and direction of flow through the pump is controlled by changing the
angle of the swash plate. The angle of the swash plate is set by a signal received from the
motion controller in the control panel. The pump is directly connected to the prime mover, an
electrical motor or gas engine.
iii.Controller
The controller is the brains of the system. It tells the pump which direction to pass oil and at
what flow rate. The controller receives a continuous location signal from a probe that senses
the position of the master piston within the master cylinder. When the probe senses that the
master piston is at a preset travel position (such as the top of the stroke) the control panel
delivers a signal to the pump to change flow direction. Stroke length, polished rod velocity, top
turnaround and bottom turnaround acceleration are all considered by the controller in delivering
a signal to the hydraulic pump.
Slave Cylinders
The slave cylinders mount on the wellhead and provide the power to stroke the polished rod.
The assembly consists of twin cylinders mounted on either side of the polished rod, a traveling
cross yoke (green) to pick up the polished rod. A fixed yoke (connector plate) ensures the rod
is pulled straight and held in place. A rod clamp is applied above the traveling yoke.
Controls
There are three primary hardware items in the control system. These are the probe, which is
mounted on top of the N2 accumulator, the controller and the display unit. The probe accurately
senses the position of the master piston and sends this position by means of an electrical signal
to the controller. The controller determines what the pump must do - the flow rate and where
the oil is to be sent (chamber B or C) to meet the conditions set by the operator.
With this information - the operator presets the master piston position signal from the probe via
the display unit. The controller develops and sends an electrical signal to the pump for control
purposes.
8
Revised 1/15/14
ECOQUIP 9000-6 AND 9000-6X SERIES HYDRAULIC PUMP JACKS
Display unit:
Main Screen
Button 1 will start or stop the cycling of the cylinders
Button 2 will bring up the Jog Screen
Button 3 will bring up the Velocity Screen
Screen. Button 4 will bring up the Stroke Screen
Screen
Button 5 will bring up the Setup Screen
Button 6 will bring up User Manual.
Button 7 will bring up Timed option
Button 8 will bring up the Diagnostics
Due to the engineered design of the Ecoqiup 9000-6 series, a catastrophic failure is highly
unlikely. The two closed loop systems will operate properly while the internal seal groups on
the master piston are keeping all the chambers independent. On a failure what typically occurs
is that oil from Chamber A will leak past the bottom seal set on the master piston and the operator
will start to notice a gradual loss of bottom turnaround on the slave cylinders. However, not all
loss of bottom turnaround are due to leaking seal sets. If valve 1, 2 or 6 are left open, oil can
return from the slave cylinders and Chamber A into the hydraulic oil tank causing the unit to
loose bottom turn around in which case Chamber A has to be re-filled with the proper amount
9
Revised 1/15/14
ECOQUIP 9000-6 AND 9000-6X SERIES HYDRAULIC PUMP JACKS
of oil to correct the loss of bottom turnaround. The other possible failure is nitrogen leaking from
Chamber D past the top seal set on the master piston and the operator will start to notice the
prime mover working harder and reduced strokes per minute. 4. Notes for Completion Crew
o The area where the power unit is to be located should be about 20’ from the well head, 6"
above the adjacent grade and the surface should be level and preferably graveled. Setting the
unit on 2 (2" x 8" x 6') long planks will keep the frame out of the base material.
o Install a minimum 6" long pipe nipple between the tubing hanger flange and the ratigan/BOP.
We find on some wellheads that our slave cylinder mounting flange interferes with the hammer
locks stems on the ratigan. Raising the BOP eliminates this interference.
o The ratigan stem and the production tee should be located parallel with one another (i.e. inline with one another)
o The polished rod should extend a minimum of 10 feet above the tubing hanger flange with
the pump at the bottom of its travel. Do not tighten the pony rod on the polished rod, as it must
be removed to install a rod retainer bushing and extension polish rod during installation.
o The power unit weighs about 6,500 lbs. The picker should be capable of lifting t h i s
w e i g h t a t 1 5 f e e t and setting the power unit on the graveled pad. The picker is also needed
to set the slave cylinders in place. The weight requirement is approximately 2,000 lbs and needs
to reach a height of about 30 feet.
o A rod clamp is required for placement above the traveling yoke, in addition to the rod clamp
left in place above the stuffing box.
o See Appendix B for Wellhead Configuration Diagram.
10
Revised 1/15/14
ECOQUIP 9000-6 AND 9000-6X SERIES HYDRAULIC PUMP JACKS
5. Installation of Slave Cylinders
1. Slightly loosen the bolts located on the hoses at the bottom of the slave cylinders. This allows
the hoses to rotate and makes mounting easier.
2. Secure slings in lifting horns located at top of slave cylinders ensuring no pressure is put on
hoses, fitting or valves.
3. If not already done, remove half of the mounting plate. This should be the half that is facing
the open sides of the traveling yoke and the slave cylinder top plate.
4. Remove studs from wellhead as described in Appendix C.
5. Place the removed half of mounting plate on the wellhead and align holes accordingly. Place
one short stud in the middle hole to keep plate in place. Next move the lifted slave cylinders
into appropriate position above wellhead. Bolt slave cylinder assembly to wellhead and ensure
that half-mounting plate is reattached to slave cylinders using the two bolts provided. (see
Appendix C)
6. A person must be lifted to the top of the slave cylinders (using a man basket or man sling)
to remove the pony rod from the polished rod. This is done to enable the placement of a rod
retainer bushing over the rod and securing it in the traveling yoke. A rod rotator can be installed
at this time if required. Apply rod clamp(s) above the traveling yoke (or rod rotator if present)
and then replace the pony rod. Ensure the valve V8 at the top of slave cylinders is OPEN.
7. Attach all hoses to the power unit. The two large hoses located at the bottom of the slave
cylinders attach to the ports leading to chamber A of the power unit. The small hose coming
from the top of the slave cylinders attaches to valve V7 located on the hydraulic oil tank of the
power unit.
8. Re-tighten the bolts, as described in Step 1, to hold the hoses in to place.
9. After the system has been charged with oil, the rod clamp above the stuffing box must be
removed.
NOTE: Two rod clamps are required for loads exceeding 22,000lbs.
11
Revised 1/15/14
ECOQUIP 9000-6 AND 9000-6X SERIES HYDRAULIC PUMP JACKS
6. System Oil Fill
After the slave cylinders are installed and all hose connections have been tightened the unit is
charged with oil.
1. Go to the main screen. Press button “2”. This brings up the “JOG” Screen
2. Open valves V6 and V1. This allows oil from the pump to be discharged into chamber A.
The pressure (approx. 300 psi) may be sufficient to raise the slave cylinders.
o If the slave cylinders rise, close V1 and extend slave cylinder down by pressing and holding
#8 Retract. This will lower the “Actual Position” number on the screen. Note that you should
bring down the green traveling yoke to 4-6” above the fixed yoke connector plate. If desired
bottom turnaround is not reached, re-open V1 and allow oil to enter system and raise slave
cylinders again, then close V1 and repeat holding down #8 Retract until desired bottom
turnaround is reached.
o If the slave cylinders do not rise from initial pressure, press and hold #8 Retract (V1 is open)
until the desired stroke bottom setting is displayed in “Actual Position” on the screen. Ensure
that you leave 4-6” of space between the traveling yoke and the fixed yoke connector plate.
3. Now close valve V1. Press #7 Extend key to raise slave cylinders a few inches, (refer to
travel chart on page 19) then remove the rod clamp above the stuffing box.
4. The unit is now ready to have the bottom and top turnaround settings for the master piston
set, which in turn, produce the stroke length.
see picture of “Jog Screen” on next page
12
Revised 1/15/14
ECOQUIP 9000-6 AND 9000-6X SERIES HYDRAULIC PUMP JACKS
JOG SCREEN
Button 3 will set the current position as the Top Turn Around.
Button 4 will set the current position as the Bottom Turn Around.
Button 5 will reset the Top and Bottom Turn Around to their default values.
Button 7 will extend the cylinders.
Button 8 will retract the cylinders.
ESC Button will return to the Main Screen.
13
Revised 1/15/14
ECOQUIP 9000-6 AND 9000-6X SERIES HYDRAULIC PUMP JACKS
7. Balancing the Unit
The unit is balanced by changing the pressure in the accumulator (chamber D). Nitrogen is
added or released through a #6 JIC port located below the nitrogen pressure gauge.
Increasing the ballast pressure, by adding nitrogen, until the slave cylinders begin to rise puts
the unit in static balance. At this point the nitrogen pressure is sufficient to support the weight
of the polished rod load.
The pressure in the nitrogen chamber may require adjustment to reach dynamic balance. If the
unit is working harder in the sucker rod up stroke, the nitrogen pressure should be increased.
Inversely, if it is working harder during the down stroke, the nitrogen pressure should be
reduced.
To ensure that the system is in balance, you can verify using one of the following methods.
o Take the maximum and minimum pressure measurements (psi) from gauge A (to read Gauge
A, open V6 at the bottom of the master piston). Add these together and divide by two, this
number will be the same as the reading on the nitrogen pressure gauge if the unit is in balance.
Please remember to close V6 again.
o If the maximum measurements (psi) are the same on gauges B and C while unit is stroking,
then the unit is in balance.
NOTE: Ambient temperature changes will result in a change in accumulator pressure.
Therefore, balancing should be done to suit the mean daily temperature rather than the
high or low daily temperature. 8. Setting the Stroke Length and Turnaround Positions
The Series 9000-6 slave cylinders when provided with 3" diameter cylinders will move a
theoretical 6.15" for each 1" change in master piston position. Therefore, to perform a 120"
stroke the turnaround points should be set a theoretical 19.5" apart. Momentum and oil
compressibility increase the stroke length as the pumping speed increases, therefore the desired
stroke length should be set for the maximum expected pumping speed to prevent over-stroking
the slave cylinders. At slower pumping speeds a slight reduction in stroke length will be realized.
Now the unit is ready to have the stroke length set. Stroke length is set by setting the traveling
distance of the master piston, which is the difference between the STROKE TOP and STROKE
14
Revised 1/15/14
ECOQUIP 9000-6 AND 9000-6X SERIES HYDRAULIC PUMP JACKS
BOTTOM settings (i.e. Stroke Bottom Setting 8" and Stroke Top Setting 23” would give 15”
of master piston travel, thus giving you a 92" stroke with 3" slave cylinders and 109” stroke
with 2.75” slave cylinders as defined by the Stroke Length and Master Piston Travel chart).
Desired stroke length can be obtained using chart on the following page.
NOTE: Ensure that only the minimum amount of oil is used to extend the slave cylinders.
Over extension occurs at 144” when using 3” slave cylinders, therefore when there is 23”
of travel by the master piston.
15
Revised 1/15/14
ECOQUIP 9000-6 AND 9000-6X SERIES HYDRAULIC PUMP JACKS
Stroke Length and Master Piston Travel Chart
Master Piston Displacement 10.5 Master 3" Slave Cylinder 86.62 14
0 0 0 1 86.62 6 2 173.25 12 3 259.87 18 4 346.49 24 5 433.12 31 6 519.74 37 7 606.36 43 8 692.99 49 9 779.61 55 10 866.23 61 11 952.86 67 12 1039.48 73 13 1126.10 80 14 1212.73 86 15 1299.35 92 16 1385.97 98 17 1472.60 104 18 1559.22 110 19 1645.84 116 20 1732.47 122 21 1819.09 129 22 1905.72 135 23 1992.34 141 24 2078.96 147 25 2165.59 153 16
Revised 1/15/14
ECOQUIP 9000-6 AND 9000-6X SERIES HYDRAULIC PUMP JACKS
Setting Stroke Length Procedure
1. On the main screen press button #4. This brings you to the Stroke Screen.
Left and Right Arrow Button will select the setting to adjust.
Up and Down Arrow Button will adjust the selected setting.
Button 8 will switch between adjusting the inches and hundredths of an inch.
OK Button will save the setting value.
ESC Button will return to the Main Screen
NOTE: If stroke speed is to be set to HIGH range, you must allow for possible over
travel for both your turnaround settings. (i.e. stroke bottom is 3” and stroke top is
23”, the settings should be adjusted to 3.5” and 22.5” respectively).
17
Revised 1/15/14
ECOQUIP 9000-6 AND 9000-6X SERIES HYDRAULIC PUMP JACKS
9. Starting the Unit
Go to Main screen and press #2 JOG. Using #7 Extend and #8 Retract, cycle the unit through
one up – down cycle, stopping the upward travel (of the slave cylinders) at your set
turnaround. At the low point, the slave cylinders should be about 4-6” above the fixed yoke
connector plate at the top of the slave cylinders.
1. If the slave cylinders are bottoming out, stop the unit and add a slight amount of oil to
the system. If the slave cylinders are turning around more than 4-6" above the top of the
fixed yoke connector plate drain some oil from the system by opening valves V6 and only
on the down stroke V2 (intermittently) – you can hear the oil come into the tank.
2. Repeat until the correct amount of oil is in the system. This is achieved when the bottom
turnaround is taking place with the traveling yoke not more than 4-6" above the fixed yoke
connector plate.
3. Start increasing the pumping speed by moving the SPEED UP and SPEED DOWN to
the next position. Monitor the slave cylinder’s action and turnaround positions. Increase
the speed until the desired strokes per minute is achieved.
See next page for Velocity Screen Picture
18
Revised 1/15/14
ECOQUIP 9000-6 AND 9000-6X SERIES HYDRAULIC PUMP JACKS
VELOCITY SCREEN
Left and Right Arrow Button will select the setting to adjust.
Up and Down Arrow Button will adjust the selected setting.
OK Button will save the setting value.
ESC Button will return to the Main Screen.
19
Revised 1/15/14
ECOQUIP 9000-6 AND 9000-6X SERIES HYDRAULIC PUMP JACKS
10.
Bleeding the System
The system may have to be purged of air at some time. It is possible that air can enter the system,
therefore affecting the operations of the pump jack. (V = Valve)
1. Ensure that motor and pump are running.
2. Ensure V7 is closed and disconnect from oil tank. Place end in filler cap opening on top
of tank for observation.
3. Ensure V8 is open at the top of the slave cylinders.
4. Now open V1, V6 and V7. This will allow a full circulation of the system. This should
continue until there is a steady stream of oil being observed from V7, with NO air remaining
in the oil.
5. When this occurs, close V8 at top of slave cylinders and reconnect V7 to the oil
reservoir.
6. The system is ready to be filled. Follow the instructions in section 6.1 System Oil Fill.
NOTE: This is best done with master piston at bottom (approx. 24.7” reading at “Actual
Position” on JOG Screen) and the slave cylinders at their bottom position.
NOTE: Before beginning this procedure, ensure the valve (V8) located at the top of the
slave cylinders is open.
20
Revised 1/15/14
ECOQUIP 9000-6 AND 9000-6X SERIES HYDRAULIC PUMP JACKS
11.
Shutdown and Draining of System
1. Stop the unit with the polished rod near the bottom of its stroke, 12” above the fixed yoke.
2. Apply a rod clamp above the stuffing box.
3. Turn the motor off.
4. Open valves V6 and V2, this drains oil from chamber A into the reservoir. Watch the oil
level in the reservoir to ensure it does not overflow.
5. As oil is drained from the system, the slave cylinders will lower until the rod clamp takes the
rod load.
6. The master piston will be pushed to its bottom position by nitrogen pressure in chamber D.
7. The master piston has reached its bottom travel when this screen reads approximately 24.7”
and oil flow stops. Slave Cylinders should be at bottom position now. Now close valves V6
and V2.
NOTE: At this point there is no pressure on the slave cylinders and, as the master piston
has bottomed out, there is no danger from potential movement of the slave cylinders. It is
safe to start work on and around the slave cylinders.
21
Revised 1/15/14
ECOQUIP 9000-6 AND 9000-6X SERIES HYDRAULIC PUMP JACKS
12.
Removal of Slave Cylinders
1. Remove the top rod clamp above the travelling yoke.
2. Remove the rod bushing from the traveling yoke and take off the rod. The pony rod may
have to be removed to do this.
3. Attach a sling to the horns provided on the sides of the stationary yoke.
4. Loosen the bolts at the hose connections at the bottom of the slave cylinders until the hoses
can be rotated by hand, but not so loose that oils seeps out. Also, disconnect these hoses from
chamber A of the power unit.
5. Disconnect the hose connected to V7. At this point, it is important to put caps and plugs on
hydraulic pump, port V7 and all hoses respectively.
6. Remove all 8 studs that bolted slave cylinder assembly to wellhead. In addition, remove the
two studs from half the mounting plate facing the open end of the top of the slave cylinders.
Check Appendix A for stud locations. The slave cylinder assembly is ready to be lifted from
the wellhead.
7. Power unit and slave cylinders are now ready to be loaded and transported.
NOTE: Ensure the hoses connections and all caps and plugs are secured in place on all
hoses to prevent leakage while in transport. Also, ensure that the split mounting plate, rod
bushing and extended studs are all transported along with the unit.
22
Revised 1/15/14
ECOQUIP 9000-6 AND 9000-6X SERIES HYDRAULIC PUMP JACKS
Appendix A: Pump Jack Diagram and Flow
23
Revised 1/15/14
ECOQUIP 9000-6 AND 9000-6X SERIES HYDRAULIC PUMP JACKS
Appendix B: Wellhead Configuration
24
Revised 1/15/14
ECOQUIP 9000-6 AND 9000-6X SERIES HYDRAULIC PUMP JACKS
Appendix C: Wellhead Mounting Procedure
WELLHEAD INSTALLATION
2000LB Well head: Stud A – 1” x 11”
Stud B – 1” x 15”
3000lb Well head: Stud A – 1 1/8” x 11”
Stud B – 1 1/8” x 15”
5000lb Well head: Stud A – 1 3/8” x 15”
Stud B – 1 3/8” x 18”
Bolt C ia and ib: 1 ¼” x 5 ½” Gr. 8 bolts
25
Revised 1/15/14