1
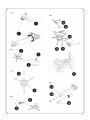
PRIMUS
®
MultiFuel Stove
Part No. 328894
User Manual and
Product Specifications
IMPORTANT
Read instructions before operation.
Instuctions for use
Fuels and performance
IMPORTANT: Read these instructions
carefully before connecting the appliance to
the gas cartridge or liquid fuel bottle. Study
the instructions at regular intervals to remain
familiar with the operation of the appliance
and keep them for future reference. Failure
to follow these instructions may result in
serious injury or death!
Jet 45 (0.45mm)
• Primus cartridge gas (propane/butane mix)
is the ideal fuel for the MultiFuel EX stove.
The fuel is very easy to use, normally requires
no priming, and is efficient, environmentally
friendly and clean (no soot). Minimum
maintenance and cleaning are required.
CAUTION: This appliance consumes air
(oxygen) and produces carbon dioxide. To
avoid danger to life, NEVER light or use the
appliance in an unventilated space, indoors,
in a tent, in a vehicle or In any other enclosed
area.
Use outdoors only!
NEVER cover the stove (gas cartridge or
liquid fuel bottle) with a wind shield, rocks
or similar which may cause overheating or
damage to the stove and cartridge/fuel bottle.
Overheating a gas cartridge or liquid fuel
bottle in this way is highly dangerous.
Jet 37 (0.37mm)
• Primus PowerFuel, high quality white gas
(MSR® White Gas/ Coleman® Fuel) affords
clean combustion and leaves practically no
deposits in the fuel system.
• Vehicle petrol should be used only in
exceptional cases since it contains additives
which are harmful to your health and also
leave deposits in the fuel system.
• For health reasons, leaded petrol should
never be used. Jet 28 (0.28 mm)
• Although kerosene is available worldwide, it
creates more soot, is more difficult to prime
and necessitates frequent cleaning.
• Diesel oil may be used if no other fuel is
available. Diesel oil burns with a very sooty
flame, talces a long time to preheat and
necessitates frequent cleaning.
1. Introduction
2. Safety information (fig. 1)
1.1 This appliance is designed for use only
with Primus 2202, 2206 and 2207 gas
cartridges containing propane/butane gas
mixtures or Primus liquid fuel bottles for white
gas, Primus PowerFuel, (MSR® White Gas/
Coleman® Fuel), unleaded petrol, paraffin and
other, equivalent fuels.
2.1 Ensure that the appliance and pump seals
(1) are in place and in good condition before
fitting the gas cartridge or liquid fuel bottle.
1.2 Any attempt to fit another type of gas
cartridges or liquid fuel bottle may be
dangerous. This may result in leakage, leading
to injury or death.
1.3 Gas consumption: 180 ph / 8,000 Btu/h
(approx. 2.3 kW) at 1 bar pressure. (Canada:
Gas: 12000 Btu/h, white gas/kerosene 8000
Btu/h)
1.4 Jet size: 0.45 mm for Primus disposable
cartridges. Jet size: 0.37 mm for white gas
Primus PowerFuel, (MSR® White Gas/
Coleman@ Fuel) and unleaded petrol. Jet size:
0.28 mm for kerosene and similar fuels.
1.5 The appliance complies with EN 521,
Z21.72b-2002/CSA 11.2b-2002 and CSA
B140.9.2-1975. The CE approval (EN 521)
regards only LP Gas.
1.6 Ensure at all times that the hose
between the cartridge and stove is straight,
and cannot come in contact with the flame
or hot gases. Ensure that the hose is not
twisted or subject to abrasion.
2.2 The appliance may be used outdoors
only. NEVER light or use the appliance in an
unventilated space, indoors, in a tent, in a
vehicle or In any other enclosed area.
2.3 The appliance must be operated on a level
surface.
2.4 Ensure that no flammable materials or
spilled fuel are present in the vicinity of the
appliance (see 4.8.6 and 6.8.6).
2.5 Always fit or replace the gas cartridge/
liquid fuel bottle in a safe place. This should
be done outside only, away from possible
sources of ignition, such as naked flames,
pilot lights and electric fires, and well away
from other people.
2.6 In the event of a leak from your appliance
(as indicated by a smell of gas, white gas
etc.), remove the stove immediately to a
well-ventilated location outdoors, away from
possible sources of ignition, where the leakage
can be investigated and corrected. Checking
the correct operation of the appliance when
using cartridge gas should only be carried
out outdoors. NEVER check for leaks with a
naked flame, use soapy water.
2.7 Never use an appliance with damaged or
worn seals. Never use a leaking, damaged or
malfunctioning appliance.
2.8 Never leave the applance unattended
when lit.
2.9 Do not allow pans to boil dry.
3. Handling the appliance
and contact your local dealer.
3.1 Be careful not to touch the hot parts of the
appliance during or after use.
4.6 Swing the legs (pan supports) (12) into
position in the wind shield (11).
3.2 Storage: Always unscrew the cartridge or
liquid fuel bottle from the appliance when not
in use. Store the cartridge or bottle In a safe,
dry place away from heat.
4.7 The stove is now ready for use.
3.3 Do not misuse the appliance, or use it for
any purpose other than that intended.
3.4 Handle the appliance with care. Do not
drop it.
4.8.1 Aways place the appliance on a steady
surface. Ensure that the hose is fully extended,
and that it is run straight between the cartridge
and stove. Keep the cartridge clear of the heat
of the appliance.
4.8.2 First turn the shut-off valve (2) counter
clockwise and light the burner (4) immediately.
4.8.3 Adjust the flame using the shut-of valve
(2).
4. Assembling and operating
the appliance with a gas
cartridge (fig. 2 and 4)
4.01 It is absolutely essential that the
fuel line be completely clear of liquid fuel
when cartridge gas is used, otherwise a
dangerously high flame will result! (See
6.8.7 for instructions on how to drain the
fuel system.) Also ensure that a 0.45 mm jet
is installed.
4.8.4 Affer lighting, keep the appliance upright
and do not move it around. A high flame may
occur if the appliance has not been preheated
fully or if it is moved without care.
4.8.5 After use, close the shut-off valve (2).
4.8.6 A minimum clearance must be
maintained with flammable materials. The
minimum permissible clearance between
the appliance and ceiling, and between the
appliance and the nearest, wall, is 1250
mm. These minimum clearances must be
observed to prevent a fire hazard.
4.1 Ensure that the shut-off valve (2) are fully
closed (by turning the knob fully clockwise).
4.2 Keep the cartridge (3) upright when fitting
it to the valve. 4.3 Place the valve squarely on
top of the cartridge (as shown in Fig .2).
4.4 Screw the cartridge carefully into the valve
until it meets the O-ring, taking care not to
cross-thread the cartridge. Hand-tighten only.
Do not over-tighten, otherwise the cartridge
valve may be damaged.
4.5 Ensure that the gas seal is tight. Carry out
checks outdoors. NEVER use a naked fame
to check for leaks. Apply warm, soapy water
to the joints and connections, and observe
for leaks in the form of bubbles around the
suspect area. If in doubt, or if an escape of
gas can be heard or smelled, do not attempt
to light the appliance. Unscrew the cartridge
5. Changing the cartridge
5.1 Close the shut-off valve (2) fully. Ensure
that the fame is extinguished and that there is
no other fame source in the vicinity. Change
the cartridge outdoors away from other
people. Unscrew the cartridge tom the valve
and replace the O-ring seal if cracked or worn.
Avoid cross-threading by placing the valve
squarely on tile cartridge thread, and handtighten only as described in section 4.
6. Assembling and operating
the appliance with liquid fuel
(figs. 3 and 4)
6.01 The appliance is delivered with three jets.
Jet 45 is for cartridge gas, jet 37 for white gas
and unleaded petrol, and jet 28 for kerosene,
diesel oil and similar fuels. Ensure that the
correct jet is installed.
6.02 Fill a Primus fuel bottle to the fillng mark
with liquid fuel. NOTE! Never overfill the bottle!
5.1 Ensure that the shut-off valve (2) are fully
closed (by turning the knob fully clockwise). 82
Screw the pump (21) into the fuel bottle (20).
8.3 Screw the fuel pump swivel coupling
(22) carefully into the valve until it meets the
control valve O-ring (as shown in Rg. 3). Be
careful not to cross-thread the connection.
Hand-tighten only - overtightening will
damage the connection.
6.4 Swing the legs (pan supports) (12) into
position in the wind shield (11).
6.5 Pump about 20 full strokes, or more if the
fuel level is below the filling mark on the fuel
bottle.
6.6 Place the fuel bottle on a firm, level
surface with the text ‘ON’ the fuel pump facing
upward.
6.8.1 Always place the appliance on a steady
surface. Ensure at all times that the hose
between the cartridge and stove is straight,
and cannot come in contact with the flame
or hot gases. Ensure that the hose is not
twisted or subject to abrasion. Keep
the fuel bottle away from the heat of the
appliance.
6.8.2 Open the shut-off valve (2). Allow fuel to
spray from the jet for about 2 seconds before
closing the control. If using kerosene or diesel,
or if the weather is cold and windy more fuel
will be required for preheating. In this case,
allow fuel to escape for 4-6 seconds.
6.8.3 Check for leaks at the shut-off valve,
fuel pump, jet, fuel hose and fuel line. DO
NOT USE THE APPLIANCE IF LEAKS ARE
PRESENT.
6.8.4 Light the priming pad. DO NOT LEAN
OVER THE APPLIANCE WITH YOUR HEAD
OR BODY! The priming pad will now burn
for about 40 seconds if white gas is used,
and for longer if kerosene or diesel is used or
if the ambient temperature is low. Open the
shut-off valve (2) slowly (by honing counter
clockwise) when the fuel in the priming pad
begins to run out, but before the flame has
expired completely. If the appliance burns
with a yellow or an unstable flame, priming
has been insufficient. Try closing the shut-of
valve (2) somewhat until a steady, blue flame
is established and allow the device to burn at
low power for a while to heat up. If the stove
still cannot be operated at full power, the only
course is to turn it off, allow it to cool fully
and repeat the priming procedure for a longer
period using more priming fuel. Remember
also that the stove must be shielded from the
wind during this procedure.
6.8.5 After lighting, keep the appliance upright
and do not move it around. A high fame may
occur if the appliance has not been preheated
fully or if it is moved without care.
6.8.6 A minimum clearance must be
maintained with flammable materials. The
minimum permissible clearance between
the appliance and ceiling, and between the
appliance and the nearest wall, is 1250 mm
(48 inches). These minimum clearances
must be observed to prevent a fire hazard.
6.8.7 To turn the appliance off and empty the
fuel system, turn the fuel bottle over so that
the ‘OFF’ on the fuel pump is facing upward.
When the flame has been extinguished
and air is flowing through the jet, close the
shut-off valve (2) by turning the knob fully
counterclockwise. Note! This procedure will
take about 1 minute. Allow the appliance to
cool before disassembling it.
6.8.8 NEVER relight a hot appliance. Hot
parts may vaporise the liquid fuel and cause a
dangerous ‘fireball’.
7. Maintenance
7.01 When using liquid fuels, the jet should
be cleaned regularly for optimum, trouble-free
operation. With extended use of liquid fuel, Of
fuel of poor quality, the fuel pipe in the stove
(30) can need cleaning, see section 7.5.
7.1 Cleaning the jet
Close the shut-off valve (2) and gas control (5),
and unscrew the cartridge or fuel bottle.
7.2 The Jet (10) can be cleaned in situ or when
unscrewed from the appliance.
7.3 Clean the jet using the cleaning needle (26)
supplied with the appliance.
7.4 Refit the jet and screw it home securely to
ensure a good seal. Fit a Primus cartridge for
added safety and check the joint with warm
soapy water. The appearance of bubbles
indicates that the joint is not sufficiently tight.
7.5 Cleaning the fuel pipe (Fig .5)
Disconnect the hose using multitools 36 & 37.
Use tool 37 to unscrew the connecting nut
and tool 36 to hold the fuel pipe. The fuel pipe
can then be cleaned by turning the centrally
positioned rod (30) 4-5 times forwards and
backwards (using tool 36 if required).
7.6 Fuel pump (Fig. Sj
It the pump does not pressurise the fuel bottle,
stretch the leather pump gasket (28) slightly
and lubricate it with Primus leather oil (saliva
or a mineral-based oil). Unscrew and withdraw
the pump rod. Rub oil into the gasket until
it becomes soft and pliable. If the pump still
fails to pressurise the fuel bottle, replace the
gasket or proceed to 77.
7.7 If the pump falls to maintain the pressure
in the fuel bottle, clean and chalk the nonreturn valve (29). Remove the valve and wipe
the rubber gasket with a cloth. Refit the valve.
7.8 Routine service and maintenance
Always ensure that the seats and O-rings are
correctly seated and are in good condition.
Carry out this check each time before
assembling the appliance. Replace the seals
if damaged or worn. New seals are available
from your local dealer
7.9 Multi-tool
The tool is used for removing and fitting the
jet (10), locknut (31), hose connection (32),
bottom screw (33) and priming pad lock (34).
See Fig. 5.
8. Hints and troubleshooting
Primus cartridge gas (propane/butane mix)
is the ideal fuel for the MultiEuei EX stove.
The fuel is very easy to use, normally requires
no priming, and is efficient, environmentally
friendly and clean (no soot). Minimum
maintenance and cleaning are required.
Primus PowerFuel, high quality white gas
(MSR® White Gas/ Coleman® Fuel) affords
clean combustion - although not as clean
as cartridge gas - and leaves practically no
deposits in the fuel system.
The stove is equipped with fuel filters in the
pump hose (35) This filter normally require no
other attention than replacement as required.
Taking care to avoid damage to the sealing
faces. Carry out leak testing as described In
4.5.
The factors which govern the output of stoves
running on cartridge gas are listed below, with
hints on how to increase (or maintain) output
in cold weather.
Factors affecting heat output
• Quantity of gas in cartridge
• Temperature of ambient air
• Initial temperature of gas
How to increase output in cold weather
• Preheat the cartridge by placing it upright in
1” (2.5 cm) of warrn water.
• Preheat the cartridge with your hands or
place it inside your jacket before connecting it
to the appliance.
Possible causes of reduced power
• Insufficient pressure in liquid fuel bottle
• Incorrect jet fitted
• Jet or jet filter blocked
• Fuel filter blocked
• Appliance not shielded from wind etc.
Possible causes of unstable, yellow flame
• insufficient priming
• incorrect jet
• Appliance not shielded from wind etc. Use
Primus windscreen and heat reflector or move
stove to sheltered location.
• Excessive pressure in fuel bottle due to
excessive pumping. Reduce power by closing
gas control.
• Old or poor-quality fuel
9. Service and repair
For your safety
9.1 Return the appliance to your local retailer
if a fault cannot be corrected using these
instructions.
If you smell gas
1. DO not attempt to light appliance
2. Extinguish any open flame
3. Disconnect from fuel supply
9.2 Never attempt any other maintenance or
repair.
9.3 Never modify the appliance since this may
make it unsafe.
9.4 The stove has been approved with a
factory-fitted hose. For this reason the hose
must NEVER be replaced by a type other than
the original.
10.PARTS AND ACCESSORIES
10.1 Use only Primus brand parts and
accessories. Take care to avoid touching hot
parts when filling parts and accessories.
10.2 Replacement cartridges; Use only Primus
2202,2205 or 2207 propane/butane mix gas
cartridges with this appliance. Replacement
fuel bottles: Use only Primus 721950 and
721960 fuel bottles with this appliance.
10.3 Parts are available from your Primus
dealer.
DO not store or use gasoline or other liquids
with flammable vapours in the vicinity or any
other appliance
DANGER: CARBON MONOXIDE HAZARD
This appliance can produce carbon monoxide
which has no odour. Using it in an enclosed
space can kill you. Never use this appliance in
an enclosed space such as a camper, tent, car
or home.
WARNING: Keep stove area clear and free
from combustible materials, gasoline and
other flammable vapours and liquids
WARNING: See too that no obstruction of
combustion or ventilation occur.
WARNING: See too that the flame on the
appliance is steady. The flame shall always
leave the stove straiaght upwards. Note. Wind
may press the flame down under the burner, if
that happens stop the stove immediately and
move it to a wind protected area.
WARNING: When the stove is in storage, the
gas canister has to be disconnected.
CUSTOMER SERVICE 1300 555 197
[email protected]
Distributed by
PRIMUS AUSTRALIA PTY LTD
Bundoora Victoria 3083
www.primusaustralia.com.au