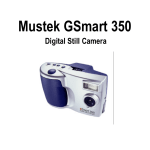
1
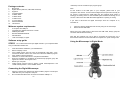
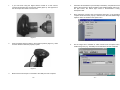
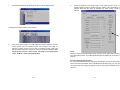
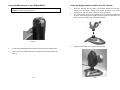
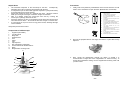
Parent Quick Start Guide
7.
You need the Adobe Acrobat Reader software to open the manual.
Click “Install Adobe Acrobat Reader 5.1” if your computer does not
While 4 in 1 E. Microscope is easy to install and use, the initial hardware
and software setup must be done by
have this software.
an adult. Please follow the
instructions below to get started.
8.
If you have the Adobe Acrobat Reader software installed, you can
read the manuals for the E.Microscope and the camera suite by
Do not attach the microscope to your computer yet! It is important to
clicking “E. Microscope Manual” and “ArcSoft Application Software
install the software first.
Manual” on the menu screen respectively.
1.
Insert the E.Microscope installation CD.
2.
Wait for the autoplay to start.
(If Autoplay does not automatically launch the installer, go to the
desktop and double-click on the icon named My Computer.
Double-click the icon for the CD-ROM/DVD drive that contains the E.
Under the environment with electrostatic discharge, the sample
may malfunction and require user to reset the sample.
Microscope software. Sometimes this will cause Autoplay to start. If
it doesn’t, double-click on the autorun.exe, and follow the setup
steps on this page.)
3.
Click “Install E. Microscope Driver” on the menu..
4.
Follow the steps by clicking the appropriate buttons.
5.
After finishing the driver installation. You can install the ArcSoft
camera suite by clicking “Install PhotoImpression” and “install
VideoImpression” on the menu screen.
6.
Follow the steps by clicking the appropriate buttons.
-i-
- ii -
“VideoCap” from the “E-Microscope” program group.
Package contents:
1.
2.
3.
4.
5.
6.
7.
8.
9.
10.
Microscope
Digital camera (with lens, USB cable and stand)
Eyepiece.
2 prepared slides
10 blank slides
12 blank labels
12 slide covers
12 cover glasses
Software CDROM
This manual
Minimum system requirements:
·
A computer with USB port
·
Intel Pentium II 350MHz Processor or faster
·
64MB System RAM
·
Windows 98SE/Me/2000/XP
·
CD-ROM drive
·
16-bit color display or higher
Software setup guide
Note:
For the location of the USB ports on your computer, please refer to your
computer’s user manual. To ensure that the digital microscope works normally, do
not connect or disconnect the USB cable from the computer while system is
starting up or shutting down. To avoid unstable system software functioning, do not
connect or disconnect the USB cable while application is opening or closing.
If you want to disconnect the digital microscope when the computer is on,
remember to:
1.
2.
Close any software application that currently using for the microscope.
Disconnect the USB cable.
Never pull on the cable portion to disconnect the USB cable, always grasp the
connector itself while disconnecting.
Note that the computer may not be able to recognize the microscope if it is
disconnected and then reconnected while the computer is in power saving mode.
Using the Microscope in Digital Mode:
STOP!!! Do not attach the microscope digital camera to your computer! Make
sure you install the software first.
1.
2.
3.
4.
5.
6.
7.
8.
Insert the software CDROM to your CDROM drive
Wait for autoplay to start
If the installer screen does not come up automatically, click “Start”, “Run”,
and execute the file “autorun.exe” of the CD to start the installation program.
Click “Install E. Microscope Driver”
Follow the on-screen instructions to complete the installation.
When the installation is completed, the E-Microscope program group will
appear as a folder in the Program menu.
Restart your computer.
Install ArcSoft Camera Suite by clicking “Install PhotoImpression” and
“Install VideoImpression” on the installer screen.
Connecting the Digital Microscope:
1.
2.
After the E-Microscope software has been installed, plug the microscope’s
USB cable into your computer’s USB port.
Go to the Windows Start menu to launch the software “AMCap” or
-1-
-2-
1.
If you have been using the digital camera module as a web camera,
unscrew the objective lens unit from the camera (figure 2). The eyepiece on
the microscope also needs to be removed.
4.
Install two AA size batteries (not included) in the battery compartment at the
base of the microscope. Place the slide on the sample platform and turn on
the light source, the bottom light source is recommended if using
transparent slide.
5.
Start “VideoCap” program from the Windows Start menu. If the message
“Capture device not found” pops up, make sure the “Microsoft WDM Image
Capture” device is checked in the Option menu.
6.
Set the image size to 640x480 in “Video Format” from the Option menu,
smaller image size (e.g. 352x288) is recommended for slower computers.
Figure 2
2.
Snap the digital camera module in the eyepiece position (Figure 3), make
sure the camera module sits properly in place.
Figure 3
3.
Make sure the microscope is connected to the USB port of the computer.
-3-
-4-
7.
Preview the slide image by checking “Preview” from the Option menu:
9.
If there is flickering in the image shown, from “Video Source” menu, try
checking different “Flicker” setting under the “Setting” tab until flickering is
reduced. Note that this option is available only when “Indoor” mode is
selected.
or clicking the “Preview” button on the tool bar:
8.
If the image is too bright or too dark, adjust the camera exposure. Choose
“Video Source” from the “Options” menu. If the image is too bright, try
selecting “Outdoor” mode. If it is too dark, try selecting “Indoor” mode. You
will also need to adjust the “Exposure” control for optimum brightness. Note
that if you can only see a white screen, the image is too bright. Please
select “Outdoor” mode as described above.
Focus:
Adjust the focus ring until the image on the computer screen looks clear. Focusing
may take a little practice. Try making small changes and waiting for the screen to
catch up.
Selecting different magnification:
You can choose different level by rotating the magnification ring on the microscope.
The current level is indicated on the magnification level label facing you. You will
feel a click if the lens is properly aligned. Levels of 100X, 200X and 300X can be
selected.
-5-
-6-
Single frame (still frame) capture:
In VideoCap, select Single Frame from the Capture menu:
To save the frame, select the Save Single Frame… option from the File menu:
Or press Capture Single Frame button when you are ready to save your image:
Save the image in the directory you selected:
-7-
-8-
Using the Microscope in non-Digital Mode:
Using the digital camera module as a PC camera:
1.
1.
Replace the digital camera module of the microscope with the removable
eyepiece for direct viewing (figure 4).
2.
Screw the objective lens unit back to the camera module if it has been
removed for microscope viewing. Care should be taken not to make
fingerprints or dust on the lens and the sensor of the camera.
The camera stand comes in two separate pieces, connect them together as
shown in the following picture. Make sure the top part is secured into the
base. Push downwards to connect the joint together.
Figure 4
3.
2.
Focusing and magnification level selection are the same as in digital mode.
3.
Please refer to the detail instructions of using the microscope starting from
page 12.
-9-
Place the camera unit on the stand as shown below.
- 10 -
4.
5.
6.
7.
8.
9.
Connect the camera module to the USB port of the computer
Start “VideoCap” program from the Windows Start menu. If the message
“Capture device not found”, make sure the “Microsoft WDM Image Capture”
device is checked in the Option menu.
Preview the slide image by checking “Preview” from the Option menu or
clicking the “Preview” button on the tool bar.
Adjust the focus by rotating the lens until a clear image is displayed.
You can take still pictures and save them in the computer using the same
procedure as described in the section “Using the Microscope in Digital
Mode”.
To use the camera module as a web camera for video conference, you need
to install applications like “Netmeeting” or “MSN Messenger”, which can be
downloaded from Microsoft’s web site. Please refer to the corresponding
application manual.
Handling note:
The image sensor of the camera is a delicate integrated circuit and must be
handled carefully. When you remove the lens from the camera, dust may fall on
the sensor. Only use a blower to clean the dust. Never touch the sensor.
Video Control:
Video Capture:
Still Capture:
Magnification:
We take great pleasure in introducing you to the world of Microscope.
Microscope refers to an instrument with lenses for making very small near
objects to appear larger. Because there are innumerable of living things that
cannot be seen with our naked eyes, microscope enables these invisible living
things to be seen effortlessly.
The discovery of microscope goes back many many years, and since the
invention it has exposed to a new field of exploration and study as more
attractive, and exquisite specimens as you ever imagined can be evidence.
In our new world of advanced technology, every science from the most
fundamental study of biology to the highly skilled fields of astro-physiology will
use some form of microscope. The mission of microscope allows anyone
from all walks of life to better comprehend the complexity forms of living
organisms or stagnant materials that construct this world in which we live in.
This microscope set will be the starting point to your many hours of fruition as a
hobby or broader your opportunity to a wonderful world of science.
Happy Experimenting!!!
Attention
Technical Specifications:
Image Sensor:
Color:
Interface:
Video Preview:
Welcome to the world of
Micro-Science ®
1/4.5 inch color CMOS (310k effective pixels)
24 bit RGB
USB (version 1.1)
30fps @320x240 pixels (CIF)
12fps @640x480 pixels (VGA)
PC software provides control for Auto or Manual white
balance, exposure, brightness, contrast, hue, saturation,
sharpness, gamma, 50/60Hz flicker filtering
30fps @320x240 pixels (CIF)
12fps @640x480 pixels (VGA)
30fps @320x240 pixels (CIF)
12fps @640x480 pixels (VGA)
100, 200, 300 (for 14” screen)
- 11 -
The following information should be read carefully in order to overcome
confusions.
This microscope set is appropriate for children over 8 years old. If not applied,
supervision of adult is required as this set comprises of functional sharp edge.
Before using the microscope, attentively and carefully read the instructions, follow
the guide, and have them for direction in case you need further helpful hints.
In any situation, be extreme caution to not allow chemicals to come into contact
with any part of the body, especially the eyes and mouth. Keep away young
infants and animals from the experiment. Always, reserve the microscope set in
a place where young infant is out of reach.
Eye protection is not provided, it can be obtained from any science departments,
and major shopping outlets. Remember, in case of accidents please seek
medical advice.
- 12 -
Helpful Hints
Procedures
•
1.
•
•
•
•
•
The essential component of the microscope is the lens. Consequently,
adequate care must be exercised when dealing with the lens.
It is important to put the removable eyepiece at position 1 (see picture below)
for viewing without the camera module.
Microscope should be stored in a moisture free place. Because moisture
build up on the light encourages a reduction in light concentration.
After it is utilized, protect the microscope from dust by covering the
microscope or placing it back into the box.
If the lens gets dusty or dirty, it is suggested to clear off the lens surface with a
soft cotton cloth or tissue. Do not rub the lens with a finger or unclean cloth.
If a microscope is not put to use for a long period of time, discharge the light
source batteries.
Firstly, insert 2 AA penlite dry cells batteries in the back of the base. You will
need to use a screwdriver to open the base. (Batteries are not included)
1.
2.
3.
4.
5.
6.
7.
8.
9.
Always keep instructions to hand.
10.
Components of a Microscope
11.
12.
1.
2.
3.
4.
5.
6.
7.
8.
9.
10.
11.
12.
Eyepiece (removable)
Focusing knob
Body tube
Objective lens
Arm
Stage
Clip
Clip adjustors
Non-transparency illuminator
Power switches for the illuminators
Base
Magnification revolving turret
13.
Only adults should install and replace
batteries and bulb.
Alkaline batteries are recommended.
Do not use rechargeable batteries.
Non-rechargeable batteries are not to be
recharged.
If the toy has not used for a long time, remove
the batteries.
Do not mix old and new batteries.
Do not mix alkaline, standard (carbon zinc) or
rechargeable (nickel-cadmium) batteries.
Exhausted batteries are to be removed from
the toy.
The supply terminals are not to be
short-circuited.
Only batteries of the same or equivalent type
as recommended are to be used.
Batteries are to be inserted with the correct
polarity.
Do not dispose of batteries in fire, batteries
may explode or leak.
Batteries may explode or leak if misused.
2.
Now put the prepared slide on the stage, and fasten it in place with the clip
adjustors.
3.
Next, choose the magnification strength you desire. In general, it is
recommended to begin with lower magnification for easier focusing. To
change the magnification setting, turn the magnification revolving turret until
you hear a click.
1
3
10
12
4
6
9
5
2
7
11
8
- 13 -
- 14 -
4.
Choose the illuminator for viewing. If an object is thin and crystalline, or when
light can advance through the object, use the transparency illuminator. For an
object which light does not advance through, use the non-transparency
illuminator.
1.
Temporary Mount
•
•
•
•
Wipe the slide and cover glass clean
Thin the sample with a razor blade. (Be extremely careful)
Then pick it up with tweezers, and put it on the centre part of the glass slide.
Next, add one drop of water on the sample with a dissecting needle. If the
sample is clear, add one drop of methylene blue or eosin solutions. (Be
extremely careful)
Gently put the cover glass on it, take care not to let any air bubbles in it.
Remove any excess water or dyeing solutions with blotting paper.
Now, it is ready for observation.
•
•
•
Remember to wash your hands immediately after doing the preparations and
dispose the dyeing solutions down the drain not into a sink.
5.
Look through the eyepiece and slowly adjust the focusing knob until the object
on the slide becomes clear. To view different part of the slide, adjust the clip
adjustors until the desired object appears through the eyepiece.
2.
Permanent Mount
•
•
Wipe the slide and cover glass clean.
Continue as above but before covering the slide with the cover glass, add few
drops of gum media (or Canada balsam) solution or transparent adhesive
glue with a dissecting needle to the slide.
Put down on the cover glass with tweezers or fix it in place, and leave it to dry
for about a day.
•
Replacing Light Bulb
How To Make a Prepared Slide
Caution: Light bulb could be hot after using. Do not change
Please note that if the given specimen is not thin and crystalline, it cannot be
inspected by the microscope. This is due to the fact that light from the reflector or
light source does not advance through.
•
•
light bulb immediately after using the microscope. Turn off all
power before changing light bulb.
Fibres of wool, pollen, or salt will be simple to see, and will not need a cover
glass.
Crystal-clear specimen are stain first with a drop or two drops of methylene
blue. Eosin or other dyeing solutions are available on the market.
Also note these are dyeing solutions, and thus could induce staining of clothing,
fabrics, and carpets. Extreme care should be handled when dealing with these
solutions.
- 15 -
- 16 -
Changing the Non-Transparency Illuminator light bulb
1.
2.
3.
4.
The microscope uses a 3V, 0.2A, TL-3 type light bulb.
Pull the back of the Non-Transparency Illuminator until the session comes out.
Remove the old light bulb by turning it anti-clockwise.
Put the new light bulb in place by turning it clockwise.
5.
Put the session back into the illuminator.
INSTRUCTION MANUAL
4 IN 1 PC LINK E. MICROSCOPE
Safety Recommendations:
Always seek medical attention in case of any doubts.
In case of:
•
Eye contact: Wash out eye with plenty of water, and if necessary holding
eye open.
•
Inhalation: Remove person to fresh air.
•
Cut: Cut should be washed in antiseptic solution, or clean water. Next step
is to put on a bandage.
•
Swallowed: Do not encourage vomiting. Wash out mouth with water, and
drink fresh water.
In any of the above situations, please contact a doctor.
WARNING!
Only for use by children over 8 years old. Only for use under
the supervision of adult. This toy contains functional edge.
CAUTION!
Read the instructions before use, follow them and keep
them for reference. Keep small children and animals away
from experiments. Store the microscope set out of reach
of small children. Eye protection for supervising adults is
not included.
- END -
Copyright © 2003 Eastcolight (Hong Kong) Ltd. All rights reserved.