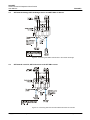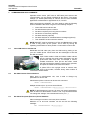
1
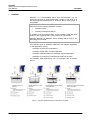
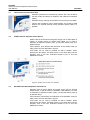
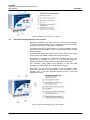
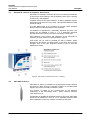
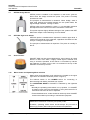
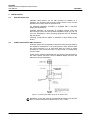
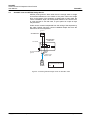
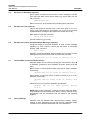
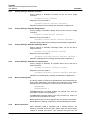
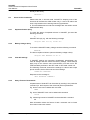
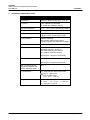
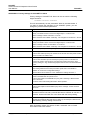
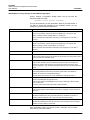
Labkotec Oy
Myllyhaantie 6
FI-33960 Pirkkala
FINLAND
Tel. +358 29 006 260
Fax +358 29 006 1260
Internet: www.labkotec.fi
13.08.2009
D15362Fe
SolarSET GSM
SolarSET GSM with a Beacon
Solar Powered Oil Separator Alarm Devices
User Manual
Copyright © 2009 Labkotec Oy
All rights reserved
SolarSET
Solar-Powered Oil Separator Alarm Device
User Manual
D15362Fe
TABLE OF CONTENTS
1 GENERAL ........................................................................................................................................... 3 2 OPERATION ....................................................................................................................................... 4 3 SYSTEM COMPONENTS ................................................................................................................... 5 3.1 Labcom 200 Communication Unit ............................................................................................. 6 3.2 OilSET-1000 Oil Separator Alarm Device ................................................................................. 6 3.3 SandSET-1000 Sand Separator Alarm Device ......................................................................... 6 3.4 SET-2000 Oil/Sludge Separator Alarm Device.......................................................................... 7 3.5 SET-2000 Hi Level/Oil Oil Separator Alarm Device .................................................................. 8 3.6 SET DM/3 Oil Sensor ................................................................................................................ 8 3.7 SET/S2 Sludge Sensor .............................................................................................................. 9 3.8 SET/OS2 High Level Sensor ..................................................................................................... 9 3.9 Xenon beacon ........................................................................................................................... 9 3.10 Mains Power and Operating Mode switches ............................................................................. 9 4 INSTALLATION ................................................................................................................................. 10 4.1 SolarSET Alarm Unit ............................................................................................................... 10 4.2 OilSET-1000 and SET DM/3 Oil Sensor.................................................................................. 10 4.3 SandSET-1000 and SET/S2 Sludge Sensor ........................................................................... 11 4.4 SET-2000 Oil/Sludge, SET/S2 Sludge Sensor and SET DM/3 Oil Sensor ............................. 12 4.5 SET-2000 Hi Level/Oil, SET/OS2 sensor and SET DM/3 sensor............................................ 12 5 COMMISSIONING AND COMMANDS ............................................................................................. 13 5.1 Insert SIM Card to Labcom 200 ............................................................................................... 13 5.2 Set Administrator Phone Numbers .......................................................................................... 13 5.3 Set Alarm Recipient (End User) Phone Numbers ................................................................... 13 5.4 Set Device or Site Name (optional) ......................................................................................... 14 5.5 Set Date and Time (optional) ................................................................................................... 14 5.6 Set Date and Time for Scheduled Status Messages (optional) ............................................... 14 5.7 Test SolarSET Functions with the Sensors ............................................................................. 14 5.8 Factory Settings ....................................................................................................................... 14 5.9 Other Useful Commands ......................................................................................................... 16 6 TEST AND MAINTENANCE ............................................................................................................. 17 7 TROUBLE-SHOOTING ..................................................................................................................... 18 7.1 SolarSET functionality test fails ............................................................................................... 18 7.2 Probe functionality test fails ..................................................................................................... 18 7.3 Device does not respond to SMS ............................................................................................ 18 8 TECHNICAL AND SAFETY DATA.................................................................................................... 19 APPENDIX A. FACTORY SETTINGS FOR SOLARSET OIL ALARM .................................................... 20 APPENDIX B. FACTORY SETTINGS FOR SOLARSET SLUDGE ALARM ........................................... 21 APPENDIX C. FACTORY SETTINGS FOR SOLARSET OIL/SLUDGE ALARM .................................... 22 APPENDIX D. FACTORY SETTINGS FOR SOLARSET HI LEVEL/OIL ALARM ................................... 23 APPENDIX E. CONNECTOR FLANGE .................................................................................................. 24 SYMBOLS
Warning / Attention
Pay special attention to installations at explosive atmospheres
Copyright © 2009 Labkotec Oy
2/24
All rights reserved
SolarSET
Solar-Powered Oil Separator Alarm Device
User Manual
1
D15362Fe
GENERAL
SolarSET is a solar-powered alarm and communication unit for
monitoring the level of liquid hydrocarbon, sludge or high level in oil
and sand separators/interceptors in locations where mains power is
unavailable.
NOTE! This user manual includes operating and installation
instructions for the following SolarSET versions:
•
SolarSET GSM
•
SolarSET GSM with a Beacon
In addition to all the GSM functions of the SolarSET GSM, the latter
version is also equipped with a xenon beacon for visual alarm.
SolarSET Beacon (i.e. SolarSET with a flashing beacon only) is not
described in this manual.
Four different types of SolarSET GSM units are available depending
on the application, namely:
-
SolarSET Oil Alarm for oil separators
-
SolarSET Sludge Alarm for sand separators
-
SolarSET Oil/Sludge Alarm for combined oil and sludge alarm
-
SolarSET Hi Level/Oil for combined high level and oil alarm
All SolarSET GSM applications can be equipped with a flashing
beacon.
Figure 1. SolarSET GSM alarm device application examples
Copyright © 2009 Labkotec Oy
3/24
All rights reserved
SolarSET
Solar-Powered Oil Separator Alarm Device
User Manual
2
D15362Fe
OPERATION
SolarSET GSM operates in low-power mode. Low-power mode
means that the system is sleeping most of the time and wakes up
every 60 minutes for 10-20 seconds (depending on the probe) to
check the oil, sludge or high level in the separator. All operations are
controlled by Labcom 200 communication unit.
TEXT MESSAGES
In case of oil, sludge or high level alarm, or probe failure, SolarSET
sends an alarm message as a text message (SMS) to end user’s
mobile phone or SCADA system. Alarms are also visible locally inside
SolarSET during the wake-up period.
SOLAR PANEL AND BATTERY
Solar panel charges the lead acid battery which powers Labcom 200
communication unit and the SET-1000 or SET-2000 separator alarm
unit. Charging of battery is controlled by a build in solar panel charge
controller in Labcom 200.
In normal use (with the factory settings) there is no need for
recharging or replacing the battery during its natural life time because
of the sophisticated low-power function of the system.
SolarSET GSM will function at least 2 months without having any
sunlight. When SolarSET GSM is equipped with a xenon beacon, the
operational time is much less in case of an alarm (see below).
Battery life time is normally about 5 years.
Please note that battery life time and operational time of SolarSET in
different cases depends on many things like amount of solar energy
per during the day and previous days, temperature, battery age and
the settings of your SolarSET system. Operational times presented in
this document are best estimates in particular cases.
XENON BEACON
When SolarSET GSM is equipped with a flashing xenon beacon, the
beacon will start flashing after the text messages have been sent.
Beacon will flash at least once every 5 seconds until the alarm goes
off. Alarm situation is measured every 60 minutes like is the case
when alarm is not active.
In case of an alarm, SolarSET is able to flash the beacon for about 10
days with no sun-light at all. In practise there is always some solar
power available, so SolarSET may function much longer, even with no
interruption at all.
With no alarms, SolarSET GSM with a flashing beacon will stay
operational for at least 2 months without having any sunlight.
Copyright © 2009 Labkotec Oy
4/24
All rights reserved
SolarSET
Solar-Powered Oil Separator Alarm Device
User Manual
3
D15362Fe
SYSTEM COMPONENTS
SolarSET consists of a lockable IP65 polycarbonate housing
containing OilSET-1000, SandSET-1000, SET-2000 Oil/Sludge or
SET-2000 Hi Level/Oil separator alarm device (12 VDC), Labcom 200
communication unit (12 VDC) with a charge controller, 12 V / 7 Ah
battery and operating switches.
Possible fail-safe probes are SET DM/3 oil probe, SET/S2 sludge
probe and SET/OS2 high level probe. Standard probe cable length is
10 meters and it’s extendable to 300 meters.
The following table lists the possible components and item numbers of
different SolarSET applications. Details of each component are
provided in the following chapters.
SolarSET Application
Components
Item Number
Separator Alarm Unit
Probe(s)
GSM only
GSM and
Beacon
SolarSET Oil Alarm
OilSET-1000 (sv1)
SET DM/3
8525605
8530386
SolarSET Sludge Alarm
SandSET-1000 (sv1)
SET/S2
8530057
8530387
SolarSET Oil/Sludge Alarm
SET-2000 Oil/Sludge
(sv1)
SET DM/3
SET/S2
8530072
8530388
SolarSET Hi Level/Oil Alarm
SET-2000 Hi Level/Oil
(sv1)
SET/OS2
SET DM/3
8530233
8530389
Table 1. SolarSET alarm unit combinations
Figure 2. SolarSET GSM and SolarSET GSM with Beacon - Components
Copyright © 2009 Labkotec Oy
5/24
All rights reserved
SolarSET
Solar-Powered Oil Separator Alarm Device
User Manual
3.1
D15362Fe
Labcom 200 Communication Unit
SolarSET operations are controlled by Labcom 200. User is able to
set and modify the settings of SolarSET with GSM text messages
(SMS).
SolarSET factory settings can be taken into use with just one SMS.
Labcom 200 includes a built-in GSM modem and a built-in GSM
antenna. An external antenna is also possible if signal quality is a
problem.
3.2
OilSET-1000 Oil Separator Alarm Device
OilSET-1000 is the Ex-barrier and power supply unit for SET DM/3 oil
sensor. A special version of OilSET-1000 called sv1 is used in
SolarSET to separate oil alarm (relay 1) and probe failure (relay 2) to
different relays.
LED indicators, push buttons and interfaces of the OilSET-1000 (12
VDC) control unit are described in figure 2.
Test button can be used to simulate an alarm condition. When
pressing the test button, all LEDs will be on and both relays will deenergise. Prior to the test, SolarSET should be put to Test and
Maintenance mode.
Figure 3. OilSET-1000 control unit – features
3.3
SandSET-1000 Sand Separator Alarm Device
SandSET-1000 is the Ex-barrier and power supply unit for SET/S2
sludge sensor. A special version of SandSET-1000 called sv1 is used
in SolarSET to separate oil alarm (relay 1) and probe failure (relay 2)
to different relays.
LED indicators, push buttons and interfaces of the SandSET-1000 (12
VDC) control unit are described in figure 3.
Test button can be used to simulate an alarm condition. When
pressing the test button, all LEDs will be on and both relays will deenergise. Prior to the test, SolarSET should be put to Test and
Maintenance mode.
Copyright © 2009 Labkotec Oy
6/24
All rights reserved
SolarSET
Solar-Powered Oil Separator Alarm Device
User Manual
D15362Fe
Figure 4. SandSET-1000 control unit – features
3.4
SET-2000 Oil/Sludge Separator Alarm Device
SET-2000 Oil/Sludge is an alarm device for monitoring the thickness
of the oil layer accumulating in the oil separator and the accumulation
of sludge or sand layer on the bottom of separator.
A special version of SET-2000 called sv1 is used in SolarSET to direct
both alarms (oil and sludge) to relay 1 and possible failures of both
probes to relay 2.
The SET DM/3 probe is for monitoring of oil layer while SET/S2 probe
monitors the accumulated sludge on the bottom of the tank.
Oil separator is regarded as a potentially explosive (Ex) area. The
probes can be installed in zone 0, 1 or 2 potentially explosive
atmosphere but the control unit must be mounted in a safe area.
LED indicators, push buttons and interfaces of the SET-2000
Oil/Sludge (12 VDC) control unit are described in figure 3.
Test button can be used to simulate an alarm condition. When
pressing the test button, all LEDs will be on and both relays will deenergise. Prior to the test, SolarSET should be put to Test and
Maintenance mode.
Figure 5. SET-2000 Oil/Sludge control unit – features
Copyright © 2009 Labkotec Oy
7/24
All rights reserved
SolarSET
Solar-Powered Oil Separator Alarm Device
User Manual
3.5
D15362Fe
SET-2000 Hi Level/Oil Oil Separator Alarm Device
SET-2000 Hi Level/Oil is an alarm device for monitoring the thickness
of the oil layer accumulating in the oil separator and to give a warning
of high level in the separator.
A special version of SET-2000 called sv1 is used in SolarSET to direct
both alarms (high level and oil) to relay 1 and possible failures of both
probes to relay 2.
The SET DM/3 probe is for monitoring of oil layer while SET/OS2
probe monitors the total liquid level in the separator.
Oil separator is regarded as a potentially explosive (Ex) area. The
probes can be installed in zone 0, 1 or 2 potentially explosive
atmosphere but the control unit must be mounted in a safe area.
LED indicators, push buttons and interfaces of the SET-2000 Hi
Level/Oil (12 VDC) control unit are described in figure 3.
Test button can be used to simulate an alarm condition. When
pressing the test button, all LEDs will be on and both relays will deenergise. Prior to the test, SolarSET should be put to Test and
Maintenance mode.
Figure 6. SET-2000 Hi Level/Oil control unit – features
3.6
SET DM/3 Oil Sensor
SET DM/3 oil sensor is installed into the light liquid storage chamber
and gives an alarm when the chamber is filled to a pre-determined
degree. The probe is normally immersed in water.
The function is based on the measurement of the electrical
conductivity of the surrounding liquid – water conducts electricity
much better than oil.
Oil separator is regarded as potentially explosive (Ex) area. SET DM/3
probe can be installed in a zone 0, 1 or 2 potentially explosive area
but the SolarSET control unit must be mounted in a safe area.
Copyright © 2009 Labkotec Oy
8/24
All rights reserved
SolarSET
Solar-Powered Oil Separator Alarm Device
User Manual
3.7
D15362Fe
SET/S2 Sludge Sensor
SET/S2 probe is installed in the separator or tank and it gives an
alarm when the sludge reaches the probe. The probe is normally
immersed in water.
The principle of measurement is ultrasonic. When sludge, sand or
other solid particles accumulate between the two probe heads, the
signal strength weakens, causing an alarm.
SET/S2 probe can be installed in a zone 0, 1 or 2 potentially explosive
atmosphere but the control unit must be mounted in a safe area.
This probe requires slightly different settings of the systems than SET
DM/3. See chapter “Commissioning” for more details.
3.8
SET/OS2 High Level Sensor
SET/OS2 probe is installed above separator’s outlet’s upper level. It
monitors the total level of the separator, regardless of existence of the
oil layer or sludge in the separator.
The principle of measurement is capacitive. The probe is normally in
the air.
3.9
Xenon beacon
SolarSET GSM can also be equipped with a xenon beacon for visual
alarms. In case of an alarm, a highly visible signal is flashed once
every 5 seconds. Operation of the beacon is controlled by Labcom
200. Beacons’ IP-rating is IP67, and it is mounted on the top of the
SolarSET enclosure by screws.
3.10
Mains Power and Operating Mode switches
Mains power and Operating mode switches are located at the upper
right corner of SolarSET enclosure (note 5 in figure 2).
The leftmost switch is the POWER switch for connecting or
disconnecting both battery terminals from system.
The OPERATING MODE of SolarSET is selected by the rightmost
switch:
• Normally the operating mode switch is in up position, i.e. SolarSET
is sleeping most of the time and wakes up every 60 minutes for 15
seconds to check the oil level in separator.
• Test and Maintenance –mode should be used only when SolarSET
needs to be waked up for testing or maintenance purposes.
Please, note that SolarSET consumes much more power in Test and
Maintenance mode than in Normal (Low-power) mode.
Therefore, operating mode switch should always be put back to
Normal (up position) after testing and maintenance operations!
Copyright © 2009 Labkotec Oy
9/24
All rights reserved
SolarSET
Solar-Powered Oil Separator Alarm Device
User Manual
4
4.1
D15362Fe
INSTALLATION
SolarSET Alarm Unit
SolarSET alarm device can be wall mounted or installed on a
pedestal. The enclosure has mounting holes at each of the corners
beneath the mounting holes of the front cover.
For pedestal installation, SolarSET is equipped with a connector
flange (see Appendix E).
Orientate SolarSET as accurately as possible towards south and
direct sunlight. Check the best possible installation angle (e.g. 68°) at
your site. Pedestals or other mounting equipment are not delivered
with the device.
All wiring, except sensor cables, of SolarSET is done already at the
factory.
4.2
OilSET-1000 and SET DM/3 Oil Sensor
Insert the sensor into the separator using the access point provided by
the separator manufacturer. The probe gives an alarm earliest when
the upper electrode is in oil and latest when the probe is totally
immersed in a non-conductive liquid - in other words, it is totally away
from the water.
Probe can be mounted suspended from the ceiling of the separator by
the cable. Please check the correct installation depth also from the
instructions of the oil separator.
Figure 7. Connecting SET DM/3 oil sensor to OilSET-1000
Resistance of the wire used for equipotential grounding must be less
than 1 Ω and cross section at least 4 mm² or 2 x 1.5 mm².
Copyright © 2009 Labkotec Oy
10/24
All rights reserved
SolarSET
Solar-Powered Oil Separator Alarm Device
User Manual
4.3
D15362Fe
SandSET-1000 and SET/S2 Sludge Sensor
SET/S2 probe gives an alarm when there is enough sand or sludge
accumulated between the two heads of the probe. When the sludge
layer on the bottom of the separator or settling tank is pretty solid, the
correct installation depth can be adjusted based on the current level.
In case the level is not that clear, a tryout period of couple of days
may be useful.
Probe can be mounted suspended from the ceiling of the separator by
the cable. Please check the correct installation depth also from the
instructions of the oil separator.
9
-
10 11
JUNCTION BOX
LJB2-78-83
2
1
Pair shield
3
SandSET-1000
+
SHD
Channel 1
To equipotential
ground
Shield of the
probe cable
SET/S2
PROBE
All shields and excess wires
to be connected to the same
point.
Figure 8. Connecting SET/S2 sludge sensor to SandSET-1000.
Copyright © 2009 Labkotec Oy
11/24
All rights reserved
SolarSET
Solar-Powered Oil Separator Alarm Device
User Manual
4.4
D15362Fe
SET-2000 Oil/Sludge, SET/S2 Sludge Sensor and SET DM/3 Oil Sensor
Figure 9. Connecting SET DM/3 and SET/S2 to SET-2000 Oil/Sludge
4.5
SET-2000 Hi Level/Oil, SET/OS2 sensor and SET DM/3 sensor
Figure 10. Connecting SET/OS2 and SET DM/3 SET-2000 Hi Level/Oil
Copyright © 2009 Labkotec Oy
12/24
All rights reserved
SolarSET
Solar-Powered Oil Separator Alarm Device
User Manual
5
D15362Fe
COMMISSIONING AND COMMANDS
Separator alarm device (SET-1000 or SET-2000) and Labcom 200
communication unit are already initialized at the factory. The factory
settings (i.e. default parameters) of Labcom 200 for each SolarSET
application are described in Appendices A, B, C and D.
While commissioning SolarSET, the user needs to take the following
actions. Detailed instructions are given in the following chapters.
1.
2.
3.
4.
5.
6.
7.
Insert SIM card to Labcom 200
Set administrator phone numbers
Set alarm recipient (end user) phone numbers
Set device or site name (optional)
Set date and time (optional)
Set date and time for scheduled status messages (optional)
Test SolarSET functions with the sensors
NOTE! SolarSET must be switched in to Test and Maintenance -mode
in order to fully power up the system. This is done by turning the
Operating mode switch to down position. Power switch must be ON.
5.1
Insert SIM Card to Labcom 200
Deactivate the PIN code query from the SIM card by placing it into
your own mobile phone. Send some test text messages to see that
the SIM card works.
Open GSM modem’s SIM card holder inside Labcom
200 by pressing the small button indicated in the left
picture with some force with, for example, a narrowheaded screwdriver. Then pull out the holder, install
the SIM card with the metallic contacts facing upwards,
and push the holder back inside the modem.
A yellow LED in the up-right corner of Labcom 200,
next to the modem, will blink slowly when modem is
connected to GSM network.
5.2
Set Administrator Phone Numbers
When given an administrator role, user is able to change any
parameter of Labcom 200.
Administrator phone numbers can be set with command.
OPTEL +44xxxxxxxxxx
Multiple numbers (max. 5) can be set as follows:
OPTEL +44xxxxxxxxxx +44yyyyyyyyyy +44zzzzzzzzzz
NOTE! If administrators are not set, all users can change parameters.
After at least one administrator number is set, only the administrator
can change the settings. Use international format (+44…).
5.3
Set Alarm Recipient (End User) Phone Numbers
Alarm messages are sent to end user phone numbers.
Maximum of 10 end user numbers can be set with the following
message:
TEL +44xxxxxxxxxx +44yyyyyyyyyy
Copyright © 2009 Labkotec Oy
13/24
All rights reserved
SolarSET
Solar-Powered Oil Separator Alarm Device
User Manual
5.4
D15362Fe
Set Device or Site Name (optional)
Device name is visible as the first text in every message to tell the
user where the alarm came. Device name (e.g. Airport ABC) can set
with command
NAME Airport ABC
Name can be max. 20 characters long including space characters.
5.5
Set Date and Time (optional)
Labcom 200 keeps its internal clock in time even when it is in lowpower mode. Date and time is important only if you want to receive
scheduled status message of the system at a certain time of day.
Date and time is set with command:
CLOCK 12.8.2009 11:00
(Format is dd.mm.yyyy hh:min).
5.6
Set Date and Time for Scheduled Status Messages (optional)
It might be useful to command SolarSET to send a status message
regularly e.g. once a week to ensure that the device is functioning
properly. With command
TXD 7 10:00
SolarSET sends the following status message once a week at 10:00
starting from the moment when TXD command was executed.
“Airport ABC Oil ok, Probe ok, Battery 13.1 V”
5.7
Test SolarSET Functions with the Sensors
SolarSET status can be asked by sending the measurement query M
to SolarSET. (Example is from SolarSET Oil Alarm, battery level will
vary.)
When sensor is connected and totally immersed in water, SolarSET
should reply:
“Airport ABC Oil ok, Probe ok, Battery 12.8 V”
When sensor is connected and it is either immersed in oil or in air,
SolarSET should reply:
“Airport ABC Oil alarm, Probe ok, Battery 12.8
V”
When sensor is not connected, SolarSET should reply:
“Airport
12.8 V”
ABC
Oil
ok,
Probe
failure,
Battery
NOTE! Most of the parameters, including the above SMS text fields,
of the SolarSET are set already at the factory. Factory settings can be
programmed with the commands that are listed in the following
chapters.
5.8
Factory Settings
SolarSET units are delivered with defined factory settings. Factory
settings of each application area can be set with a particular single
command, which are described below and in the appendices.
Copyright © 2009 Labkotec Oy
14/24
All rights reserved
SolarSET
Solar-Powered Oil Separator Alarm Device
User Manual
5.8.1
D15362Fe
Factory Settings: SolarSET Oil Alarm
Factory settings of SolarSET Oil Alarm can be set with a single
command:
SOLARSET FACTORY SETTINGS
Response to this command is:
“SOLARSET FACTORY SETTINGS RESTORED.”
SolarSET Oil Alarm factory settings are described in Appendix A.
5.8.2
Factory Settings: SolarSET Sludge Alarm
Factory settings of SolarSET Sludge Alarm can be set with a single
command:
SOLARSET SLUDGE FACTORY SETTINGS
Response to this command is:
“SOLARSET SLUDGE FACTORY SETTINGS RESTORED.”
SolarSET Sludge Alarm factory settings are described in Appendix B.
5.8.3
Factory Settings: SolarSET Oil/Sludge Alarm
Factory settings of SolarSET Oil/Sludge Alarm can be set with a
single command:
SOLARSET OILSLUDGE FACTORY SETTINGS
Response to this command is:
“SOLARSET OILSLUDGE FACTORY SETTINGS RESTORED.”
SolarSET Oil/Sludge factory settings are described in Appendix C.
5.8.4
Factory Settings: SolarSET Hi Level/Oil Alarm
Factory settings of SolarSET Hi Level/Oil Alarm can be set with a
single command:
SOLARSET HILEVELOIL FACTORY SETTINGS
Response to this command is:
“SOLARSET HILEVELOIL FACTORY SETTINGS RESTORED.”
SolarSET Hi Level/Oil factory settings are described in Appendix D.
5.8.5
Beacon Flashing Rate
The factory setting commands of all applications will automatically set,
among other parameters, the following two parameters, which define
the flashing rate of the beacon in case of alarm or fault, namely:
STROBETIME 1
STROBEINTERVAL 5
STROBEINTERVAL command defines the interval how often (in
seconds) the beacon will start flashing.
STROBETIME command defines how many seconds (i.e. times in a
row) the beacon will flash at one time.
Beacon flashing rate can be changed at any time with the commands.
NOTE! Beacon is flashing constantly In Test and Maintenance mode.
5.8.6
Beacon Activation
When SolarSET GSM is equipped with a flashing beacon, the
following command should be given always after the above factory
settings to activate the beacon. This command has also been set
Copyright © 2009 Labkotec Oy
15/24
All rights reserved
SolarSET
Solar-Powered Oil Separator Alarm Device
User Manual
D15362Fe
already at the factory.
PROTOCOL 7
5.9
Other Useful Commands
Please note that, in Normal mode, SolarSET is sleeping most of the
time and will activate the GSM modem only in case of an alarm and
once a day based on the Listening interval (LI) parameter.
In Test and Maintenance mode text messages are sent within normal
GSM network delay.
5.9.1
Separator Status Query
To check the status of separator alarms in SolarSET, just send the
following command:
M
SolarSET will reply e.g. with the following message
“Airport ABC Oil Ok, Probe Ok”
5.9.2
Battery Voltage Query
To check the SolarSET battery voltage, send the following command:
BATVOLT
The device replies as follows (name and battery voltage varies):
“Airport ABC BATVOLT 12.90 V”
5.9.3
Clear All Settings
If SolarSET settings are somehow misadjusted, administrator can
clear all settings and then restore the factory settings. These settings
apply only for the Labcom 200 communication unit and not for the
mode and delay switches in the SET-1000 or SET-2000 control unit.
The following command clears all the settings in Labcom 200 except
phone numbers, device PIN-code and clock settings.
CLEAR ALL SETTINGS
Response to this message is
“ALL SETTINGS CLEARED.”
5.9.4
Query Format of Commands
All parameters of SolarSET can be asked by sending it the particular
command (i.e. the first part of the command) with no parameters.
E.g. device name can be asked with command
NAME
E.g. time of SolarSET clock can be asked with command
CLOCK
E.g. measuring interval of SolarSET can be asked with command
MI
More information about the format of each command can be found
from Labcom 200 user manual.
Copyright © 2009 Labkotec Oy
16/24
All rights reserved
SolarSET
Solar-Powered Oil Separator Alarm Device
User Manual
6
D15362Fe
TEST AND MAINTENANCE
The operation of the probe and alarm device should be checked
always after the installation and commissioning.
The following test procedures can be executed whenever visiting the
site. The test procedure below is for OilSET-1000 but it applies to
SandSET-1000, SET-2000 Oil/Sludge and SET-2000 Hi Level/Oil
taking into account different kind of messages and a bit longer delay
of SET/S2 probe.
TEST PROCEDURE #1
1. Switch SolarSET into Test and Maintenance mode. Wait for some
20 seconds so that GSM modem is registered into network.
2. Press test button on OilSET-1000 for min. 15 seconds. During this
all the LEDs of OilSET-1000 should be on and relays de-energize.
3. After few seconds, an alarm message should appear on user’s
mobile phone saying “Oil alarm” and “Probe failure”. (Beacon will
start flashing in case it is in use).
4. Release the test button. All LEDs should go blind and relays
energize. (Beacon will stop flashing in case it is in use.)
5. After few seconds, a message should appear on user’s mobile
phone saying “Oil ok” and “Probe ok”.
6. Switch SolarSET back to Normal mode.
Table 1. SolarSET functionality test
TEST PROCEDURE #2
1. Switch SolarSET into Test and Maintenance mode.
2. Immerse the probe into water. OilSET-1000 should have no alarms
and SolarSET should send a text message “Oil ok” among other
information.
3. Lift the probe up in air or oil. OilSET-1000 should indicate an Oil
alarm and SolarSET should send a text message “Oil alarm”.
(Beacon will start flashing in case it is in use.)
4. Immerse the probe back into water. The alarm should go off in
OilSET-1000 after a delay of 5 sec. An SMS “Oil ok” is sent to end
users. (Beacon will stop flashing in case it is in use.)
5. Clean up the probe before placing it back into the oil separator.
6. Switch SolarSET back to Normal mode.
Table 2. Probe functionality test
NOTE! It is very important to switch SolarSET back to Normal mode
after the test. If this is not done, the battery will drain empty within one
day. This may damage the battery and result malfunction of the
system.
Copyright © 2009 Labkotec Oy
17/24
All rights reserved
SolarSET
Solar-Powered Oil Separator Alarm Device
User Manual
7
7.1
D15362Fe
TROUBLE-SHOOTING
SolarSET functionality test fails
If no messages are received, check that the Test and Maintenance
switch is down and Main Power switch is up. Then check that mains
power LED is on in both Labcom 200 and SET-1000 or SET-2000
control unit.
If alarm and fault LEDs are not on during test, but mains LED is on,
contact your sales representative.
If previous issues are checked and verified, send message TEL to
SolarSET in order to check that user’s number is on the end user
phone number list. If user’s number is not on the list or is wrong,
please correct it with TEL message.
7.2
Probe functionality test fails
Clean up the probe and place it back on its place. Repeat the test
again. If functionality is not recovered, contact your sales
representative.
7.3
Device does not respond to SMS
1. Make sure that the GSM modem is registered to network. A yellow
LED next to GSM modem (right side) is blinking slowly if modem
is on-line. You can always try calling the device phone number.
If the LED is not blinking, the modem has no access to GSM
network. Remove the SIM card, put it to your own phone and
make sure that the PIN code is deactivated.
2. If there is no power at all, make sure that the battery is not empty.
The battery voltage should be checked with a voltmeter. Battery
terminals are visible in Appendix A. If battery is drained for some
reason, the terminal voltage can drop below specified rating.
Make sure that the voltage does not decrease below 11.5 V.
CAUTION! Be careful when operating with the battery, it can drive
dangerously high electric currents. Short-circuiting the battery is
dangerous.
3. If the device has been functional, but stops responding on its own,
the signal strength should be tested. This can be done by sending
message CSQ to SolarSET. If the response gives CSQ-value
above 10, the signal strength should not be a problem. If there is
no response, the signal can be so weak that the response cannot
be sent.
4. If there is enough power and the GSM modem is registered to
GSM network, it’s possible that your phone number is not on the
administrator list. There is, however, one way to get back to the
administrator list.
First send a message SOPTEL 1234 +xxxxxxx, where +xxxxxxx is
your own phone number. SolarSET does not answer to this email.
Finally, set yourself as operator with command OPTEL.
Copyright © 2009 Labkotec Oy
18/24
All rights reserved
SolarSET
Solar-Powered Oil Separator Alarm Device
User Manual
8
D15362Fe
TECHNICAL AND SAFETY DATA
SolarSET alarm unit
Dimensions
300 mm x 400 mm x 132 mm (L x H x D)
Enclosure
IP 65, material polycarbonate
(IP 43 with two ventilation device)
Ambient temperature
-25 ºC…+50 ºC (SET-1000 and SET-2000)
Battery
12 VDC, 7 Ah lead-acid battery
Power consumption
Max 1,9 VA
Typical 0,1 mVA (on low-power mode)
Alarm indication
GSM text message
(also a highly visible xenon beacon
available together with GSM text message)
Communication unit
Labcom 200 (12 VDC)
Alarm Unit
OilSET-1000 sv1 (12 VDC) or
SandSET-1000 sv1 (12 VDC) or
SET-2000 Oil/Sludge (12 VDC) or
SET-2000 Hi Level/Oil (12 VDC)
(See chapter 3. System Components)
Probes
SET DM/3 and/or SET/S2 and/or SET/OS2
(See chapter 3. System Components)
Max. impedance of the
current loop between the
control unit and a probe
75 Ω.
Ex-classification
SET-1000 and SET-2000 control units:
II (1) G [EEx ia] IIC
VTT 04 ATEX 031X
(Ta = -25 ºC …+50 ºC)
Electrical parameters
SET-1000 and SET-2000 control units:
Uo = 14,7 V
Io = 55 mA
Um = 23 V
Po = 297 mW R = 404 Ω
Copyright © 2009 Labkotec Oy
19/24
All rights reserved
SolarSET
Solar-Powered Oil Separator Alarm Device
User Manual
D15362Fe
APPENDIX A. Factory Settings for SolarSET Oil Alarm
Factory settings of SolarSET Oil Alarm can be set with the following
single command:
SOLARSET FACTORY SETTINGS
This will automatically set the parameters listed in the table below. If
you want to change the operation of your SolarSET system, you can
change any of the individual parameters.
Command and parameters
Explanation
DI1 Oil alarm ok 0 1
Settings for oil alarm
Relay 1 of OilSET-1000 is connected to digital input 1 of Labcom 200.
Alarm message is either “Oil alarm” or “Oil ok”.
Alarm activates when OilSET-1000 relay 1 de-energizes for more than 1 second.
DI2 Probe failure ok 0 1
Settings for probe status
Relay 2 of OilSET-1000 is connected to digital input 2 of Labcom 200.
Alarm message is either “Probe failure” or “Probe ok”
Alarm activates when OilSET-1000 relay 2 de-energizes for more than 1 second.
VLIM 11.8
Alarm level (in Volts) for battery voltage.
MI 60
Measuring interval
Labcom 200 wakes up every 60 minutes for 20 seconds from low-power mode to
check the status of OilSET-1000.
LI 1
Listening interval
Labcom 200 will wake up from Normal (low-power) mode at 12:00 AM for 2
minutes to check if user has given new SMS commands. Interval is in days
(factory setting is 1 day). Exact timing requires that CLOCK command has been
given.
PROTOCOL 4
SolarSET protocol setting
This setting determines the sleep and wake-up behaviour of SolarSET in
addition to normal user configurable settings.
NOTE! When xenon beacon is in use, PROTOCOL setting should be 7.
PROBEDELAY 7
Delay of alarm unit (OilSET-1000 and probe) in seconds. Correct relay output
value is available after this period of time.
Labcom 200 replies to PROBEDELAY query with a message: ”Measurement
time 7 seconds”.
Incorrect value of this setting will result in false operation.
SETPOWER 8
Power-on time for OilSET-1000.
Labcom 200 replies to SETPOWER query with a message: “Power on-time 8
seconds”.
STROBETIME 1
Beacon flashing time
Strobetime defines how many seconds the beacon will flash at one time. In
practice, beacon will flash one or two times with the factory setting.
STROBEINTERVAL 5
Beacon flashing interval
Strobeinterval defines the interval how often (in seconds) the beacon will
start flashing. Factory setting is 5 seconds.
More information about the format of each command can be found
from Labcom 200 user manual.
Copyright © 2009 Labkotec Oy
20/24
All rights reserved
SolarSET
Solar-Powered Oil Separator Alarm Device
User Manual
D15362Fe
APPENDIX B. Factory Settings for SolarSET Sludge Alarm
Factory settings of SolarSET Sludge Alarm can be set with the
following single command:
SOLARSET SLUDGE FACTORY SETTINGS
This will automatically set the parameters listed in the table below. If
you want to change the operation of your SolarSET system, you can
change any of the individual parameters.
Command and parameters
Explanation
DI1 Sludge alarm ok 0 1
Settings for sludge alarm
Relay 1 of SandSET-1000 is connected to digital input 1 of Labcom 200.
Alarm message is either “Sludge alarm” or “Sludge ok”.
Alarm activates when SandSET-1000 relay 1 de-energizes for more than 1
second.
DI2 Probe failure ok 0 1
Settings for probe status
Relay 2 of SandSET-1000 is connected to digital input 2 of Labcom 200.
Alarm message is either “Probe failure” or “Probe ok”
Alarm activates when SandSET-1000 relay 2 de-energizes for more than 1
second.
VLIM 11.8
Alarm level (in Volts) for battery voltage.
MI 60
Measuring interval
Labcom 200 wakes up every 60 minutes for 20 seconds from low-power mode to
check the status of SandSET-1000.
LI 1
Listening interval
Labcom 200 will wake up from Normal (low-power) mode at 12:00 AM for 2
minutes to check if user has given new SMS commands. Interval is in days
(factory setting is 1 day). Exact timing requires that CLOCK command has been
given.
PROTOCOL 4
SolarSET protocol setting
This setting determines the sleep and wake-up behaviour of SolarSET in
addition to normal user configurable settings.
NOTE! When xenon beacon is in use, PROTOCOL setting should be 7.
PROBEDELAY 15
Delay of alarm unit (SandSET-1000 and probe) in seconds. Correct relay output
value is available after this period of time.
Labcom 200 replies to PROBEDELAY query with a message: ”Measurement
time 15 seconds”.
Incorrect value of this setting will result in false operation.
SETPOWER 16
Power-on time for SandSET-1000.
Labcom 200 replies to SETPOWER query with a message: “Power on-time 16
seconds”.
STROBETIME 1
Beacon flashing time
Strobetime defines how many seconds the beacon will flash at one time. In
practice, beacon will flash one or two times with the factory setting.
STROBEINTERVAL 5
Beacon flashing interval
Strobeinterval defines the interval how often (in seconds) the beacon will start
flashing. Factory setting is 5 seconds.
More information about the format of each command can be found
from Labcom 200 user manual.
Copyright © 2009 Labkotec Oy
21/24
All rights reserved
SolarSET
Solar-Powered Oil Separator Alarm Device
User Manual
D15362Fe
APPENDIX C. Factory Settings for SolarSET Oil/Sludge Alarm
Factory settings of SolarSET Oil/Sludge Alarm can be set with the
following single command:
SOLARSET OILSLUDGE FACTORY SETTINGS
This will automatically set the parameters listed in the table below. If
you want to change the operation of your SolarSET system, you can
change any of the individual parameters.
Command and parameters
Explanation
DI1 Separator alarm ok 0 1
Settings for combined oil and sludge alarm
Relay 1 of SET-2000 Oil/Sludge is connected to digital input 1 of Labcom 200.
Alarm message is either “Separator alarm” or “Separator ok”.
Alarm activates when SET-2000 Oil/Sludge relay 1 de-energizes for more than 1
second.
DI2 Probe failure ok 0 1
Settings for combined probe status
Relay 2 of SET-2000 Oil/Sludge is connected to digital input 2 of Labcom 200.
Alarm message is either “Probe failure” or “Probe ok”
Alarm activates when SET-2000 Oil/Sludge relay 2 de-energizes for more than 1
second.
VLIM 11.8
Alarm level (in Volts) for battery voltage.
MI 60
Measuring interval
Labcom 200 wakes up every 60 minutes for 20 seconds from low-power mode to
check the status of SET-2000 Oil/Sludge.
LI 1
Listening interval
Labcom 200 will wake up from Normal (low-power) mode at 12:00 AM for 2
minutes to check if user has given new SMS commands. Interval is in days
(factory setting is 1 day). Exact timing requires that CLOCK command has been
given.
PROTOCOL 4
SolarSET protocol setting
This setting determines the sleep and wake-up behaviour of SolarSET in
addition to normal user configurable settings.
NOTE! When xenon beacon is in use, PROTOCOL setting should be 7.
PROBEDELAY 15
Delay of alarm unit (SET-2000 Oil/Sludge and probes) in seconds. Correct relay
output value is available after this period of time.
Labcom 200 replies to PROBEDELAY query with a message: ”Measurement
time 15 seconds”.
Incorrect value of this setting will result in false operation.
SETPOWER 16
Power-on time for SET-2000 Oil/Sludge.
Labcom 200 replies to SETPOWER query with a message: “Power on-time 16
seconds”.
STROBETIME 1
Beacon flashing time
Strobetime defines how many seconds the beacon will flash at one time. In
practice, beacon will flash one or two times with the factory setting.
STROBEINTERVAL 5
Beacon flashing interval
Strobeinterval defines the interval how often (in seconds) the beacon will start
flashing. Factory setting is 5 seconds.
More information about the format of each command can be found
from Labcom 200 user manual.
Copyright © 2009 Labkotec Oy
22/24
All rights reserved
SolarSET
Solar-Powered Oil Separator Alarm Device
User Manual
D15362Fe
APPENDIX D. Factory Settings for SolarSET Hi Level/Oil Alarm
Factory settings of SolarSET Hi Level/Oil Alarm can be set with the
following single command:
SOLARSET HILEVELOIL FACTORY SETTINGS
This will automatically set the parameters listed in the table below. If
you want to change the operation of your SolarSET system, you can
change any of the individual parameters.
Command and parameters
Explanation
DI1 Separator alarm ok 0 1
Settings for combined oil and sludge alarm
Relay 1 of SET-2000 Hi Level/Oil is connected to digital input 1 of Labcom 200.
Alarm message is either “Separator alarm” or “Separator ok”.
Alarm activates when SET-2000 Hi Level/Oil relay 1 de-energizes for more than
1 second.
DI2 Probe failure ok 0 1
Settings for combined probe status
Relay 2 of SET-2000 Hi Level/Oil is connected to digital input 2 of Labcom 200.
Alarm message is either “Probe failure” or “Probe ok”
Alarm activates when SET-2000 Hi Level/Oil relay 2 de-energizes for more than
1 second.
VLIM 11.8
Alarm level (in Volts) for battery voltage.
MI 60
Measuring interval
Labcom 200 wakes up every 60 minutes for 20 seconds from low-power mode to
check the status of SET-2000 Hi Level/Oil.
LI 1
Listening interval
Labcom 200 will wake up from Normal (low-power) mode at 12:00 AM for 2
minutes to check if user has given new SMS commands. Interval is in days
(factory setting is 1 day). Exact timing requires that CLOCK command has been
given.
PROTOCOL 4
SolarSET protocol setting
This setting determines the sleep and wake-up behaviour of SolarSET in
addition to normal user configurable settings.
NOTE! When xenon beacon is in use, PROTOCOL setting should be 7.
PROBEDELAY 7
Delay of alarm unit (SET-2000 Hi Level/Oil and probes) in seconds. Correct relay
output value is available after this period of time.
Labcom 200 replies to PROBEDELAY query with a message: ”Measurement
time 7 seconds”.
Incorrect value of this setting will result in false operation.
SETPOWER 8
Power-on time for SET-2000 Hi Level/Oil.
Labcom 200 replies to SETPOWER query with a message: “Power on-time 8
seconds”.
STROBETIME 1
Beacon flashing time
Strobetime defines how many seconds the beacon will flash at one time. In
practice, beacon will flash one or two times with the factory setting.
STROBEINTERVAL 5
Beacon flashing interval
Strobeinterval defines the interval how often (in seconds) the beacon will start
flashing. Factory setting is 5 seconds.
More information about the format of each command can be found
from Labcom 200 user manual.
Copyright © 2009 Labkotec Oy
23/24
All rights reserved
SolarSET
Solar-Powered Oil Separator Alarm Device
User Manual
D15362Fe
APPENDIX E. Connector Flange
Copyright © 2009 Labkotec Oy
24/24
All rights reserved