1
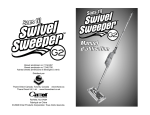
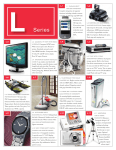
U.S. Patent No. 7,152,267
U.S. Patent No. 7,340,795
Other U.S. & Foreign Patents Pending.
Distributed by
Thane Direct Canada, Toronto, Canada www.thane.ca
Thane Direct UK, Ltd. www.thanedirect.co.uk
Fairfield, NJ 07004
Made In China
© 2008 Ontel Products Corporation. All Rights Reserved.
Congratulations and thank you for purchasing the
Cordless
, the quick & agile floor and carpet
sweeper that lets you clean dirt and messes faster and
easier than ordinary cordless sweepers. The Secret:
combines the cleaning power of
Quad-Brush® Technology – powerful rotating cleaning
brushes pick up dirt and messes from all four sides of the
sweeper head – with a 360° swivel feature to easily
maneuver around furniture and other objects. It has an
extended pole, is super-lightweight and it’s bagless too!
glides effortlessly on four gentle floor super
sliders while its back-saver elbow joint and low-profile design
lets you get under couches, beds and other furniture with
ease. Now with Touchless Dirt Tray – just push tabs to
empty for quick disposal of dirt & debris.
–2–
BASIC TROUBLESHOOTING:
1. Swivel Sweeper G2 is sluggish
or won't start:
Make sure the battery is fully charged and securely inserted
into the "Battery Compartment" and that the pole section with
the "Battery Compartment" is securely connected to the "Pole
Base." Check the "Rotating Cleaning Brushes" to make sure
they are not entangled with hair, debris, etc.
2. Battery not charging:
Make sure that the "Rechargeable Battery" is fully inserted into
the "Battery Charger." Also, check to make sure that the red
indicator light on the "Battery Charger" comes on when charging.
3. Rotating Brushes become bound and
sweeper shuts off:
See "Automatic Shut-Off Feature" instructions on pg. 6.
4. Swivel Sweeper G2 operating but not
picking up mess:
The "Touchless Dirt Tray" may be full. Empty out if necessary
(see Emptying The Touchless Dirt Tray Instructions on pg. 7).
Also, some debris may be lodged in carpeting (such as
staples) or may be too large/heavy for the sweeper to pick up.
Make sure the "Touchless Dirt Tray" is fully closed.
5. Dirt & Debris escaping from sweeper
during cleaning:
Make sure the "Touchless Dirt Tray" is empty and securely
connected to the sweeper. Also, check to see that the "Rotating
Cleaning Brushes" are not entangled with debris such as hair,
paper, etc. Use the "Brush Cleaning Tool" to clean off, if necessary.
– 10 –
SAFETY PRECAUTIONS
MAKE SURE TO COMPLETELY READ AND
UNDERSTAND ALL OF THE FOLLOWING SAFETY
INSTRUCTIONS AND WARNINGS IN THIS BOOKLET
& ON THE BATTERY CHARGER, PRIOR TO USING
SWIVEL SWEEPER G2.
• Make sure Swivel Sweeper G2 is securely assembled
before use.
• Never use Swivel Sweeper G2 clean up liquids or wet
messes, especially not flammable or combustible
liquids.
• Swivel Sweeper G2 contains a rechargeable 7.2V
Ni-MH (Nickel-Metal Hydride) battery, dispose of
battery properly.
• Keep fingers, hair, all other body parts and clothing
away from the rotating cleaning brushes.
• Do NOT use Swivel Sweeper G2 to clean up any
burning or lighted materials such as cigarettes, matches
and ashes.
• Do NOT use on coarse concrete surfaces.
• Do NOT use outdoors: patios, decks or rough surfaces.
• Swivel Sweeper G2's mechanical parts are not userserviceable. Contact a qualified professional for service.
• Make sure Swivel Sweeper G2 is turned off and that the
battery is removed, before cleaning its rotating brushes
of hair, debris etc.
• Do NOT handle or charge battery when hands are wet.
• Only use the included charger to charge Swivel
Sweeper G2's battery.
• Store your Swivel Sweeper G2 indoors in a dry,
safe place.
–3–
IMPORTANT MAINTENANCE & CARE:
1
(continued)
2
Step 5) Replace the "Tinted Outer Body
Frame" and lock by sliding the "Outer Body
Frame Lock Clips" outward and away from
the pole (SEE FIG. 12).
COMPONENTS
1.
2.
3.
4.
5.
6.
7.
8.
9.
10.
11.
12.
13.
14.
15.
16.
17.
18.
Handle with Rotating Rubberized Hang Loop
Handle
Heavy Duty Aluminum Pole
Rechargeable 7.2V Battery
Back Saver Elbow Joint
Elbow Joint Lock Release Switch
Battery Compartment
On/Off Switch
Magnetic Latch A
Pole Base
Air Filter
4
Tinted Outer Body Frame
Base
Touchless Dirt Tray
Outer Body Frame Lock Clips
Rotating Cleaning Brushes
Magnetic Latch B
5
6
Touchless Dirt Tray
Lock Clips
19. One-Piece
7
Battery Charger
20. Brush Cleaning Tool 8
& On-Board
Storage Cover
Step 6) Lift the "Air Filter" up & out by its
"Removal Notch" (SEE FIG. 13). Rinse the
"Air Filter" off, let dry and replace back into
sweeper.
FIG. 13
3
MAGNETIC LATCH SYSTEM
FOR SPACE-SAVING STORAGE:
Swivel Sweeper’s Magnetic Latch System lets you store
your sweeper in a compact manner between uses.
Storing Swivel Sweeper
Between Uses:
20
10
IMPORTANT: When you are
finished cleaning with Swivel
Sweeper, empty out the
"Touchless Dirt Tray," close it,
then fold the sweeper head up
to the side of the "Pole Base" to
engage the two "Magnetic
Latches," for space-saving
storage between uses
(SEE FIG. 14).
To release the sweeper head
from the "Pole Base," gently tap
it down.
18
16
Removal
Notch
Periodically wipe down your Swivel Sweeper
with a dry or damp lint-free cloth. Do not use
water, liquid cleansers or abrasive materials
to clean Swivel Sweeper.
9
17
FIG. 12
11
19
13
12
15
14
–4–
FIG. 14
–9–
IMPORTANT MAINTENANCE & CARE:
As with any rotating brush cleaning device,
Swivel Sweeper’s four cleaning brushes
will accumulate fine debris such as hair,
thread and other particles. To maintain
optimal sweeper performance, clean the
sweeper’s rotating brushes of hair and
debris and its "Air Filter" of dust and dirt as
necessary following the directions below.
FIG. 8
A.
B.
C.
D.
Step 1) Make sure the Swivel Sweeper is turned OFF and remove
the battery to ensure unit does not accidentally turn on.
Step 2) Unlock the "Tinted Outer Body
Frame" by sliding the two "Outer Body
Frame Lock Clips" inward towards the pole
(SEE FIG. 8).
TO ASSEMBLE SWIVEL SWEEPER:
FIG. 9
Step 1)
Step 2)
Screw "Pole A" onto
"Pole B" until secure.
Screw "Pole B" onto
"Pole C" until secure.
Step 3) Next, lift the "Tinted Outer Body
Frame" up and over the aluminum pole to
remove it. The four rotating brushes are
now completely exposed (SEE FIG. 9).
Step 3)
Align the arrow on "Pole C" with the arrow
on "Sweeper Head D." When arrows are
aligned, pole will easily slide onto Sweeper
Head. Then push firmly together until pole
locks into place.
CAUTION: Brush Cleaning Tool has sharp tip and ripping
blade. Avoid contact with tip and ripping blade.
Step 4) Use the comb side of the "Brush
Cleaning Tool" to pull up and loosen
tangled debris. Simply guide the blade
along the shaft of the "Rotating Cleaning
Brushes" (SEE FIG. 10).
Step 5) Use the other end of the "Brush
Cleaning Tool" to cut and remove tangled
debris. Simply guide the blade along the
shaft of the "Rotating Cleaning Brushes"
(SEE FIG. 11). Dispose of debris in
garbage.
–8–
Upper Pole
Middle Pole
Lower Pole
Sweeper Head
FIG. 10
FIG. 11
FIG. 1
CHARGING YOUR BATTERY:
Step 1) Plug the "Battery Charger" into a
standard electrical outlet as below:
UL/cUL 120V AC 60Hz
TUV/UK 220-240V AC 50/60Hz
Step 2) Align the arrow on the "Rechargeable
B a t t e ry" with the arrow on the "Battery Charger."
Then, insert the "Rechargeable Battery" down into
the "Battery Charger" (SEE FIG. 1). NOTE: Red
light on the front of the "Battery Charger" should
turn on to indicate that the battery is charging.
–5–
IMPORTANT: For initial battery charge, let battery charge
for at least 8 full hours. When recharging, charge time
will vary dependent upon the amount of power that is left
in the battery after its last use. Recommended recharging time for the battery after completely
depleting it
is 6-8 hours. Battery may be left in charger for extended
periods of time but do NOT exceed 24
consecutive
hours. Doing so may lead to shortened overall battery
life. It is not necessary to wait until
battery power
is fully depleted before recharging.
USING THE BACK SAVER ELBOW JOINT FEATURE:
Step1) To sweep under furniture, push the "Elbow Joint Lock Switch"
up towards you to unlock (SEE FIG. 3).
Step 2) Then push the sweeper pole down so the "Elbow Joint"
bends towards the floor (SEE FIG. 4).
Step 3) To lock the "Elbow Joint" into the starting position, pull the sweeper pole back up until the "Elbow Joint" locks into place (SEE FIG. 5).
FIG. 4
FIG. 3
FIG. 5
USING SWIVEL SWEEPER:
Step 1) Make sure the Swivel Sweeper is turned off. (NOTE: The
"On/Off Switch" is located on the front of the "Battery Compartment").
Step 2) Make sure the "Touchless D i rt Tray" is empty (see following
directions on EMPTYING THE TOUCHLESS DIRT TRAY).
Step 3) Insert the "Rechargeable Battery" down into the "Battery
Compartment" located on the
FIG. 2
front of the pole until it locks
into place (SEE FIG. 2).
EMPTYING THE TOUCHLESS DIRT TRAY:
Step 1) Make sure the Swivel Sweeper is turned off.
Step 2) With the Swivel Sweeper "Base" over a garbage receptacle,
press and hold the "Touchless Dirt Tray Lock Clips" inward (SEE FIG 6)
until the "Touchless Dirt Tray" swings open (SEE FIG. 7).
Step 3) Empty the dirt and debris into a garbage receptacle.
Step 4) Turn the Swivel Sweeper
G2 on to begin cleaning.
Step 5) When you are done
cleaning, turn the Swivel
Sweeper off and empty the contents of the "Touchless Dirt Tray" into a
garbage receptacle. (See the following instructions to empty the
"Touchless Dirt Tray.") Recharge the battery if necessary.
IMPORTANT: AUTOMATIC SHUT-OFF FEATURE
Swivel Sweeper will automatically shut off to protect its moving parts
if the brushes become bound by carpets, rugs, hair or other objects.
Step 4) Then place the "Base" back on the floor or other flat surface. With
gentle downward pressure, snap the "Touchless D i rt Tray" closed.
IMPORTANT: If "Touchless Dirt Tray" does not securely connect back up into the "Base," check to make sure
that no small metal debris (e.g. staples, paper clips
etc.) has magnetized to the Swivel Sweeper’s motor
located on the underside of the "Base."
FIG. 6
FIG. 7
TO RESET THE SHUT-OFF FEATURE:
1. Place the "On/Off" switch in the "Off" position.
2. Untangle the sweeper’s brushes from the object(s) they are bound by.
Sweeper will be ready to operate within 10 minutes.
–6–
–7–