1
Rest for a short period of time after each set. The ideal
resting periods are:
• Rest for three minutes after each set for a muscle
building workout.
• Rest for one minute after each set for a toning workout.
• Rest for 30 seconds after each set for a weight loss
workout.
Plan to spend the first couple of weeks familiarizing
yourself with the equipment and learning the proper
form for each exercise.
COOLING DOWN
End each workout with 5 to 10 minutes of stretching.
Include stretches for both your arms and legs. Move
slowly as you stretch and do not bounce. Ease into
each stretch gradually and go only as far as you can
without strain. Stretching at the end of each workout is
an effective way to increase flexibility.
ASSEMBLY
• Place all parts in a cleared area and remove the
packing materials. Do not dispose of the packing
materials until assembly is completed.
STAYING MOTIVATED
Make Things Easier for Yourself
For motivation, keep a record of each workout. The
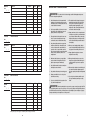
chart on pages 13 and 14 of this manual can be photocopied and used to schedule and record your workouts. List the date, the exercises performed, the
weight used, and the numbers of sets and repetitions
completed. Record your weight and key body measurements at the end of every month. Remember, the
key to achieving the greatest results is to make exercise a regular and enjoyable part of your everyday life.
This manual is designed to ensure that the
weight bench can be assembled successfully
by anyone. Most people find that by setting
aside plenty of time, assembly will go smoothly.
The following tools (not included) are required
for assembly:
• two adjustable spanners
Before beginning assembly, carefully read the
following information and instructions:
• one rubber mallet
• one standard screwdriver
• Assembly requires two persons.
• one Phillips screwdriver
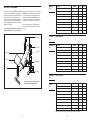
MUSCLE CHART
O
A
P
L
B
Q
C
R
D
S
E
T
F
G
M
U
N
H
V
I
W
J
X
K
A.
B.
C.
D.
E.
F.
G.
H.
I.
J.
K.
L.
M.
N.
O.
P.
Q.
R.
S.
T.
U.
V.
W.
X.
Sternomastoid (neck)
Pectoralis Major (chest)
Biceps (front of arm)
Obliques (waist)
Brachioradials (forearm)
Hip Flexors (upper thigh)
Abductor (outer thigh)
Quadriceps (front of thigh)
Sartorius (front of thigh)
Tibialis Anterior (front of calf)
Soleus (front of calf)
Anterior Deltoid (shoulder)
Rectus Abdominus (stomach)
Adductor (inner thigh)
Trapezius (upper back)
Rhomboideus (upper back)
Posterior Deltoid (shoulder)
Triceps (back of arm)
Latissimus Dorsi (mid back)
Spinae Erectors (lower back)
Gluteus Medius (hip)
Gluteus Maximus (buttocks)
Hamstring (back of leg)
Gastrocnemius (back of calf)
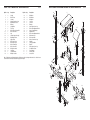
• For help identifying small parts, use the PART
IDENTIFICATION
CHART.
MUSCLE
CHART
• lubricant, such as grease or petroleum jelly,
and soapy water
all parts(neck)
as you assemble them, unless
A.• Tighten
Sternomastoid
instructed
to
do
otherwise.
B. Pectoralis Major (chest)
C. Biceps (front of arm)
you assemble
D.• As
Obliques
(waist) the weight bench, make sure all
parts
are
oriented
as shown in the drawings.
E. Brachioradials (forearm)
F. Hip Flexors (upper thigh)
G. Abductor (outer thigh)
Quadriceps
(front ofthe
thigh)
1.H. Before
assembling
weight bench, make
I. sure
Sartorius
(frontread
of thigh)
that you
and understand the inforJ. mation
Tibialis in
Anterior
(front
of calf)
the box
above.
K. Soleus (front of calf)
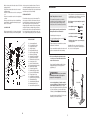
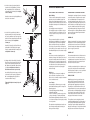
L. Lift an Upright (1) and tighten an M10 x 65mm
M. Adjustment
Rectus Abdominus
(stomach)
Knob (30)
into the Upright and
N. Upright
Adductor
(inner
Base
(7).thigh)
O. Trapezius (upper back)
P. Rhomboideus (upper back)
Q. Deltoid (shoulder)
Do not insert the M10
R.x 65mm
TricepsAdjustment
(back of arm)
Knob (30) through the
S.rectangle
Latissimus
Dorsi
(mid
back) (1).
hole
in the
Upright
T. Spinae Erectors (lower back)
U. Gluteus Medius (hip)
V. Orient
Gluteus
Maximus
the
Upright(buttocks)
Base (7) with the welded
W. nut,
Hamstring
(back of leg)
and a Stabiliser
(37) with the anchor hole,
X. inGastrocnemius
of calf)
the indicated (back
location.
Attach an Upright
Base to the Stabiliser with four M10 x 80mm Bolts
(35), two Joint Plates (20), and four M10 Nylon
Locknuts (19). Do not tighten the Locknuts yet.
Assembly will be more convenient if you have a
socket set, a set of open-end or closed-end spanners, or a set of ratchet spanners.
1
1
30
Welded Nut
WARNING:
7
Welded Nut
37
19
7
20
Assemble the other Upright Base (7) to the other
Stabiliser (37) in the same manner.
Anchor
Hole
35
20
Anchor Hole
37
12
5