1
ENGLISH
RUSSIAN
AVN SYSTEM
Owner’s Manual
SONATA
Thank you for purchasing our product.
Before using this product, read the user’s manual carefully for safe and useful operation.
The contents of this manual may vary depending on the product version.
Table of contents
GENERAL INFORMATION . . . . . . . . . . . . . . . . . . . . . . .3
SAFETY NOTES . . . . . . . . . . . . . . . . . . . . . . . . . . . . .3
MEDIA
Music Player . . . . . . . . . . . . . . . . . . . . . . . . . . . . . .21
USB Mode . . . . . . . . . . . . . . . . . . . . . . . . . . . . . . . .22
REFERENCES
Compatible USB devices . . . . . . . . . . . . . . . . . . . . .22
DVD Terms . . . . . . . . . . . . . . . . . . . . . . . . . . . . . . . . .5
DVB-T . . . . . . . . . . . . . . . . . . . . . . . . . . . . . . . . . . .27
Region Code Information . . . . . . . . . . . . . . . . . . . . . .6
DVD PLAYER . . . . . . . . . . . . . . . . . . . . . . . . . . . . . .29
Region Code . . . . . . . . . . . . . . . . . . . . . . . . . . . . . . . .6
SETUP
COMPONENTS
Sound Setting . . . . . . . . . . . . . . . . . . . . . . . . . . . . .30
CONTROLLERS AND FUNCTIONS
Updates . . . . . . . . . . . . . . . . . . . . . . . . . . . . . . . . . .30
Controller Names . . . . . . . . . . . . . . . . . . . . . . . . . . . .8
Basic Functions. . . . . . . . . . . . . . . . . . . . . . . . . . . . . .8
REAR VIEW CAMERA . . . . . . . . . . . . . . . . . . . . . . . .31
RADIO . . . . . . . . . . . . . . . . . . . . . . . . . . . . . . . . . . . .10
SPECIFICATIONS . . . . . . . . . . . . . . . . . . . . . . . . . . .32
BLUETOOTH
TROUBLE SHOOTING . . . . . . . . . . . . . . . . . . . . . . . .33
Understanding Bluetooth wireless technology . . . . .11
Using Bluetooth wireless technology . . . . . . . . . . . .11
Bluetooth Compatibility . . . . . . . . . . . . . . . . . . . . . .12
Bluetooth Connection . . . . . . . . . . . . . . . . . . . . . . .19
Operation of Handsfree . . . . . . . . . . . . . . . . . . . . . .19
2
AVN SYSTEM Owner’s Manual
WARRANTY . . . . . . . . . . . . . . . . . . . . . . . . . . . . . . . .34
General information
SAFETY NOTES
• Do not use the product when there is no
sound or the display is abnormal. Using the
product within an abnormal state may lead
to accidents, fires or electric shock.
• Introducing moisture or liquids into the
device could lead to product malfunction or
fires. Heed caution to prevent the ventilation
from becoming blocked. Blocked ventilation
will accumulate heat within the product interior and lead to malfunction or fire.
• Do not damage vehicle parts when installing
the device. Damage to vehicle parts upon
installation may lead to fires, electric shock
or accidents.
• Staring at the screen for prolonged periods of time while driving could lead to
accidents. First park the vehicle in a safe
location before operating or watching the
device.
• Do not disassemble or modify the product.
This may lead to product damage, fires,
electric shock and accidents. Malfunction or
defects caused by user negligence shall not
be covered by customer service.
• Do not operate the device for prolonged
periods of time with the ignition turned off.
Such operations may lead to battery discharge.
• If the sound is too loud while the vehicle
is in motion, this may block outside sound
and lead to accidents.
• The design and specifications of the product may change without prior notice quality
improvement.
• Use only designated components. Use of
non-designated components could lead to
product damage or abnormal operation.
Malfunction or defects caused by user negligence shall not be covered by customer
service. Upon loss or damage of components, purchase new products at your place
of purchase.
• Use the product only when the temperature is between 0°C ~ 60°C. Use of the
product within high or low temperatures
could lead to product malfunctions.
• Do not pull or cause shock to the LCD
panel. Such could lead to LCD panel damage. Do not press the case around the
touch panel with strong force. Such acts
could lead to product damage or malfunctions.
• When operating the navigation, guidance
may not match with actual road conditions due to changes in traffic regulations.
Comply with actual road and traffic regulations when driving. Accidents caused by
non-compliance with traffic regulations or
actual road conditions shall be the sole
responsibility of the user and our company
shall not be liable to compensations in any
cases. Always practice safe driving.
• When cleaning the touch screen, make sure
to turn off the device and use a dry and
smooth cloth. Never use tough materials as
such materials may damage the device panel
or cause color and quality deterioration.
• After use, put the disc back in its original
case. Leaving discs uncased could lead
to disc deformation (bending) or scratches and result in malrecognition.
• Do not use abnormally shaped discs, such
as 8cm, heart-shaped, or octagon-shaped
discs. Refrain from abnormal use of the
Disc slot, such as inserting more than one
disc at a time. Such could lead to product
malfunction.
AVN SYSTEM Owner’s Manual
3
General information
• Do not expose discs to direct sunlight, high
humidity or high temperature for prolonged
periods of time. Such acts could lead to
disc deformation.
• Remove fingerprints or dust on disc surfaces with a soft cloth. Never use chemical
cloths or solvents, such as benzene, as
such materials may cause damage to disc
surfaces.
4
AVN SYSTEM Owner’s Manual
REFERENCES
DVD Terms
DVD
CHAPTER
TITLE
TRACK
Multi Angle
DVD stands for Digital Versatile Disc or Digital Video Disc. DVDs can hold up to 135 minutes of video
and movies with maximum 8 languages and 32 subtitles. DVDs can also support MPEG-2 video
compression and Dolby Digital Surround Sound, allowing viewers to enjoy clean quality movies with
outstanding sound.
Chapters are information recorded within DVD discs. One DVD title is divided into several sections and
these sections are called chapters. Specific scenes can be easily searched through the chapter numbers.
Titles are information recorded within DVD discs. DVD discs can be divided into many titles.
Tracks are information recorded within Video CDs and Audio CDs. Such CDs are divided into several
tracks so that you can quickly search for specific scenes or songs.
Some DVD discs may contain scenes simultaneously filmed from multiple angles.
AVN SYSTEM Owner’s Manual
5
REFERENCES
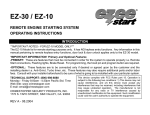
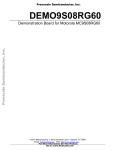
Region Code Information
This product as well as all types of DVD discs
contain region codes. If the device region
code does not support an inserted disc, the
DVD cannot be played.
Check the figure below for region code information.
1: Canada and USA
2: Europe, Japan, Middle East and South
Africa
3: South East Asia
4: Australia, and South America
5: Africa, Russia, and the rest of Asia
6: China
6
AVN SYSTEM Owner’s Manual
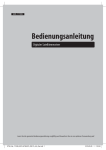
Region Code
The region code for domestic DVDP is number 5 or ALL. The device does not support
discs with other region codes. Only use discs
with region codes of number 5 or ALL.
5
ALL
[Region Code 5]
[ALL]
COMPONENTS
Before using the product, check to see that the following components have been included.
Product images and specifications may change without prior notice.
Device
User’s Manual
(User Manual, Antenna Installation Manual)
AVN SYSTEM Owner’s Manual
7
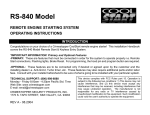
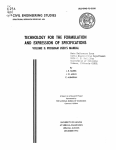
CONTROLLERS AND FUNCTIONS
Controller Names
➊
➋
➌
➍
➎
➏
➑
➒
➓ AUX Mode
11 Volume Control
12 Power On/Off
13 Navi Map
14 NAVI Menu
15 NAVI Route
16 17 Tune DOWN/ UP
18 Dimmer
19 Setup Mode
Disc Eject
Disc Insert Slot
Clock Mode
FM/AM Mode
Disc Mode Selection
➐ SEEK UP/DOWN
Source Selection
Bluetooth Mode
Basic Functions
➊ Disc Eject
While a disc is playing, ejects the disc and the
system converts to the most recently operated mode. The Disc will not be ejected within
ACC OFF state.
➋ Disc Insert Slot
Slot for disc insertion. Once a disc is inserted,
the previous mode is canceled and the disc
will immediately be operated.
➌ Clock Mode
Displays the current time.
➍ FM/AM Mode
Operates RADIO Mode. Press once to listen
to FM Radio and press again to switch to AM
Radio.
➎ Disc Mode Selection
Operates Disc Mode. Supported discs are
audio CDs and DVDs.
➏,➐ SEEK UP / DOWN
Press these keys to operate SEEK/TRACK
UP/DOWN.
➑ Source Selection
Press to operate Media Player. If a USB
8
AVN SYSTEM Owner’s Manual
Memory has been connected once Media
Player begins to operate, then the mode will
operate in order of USB Music, USB Image. If
an iPod or iPhone has been connected, then
iPod mode will operate. The order of operation is as follows when a USB is connected.
If a USB has not been connected, no operation will occur even if this button is pressed.
➒ Bluetooth Mode
When an external device has been connected
to AUX, pressing this button will output the
video and audio from the external device.
CONTROLLERS AND FUNCTIONS
➓ AUX Mode
When an external device has been connected
to AUX, pressing this button will output the
video and audio from the external device.
11 Volume Control
Turn left and right will decrease and increase
the volume. The volume is divided into Radio,
USB Music, DVD, iPod, Bluetooth Phone, and
NAVI guidance volume. Adjusting the volume
when operating each mode will only change
the volume for the currently playing mode.
18 Dimmer
Press to darken the screen brightness or turn
off the screen. When the screen is turned off,
touching any place on the screen or repressing this button will restore the screen brightness. Audio will continue to play even if the
screen is turned off.
19 Setup Mode
Press to operate Setup Mode. The Setup
Mode of this device includes Audio Setting,
Equalizer, Navi Setup, System Upgrade, and
other features.
12 Power On/Off
Press to turn the power on/off. Shortly press
this button to mute the audio.
13 Power On/Off
Displays the map screen for the current position.
14 Power On/Off
Displays the Navi Menu screen.
15 Power On/Off
Displays the Navi Route screen.
16 , 17 Tune DOWN/UP
Decreases/ Increases the radio frequency in
one step increments.
AVN SYSTEM Owner’s Manual
9
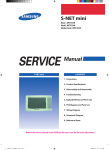
RADIO
Press to begin operating radio mode. Press
again to toggle between FM/AM modes. It
may take some time to convert the screen
so operate the device at an appropriate time
interval.
Radio Screen
➍ Option TAB
In case of RDS Radio regions, this tab allows
you to make Option settings for RDS Radio.
12 Preset save
Press to automatically save the currently playing
radio channel to the selected Preset Number.
➎ Broadcast display
Displays the currently playing broadcast.
➏, ➒ Tune Down/Up button
Use to operate the Tune down / up functions.
➐, ➑ Seek Down/Up button
Use to operate the Seek down / up functions.
13 , 15 Previous / Next page button
Press to move to the previous / next page
within the List Tab.
➊ Playing TAB
The Playing Tab is the Radio main screen.
The Playing Tab allows you can check the
currently playing radio broadcast.
10
➋ Preset TAB
The Preset Tab allows you to save frequently
played frequencies broadcasts as presets.
➓ Preset Number
Up to 12 preset channels can be saved to
each FM / AM modes.
➌ List TAB
The List Tab allows you to search and save all
receivable broadcasts.
11
AVN SYSTEM Owner’s Manual
Preset Delete
Press to easily delete previously saved preset
channels.
14 Search
Updates all Radio channels within the List
Tab. Press to delete all previously saved lists.
All channels that can be received from the
current location are received and changed
for display. Operating this function may take
up to 5 minutes depending on your current
location.
BLUETOOTH
Understanding Bluetooth
wireless technology
Bluetooth wireless technology establish¬es
a wireless link between two devices, such as
your phone and the unit.
The first time you use two devices together
you must connect them by establishing a
relationship using a PIN code. After the initial
connecting, the two devices can connect
automatically each time you turn them on.
※ Note
Using Bluetooth wireless
technology
This device supports wireless Bluetooth.
Bluetooth wirelessly connects a Bluetooth
mobile phone with the device.
1. This device is connected to a mobile phone
when the power is set to standby state
(ACC ON state).
2. The maximum distance for a Bluetooth
wireless connection is 10m.
• Due to the variety of Bluetooth phones and
their firmware version, your device may
respond differently when per¬forming over
Bluetooth.
3. This device is equipped with the latest
Digital Noise & Echo technology to provide
optimal sound quality and minimal sound
distortion. Nonetheless, minor echo and
noise may still occur in some situations. In
such cases, close the window to improve
the sound quality.
• As difference in functional operation by
model is mainly resulted from fea¬ture of a
hands-free phone, consult manufacturer of
a phone if you have any question.
4. This device supports the following
Bluetooth profiles.
▶ HFP (Hands Free Profile)
▶ PBAP (Phone Book Access Profile)
• There may be restrictions on using
Bluetooth technology in some loca¬tions.
• You can check the Bluetooth phone compatibility list on the designated web-site.
AVN SYSTEM Owner’s Manual
11
BLUETOOTH
Bluetooth Compatibility
S, S1, S2 = Supported
N = Not Supported
Function Test List
12
Disconnect(AG)
Reconnect(AG)
Connect with pair(HF)
Disconnect(HF)
Keep Connection
Auto Audio Connection(AG)
Number Call(AG)
Number Call(HF)
Cancel Outgoing Call(HF)
Cancel Outgoing Call(AG)
Audio Transfer at HF during Ongoingcall
Audio Transfer at AG during Ongoingcall
End Ongoing Call(HF)
End Ongoing Call(AG)
Last Dail(Redial) Ca+Y4ll(HF)
Incoming Local Ring
Incoming In-band Ring
Incoming Call Number
Accept Incoming Call(HF)
Accept Incoming Call(AG)
Reject Incoming Call(HF)
Reject Incoming Call(AG)
Scan & Connect OPP client
Receive Phone Book
A2DP Sink Support
AVRCP
Call-In during Playing
during Call-In, Answer and CallEnd
during Call-In, Reject
A2DP
Scan Device(AG)
OPP
Connect with pair(AG)
HFP
Model No.
Connection
Manufactures
Scan
Apple
Blackberry
iPhone
8100(pearl)
S
S
S
S
S
S
S
S
S
S
S
S
S
S
N
N
S
S
S
S
S
S
S
S
S
S
S
S
S
S
S
S
S
S
S
S
N
N
S
S
S
S
S1
S1
S
S
S
S
N
S
N
S
N
N
N
N
N
N
N
N
N
N
HP
HW6915
S
S
S
S
S
S
S
N
S
S
S
S
S
S
S
S
S
N
S
S
S
S1
S
S
S
S
N
N
N
N
N
Nokia
KE850
KE970
KU250
KU970
A780
E1000
E550
E680
RAZR V3i
RAZR V3X
REBl V6
RIZR K1
RIZR Z8
ROKR E2
SLVR L7
U6
V195
V360
V3x
V3xx
V500
S
S
S
S
S
S
S
S
S
S
S
S
S
S
S
S
S
S
S
S
S
S
S
S
S
S
S
S
S
S
S
S
S
S
S
S
S
S
S
S
S
S
S
S
S
S
S
S
S
S
S
S
S
S
S
S
S
S
S
S
S
S
S
S
S
S
S
S
S
S
S
S
S
S
S
S
S
S
S
S
S
S
S
S
S
S
S
S
S
S
S
S
S
S
S
S
S
S
S
S
S
S
S
S
S
S
S
S
S
S
S
S
S
S
S
S
S
S
S
S
S
S
S
S
S
S
S
S
S
S
S
S
S
S
S
S
S
S
S
S
S
S
S
S
S
S
S
N
N
N
N
S
S
S
S
S
S
N
S
N
S
S
S
S
S
S
S
S
S
S
S
S
S2
S2
S2
S1
S2
S2
S2
S2
S2
S2
S2
S2
S2
S2
S2
S2
S2
S
S
S
S
S
S
S
S
S
S
S
S
S
S
S
S
S
S
S
S
S
S
S
S
S
S
S
S
S
S
S
S
S
S
S
S
S
S
S
S
S
S
S
S
S
S
S
S
S
S
S
S
S
S
S
S
S
S
S
S
S
S
S
S
S
S
S
S
N
S
S
S
S
S
S
S
S
S2
S
S
S
S
S
S
S
S
S
S
S
S1
S1
S
S1
S1
S1
S1
S
S
N
S1
S1
S1
S1
S1
S1
S
S
S
S
S
S
S
S
S
S
S
S
S
S
S
S
S
S
S
S
S
S
S
S
S
S
S
S
S
S
S
S
S
S
S
S
S
S
S
S
S
S
S
S
S
S
S
S
S
S
S
S
S
S
S
S
S
S
S
S
S
S
S
N
N
N
N
S
S
N
S
N
N
N
N
N
N
N
N
N
N
N
N
N
S
S
S
S
N
N
S
N
S
S
S
S
S
S
S
S
S
S
S
S
S
S
S
S
S
S
S
S
S
S
S
S
S
S
S
S
S
S
S
S
S
S
S
S
S
S
S
S
S
S
S
S
S
S
S
S
S
S
S
S
S
S
S
S2
S1
S2
S1
S2
S2
S2
S2
S2
S2
S2
S2
S2
S2
S2
S2
S2
S2
S2
S2
S2
S
S
S
S
S
S
S
S
S
S
S
S
S
S
S
S
S
S
S
S
S
S
S
S
S
S
S
S
S
S
S
S
S
S
S
S
S
S
S
S
S
S
S
S
S
S
S
S
S
N
N
S
S
S
S
S
N
S
S
S
S
S
S
S
S
S
S
S
S
S
N
N
S
S
S
S
S
N
S
S
S
S
S
S
N
N
N
N
N
N
N
N
N
S
S
S
S
S
N
N
N
N
S
S
N
N
N
N
N
N
N
N
N
N
S
S
S
S
S
N
N
N
N
S
S
N
N
N
N
N
N
N
N
N
N
S
S
S
S
S
N
N
N
N
S
S
N
N
N
N
N
N
N
N
N
N
S
S
S
S
S
N
N
N
N
S
S
N
N
N
N
N
N
N
N
N
N
S
S
S
S
S
N
N
N
N
S
S
N
AVN SYSTEM Owner’s Manual
BLUETOOTH
Function Test List
AVRCP
Call-In during Playing
during Call-In, Answer and CallEnd
during Call-In, Reject
S
S
S
S
S
S
S
S
S
S
S
S
S
S
S
S
S
S
S
S
S
S
S
S
A2DP Sink Support
N
N
N
N
N
N
N
N
N
N
N
N
N
N
N
N
N
N
N
N
N
N
N
N
Receive Phone Book
S
S
S
S
S
S
S
S
S
S
S
S
S
S
S
S
S
S
S
S
S
S
S
S
Scan & Connect OPP client
S
S
S
S
S
S
S
S
S
S
S
S
S
S
S
S
S
S
S
S
S
S
S
S
Reject Incoming Call(AG)
S
S
S
S
S
S
S
S
S
S
S
S
S
S
S
S
S
S
S
S
S
S
S
S
Reject Incoming Call(HF)
S1
S1
S1
S1
S1
S1
S1
S1
S1
S1
S
S1
S1
S1
S1
S1
S1
S1
S1
S1
S1
S1
S1
S1
Accept Incoming Call(AG)
S
S
S
S
S
S1
S1
S1
S1
S1
S
S1
S1
S1
S1
S1
S1
S1
S1
S1
S1
S1
S1
S1
Incoming Call Number
Incoming In-band Ring
S
S
S
S
S
S
S
S
S
S
S
S
S
S
S
S
S
S
S
S
S
S
S
S
A2DP
Accept Incoming Call(HF)
Incoming Local Ring
S
S
S
S
S
S
S
S
S
S
S
S
S
S
S
S
S
S
S
S
S
S
S
S
Last Dail(Redial) Ca+Y4ll(HF)
S
S
S
S
S
S
S
S
S
S
S
S
S
S
S
S
S
S
S
S
S
S
S
S
End Ongoing Call(AG)
S2
S2
S2
S2
S2
S2
S2
S2
S2
S2
S2
S2
S2
S2
S2
S2
S2
S2
S2
S2
S2
S2
S2
S2
End Ongoing Call(HF)
S
S
S
S
S
S
S
S
S
S
S
S
S
S
S
S
S
S
S
S
S
S
S
S
Audio Transfer at AG during Ongoingcall
Cancel Outgoing Call(HF)
S
S
S
S
S
S
S
S
S
S
S
S
S
S
S
S
S
S
S
S
S
S
S
S
Cancel Outgoing Call(AG)
Number Call(HF)
S
S
S
S
S
S
S
S
S
S
S
S
S
S
S
S
S
S
S
S
S
S
S
S
OPP
Audio Transfer at HF during Ongoingcall
Number Call(AG)
S
S
S
S
S
S
S
S
S
S
S
S
S
S
S
S
S
S
S
S
S
S
S
S
Auto Audio Connection(AG)
S
S
S
S
S
S
S
S
S
S
S
S
S
S
S
S
S
S
S
S
S
S
S
S
Disconnect(HF)
S
S
S
S
S
S
S
S
S
S
S
S
S
S
S
S
S
S
S
S
S
S
S
S
HFP
Keep Connection
S
S
S
S
S
S
S
S
S
S
S
S
S
S
S
S
S
S
S
S
S
S
S
S
Reconnect(AG)
Disconnect(AG)
S
S
S
S
S
S
S
S
S
S
S
S
S
S
S
S
S
S
S
S
S
S
S
S
Connect with pair(HF)
Scan Device(AG)
Model No.
Nokia
V525
V600
V600
V9
W510
3230
3250
3650
6021
6103
6110
6131
6230
6280
6288
6300
6600
6630
6650
6670
6680
6681
6820
7370
Connection
Connect with pair(AG)
Manufactures
Scan
S
S
S
S
S
S
S
S
S
S
S
S
S
S
S
S
S
S
S
S
S
S
S
S
S
S
S
S
S
S
S
S
S
S
S
S
S
S
S
S
S
S
S
S
S
S
S
S
S2
S2
S2
S2
S2
S2
S2
S2
S2
S2
S2
S2
S2
S2
S2
S2
S2
S2
S2
S2
S2
S2
S2
S2
S
S
S
S
S
S
S
S
S
S
S
S
S
S
S
S
S
S
S
S
S
S
S
S
S
S
S
S
S
S
S
S
S
S
S
S
S
S
S
S
S
S
S
S
S
S
S
S
S
S
S
S
S
S
S
S
S
S
S
S
S
S
S
S
S
S
S
S
S
S
S
S
S
S
S
S
S
S
S
S
S
S
S
S
S
S
S
S
S
S
S
S
S
S
S
S
N
N
N
S
S
N
S
N
N
N
S
S
N
N
S
S
N
N
N
N
N
N
N
N
N
N
N
S
S
N
S
N
N
N
S
S
N
N
S
S
N
N
N
N
N
N
N
N
N
N
N
S
S
N
S
N
N
N
S
S
N
N
S
S
N
N
N
N
N
N
N
N
N
N
N
S
S
N
N
N
N
N
S
S
N
N
S
S
N
N
N
N
N
N
N
N
N
N
N
S
S
N
N
N
N
N
S
S
N
N
S
S
N
N
N
N
N
N
N
N
AVN SYSTEM Owner’s Manual
13
BLUETOOTH
Function Test List
14
AVN SYSTEM Owner’s Manual
AVRCP
Call-In during Playing
during Call-In, Answer and CallEnd
during Call-In, Reject
S
N
S
S
S
S
S
S
S
S
N
S
S
S
S
S
S
S
S
S
S
S
S
S
S
S
S
A2DP Sink Support
N
N
N
N
N
N
N
N
N
N
N
N
N
N
N
N
N
N
N
N
N
N
N
N
N
N
N
Receive Phone Book
S
N
S
S
S
S
S
S
S
S
N
S
S
S
S
S
S
S
S
S
S
S
S
S
S
S
S
Scan & Connect OPP client
S
N
S
S
S
S
S
S
S
S
N
S
S
S
S
S
S
S
S
S
S
S
S
S
S
S
S
Reject Incoming Call(AG)
S
N
S
S
S
S
S
S
S
S
N
S
S
S
S
S
S
S
S
S
S
S
S
S
S
S
S
Reject Incoming Call(HF)
S1
N
S1
S1
N
S1
S
S1
S1
S1
N
S1
S1
S1
S1
S1
S1
S1
S1
S
S1
S1
S1
S1
S1
S1
S1
Accept Incoming Call(AG)
S1
N
S1
S1
S1
S1
S
S1
S1
S1
N
S1
S1
S1
S1
S1
S1
S1
S1
S
S1
S1
S1
S1
S1
S1
S1
Incoming Call Number
Incoming In-band Ring
S
N
S
S
S
S
S
S
S
S
N
S
S
S
S
S
S
S
S
S
S
S
S
S
S
S
S
A2DP
Accept Incoming Call(HF)
Incoming Local Ring
S
N
S
S
S
S
S
S
S
S
N
S
S
S
S
S
S
S
S
S
S
S
S
S
S
S
S
Last Dail(Redial) Ca+Y4ll(HF)
S
N
S
S
S
S
S
S
S
S
N
S
S
S
S
S
S
S
S
S
S
S
S
S
S
S
S
End Ongoing Call(AG)
S2
N
S2
S2
S2
S2
S2
S2
S2
S2
N
S2
S2
S2
S2
S2
S2
S2
S2
S2
S2
S2
S2
S2
S2
S2
S2
End Ongoing Call(HF)
S
N
S
S
S
S
S
S
S
S
N
S
N
S
S
S
N
S
N
S
S
S
S
S
S
S
S
Audio Transfer at AG during Ongoingcall
Cancel Outgoing Call(HF)
S
N
S
S
S
S
S
S
S
S
N
S
S
S
S
S
S
S
S
S
S
S
S
S
S
S
S
Cancel Outgoing Call(AG)
Number Call(HF)
S
N
S
S
S
S
S
S
S
S
N
S
S
S
S
S
S
S
S
S
S
S
S
S
S
S
S
OPP
Audio Transfer at HF during Ongoingcall
Number Call(AG)
S
N
S
S
S
S
S
S
S
S
N
S
S
S
S
S
S
S
S
S
S
S
S
S
S
S
S
Auto Audio Connection(AG)
S
N
S
S
S
S
S
S
S
S
N
S
S
S
S
S
S
S
S
S
S
S
S
S
S
S
S
Disconnect(HF)
S
N
S
S
S
S
S
S
S
S
N
S
S
S
S
S
S
S
S
S
S
S
S
S
S
S
S
HFP
Keep Connection
S
N
S
S
S
S
S
S
S
S
N
S
S
S
S
S
S
S
S
S
S
S
S
S
S
S
S
Reconnect(AG)
Disconnect(AG)
S
N
S
S
S
S
S
S
S
S
N
S
S
S
S
S
S
S
S
S
S
S
S
S
S
S
S
Connect with pair(HF)
Scan Device(AG)
Model No.
Nokia
7380
7650
8600
8800
9500
5500 SPORT
6120c
6230i
6500c
6820a
7650(Italy)
8910i
E50
E60
E61
E61
E62
E65
E70
E90
N70
N73
N77
N80
N91
N92
N95
Connection
Connect with pair(AG)
Manufactures
Scan
S
N
S
S
S
S
S
S
S
S
N
S
S
S
S
S
S
S
S
S
S
S
S
S
S
S
S
S
N
S
S
S
S
S
S
S
S
N
S
S
S
S
S
S
S
S
S
S
S
S
S
S
S
S
S2
N
S2
S2
S2
S2
S2
S2
S2
S2
N
S2
S2
S2
S2
S2
S2
S2
S2
S2
S2
S2
S2
S2
S2
S2
S2
S
N
S
S
S
S
S
S
S
S
N
S
S
S
S
S
S
S
S
S
S
S
S
S
S
S
S
S
N
S
S
S
S
S
S
S
S
N
S
S
S
S
S
S
S
S
S
S
S
S
S
S
S
S
S
S
S
S
S
S
S
S
S
S
S
S
S
S
S
S
S
S
S
S
S
S
S
S
S
S
S
S
S
S
S
S
S
S
S
S
S
S
S
S
S
S
S
S
S
S
S
S
S
S
S
S
S
S
N
N
S
S
N
S
S
N
S
N
N
N
S
N
S
N
S
N
S
S
N
S
S
N
N
S
S
N
N
S
S
N
S
S
N
S
N
N
N
S
N
S
N
S
N
S
S
N
S
S
N
N
S
S
N
N
S
S
N
S
S
N
S
N
N
N
S
N
S
N
S
N
S
S
N
S
S
N
N
S
S
N
N
S
S
N
N
S
N
S
N
N
N
N
N
S
N
N
N
N
S
N
S
S
N
N
N
S
N
N
S
S
N
N
S
N
S
N
N
N
N
N
S
N
N
N
N
S
N
S
S
N
N
N
S
BLUETOOTH
Function Test List
AVRCP
Call-In during Playing
during Call-In, Answer and CallEnd
during Call-In, Reject
S
N
N
N
N
N
N
N
N
N
N
N
N
N
N
N
N
N
N
N
N
N
N
N
N
N
N
N
A2DP Sink Support
N
S
S
S
S
S
S
S
S
S
S
S
S
S
S
S
S
S
S
S
S
S
S
S
S
S
S
S
Receive Phone Book
S
S
S
S
S
S
S
S
S
S
S
S
S
S
S
S
S
S
S
S
S
S
S
S
S
S
S
S
Scan & Connect OPP client
S
S
S
S
S
S
S
S
S
S
S
S
S
S
S
S
S
S
S
S
S
S
S
S
S
S
S
S
Reject Incoming Call(AG)
S
S
S
S
S
S
S
S
S
S
S
S
S
S
S
S
S
S
S
S
S
S
S
S
S
S
S
S
Reject Incoming Call(HF)
S
S
S
S
S
S
S
S
S
S
S
S
S
S
S
S
S
S
S
S
S
S
S
S
S
S
S
S
Accept Incoming Call(AG)
S
S
S
S
S
S
S
S
S
S
S
S
S
S
S
S
S
S
S
S
S
S
S
S
S
S
S
S
Incoming Call Number
Incoming In-band Ring
S
S
S
S
S
S
S
S
S
S
S
S
S
S
S
S
S
S
S
S
S
S
S
S
S
S
S
S
A2DP
Accept Incoming Call(HF)
Incoming Local Ring
S
S
S
S
S
S
S
S
S
S
S
S
S
S
S
S
S
S
S
S
S
S
S
S
S
S
N
N
Last Dail(Redial) Ca+Y4ll(HF)
S
S
S
S
S
S
S
S
S
S
S
S
S
S
S
S
S
S
S
S
S
S
S
S
S
S
S
S
End Ongoing Call(AG)
S2
S2
S2
S2
S2
S2
S2
S2
S2
S2
S2
S2
S2
S2
S1
S1
S1
S2
S
S2
S
S2
S2
S2
S2
S2
S2
S2
End Ongoing Call(HF)
S
N
N
N
N
N
N
N
N
N
N
N
N
N
N
N
N
N
N
N
N
N
N
N
N
N
N
N
Audio Transfer at AG during Ongoingcall
Cancel Outgoing Call(HF)
S
S
S
S
S
S
S
S
S
S
S
S
S
S
S
S
S
S
S
S
S
S
S
S
S
S
S
S
Cancel Outgoing Call(AG)
Number Call(HF)
S
S
S
S
S
S
S
S
S
S
S
S
S
S
S
S
S
S
S
S
S
S
S
S
S
S
S
S
OPP
Audio Transfer at HF during Ongoingcall
Number Call(AG)
S
S
S
S
S
S
S
S
S
S
S
S
S
S
S
S
S
S
S
S
S
S
S
S
S
S
S
S
Auto Audio Connection(AG)
S
S
S
S
S
S
S
S
S
S
S
S
S
S
S
S
S
S
S
S
S
S
S
S
S
S
S
S
Disconnect(HF)
N
S
S
S
S
S
S
S
S
S
S
S
S
S
S
S
S
S
S
S
S
S
S
S
S
S
S
S
HFP
Keep Connection
S
S
S
S
S
S
S
S
S
S
S
S
S
S
S
S
S
S
S
S
S
S
S
S
S
S
S
S
Reconnect(AG)
Sony
Ericsson
S
S
S
S
S
S
S
S
S
S
S
S
S
S
S
S
S
S
S
S
S
S
S
S
S
S
S
S
Connect with pair(HF)
Siemens
Disconnect(AG)
Sharp
Scan Device(AG)
Samsung
Treo750V
709SC
a707(SYNC)
D600
D820
D900
E900
SGH-F210
SGH-G600
SGH-L600
SGH-U700
T509
Z540V
GX15
S65
SK65
SL75
SX1
K700c
K700i
K750i
K800i
M600i
P990i
S500i
S700i
T610
T618
Connection
Connect with pair(AG)
Palm
Model No.
Manufactures
Scan
S
S
S
S
S
S
S
S
S
S
S
S
S
S
S
S
S
S
S
S
S
S
S
S
S
S
S
S
S
S
S
S
S
S
S
S
S
S
S
S
S
S
S
S
S
S
S
S
S
S
S
S
S
S
S
S
S2
S2
S2
S1
S1
S1
S1
S1
S1
S1
S1
S2
S1
S2
S1
S1
S1
S2
S
S1
S
S2
S2
S1
S2
S2
S2
S1
S
S
S
S
S
S
S
S
S
S
S
S
S
S
S
S
S
S
S
S
S
S
S
S
S
S
S
S
S
S
S
S
S
S
S
S
S
S
S
S
S
S
S
S
S
S
S
S
S
S
S
S
S
S
S
S
N
S
S
S
S
S
S
S
S
S
S
S
S
N
S
S
S
S
S
S
S
S
S
S
S
S
S
S
N
S
S
S
S
S
S
S
S
S
S
S
S
N
S
S
S
S
S
S
S
S
S
S
S
S
S
S
S
S
S
S
S
S
S
S
S
S
S
N
N
N
N
N
S
N
N
N
N
S
S
S
S
N
N
N
S
S
S
S
S
S
S
S
S
S
S
N
N
N
N
N
S
N
N
N
N
S
S
S
S
N
N
N
S
S
S
S
S
S
S
S
S
S
S
N
N
N
N
N
S
N
N
N
N
S
S
S
S
N
N
N
S
S
S
S
S
S
S
S
S
S
S
N
N
N
N
N
S
N
N
N
N
S
S
S
S
N
N
N
S
S
S
S
S
S
S
S
S
S
S
N
N
N
N
N
S
N
N
N
N
S
S
S
S
N
N
N
AVN SYSTEM Owner’s Manual
15
Curitel
EVER
16
S
S
S
S
S
S
S
S
S
S
S
S
S
S
S
AVN SYSTEM Owner’s Manual
S
S
S
S
S
S
S
S
S
S
S
S
S
S
S
N
N
N
N
N
during Call-In, Reject
S
S
S
S
S
during Call-In, Answer and CallEnd
S
S
S
S
S
Call-In during Playing
S
S
S
S
S
AVRCP
S
S
S
S
S
A2DP Sink Support
S
S
S
S
S
Receive Phone Book
S
S
S
S
S
Scan & Connect OPP client
Connection
Reject Incoming Call(AG)
Scan & Connect OPP client
Receive Phone Book
A2DP Sink Support
AVRCP
Call-In during Playing
during Call-In, Answer and CallEnd
during Call-In, Reject
N
N
N
N
N
Reject Incoming Call(AG)
S
S
S
S
S
Reject Incoming Call(HF)
S
S
S
S
S
Accept Incoming Call(AG)
S
S
S
S
S
Reject Incoming Call(HF)
Incoming In-band Ring
S
S
S
S
S
Accept Incoming Call(AG)
Incoming Local Ring
S
S
S
S
S
Incoming Call Number
Last Dail(Redial) Ca+Y4ll(HF)
S
S
S
S
S
Accept Incoming Call(HF)
End Ongoing Call(AG)
S
S
S
S
S
Incoming Call Number
End Ongoing Call(HF)
Connection
Accept Incoming Call(HF)
Incoming In-band Ring
S1
S1
S1
S1
S1
Incoming Local Ring
N
N
N
N
N
Last Dail(Redial) Ca+Y4ll(HF)
S
S
S
S
S
End Ongoing Call(AG)
S
S
S
S
S
Audio Transfer at AG during Ongoingcall
S
S
S
S
S
End Ongoing Call(HF)
Cancel Outgoing Call(HF)
S
S
S
S
S
Cancel Outgoing Call(AG)
Number Call(HF)
S2
S2
S2
S2
S2
Audio Transfer at HF during Ongoingcall
Number Call(AG)
N
S
N
N
N
Audio Transfer at AG during Ongoingcall
Cancel Outgoing Call(HF)
Auto Audio Connection(AG)
S
S
S
S
S
Cancel Outgoing Call(AG)
Number Call(HF)
Disconnect(HF)
S
S
S
S
S
Audio Transfer at HF during Ongoingcall
Number Call(AG)
S
S
S
S
S
Auto Audio Connection(AG)
S
S
S
S
S
Keep Connection
S
S
S
S
S
Disconnect(HF)
Scan
S
S
S
S
S
Keep Connection
S
S
S
S
S
Reconnect(AG)
S
S
S
S
S
Connect with pair(HF)
Disconnect(AG)
S
S
S
S
S
Reconnect(AG)
Scan Device(AG)
Scan
Connect with pair(HF)
Disconnect(AG)
PT-L2200
EV-K150
EV-W100
EV-W200
EV-W300
Connect with pair(AG)
Model No.
V600i
V800
W810i
W880
Z610
Scan Device(AG)
Manufactures
Sony
Ericsson
Connect with pair(AG)
Model No.
Manufactures
BLUETOOTH
Function Test List
HFP
OPP
CDMA Type Phone Test List
HFP
A2DP
S
S
S
S
S
S
S
S
S
S
S1
S2
S
S2
S1
S
S
S
S
S
S
S
S
S
S
S
S
S
S
S
S
S
S
S
S
N
N
N
S
S
N
N
N
S
S
N
N
N
S
S
N
N
N
S
S
N
N
N
S
S
S, S1, S2 = Supported
N = Not Supported
Function Test List
OPP
A2DP
S
S
S
S
S
S
S
S
S
S
S1
S1
S1
S1
S1
S
S
S
N
S
S
S
S
S
S
S
S
S
S
S
S
S
S
S
S
N
N
S
S
S
N
N
S
S
S
N
N
S
S
S
N
N
S
S
S
N
N
S
S
S
EVER
LG
Motorola
Pantech
S
S
S
S
S
S
S
S
S
S
S
S
S
S
S
S
S
S
S
S
S
S
S
S
S
S
S
S
S
S
S
S
S
S
S
S
Call-In during Playing
during Call-In, Answer and CallEnd
during Call-In, Reject
N
N
N
N
N
N
N
N
N
N
N
N
AVRCP
S
S
S
S
S
S
S
S
S
S
S
S
A2DP Sink Support
S
S
S
S
S
S
S
S
S
S
S
S
Receive Phone Book
S
S
S
S
S
S
S
S
S
S
S
S
Scan & Connect OPP client
S
N
S
S
S
S
S
S
S
S
S
S
Reject Incoming Call(AG)
S
S
S2
S
S2
S2
S2
S
S2
S
S
S
Reject Incoming Call(HF)
N
S
S
S
S
S
S
S
S
S
S
S
Accept Incoming Call(AG)
S
S
S
S
S
S
S
S
S
S
S
S
Incoming Call Number
Incoming In-band Ring
Connection
Accept Incoming Call(HF)
Incoming Local Ring
S
S
S
S
S
N
S
S
S
S
S
S
Last Dail(Redial) Ca+Y4ll(HF)
S
S
S
S
S
S
S
S
S
S
S
S
End Ongoing Call(AG)
S1
S1
S1
S1
S1
S1
S1
S1
S1
S1
S1
S1
End Ongoing Call(HF)
Cancel Outgoing Call(HF)
N
N
N
N
N
N
N
N
N
N
N
N
Audio Transfer at AG during Ongoingcall
Number Call(HF)
S
S
S
S
S
S
S
S
S
S
S
S
Cancel Outgoing Call(AG)
Number Call(AG)
S
S
S
S
S
S
S
S
S
S
S
S
Audio Transfer at HF during Ongoingcall
Auto Audio Connection(AG)
S
S
S
S
S
S
S
S
S
S
S
S
Disconnect(HF)
S
S
S
S
S
S
S
S
S
S
S
S
Keep Connection
Reconnect(AG)
Disconnect(AG)
Scan
Connect with pair(HF)
Scan Device(AG)
EV-W350
LG-KF1100
LG-KH1400
LG-LB2500
LG-LP3900
LG-SH100
LG-SH110
LG-SV240
MS700
MS700T
V9M(RAZR2)
U-5000
Connect with pair(AG)
Model No.
Manufactures
BLUETOOTH
Function Test List
HFP
OPP
A2DP
N
S
S
S
S
S
S
S
S
S
S
S
S
S
S
S
S
S
S
S
S
S
S
S
S1
S1
S1
S1
S1
S1
S1
S1
S1
S1
S1
S1
N
N
N
N
N
N
N
N
S
S
S
S
S
N
S
S
N
N
N
N
S
S
S
S
S
N
S
S
N
S
S
S
S
S
S
S
S
N
S
S
N
S
S
S
S
S
S
S
S
N
S
N
N
N
S
S
S
S
S
S
S
N
S
N
N
N
S
S
S
S
S
S
N
N
S
N
N
N
S
S
S
S
S
S
S
N
S
N
N
N
S
S
S
S
S
S
S
N
S
N
N
N
S
S
S
S
S
S
AVN SYSTEM Owner’s Manual
17
BLUETOOTH
Function Test List
18
AVN SYSTEM Owner’s Manual
AVRCP
Call-In during Playing
during Call-In, Answer and CallEnd
during Call-In, Reject
N
N
N
N
N
N
N
N
N
N
N
N
N
N
N
N
N
N
N
N
N
N
N
N
N
A2DP Sink Support
S
S
S
S
S
S
S
S
S
S
S
S
S
S
S
S
S
S
S
S
S
S
S
S
S
Receive Phone Book
S
S
S
S
S
S
S
S
S
S
S
S
S
S
S
S
S
S
S
S
S
S
S
S
S
Scan & Connect OPP client
S
S
S
S
S
S
S
S
S
S
S
S
S
S
S
S
S
S
S
S
S
S
S
S
S
Reject Incoming Call(AG)
S
S
S
S
S
S
S
S
S
S
S
S
S
S
S
S
S
S
S
S
S
S
S
S
S
Reject Incoming Call(HF)
S
S
S
S
S
S
N
S
S
S
S
S
S
S
S
S
S
S
S
S
S
S
S
S
S
Accept Incoming Call(AG)
S
S
S
S
S
S
S
S
S
S
S
S
S
S
S
S
S
S
S
S
S
S
S
S
S
Incoming Call Number
Incoming In-band Ring
S
S
S
S
S
S
S
S
S
S
S
S
S
S
S
S
S
S
S
S
S
S
S
S
S
A2DP
Accept Incoming Call(HF)
Incoming Local Ring
S
S
S
S
S
S
S
S
S
S
S
S
S
S
S
S
S
S
S
S
S
N
S
S
S
Last Dail(Redial) Ca+Y4ll(HF)
S
S
S
S
S
S
S
S
S
S
S
S
S
S
S
S
S
S
S
S
S
S
S
S
S
End Ongoing Call(AG)
S1
S1
S1
S1
S1
S1
S1
S1
S1
S1
S1
S1
S1
S1
S1
S1
S1
S1
S1
S1
S1
S1
S1
S1
S1
End Ongoing Call(HF)
N
N
N
S
S
N
N
N
N
N
N
N
N
N
N
N
N
N
N
N
N
N
N
N
N
Audio Transfer at AG during Ongoingcall
Cancel Outgoing Call(HF)
S
S
S
S
S
S
S
S
S
S
S
S
S
S
S
S
S
S
S
S
S
S
S
S
S
Cancel Outgoing Call(AG)
Number Call(HF)
S
S
S
S
S
S
S
S
S
S
S
S
S
S
S
S
S
S
S
S
S
S
S
S
S
OPP
Audio Transfer at HF during Ongoingcall
Number Call(AG)
S
S
S
S
S
S
S
S
S
S
S
S
S
S
S
S
S
S
S
S
S
S
S
S
S
Auto Audio Connection(AG)
S
S
S
S
S
S
S
S
S
S
S
S
S
S
S
S
S
S
S
S
S
S
S
S
S
Disconnect(HF)
S
S
S
S
S
S
S
S
S
S
S
S
S
S
S
S
S
S
S
S
S
S
S
S
S
HFP
Keep Connection
S
S
S
S
S
S
S
S
S
S
S
S
S
S
S
S
S
S
S
S
S
S
S
S
S
Reconnect(AG)
Disconnect(AG)
S
S
S
S
S
S
S
S
S
S
S
S
S
S
S
S
S
S
S
S
S
S
S
S
S
Connect with pair(HF)
Scan Device(AG)
SCH-B380
SCH-B540
SCH-B550
SCH-B630
SCH-B710
SCH-B750
SCH-V740
SCH-V745
Samsung
SCH-V900
SCH-W240
SCH-W270
SCH-W290
SCH-W300
SCH-W330
SPH-B5000
SPH-B6550
SPH-B6700
SPH-V6900
SPH-V9050
SPH-V9500
Samsung
SPH-V9550
SPH-V9600
SPH-V9850
SPH-W2500
Sky
IM-U200
Connection
Connect with pair(AG)
Model No.
Manufactures
Scan
S
S
S
S
S
S
S
S
S
S
S
S
S
S
S
S
S
S
S
S
S
S
S
S
S
S
S
S
S
S
S
S
S
S
S
S
S
S
S
S
S
S
S
S
S
S
S
S
S
S
S1
S1
S1
S1
S1
S1
S1
S1
S1
S1
S1
S1
S1
S1
S1
S1
S1
S1
S1
S1
S1
S1
S1
S
S1
S
S
S
S
S
S
S
S
S
S
S
S
S
S
S
S
S
S
S
S
S
S
S
S
S
N
S
S
S
S
S
S
N
S
S
S
S
S
S
S
S
S
S
S
S
S
S
S
S
N
S
N
N
N
S
N
S
S
N
S
S
S
S
S
S
S
N
S
S
N
S
N
N
N
S
S
N
N
N
S
N
S
S
N
S
S
S
S
S
S
S
N
S
S
N
S
N
N
N
S
S
S
S
S
S
S
S
S
S
S
S
S
S
S
S
S
S
S
S
S
S
S
S
S
S
S
S
S
S
S
S
S
S
S
S
S
S
S
S
S
S
S
S
S
S
S
S
S
S
S
S
S
S
S
S
S
S
S
S
S
S
S
S
S
S
S
S
S
S
S
S
N
S
S
S
S
S
S
S
S
S
S
S
S
S
S
S
S
S
S
S
S
S
S
S
S
S
S
S
S
S
S
S
S
S
S
S
S
S
S
S
S
S
S
S
S
S
S
S
S
S
S
S
S
S
BLUETOOTH
Bluetooth Connection
Press PHONE to move to the following Phone
screen.
Use the Dial tab to enter the phone number.
Press SEND to make the call. Press END to end
the call. When using Transfer, the call can be
switched between the mobile phone or Handsfree.
Press Mute to mute the phone call.
Select the Contacts Tab to use the Contacts.
Press Download to download the contacts
from your mobile phone.
Press Delete All to delete all downloaded
contacts. Use the keypad to search for the
desired contacts.
Incoming call
Recents
This state allows you to pair the device.
From the Bluetooth menu within your mobile
phone, find “MyCar” and pair. Once pairing is
successful, the next step will be displayed.
Operation of Hands free
Outgoing Call
When a call is received, the Incoming Call
screen is displayed. Press Accept or Reject to
accept or reject a call.
Contacts
The Recents tab allows you to view recent
call histories. Select an item in the list to make
a call to the corresponding number.
Press Delete All to delete all recent call histories.
Note) Only call histories after the device is
turned on are saved.
AVN SYSTEM Owner’s Manual
19
BLUETOOTH
Option
The Option tab is used to select the PID to be
used upon pairing.
20
AVN SYSTEM Owner’s Manual
MEDIA
Press MEDIA to operate USB or iPod Media
modes.
A USB Memory or iPod / iPhone must be
connected to the USB terminal. If no device
has been connected, no operation will occur
even if the button is pressed. When a USB
Memory or iPod/iPhone has been connected,
the device will automatically begin to operate. Also, some USBs may not be recognized
depending on the USB Memory type.
Music Player
➊ Playing Tab
This is the main screen in which USB MP3 or
iPod/iPhone MP3 operates.
➌, ➎. Previous / Next
These buttons are used to select the previous
or next song. Previous songs are saved in the
order as played. This is not related with the
list order.
The next song is played based on the listed
order.
➍ Play/Pause
Used to pause or play the current song.
➏, ➐ Previous / Next
Moves to the previous or next list page.
➋ List Tab
Displays the list of files saved within the USB
Memory or iPod/iPhone.
AVN SYSTEM Owner’s Manual
21
MEDIA
USB Mode
If there is an image in the USB, the Image
Viewer or Slide Show functions can be used.
➍, ➏ Previous / Next button
Displays the previous or next USB image
within the list.
➎ Play / Pause button
Plays or pauses the Slide Show.
Compatible USB devices
• Devices which require additional program
installation when you have connected it to a
computer, are not supported.
• MP3 player: Flash type MP3 player
The MP3 player requiring installation of a
driver is not supported.
• USB Flash Drive: Devices that support
USB2.0 or USB1.1.
➊ Playing Tab
Main screen that displays the USB Image.
While the USB MP3 is operating, re-press the
MEDIA key to view USB images. This feature
is supported only when the USB contains
images.
Here, the selected audio within the USB MP3
will continue to play.
➋ List Tab
Displays the USB Image List.
➌ Option Tab
The USB Image list is displayed with images
placed within small grid format.
22
AVN SYSTEM Owner’s Manual
➐, ➒ Previous / Next
Moves to the previous / next page within the
USB Image List.
➑ Folder Up
Moves to the one level up folder to display
the USB Image.
MEDIA
USB Memory Compatibility
Product Company
1
2
4
5
6
PID
Nano Drive
128M
0x0EA0
0x2168
F/H
Pass
2010-01-26
Absolline
AL Tech
anydriver
AXXEN
7
8
VID
Model Name
3
BMK Technology Co., LTD
9
Speed
Compatibility Last Update date
(F/H)
Cap
Name
AnyDrive 2.0 High
128M
0x0EA0
0x2168
F/H
Pass
2010-01-26
AnyDrive Mini USB
128M
0x0EA0
0x2168
F/H
Pass
2010-01-26
anydriver
128M
0x0EA0
0x2168
F/H
Pass
2010-01-26
-
4G
0x1307
0x0163
F/H
Pass
2010-01-26
SKYXM
4G
0x1516
0x1603
F/H
Pass
2010-01-26
MemoRive
512M
0x13FE
0x1D00
F/H
Pass
2010-01-26
MemoRive PRO
128M
0x0F5F
0x1325
F/H
Pass
2010-01-26
MemoRive PRO
128M
0x0F5F
0x1325
F/H
Pass
2010-01-26
10
celldisk
celldisk
2G
0x090C
0x1000
F/H
Pass
2010-01-26
11
DaoKorea
128MB
128M
0x0EA0
0x2168
F/H
Pass
2010-01-26
12
Dr.Soft
CoolGate
64M
0x09A6
0x8001
F
Pass
2010-01-26
13
ECPART
MUDISK 128MB
128M
0x0C76
0x0007
F
Pass
2010-01-26
AXIS Mobile Disk 2.0
32M
0x0EA0
0x2168
F/H
Pass
2010-01-26
HMDS-512C
512M
0x0EA0
0x2168
F/H
Pass
2010-01-26
HMDS-512C
512M
0x0EA0
0x2168
F/H
Pass
2010-01-26
HP v120w
2G
0x03F0
0x2107
F/H
Pass
2010-01-26
14
15
Hana Micron
16
17
18
19
20
HP
Imation
INNATOR
iCON
1G
0x090C
0x1000
F/H
Pass
2010-01-26
nano flash drive
4G
0x0718
0x04A2
F/H
Pass
2010-01-26
USB X Drive PLUS
128M
0x0EA0
0x2168
F/H
Pass
2010-01-26
Etc
AVN SYSTEM Owner’s Manual
23
MEDIA
Product Company
PID
Speed
Compatibility Last Update date
(F/H)
celldisk
2G
0x1307
0x0163
F/H
Pass
2010-01-26
IOCELL
CELLDISK 2.0
256M
0x067B
0x2517
F/H
Pass
2010-01-26
23
CellDisk ActiveDrive
128M
0x067B
0x2517
F/H
Pass
2010-01-26
24
IOCELL
celldisk SLIDER
1G
0x1307
0x0163
F/H
Pass
2010-01-26
25
iriver
DOMINO
4G
0x090C
0x1000
F/H
Pass
2010-01-26
Storage Device
2G
0x058F
0x6387
F/H
Pass
2010-01-26
JetFlashMass
Mass Storage Device
2G
0x058F
0x6387
F/H
Pass
2010-01-26
2010-01-26
26
27
28
Mass Storage Device
8G
0x058F
0x6387
F/H
Pass
29
JUNGSOFT
NEXDISK PSD401
128M
0x0EF5
0x2366
F/H
Pass
2010-01-26
30
KMIT
UNI DRIVE(KMF-UD)
32M
0x09A6
0x8001
F
Pass
2010-01-26
31
LEXAR
JUMPDRIVE
128M
0x05DC
0xA101
F
Pass
2010-01-26
XTICK
2G
0x090C
0x1000
F/H
Pass
2010-01-26
XTICK
4G
0x043E
0x70D4
F/H
Pass
2010-01-26
XTICK UM5-4GB
4G
0x043E
0x70D4
F/H
Pass
2010-01-26
32
33
LG
34
35
USB drive 128MB
128M
0x04E8
0x0111
F/H
Pass
2010-01-26
36
USB Flash Disk
128M
0x04E8
0x0111
F/H
Pass
2010-01-26
37
DiskOnKey
512M
0x08EC
0x0012
F/H
Pass
2010-01-26
38
MemoRix
Systems Flash Disk Pio
39
24
VID
Model Name
21
22
Cap
Name
M-DISK
16M
0x08EC
0x0822
F
Pass
2010-01-26
StorageMate
256M
0x08EC
0x0012
F
Pass
2010-01-26
40
MWR
Memorette COBU1
8G
0x090C
0x1000
F/H
Pass
2010-01-26
41
NextWay
Mass Storage UFD0.3
128M
0x0483
0x1307
F
Pass
2010-01-26
42
PNY
USB DISK 20
128M
0x0D7D
0x1600
F/H
Pass
2010-01-26
43
pqi
intelligentStick
2G
0x3538
0x0060
F/H
Pass
2010-01-26
44
PQI
Traveling Disk U172P
4G
0x3538
0x0901
F/H
Pass
2010-01-26
AVN SYSTEM Owner’s Manual
Etc
SD/MMC/MS Reader
MEDIA
Product Company
Name
Cap
VID
PID
Model Name
Speed
Compatibility Last Update date
(F/H)
45
PRETEC
PRETEC
1G
0x4146
0xBA63
F/H
Pass
2010-01-26
46
RiData
USB Flash Disk
128M
0x08EC
0x0845
F/H
Pass
2010-01-26
47
SAMSUNG
M4GSD
4G
0x054C
0x0243
F/H
Pass
2010-01-26
48
Samsung
512M
0x067B
0x2515
F/H
Pass
2010-01-26
2010-01-26
Etc
Pleomax
512M
49
SAMSUNG
SUM-BWB4
4G
0x090C
0x1000
F/H
Pass
50
Samsung
Truition
128M
0x0DD8
0x6200
F
Pass
2010-01-26
51
SanDisk
U3 Cruzer Micro 8.02
4G
0x0781
0x5406
F/H
Pass
2010-01-26
Flash Disk(FD-03)
128M
0x08EC
0x0845
F/H
Pass
2010-01-26
FLEX Drive (FD-02)
128M
0x0EA0
0x2168
F/H
Pass
2010-01-26
MINI USB 2.0
128M
0x1080
0x2001
F/H
Pass
2010-01-26
TURBO USB 2.0
128M
0x1080
0x2001
F/H
Pass
2010-01-26
self IC Boot
512M
0x1080
0x0001
F
Pass
2010-01-26
self IC slide
256M
0x1307
0x0163
F/H
Pass
2010-01-26
selfdisk
128M
0x1080
0x0001
F
Pass
2010-01-26
2010-01-26
52
53
54
55
Sarotech Co., Ltd
SELF I&C
56
57
self IC
58
selfdisk
59
SELFIC Technology
USB Mass Storage Device
4G
0x1307
0x0165
F/H
Pass
60
SELLGINO
Memoryu 2.0 HIGHSPEED
128M
0x0EF5
0x2366
F/H
Pass
2010-01-26
61
SILICON
POWER ULTIMA 128MB
128M
0x0EA0
0x2168
F/H
Pass
2010-01-26
62
Sitec
DataTank II
128M
0x11A2
0x2517
F/H
Pass
2010-01-26
63
SKC
EZ Stick plus
128M
0x0EA0
0x2168
F/H
Pass
2010-01-26
64
SMI
USB DISK
512M
0x090C
0x1000
F/H
Pass
2010-01-26
2010-01-26
65
66
67
SMI Corporation
Sony
TD Micro
2G
0x058F
0x9380
F
Pass
USB DISK(Zyrus)
4G
0x090C
0x1000
F/H
Pass
2010-01-26
Micro Vault tiny
1G
0x054C
0x02A5
F/H
Pass
2010-01-26
AVN SYSTEM Owner’s Manual
25
MEDIA
Product Company
Name
68
26
Teclast
69
70
Transcend Jflash
70
Transcend
71
72
73
74
75
76
77
TRUTION
UFDBM
USB-DISK
-
AVN SYSTEM Owner’s Manual
Cap
VID
PID
Model Name
Speed
Compatibility Last Update date
(F/H)
Coolflash
128M
0x058F
0x9380
F
Pass
2010-01-26
Coolflash
Mass Storage Device(Jflash)
Jflash Mass Storage
Device(Jflash)
Flash Drive
T3
T4
FREEDIK-LWFORMAT
Ud SP
USB2.0 Flash Drive
-
128M
4G
0x058F
0x058F
0x9380
0x6387
F
F/H
Pass
Pass
2010-01-26
2010-01-26
4G
0x058F
128M
0x0457
8G
0x090C
8G
0x054C
256M
0x0EF5
256M
0x090C
256M
0x0EA0
128M
0x0EA0
Pass 77 / Total 77
0x6387
F/H
Pass
2010-01-26
0x0151
0x1000
0x0243
0x2202
0x1000
0x2168
0x2168
F/H
F/H
F/H
F
F/H
F/H
F/H
Pass
Pass
Pass
Pass
Pass
Pass
Pass
2010-01-26
2010-01-26
2010-01-26
2010-01-26
2010-01-26
2010-01-26
2010-01-26
Etc
MEDIA
DVB-T
LIST
SCAN – Automatic/Manual Search
Installation
Antenna connection
• Active Film Antenna can be attached to the
window.
• The location of the antenna could affect the
reception performance of TV signals very
much.
MENU
• Touching the screen, you can see DISPLAY
MENU icons of INSTALLATION, SYSTEM,
CHANNEL LIST, and PREFERENCES.
• On pressing “CHANNEL LIST” icon, you can
see the Channel List saved.
• You can directly select a channel by selecting list item.
• On Pressing “Installation - Automatic/Manual
Search”, DTV will automatically start channel scan to find out available broadcasting
channels in the area.
• It will take a few minutes depending on the
signal condition.
AVN SYSTEM Owner’s Manual
27
MEDIA
EPG
PREFERENCES
• Language Setting: [PREFERENCES] icon
[LANGUAGE SETTING] [MENU
LANGUAGE] Select [English] or [Russia].
• Reset: [SYSTEM] [RESET DEFAULT],
restore the factory setting.
• On pressing “EPG”, you can see the program guide. Selecting any program, it will
show its Program Information.
• When the broadcaster does not carry the
ESG data in the program, this function will
not work properly.
• AV Settings: [PREFERENCES] -> [AV
Control]. You can change Audio output,
Screen ratio, Display format.
28
AVN SYSTEM Owner’s Manual
MEDIA
DVD PLAYER
Press [DVD] to select DVD mode.
Audio CD or DVD can be played.
Even when operating a different mode, inserting a DVD disc into the DISC insert slot will
automatically start DVD mode.
Only DVDs with the proper region codes can
be played.
➍ Option TAB
This Tab is used to set the multi language,
Caption, or Angle of the current DVD video.
➎, ➐ Previous / Next
During DVD play, uses to the very beginning
or end.
➏ Play/Pause
Plays or pauses the DVD video.
➊ Playing TAB
Playing Tab is the DVD Video main screen.
DVD videos can be viewed within this tab.
➋ Title TAB
If the DVD video you are watching is comprised of several titles, use this tab to move
directly to a Title.
➌ Chapter TAB
This Tab is used to set the multi language,
Caption, or Angle of the current DVD video.
AVN SYSTEM Owner’s Manual
29
SETUP
SOUND Setting
Surround
Used to turn on the external AMP surround
feature.
Beep
Sets whether to sound a ‘BEEP’ when operating the device.
Equalizer Setting
Allows the music equalizer to be set according to user preference.
This is the Sound setup. Press SOUND to
display the Setup screen.
Fader & Balance
Adjusts the speaker balance. Use the cursor
key (top/bottom/left/right) on the screen to
adjust the speaker balance. Press [CENTER]
to restore the center value.
Bass
Adjusts the Bass. Use the BASS cursors to
adjust.
Mid
Adjusts the MID. Use the MID cursors to adjust.
Treble
Adjusts the Treble. Use the Treble cursors to
adjust.
30
AVN SYSTEM Owner’s Manual
Update
Allows updates for the system program or
Navi Map DB.
REAR VIEW CAMERA
Rear View Camera
This product supports the rear view camera
feature.
When reversing, the video from the rear view
camera is displayed on the device screen.
AVN SYSTEM Owner’s Manual
31
SPECIFICATIONS
32
Tuning Range
AM: 522 ~ 1,620 KHz. 9 KHz. Steps
FM: 87.5 ~ 108.0 MHz. 100 KHz. steps
Sensitivity
AM: 15 ㎶
FM: 1.5 ㎶
FM Stereo Separation
30 dB
CD Frequency Response
20 ~ 20,000 Hz
CD S/N Ratio
50 dB
CD Channel Separation
40 dB
CD Audio Format
Red Book (IEC 908)
Logical File Format
ISO 9660 (level 1,2 & 3), Joliet
Usable Sampling and Bit Rates
MP3: Sampling rate 44.1 KHz,
Bit rate 32-320 KB/s with VBR
ID3 Tags
ID3v1, ID3v2
AUX Input Sensitivity
2V ( VOLUME STEP 20 )
700 mV @ 10 K Ohm.
Bluetooth
-Output Power
- Profile
Version 2.0
+ 4dBm Max
Advanced Audio Distribution Profile
Audio/Video Remote Control Profile
Hands-Free Profile
Head Set Profile
AVN SYSTEM Owner’s Manual
TROUBLE SHOOTING
Voice Signal
Screen
Display
Disc operation
General
Error
Cause
Solution
The power does not turn on.
When the lead wire or connector is not
properly connected
Contact your nearest SERVICE
CENTER.
Power is on but the device
does not operate.
When the temperature is colder or hotter than
the operating temperature range
The device operates only within a
temperature range of 0°C ~ 60°C.
Button does not operate and
the screen is not properly
displayed.
When the microprocessor is operating
abnormally due to noise or other causes
Reboot the device or turn the ignition
off and on
When disc is inserted upside down
Insert the disc with the printed side
facing up.
When the disc is scratched or bent
Clean the disc.
When there is moisture on the disc.
Dry the disc.
Disc does not play or skips.
Noise occurs.
Another disc is already inserted.
Eject the disc and insert the new disc.
Disc cannot be inserted.
Foreign substances have accumulated within
the disc insert slot
Remove the foreign substances and
insert the new disc.
Screen is not displayed.
Monitor is turned off.
Turn the monitor back on.
Screen is too dark.
When product temperature has become too
low.
Re-operate at normal temperatures.
Volume is too low.
Increase the volume.
Speaker lines have not been properly
connected.
Check the speaker connection.
Device set to mute.
Check if Mute is turned on.
No sound.
AVN SYSTEM Owner’s Manual
33
LIMITED WARRANTY
LIMITED WARRANTY
ORIGINAL NAVIGATION HEAD UNIT
SUPPLIED BY VEHICLE DEALER
Product :
Product No. :
WHAT THIS WARRANTY COVERS
1. Vehicle Dealer Shop ("Dealer") warrants
to you that the Hardware will be free from
defects in workmanship and materials
under normal use ("Defects") for a period of
three (3) years/60,000KM from the date that
the Hardware was first installed by DEALER
("Warranty Period"). During the Warranty
Period the Hardware will be repaired or
replaced at DEALER's choice ("Limited
Warranty") without charge to you for either
parts or labor. This Limited Warranty covers
the replacement of the head unit including
of the Hardware only.
WHAT THIS WARRANTY DOES NOT COVER
2. The Limited Warranty does not apply to
normal wear and tear, does not apply
when the Hardware is opened or repaired
by someone not authorized by DEALER
and does not cover repair or replacement
of any Hardware or part thereof damaged
34
AVN SYSTEM Owner’s Manual
by: misuse, moisture, liquids, proximity
or exposure to heat and accident, abuse,
non-compliance with the instructions supplied with the Hardware, neglect or misapplication. The Limited Warranty does not
cover physical damage to the surface of the
Hardware. This Limited Warranty does not
cover any software that may accompany or
be installed on the Hardware. The Limited
Warranty does not cover the installation,
removal or maintenance of the Hardware or
any costs related herewith.
HOW TO MAKE A WARRANTY CLAIM
3. In order to make a claim of a Defect, you
must contact DEALER during the Warranty
Period via www.navitel.su to explain the
Defect and to obtain an RMA number
(Return Materials Authorization) if necessary.
You must return the Hardware during
the Warranty Period, along with the RMA
number provided by DEALER and an
explanation of the Defect, to the address
provided to you by DEALER. If a defect
arises and a valid claim under this Limited
Warranty is received by DEALER after
the first 3yrs/60,000KM of the Warranty
Period, DEALER is entitled to charge you
for any reasonable shipping and handling
costs made in connection with the repair
or replacement of the Hardware. You must
comply with any other return procedures
stipulated by DEALER, if any.
DEALER LIMITED WARRANTY
YOUR LEGAL RIGHTS
4. Some countries may not allow the exclusion or limitation of damages. If any part of
this Limited Warranty is held to be invalid or
unenforceable, the remainder of the Limited
Warranty shall nonetheless remain in full
force and effect.
5. This Limited Warranty is the only express
warranty made to you and is provided in
place of any other express warranties or
similar obligations (if any) created by any
advertising, documentation, packaging, or
other communications.
LIMITED WARRANTY
6. Except for the Limited Warranty and to the
maximum extent permitted by applicable
law, DEALER and its suppliers provide the
Hardware "AS IS AND WITH ALL FAULTS",
and hereby disclaim all other warranties
and conditions, whether express, implied or
statutory, including, but not limited to, any
(if any) implied warranties, duties or conditions of satisfactory quality, of fitness for a
particular purpose, of reliability or availability,
of accuracy or completeness of responses, of
LIMITED WARRANTY
results, of workmanlike effort, of lack of viruses, and of reasonable care and skill, all with
regard to the Hardware, and the provision of
or failure to provide support or other services,
information, software, and related content
through the Hardware or otherwise arising out
of the use of the Hardware. Also, there is no
warranty or condition of quiet enjoyment, quiet
possession, or non-infringement with regard to
the Hardware.
7. This Limited Warranty does not affect any
legal rights under applicable national legislation governing the sale of consumer goods.
8. This Limited Warranty cannot be transferred
to any other person.
10. Notwithstanding any damages that you
might incur for any reason whatsoever,
the entire liability of DEALER and any of
its suppliers shall be limited to the amount
actually paid by you for the Hardware.
11. DEALER shall not be liable for
• any fraud on the part of its employees
and/or agents; or
• any fraudulent misrepresentation on the
part of its employees and/or agents.
12. Notwithstanding the above, neither party's
liability for death or personal injury resulting from its own negligence shall be
limited.
LIMITATION OF LIABILITY
9. Neither DEALER nor its suppliers shall be
liable to you or to any third party for any
damages either direct, indirect, incidental,
consequential or otherwise (including in
each case, but not limited to, damages for
the inability to use the equipment or access
data, loss of data, loss of business, loss
of profits, business interruption or the like)
arising out of the use of or inability to use
the Hardware even if DEALER has been
advised of the possibility of such damages.
AVN SYSTEM Owner’s Manual
35
SUPPORT - HOTLINE
< MOTREX / Russia Branch >
≪MOTREX≫, 117303 Russia, Moscow, Ul.Bolshaya Yushunskaya, Dom 1A, K.1, office 410
e-mail : [email protected] / [email protected]
Tel : (+7) 495 318 1527