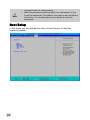
1
Intel-Powered Convertible Classmate PC User’s Manual © Copyright 2010 All Rights Reserved. The information in this document is subject to change without prior notice in order to improve reliability, design and function and does not represent a commitment on the part of the manufacturer. In no event will the manufacturer be liable for direct, indirect, special, incidental, or consequential damages arising out of the use or inability to use the product or documentation, even if advised of the possibility of such damages. This document contains proprietary information protected by copyright. All rights are reserved. No part of this manual may be reproduced by any mechanical, electronic, or other means in any form without prior written permission of the manufacturer. Limitation of Liability While reasonable efforts have been made to ensure the accuracy of this manual, the manufacturer and distributor assume no liability resulting from errors or omissions in this manual, or from the use of the information contained herein. Contents Before You Start ....................................................................................... 1 Attention: Teachers and Parents ......................................................... 1 For Your Safety ................................................................................... 2 Caring for Your Netbook ...................................................................... 2 Regulatory Information ............................................................................ 3 Federal Communications Commission Notice .................................... 3 Modifications ........................................................................................ 4 Connections to Peripheral Devices ..................................................... 4 SAR Exposure ..................................................................................... 4 Declaration of Conformity .................................................................... 4 European Notice .................................................................................. 4 Canadian Notice .................................................................................. 5 Power Cord Requirement .................................................................... 6 Power Cord Notice .............................................................................. 7 Battery Pack Safety ............................................................................. 8 Lithium Battery Warning / Bridge Battery Warning .............................. 9 Heat Related Safety Notice ................................................................. 9 Headset and Earphone Volume Level Notice ................................... 10 Cleaning the Keyboard ...................................................................... 10 Travel Notice ..................................................................................... 10 Touring the Netbook............................................................................... 11 Front .................................................................................................. 11 Left view............................................................................................. 13 Right view .......................................................................................... 14 Back ................................................................................................... 15 Top..................................................................................................... 16 Base................................................................................................... 17 Getting Started ........................................................................................ 18 Installing the Battery .......................................................................... 18 Charging the Battery.......................................................................... 19 Opening the LCD Panel..................................................................... 20 Switching the Power On .................................................................... 20 LED Status Indicators ........................................................................ 22 Using the Netbook .................................................................................. 23 Using the Keyboard ........................................................................... 23 Using the Touch Pad ......................................................................... 24 Using the Touch Screen .................................................................... 25 Rotating the Display Panel ................................................................ 25 Using the Built-in Rotating Camera ................................................... 28 Sharing the Same Audio Source ....................................................... 29 Establishing a Wireless Connection .................................................. 29 Establishing a Network Connection ................................................... 29 Pairing with a Bluetooth Device ......................................................... 30 Using Your Netbook as a GPS Device (Option) ................................ 30 Conserving the Battery Power ........................................................... 31 BIOS Setup .............................................................................................. 32 Entering BIOS Setup ......................................................................... 32 Main Setup ........................................................................................ 32 Configuration Setup ........................................................................... 33 Intel Setup.......................................................................................... 34 Security Setup ................................................................................... 35 Boot Setup ......................................................................................... 36 Exit Setup .......................................................................................... 37 Troubleshooting ..................................................................................... 38 Specifications ......................................................................................... 39 Index......................................................................................................... 41 Before You Start Attention: Teachers and Parents This product is an educational tool designed for school age children, ages 4 and up. Make sure that students understand this product is an educational tool and not a toy. Students under age 10 must be supervised by an adult when using this netbook. Explain to students the safe and proper handling of the netbook, power supply, battery pack, and power cord. Before students take the netbook home, instruct students to keep power cords, small accessories, and loose parts away from younger children at all times. Emphasize to students that any damage to the netbook or loose parts should be reported immediately to a teacher or parent. It is recommended that students do not use the netbook for more than 30 minutes without taking a break. A break should be at least five minutes long. To ensure the netbook is in good working condition, periodically inspect the netbook, power supply and power cord for damage, and replace if necessary. Keep the power cord away from younger children. 1 For Your Safety Before using in the classroom or home environment, make sure that students understand the following precautions: • Do not drop, crush, or step on the netbook. • Do not place objects or apply heavy pressure on the netbook. • Do not place on uneven or unstable work surfaces. • Do not block the openings provided for ventilation, as overheating may occur. • Do not use or store the netbook in extreme weather conditions. • Do not expose to sudden changes in temperature or humidity: keep the netbook away from heating and A/C vents. • Do not expose to magnetic fields. • Do not expose to direct sunlight. • Do not place near fire or other sources of heat. • Do not expose to rain or moisture. • Do not leave the netbook turned on or plugged in when enclosed in a non-ventilated container, such as a backpack, as overheating may occur. Caring for Your Netbook • Do not spray water or any other cleaning fluids directly on the display. • Do not clean the netbook when it is plugged into a wall socket. • Make sure the netbook is turned off before cleaning, and clean with a slightly damp cloth. • When you are not using the netbook, keep the LCD panel closed to protect the screen from dust. • Make sure the touch pad does not come into contact with dirt, liquids, or grease. • Use the AC adapter whenever an AC wall outlet is available to prolong the battery life and usage cycle. Note 2 The netbook can withstand a fall from 70cm. However, if any errors occur after a fall, contact the repair center for service. Regulatory Information Federal Communications Commission Notice This equipment has been tested and found to comply with the limits for a Class B digital device, pursuant to Part 15 of the FCC Rules. These limits are designed to provide reasonable protection against harmful interference in a residential installation. This equipment generates, uses, and can radiate radio frequency energy and, if not installed and used in accordance with the instructions, may cause harmful interference to radio communications. However, there is no guarantee that interference will not occur in a particular installation. If this equipment does cause harmful interference to radio or television reception, which can be determined by turning the equipment off and on, the user is encouraged to try to correct the interference by one or more of the following measures: • Reorient or relocate the receiving antenna. • Increase the separation between the equipment and the receiver. • Connect the equipment into an outlet on a circuit different from that to which the receiver is connected. • Consult the dealer or an experienced radio or television technician for help. Exposure to Radio Frequency Radiation: The radiated output power of this device is below the FCC radio frequency exposure limits. Nevertheless, the device should be used in such a manner that the potential for human contact is minimized during normal operation of notebook/netbook computers. Operation on the 5.15-5.25GHz frequency band is restricted to indoor use only. The FCC requires indoor use for the 5.15-5.25GHz band to reduce the potential for harmful interference to co-channel Mobile Satellite Systems. Therefore, it will only transmit on the 5.25-5.35 GHz, 5.47-5.725 GHz and 5.725 –5.850 GHz band when associated with an access point (AP). 3 Modifications The FCC requires the user to be notified that any changes or modifications made to this device that are not expressly approved by the Manufacturer may void the user‟s authority to operate the equipment. Connections to Peripheral Devices Connections to this device must be made with shielded cables with metallic RFI/EMI connector hoods to maintain compliance with FCC Rules and Regulations. SAR Exposure This device has been tested for compliance with FCC RF Exposure (SAR) limits in typical flat configurations. Declaration of Conformity This device complies with Part 15 the FCC Rules. Operation is subject to the following two conditions: (1) this device may not cause harmful interference, and (2) this device must accept any interference received, including interference that may cause undesired operation. Changes or modifications not expressly approved by the party responsible for compliance could void the user„s authority to operate the equipment. The antenna(s) used for this transmitter must not be co-located or operating in conjunction with any other antenna or transmitter. European Notice Products with the CE Marking comply with both the EMC Directive (2004/108/EC) and the Low Voltage Directive (2006/95/EC) and R&TTE Directive (1999/5/EC) issued by the Commission of the European Community. 4 Compliance with these directives implies conformity to the following European Norms: • EN55022: 2006, CLASS B • EN61000-3-2: 2006, CLASS D • EN61000-3-3: 1995+A1: 2001+A2: 2005 • EN55024: 1998+A1: 2001+A2: 2003 • IEC61000-4-2: 2001 ED. 1.2 • IEC61000-4-3: 2006 ED. 3.0 • IEC61000-4-4: 2004 ED. 2.0 • IEC61000-4-5: 2005 ED. 2.0 • IEC61000-4-6: 2006 ED. 2.2 • IEC61000-4-8: 2001 ED. 1.1 • IEC61000-4-11: 2004 ED. 2.0 • EN300328, EN301489-1, EN301489-17 • EN60950 (IEC60950) Canadian Notice This Class B digital apparatus meets all requirements of the Canadian Interference-Causing Equipment Regulations. Wireless operation is subject to 2 conditions. The first is that the wireless device may not cause interference. The second is that the wireless device must accept any interference, including interference that may cause undesired operation of the device. When using IEEE 802.11a wireless LAN, this product is restricted to indoor use, due to its operation in the 5.15- to 5.25-GHz frequency range. Industry Canada requires this product to be used indoors for the frequency range of 5.15 GHz to 5.25 GHz to reduce the potential for harmful interference to co-channel mobile satellite systems. High-power radar is allocated as the primary user of the 5.25- to 5.35-GHz and 5.65to 5.85-GHz bands. These radar stations can cause interference with and/or damage to this device. 5 Attachment Limitations Statement Users should ensure for their own protection that the electrical ground connections of the power utility, telephone lines and internal metallic water pipe system, if present, are connected together. This precaution may be particularly important in rural areas. Caution Users should not attempt to make such connections themselves, but should contact the appropriate electric inspection authority, or electrician, as appropriate. Power Cord Requirement The power cord supplied with the AC adapter should match the plug and voltage requirements for your local area. Regulatory approval for the AC adapter has been obtained using the power cord for the local area. However, if you travel to a different area and need to connect to a different outlet or voltage, you should use one of the power cords listed below. To purchase a power cord (including one for a country not listed below) or a replacement AC adapter, contact your local dealer. U.S. and Canada • The cord set must be UL/ETL-Listed and CSA-Certified or UL/C-ETL Listed. • The minimum specifications for the flexible cord are (1) No. 18 AWG, (2) Type SPT-2, and (3) 2-conductor. • The cord set must have a rated current capacity of at least 7A. • The attachment plug must be an earth-grounding type with a NEMA 1-15P (7A, 125V) configuration. Japan 6 • All components of the cord set (cord, connector, and plug) must bear a “PSE” mark and registration number in accordance with the Japanese Dentori Law. • The minimum specifications for the flexible cord are: (1) 0.75 mm conductors, (2) Type VCT or VCTF, and (3) 3-conductor. • The cord set must have minimum rated current capacity of 7 A. • The attachment plug must be a two-pole, grounded type with a Japanese Industrial Standard C8303 (15 A, 125 VAC) configuration. 2 Other Countries • The cord set fittings must bear the certification mark of the agency responsible for evaluation in a specific country. Acceptable agencies are: • CCC (China) • The flexible cord must be of a HAR (harmonized) type HO5VVF 3-conductor cord with a minimum conductor size of 0.03 square inches. • The minimum specification for the flexible cord for Class II product 2 are: (1) 2X0.75 mm conductors, (2) 2-conductor cord. • The cord set must have a current capacity of at least 10 A and a nominal voltage rating of 125 / 250 VAC. Note: This model IS DESIGNED TO USE WITH THE FOLLOWING AC ADAPTER MODEL ONLY Manufacture: LI SHIN INTERNATIONAL ENTERPRISE CORP. Manufacture: Delta Power Cord Notice To reduce the risk of electric shock or damage to the equipment: • Plug the power cord into an AC outlet that is easily accessible at all times. • Disconnect power from the computer by unplugging the power cord from the AC outlet (not by unplugging the power cord from the computer). • If provided with a 3-pin attachment plug on the power cord, plug the cord into a grounded (earthed) 3-pin outlet. Do not disable the power cord grounding pin, for example, by attaching a 2-pin adapter. The grounding pin is an important safety feature. • Only the AC adapter provided with the computer should be used with the computer. 7 Battery Pack Safety 8 • Keep the battery away from children. • The battery pack is intended to use only with this netbook. • To reduce potential safety issues, only the battery provided with the computer, a replacement battery provided by the supplier, or a compatible battery purchased as an accessory from the supplier should be used with the computer. • The battery pack is not replaceable by the end user. Only qualified service technicians should replace the battery pack. • To reduce the risk of fire or burns, do not disassemble, crush, or puncture a battery; short the external contacts on a battery; or dispose of a battery in fire or water. Do not expose a battery to temperatures above 60ºC (140ºF). • Handle a damaged or leaking battery with extreme care. If you come in contact with the electrolyte, wash the exposed area with soap and water. If it contacts the eye, flush the eye with water for 15 minutes and seek medical attention. • Do not charge the battery pack if the ambient temperature exceeds 45°C (113°F). • To obtain a replacement battery, contact your local dealer. • When discarding a battery pack, contact your local waste disposal provider regarding local restrictions on the disposal or recycling of batteries. • Use only supplied AC Adapter for charging. Caution: Danger of explosion if battery is incorrectly replaced. Only qualified service technicians should replace and discard the battery pack. Replace only with same or equivalent type recommended by the manufacturer. Discard used batteries according to the manufacturer‟s instructions or local laws. Vorsicht: Explisionsgefahr bei unsachgernazen Austausch der Batterie. Ersatz ur durch denselben oder einem vom Hersteller empfohlenem ahnlichen Typ. Entsorgung gebrauchter Batterien navh Angaben des Herstellers. Lithium Battery Warning / Bridge Battery Warning This netbook contains a lithium battery to power the clock and calendar circuitry. Caution: Danger of explosion if battery is replaced incorrectly. Replace only with the same or equivalent type recommended by the manufacturer. Discard used batteries according to the manufacturer‟s instructions. Note: Il y a danger d‟xplosion s‟il y a remplacement incorrect de la batterie. Remplacer uniquement avcc unc batterie du meme type ou d‟un type recommande par le constructer. Mettre au rebut les batteries usages conformement aux instructions du fabricant. Vorsicht: Explosionsgefahr bei unsachgemBen Austausch der Batterie Ersatz nur durch denselben oder einem vom Hersteller empfohlenem ahnlichen Typ. Entsorgung gebrauchter Batterien nach Angaben des Herstellers. Der Arbeitsplatzbezogene Schalldruckpegel nach DIN 45 635 betragt 70dB (A) oder weniger. Zum Netzanschlua dieses Gerates ist eine geprufte Leitung zu verwenden. Fur einen Nennstrom bis 6A und einem Gerategewicht groBer 3kg ist eine 2 2 Leitung nicht leichter als (1) H05VV-F, 3G, 0.75mm (2) 2 x 0.75 mm conductors einzusetzen. Die Steckdose muB nahe dem Gerat angebracht und leicht zuganglich sein. Caution: This part is hot. Be careful. Vorsicht: Diese Flachewird sehr heiss. When you see this symbol, be careful as this spot may be very hot. The heat is generated from the CPU. Heat Related Safety Notice The computer and the AC adapter comply with the user-accessible surface temperature limits defined by the International Standard for Safety of Information Technology Equipment (IEC 60950). 9 To reduce the possibility of heat-related injuries or of overheating the computer: • Do not place the computer directly on your lap or obstruct the computer air vents. • Use the computer only on a hard, flat surface. Do not allow another hard surface, such as an adjoining optional printer, or a soft surface, such as pillows or rugs or clothing, to block airflow. • Do not allow the AC adapter to contact the skin or a soft surface, such as pillows or rugs or clothing, during operation. Headset and Earphone Volume Level Notice • Listening to music at high volume levels and for extended durations can damage one's hearing. To reduce the risk of hearing damage, lower the volume to a safe, comfortable level and reduce the amount of time listening at high levels. • For your own safety, before using headsets or earphones, always reset the volume. Some headphones are louder than other headphones, even if the volume control setting is the same. • Changing the default audio or equalizer settings might lead to higher volume and should only be done with caution. Cleaning the Keyboard To reduce the risk of electric shock or damage to internal components: • Do not use a vacuum cleaner attachment to clean the keyboard. A vacuum cleaner can deposit household debris on the keyboard surface. • Clean the keyboard regularly to prevent keys from sticking and to remove dust, lint, and particles that can become trapped beneath the keys. A can of compressed air with a straw extension can be used to blow air around and under the keys to loosen and remove debris. Travel Notice A Warning 10 To reduce the risk of electric shock, fire, or damage to the equipment, do not attempt to power the computer with a voltage converter kit sold for appliances. Touring the Netbook Front 1. Built-in rotating camera 2. Microphone 3. LCD display 4. Camera button 5. Home button Use the Built-in rotating camera for video conferencing. The built-in microphone allows the netbook to receive audio input. Contents of the current system operation are displayed here. When the camera software is running, press this button to view the software in full-screen mode. When the camera software is not running, press this button to start the software and capture images/videos. Press this button to start the Blue Dolphin application. Press twice to bring up the system menu. 11 8. Stereo speakers LED status indicators Keyboard 9. Touch pad 10. Page up button This button functions the same way as the “Page Up” key. 11 Page down button 12. Power button 13. LED status indicators This button functions the same way as the “Page down” key. Press this button to turn your netbook on and off. See “Switching the Power On”. The operation status of your netbook is displayed here. See “LED Status Indicators”. 6. 7. 12 The stereo speakers allow for audio output. The operation status of your netbook is displayed here. See “LED Status Indicators”. Use the keyboard to enter data. Use the touch pad and two buttons as a mouse. See “Using The Touch Pad”. Left view 1. External monitor port 2. USB 2.0 port 3. Microphone jack 4. 5. 6. 7. Headphone jacks Kensington security slot GPS antenna port (option for GPS model) Stylus pen slot Use this port to connect to an external monitor. Use this port to connect Universal Serial Bus devices. The netbook supports v.2.0 of the USB standard. Use the microphone jack to connect an external microphone. Use the headphone jacks to connect external headphone sets. Attach a Kensington lock to this slot to secure your notebook. Use this port to connect an external GPS antenna. The Stylus pen for the touch screen is stored here. 13 Right view 14 1. Memory card slot 2. USB 2.0 port 3. Ventilation opening 4. Power adapter port 5. LAN (RJ-45) port Insert a memory card into this slot to read the stored data on the memory card. Use this port to connect Universal Serial Bus devices. The netbook supports v.2.0 of the USB standard. The ventilation opening allows the netbook to cool off and prevent overheating. Do not block this opening when the netbook is turned on. Connect your AC adapter to this port to power up your netbook and charge the battery pack. Use this port to connect a standard RJ-45 plug of a router or ADSL modem. Back 1. Handle Use the handle to carry the netbook. 2. Name field Place your name tag here. 15 Top 1. 16 LED status indicators The operation status of your netbook is displayed here. See “LED Status Indicators”. Base 1. Battery bay 2. Battery lock switch The battery pack is stored here. Use the battery lock switch to lock the battery pack in the battery bay. 17 Getting Started Congratulations on your purchase of the Intel-powered convertible classmate PC. Your netbook features a built-in rotating camera, two headphone ports for sharing music, a rotating LCD display panel, and touch screen functions. In this section, you will be introduced to the basic operations of your netbook. Installing the Battery Before installing or removing the battery, make sure the Netbook is turned off. To install the battery pack: 1. Align the tabs on the battery pack with the slots in the battery bay, and insert the battery pack into the battery bay. 2. Slide and hold the battery lock switch to the right, in the unlocked position. 3. Slide the battery pack down gently but firmly until it locks into place. 4. Slide the battery lock switch left into the locked position. 18 To remove the battery pack: 1. Slide and hold the battery lock switch to the right, in the unlocked position. 2. Lift and remove the battery. Note You must charge the battery pack for at least six hours before using it for the first time. Charging the Battery To charge the battery, plug the AC adaptor into the netbook and an electrical outlet. Whenever possible, use the AC adaptor to keep the netbook connected to a power source. For a totally discharged battery, it will take approximately two hours to charge to 90% capacity, and approximately three hours to 100% while the netbook is powered off. It will take about five hours to charge the battery to 100% capacity while the netbook is powered on. If the system runs at heavy loads or in a high temperature environment, the battery may not be fully charged. You need to continue to charge it with the AC adaptor plugged in until the charging LED turns green. • Low battery warning: When the battery power is reduced to 10 percent, the battery status LED blinks orange and the system beeps every 16 seconds. • Very low battery warning: When the battery power is reduced to five percent, the battery status LED blinks orange and the system beeps every 4 seconds (if PC Beep is not disabled). A Warning Always use the AC adapter and power cord included with this package. Using a replacement may result in damage to your netbook. The system will not charge the battery when the temperature exceeds 40 degrees Celsius. Note 19 Opening the LCD Panel To open the LCD panel: 1. Steady the base of the netbook with one hand. 2. Hold a corner of the LCD panel with the other hand. 3. Gently raise the LCD panel to the upright position. A Never slam the LCD panel shut, as this may damage the netbook. Warning Note Do not grip the Built-in rotating camera when trying to open or close the LCD panel. Switching the Power On Once you have connected your AC adapter or charged the battery pack, you can power on your netbook. When you power on your netbook, the Power-On Self Test (POST) runs automatically to check the internal hardware and configuration. After the POST is completed, your netbook loads the installed operating system. If hardware configuration has been changed or the POST fails, a warning message may appear on the screen. This message will inform you of any errors or invalid settings, and prompt you to run the BIOS Setup Utility to correct the problem. 20 To switch the power on: Press the power button. To switch the power off: 1. Make sure all applications are turned off. 2. Press the Windows logo key, and then click Shut down. A Warning • Never turn the netbook off during the POST, or an unrecoverable error may occur. • Never turn the netbook off while the hard disk is in use, or system data may be lost or corrupted. 21 LED Status Indicators The netbook has LED status indicators on the top of the LCD panel, to the left of the LCD display and above the keyboard, allowing you to see the system and power status of your netbook at a glance. Blue light indicates the numeric keypad is activated. Blue light indicates the caps-lock is activated. Blue light indicates the system is reading/writing data. Blue light indicates the system is on. Blue light indicates the battery is fully charged and the AC adapter is plugged in. Orange light indicates the battery is charging. Blinking orange light indicates the battery power is low. No light indicates the battery pack is not installed in your system. Blue light → off → orange light → off → blue light indicates the battery temperature is too high. Blinking blue light indicates WLAN operation in progress. Blue light indicates the WLAN is on. 22 Using the Netbook Using the Keyboard You can use certain key combinations to quickly configure system settings. Graphic symbol Action System control Fn + F1 Turn the WLAN module off or on. Fn + F2 Enter the sleep mode. Fn + F3 Turn off the volume output. Fn + F4 Decrease the speaker volume. Fn + F5 Increase the speaker volume. Fn + F6 Switch the display between the LCD panel and the external monitor. Fn + F7 Decrease the brightness of the LCD. Fn + F8 Increase the brightness of the LCD. Fn + Pause (Break) Fn + SysRq (PrtSc) View system properties. Capture the on screen display as a graphic. Fn + Ins (Num LK) Lock and unlock the number pad. 23 Fn + Del (Scr LK) Fn + ↑ (PgUp) Turn the scroll lock function on or off. Move to the previous page. Fn + ↓ (PgDn) Move to the next page. Move the cursor to the beginning of a row. Move the cursor to the end of a row. Fn + ← (Home) Fn + → (End) Using the Touch Pad The touch pad includes a touch-sensitive pad, a scroll bar and two buttons, and can be used like a mouse. You can move the cursor on the screen, select items, and call up menus. • To move the cursor on the screen, move the tip of your finger across the touch pad. • To scroll up or down, slide your finger up or down the scroll bar. • To left-click, press the left button once. • To double click, quickly press the left button twice. • To right-click, press the right button once. • To drag and drop, press and hold the left button, and move your finger on the touch pad to the desired location. 24 Using the Touch Screen The display panel of your netbook also works as a touch screen. You can use the stylus pen to control system operations, or as a pen for writing or illustration applications. The first time you power on the netbook, follow the on screen instructions to activate the touch screen. A Warning Do not tap or write on the screen with excessive force. Doing so may damage the LCD display. Rotating the Display Panel The display panel of your notebook can rotate up to 180 degrees, clockwise or counterclockwise. You can fold it down with the display facing up, and use it as a writing pad. In the folded position, the internal sensor intuitively switches the screen display to match the orientation of the netbook. You can rotate the screen horizontally or vertically to suit your needs. To rotate the display panel: 1. Lightly grip the bottom corners of the display panel with your fingers while keeping your palms on the base of the netbook. 2. Gently turn in the clockwise or counterclockwise direction. 25 3. Turn 180 degrees until the display panel gently snaps into place. A Do not try to turn the display panel more than 180 degrees. Warning Note 26 If you rotate the display panel clockwise, you must turn it counterclockwise to return to its original position. If you rotate the display panel counterclockwise, you must turn it clockwise to return to its original position. To use the display panel as a writing pad: 1. Make sure the display panel has been rotated 180 degrees. 2. Hold the display panel by one or both of the upper corners. 3. Gently lower the display panel to the closed position. 27 Using the Built-in Rotating Camera The built-in rotating camera can rotate up to 180 degrees, and is equipped with an internal sensor to automatically switch to the correct orientation. You can rotate the built-in rotating camera back and forth to use on both sides of the display panel. To rotate the built-in rotating camera: 1. Hold the edge of the built-in rotating camera with your thumb and index finger. 2. Use your thumb to push the bottom edge of the built-in rotating camera up. 3. Gently turn outwards until it locks into the 180 degrees position. Note 28 The built-in rotating camera must be returned to its original position for the display panel to close properly. Sharing the Same Audio Source The two headphone ports located on the left side of the netbook allow two persons to share the same audio source, such as music, movies and videos. To share the same audio source: 1. Plug in two sets of headphones. 2. Open the audio or video file you wish to listen to. A Warning Loud volume may damage your hearing. Listen to music at a moderate level, and avoid continuous use of headphones over a long period of time. Establishing a Wireless Connection The following wireless configurations are offered with your netbook: * A WLAN card. * A 3G network card (option). Contact your retailer for details. To enable WLAN on your netbook, press [Fn + F1]. Establishing a Network Connection You can enable wireless connectivity on your netbook with an optional WWAN (Wireless Wide Area Network) or WLAN (Wireless Local Area Network) card. A wireless network connection allows you to access the internet and use network services on your netbook, such as sending and receiving e-mail messages. To establish a wireless network connection, click Start > Control Panel > Network and Sharing Center > Connect to a network. 29 Pairing with a Bluetooth Device You can enable Bluetooth functionality on your netbook with an optional Bluetooth module. A Bluetooth connection is also called a pairing. You can transfer files to a paired Bluetooth device. To establish a Bluetooth pairing: * Both devices must be discoverable. * A passcode must be exchanged between the devices to be paired. To make your device discoverable to other Bluetooth devices: 1. Click Start > Control Panel. 2. In the Control Panel search box, type "Bluetooth", and then click Change Bluetooth settings. 3. In the Bluetooth Settings dialog box, click the Options tab and select the check box for Allow Bluetooth devices to find this computer. To establish a connection to a Bluetooth enabled device or network, click Start > Control Panel > Network and Sharing Center > Set Up a Connection or Network > Connect to a Bluetooth personal area network (PAN). Using Your Netbook as a GPS Device (Option) Your netbook can operate as a GPS device with an optional GPS card. To enable GPS functionality, you will need: • An optional GPS card. Contact your retailer for details. • GPS receiver. You can use the built-in GPS receiver on your netbook, or install an external antenna for better reception. • GPS software. You must install GPS software to use your netbook for navigation. To use your netbook for GPS navigation: 1. Adjust the placement of your netbook for the clearest reception possible with the internal or external antenna. 2. Open the GPS software and follow the instructions on the screen. 30 Note Note Move outdoors or to an open area to use GPS functionality. GPS relies on satellites and needs a line of sight. Tall trees and buildings interfere with satellite signals. Some GPS software allow you to use voice commands, such as turning the volume up or down, entering addresses and asking how much farther until the next turn. You can speak your commands into the built-in microphone or a microphone connected to the netbook. Conserving the Battery Power You can use a combination of key controls to enter the sleep or hibernation mode to conserve the battery power. • In the sleep mode, hardware devices, such as the display panel and hard disk, are turned off to conserve energy. • In the hibernation mode, all system data are saved in the hard disk before powering down. No power or very little power is drawn from the battery module. To enter the sleep mode: Press and hold [Fn + F2]. To enter the hibernation mode in Windows: 1. Press the Windows logo key, and then press [U]. 2. When the popup window appears, press and hold [Shift + H]. To exit the sleep or hibernation mode: Press the power button. Note When exiting the hibernation mode, the amount of time the system requires to restore all its previous contents can range from five to twenty minutes, depending on how much RAM has been installed on your netbook. 31 BIOS Setup The BIOS (Basic Input/Output System) Setup Utility runs and maintains a variety of hardware functions. It is a menu-driven software, which allows you to easily configure and change the settings. When turning on the netbook for the first time, you may get a message prompting you to run the BIOS Setup Utility. Entering BIOS Setup Turn on the power, and press the DEL key quickly when the POST (Power-On Self Test) is running. Main Setup In this menu you can change the time and date, and view basic processor and system memory information. • System Time: Enter the time in HH:MM:SS format. • System Date: Enter the date in MM/DD/YY format. • BIOS Version: Displays the BIOS revision number. • EC Version: Displays the EC revision number. 32 • CPU Type: Displays the CPU type. • CPU Speed: Displays the CPU speed. • Total Memory: Displays the total memory available in the system. • HDD status: Displays the HDD model. • UUID: Displays your Universally Unique ID. Configuration Setup In this menu you can configure advanced settings. • SATA Controller working mode: Place your SATA controller in Legacy mode or Native IDE mode. • Language: Supports English, Portuguese and Spanish for the BIOS Setup menu. 33 Intel Setup In this menu you can control the configuration of the internal graphics display device. • 34 Video (Intel IGO) Control Sub-Menu: You can change the settings of your graphics display device here. Security Setup In this menu you can set up supervisor and user passwords to protect system information and limit third party access. • Supervisor Password Is: Displays the supervisor password. • User Password Is: Displays the user password. • Set Supervisor Password: Enter and confirm your new password. You will be asked to enter this password each time you enter the setup utility. • Set User Password: The supervisor password must be set before you can set the user password. You will be asked to enter this password each time the netbook is powered on. • Password on boot: When enabled, a password is required during system boot. Either the supervisor or user password will be accepted. • TPM Support: Trusted Platform Module technology enables remote attestation, sealed storage, authentication of hardware devices and disk encryption. 35 Note • • Passwords are not case sensitive. Write the passwords down and keep in a safe location. If you forget the passwords, the netbook may need to be sent back to the factory or to an authorized service dealer to reset the passwords. Boot Setup In this menu you can decide the order of boot devices to load the operating system. 36 Exit Setup • Exit Saving Changes: Exit system setup and save your changes to CMOS. • Exit Discarding Changes: Exit system setup without saving changes to CMOS. • Load Setup Defaults: Load default values for all setup items. • Discard Changes: Load previous values from CMOS for all setup items. • Save Changes: Save setup data to CMOS. 37 Troubleshooting Troubleshooting activity should only be performed by an adult. Your netbook has been fully tested and complies with the system specifications before shipping. However, incorrect operations and/or mishandling may cause problems. You may also encounter simple setup or operating problems that can be solved by considering the following suggestions. If the problem persists, contact your dealer for service. • Make sure the AC adapter is properly plugged into the netbook and a wall outlet. • Check to see if the power indicator of the netbook is on. • Check to see if your keyboard is operational by pressing and holding any key. • Make sure all devices connected to the external ports are plugged in properly. You can also remove these devices to eliminate them as the source of the problem. • Some software programs may cause problems during your routine use. Consult the software vendor for problem solving. • An incorrect setting in the BIOS Setup Utility may cause the system to malfunction. If you are unsure of the changes you made, go to the BIOS Setup Utility and load default settings. 38 Specifications Items Dimensions (W x D x H) Prototype w/o handle: 268 mm x 213 mmx 38.4 mm (front side) with handle: 268 mm x 207.83 mmx 38.4 mm (front side) All dimensions with tolerance 0.4mm Weight Target 4 Cell battery model type: 1.3kg 6 Cell battery model type: 1.4kg CPU Intel Atom CPU 1.66GHz Chipset Intel NM10 Express Chipset System Memory 1GB So-DIMM SDRAM module System Storage Option 1: NAND flash Option 2: 2.5” HDD LCD 10.1" TFT LCD with LED backlight Touch screen 10.1‟‟ ITO resistive touch screen Graphics Embedded in Processor Intel Atom CPU Graphics Memory Share system memory I/O ports 2 USB 2.0 2x Headphone out, Mic-in DC-in RJ-45 VGA-Out Audio HD audio codec Audio I/O Headphone out, Mic-in, Internal mono MIC, Internal Stereo Speakers Wireless (optional) WLAN 802.11b/g/n 1x2 2.4GHz band with mesh support or WLAN 802.11a/b/g/n 2x2 dual band LAN Built-in Ethernet 10 / 100M based Ethernet LAN (Support WOL) ® ® ® 39 Items 40 Prototype Card Reader 2-in-1 SD/MMC memory card reader Webcam Integrated 1.3M Pixel Camera to support Battery 4-cell or 6-cell battery Buttons/Switches Lid/Tablet switch (magnetic switch) System On/Off button 4 Bezel buttons for Tablet function: Camera button, Home button, Page up button, Page down button Status Indicators WLAN, HDD, Power, Battery Accelerometer 3-D digital accelerometer 3G (optional) GPRS/EDGE, UMTS, HSDPA, HSUPA TPM (optional) TPM 1.2 GPS (optional) Civilian usage for Navigation Bluetooth (optional) Support Bluetooth V2.1 Standard Keyboard Water resistant 83keys Keyboard Touch pad Water resistant Touch Pad with Left and Right Click Button Power Adapter 40W Adapter Index A F AC adapter factory settings replacing, 6 restoring, 37 G B GPS antenna, 13 navigation, 30 charging time, 19 installing, 18 H removing, 19 headphones, 13, 29 status indicators, 19 battery safety, 8 C S switching the power on and off, 21 system settings, 32 status indicators, 22 keyboard controls, 23 T L touch pad, 24 LCD display touch screen, 25 care and maintenance, 2 E setting up, 35 K BIOS configuration, 32 P password audio sharing, 29 battery microphone, 11, 13 stylus pen, 13, 25 opening, 20 rotating, 25 using as writing pad, 27 M external monitor connecting, 13 memory card inserting, 14 U USB connecting, 13 41