1
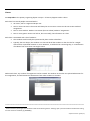
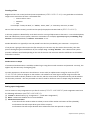
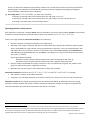
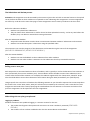
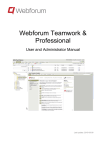
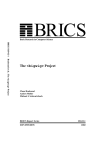
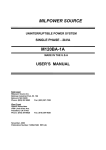
QUICK START GUIDE FOR INSTRUCTORS What is Peer Review? In brief: An instructor sets students an assignment. After students have submitted their assignment, they provide comments on submissions from other students. Once the review process is complete, students read the comments their peers have made on their own submission. Peer Review in Aropa: The instructor specifies the requirements for submission (for example, a pdf file, a PowerPoint file etc.), the closing date for submissions, and the closing date for reviews. The instructor defines a rubric to guide students in their reviewing, and indicates how many assignments each student should review. Students upload their assignment submissions. After the submission deadline, students review other students’ submissions online using the specified rubric. After the review deadline, students can see other students’ reviews of their own work, as well as all reviews of the submissions that they themselves have reviewed. If the rubric has included quantitative judgements (e.g. allocation of marks, or Likert scales), the instructor can download marks for each submission. Getting Started To register with Aropä, contact John Hamer ([email protected]) or Helen Purchase ([email protected] ). On registering, an Aropa Class will be created for you – this will typically be a ‘Test’ class, called, for example MANDY-TEST or DAVID-TEST At the Universities of Glasgow and Auckland, you will be able to login with your usual university system login name and password. Otherwise, you will be allocated a login name and password. Access Aropä at: http://aropa.ec.auckland.ac.nz/ or http://aropa.gla.ac.uk/1 1 Note that Aropa tends to work better with a browser that is not Internet Explorer – we suggest you use Google Chrome or Firefox if you can. Aropä instructors’ guide (v5) Classes An Aropa Class is the primary organising object in Aropa – all activity happens within a Class. Each Class has several people associated with it: An owner, who is a registered Aropa user. One or more instructors. The owner will always be an instructor. Instructors do not review students’ assignments. Zero or more markers. Markers can review (but not submit) students’ assignments. Zero or more guests. Guests can look at, but not modify, the information in a class. Each Class is associated with a list of students: The students would usually be represented by their student identifiers.2 Typically, but not always, the students in a Class will be all the students on the class list for a taught course within a specified semester or term. However, it could also be a tutorial group, or a combination of students from more than one taught course. Within each Class, any number of assignments can be created. The students in the Class can upload submissions for the assignments, and will review the submissions from other students in the Class. _______________________________________________________________________________________ 2 At the University of Glasgow, the identifiers used should be the guid for staff (eg. hcp1u) and the student number with trailing surname initial for students (eg 1108288p) Aropä instructors’ guide (v5) Creating a Class Registered users can create (and name) new Aropä Classes (Add a new cLASS). It is a good idea to include the taught course name that the class is associated with: o Course code or name o Semester o Year For example: “CS101, S2 2014”, or “MedSci, Term2, 2015”, or “Veterinary Science 2, S2 2015” Once a class has been created, you will need to specify the people associated with it (Edit class list). In all cases, people are identified by an id which must be a string of alphanumeric characters. It can include hyphens, dots and underscores, but not spaces, commas or semicolons. For example, hpur005, hcp37, 1108288p, hcpmarker are all acceptable ids, but Helen Purchase is not. Student identifiers can typically be cut-and-pasted from class lists provided by your institution – one per line. If one person is going to take on two roles (for example, an instructor may also wish to be a marker), then that person should given given two different ids; for example: hcp and hcp-marker. This is because the system provides a different interface depending on the role of the user: the instructor interface is different to the student and marker interface. Student access to Aropä If institutional authentication is available, students log in using their normal username and password: currently, this applies only the University of Glasgow (guid). For other institutions, the instructor should set an ‘access code’ (an alphanumeric string) for each class (Edit CLASS Details) that can be given to the students. The students can then login to Aropä using the id that the instructor has used to identify students in the class list, and this access code as the password. They will be asked to set their own password – this new password can then be used for all future access to Aropä using the student id. Setting up an Assignment You can create as many assignments as you like for a Class (Create assignment). Each assignment must have the following information (use Edit assignment): (a) A name for identification (e.g. “Assignment 1”, “Greek Hero Assignment”) (b) Dates: a submission deadline and a review deadline (c) Submission instructions: Text that tells the students what to submit (in terms of the number and nature of files uploaded); Information that tells Aropä what types of files to expect; Information that tells Aropä whether these submission items are optional or required. Aropä instructors’ guide (v5) There is an alternative submission option where students can cut-and-paste text directly into Aropä instead of uploading files: this method is recommended for submissions that use simple formatting only (paragraphs, section headings, itemised lists), but no diagrams. (d) A marking rubric (Create Rubric). A rubric may created by: Selecting an existing rubric from the drop down list, and using it as it is; or Selecting an existing rubric from the drop down list, and editing it for your own purposes; or Creating a new rubric from scratch using the editor.3 _______________________________________________________________________________________ Specifying the Peer-review process Each submission (created by a student author) will be reviewed by at least one other student reviewer. You will need to define how each submission will be allocated to at least one reviewer (Specify Allocations). There are a range of different allocation methods that can be used. Normal: reviewers are allocated randomly to the submissions With tags: a list of tags is specified, and authors indicate when they upload their submission which tag their work is associated with. Tags must be a string of alphanumeric characters. They can include hyphens, dots and underscores, but not spaces, commas or semicolons. Thus, coliseum-essay, SocratesEthics, and labours_of_hercules are fine, but Helen of Troy is not. Tags must be separated by a space, semi-colon, or comma. Once tags have been specified: Reviewers can be randomly allocated submissions with the same tag as their own, or Reviewers can be randomly allocated submissions with a different tag to their own4 Groups: students are divided into groups, and there is only one submission per group. Any student in the group can submit their group’s assignment to Aropä. Manually: the instructor types in each submission-reviewer pair manually Allocation parameters need to be set (Specify Allocations and Edit assignment), including: The number of reviews each student should do. Anonymity: you can allow reviewers to see who the authors are; authors can never see who reviewers are. Allocation records will be created automatically after the submission deadline. An allocation record is a pairing between a student reviewer and another student’s submission. When the students next login to Aropä after the submission deadline, they will see the submissions that they are to review. 3 Please do not worry if the rubric takes a few seconds to load, and if it briefly shows some text on the rubric panel – this is normal! 4 Note that unless there are exactly the same numbers of submissions for each tag specified, then it will be impossible to satisfy this criterion completely. In the case where the distribution of submissions is unequal, Aropä will minimise the number of students who will have to review an essay with the same tag as their own submission. Aropä instructors’ guide (v5) The Submission and Review process Activation: The assignment must be activated by the instructor (press the red ‘Click to activate’ button in the top left corner) before the date on which students are expected to start submitting their assignments. Inactive assignments are shown by a red dot on the main class page. Inactive assignments are not seen by students in the class at all. Before the submission deadline: Students can upload their submissions. They can look at their submission to confirm that it has been uploaded correctly, and at any time before the deadline, they can delete or amend their existing submission. After the submission deadline: Aropa will create allocation records: these are associations between students’ submissions and reviewers Students can review their peers’ submissions using the specified rubric The instructors can view the progress of the submissions and reviews during the course of the assignment. (Monitor submissions, Monitor Reviewing) After the review deadline: Students can see the feedback on their submission from other students Students can see other students’ comments on the submissions that they reviewed themselves Rolling over to next year Each Aropa Class is associated with one cohort of students, and is typically in use for the duration of one semester or term (occasionally for an entire academic year). These students need to be able to access their submissions and reviews after the end of the semester. For example, the students registered for the “PPCS, Sem1, 2012/13” Aropa Class should be able to access their submissions and reviews during the 2013/14 academic year (and beyond). Using Aropa for the next cohort of students the following semester or year therefore requires that a new Aropa Class be created. Thus a new “PPCS, Sem1, 2013/14” will need to be created by the instructor, with a new class list. New assignments will need to be created, specifying the new deadlines for this semester. Instructions and rubrics from previous assignments can be copied into the new assignments. When things do not quite go as planned Logging in problems Students sometimes have problems logging in. Common reasons for this are: The student has forgotten their password. Instructors can reset a student’s password (EDIT USER DETAILS) The student’s id has not been included in the class list. New students can be added: Aropä instructors’ guide (v5) o o any time before the submission deadline by updating and saving the class list (EDIT CLASS LIST); after the submission deadline by giving that student an extension – this will automatically add the student to the class list. Extensions Students often ask for extensions, so that they can submit their work after the submission deadline, or do their reviews after the review deadline: Individual extensions can be given to submission and reviewing dates. (Manage Student Extensions). Note that reviewing allocations for late submissions are automatically managed by the system.5 Extensions that apply to all students can be applied by changing the appropriate assignment submission and reviewing deadlines. I see what you see Sometimes it is useful to see exactly what a student sees – instructors can view the system from another person’s point of view (Impersonate Other User) _______________________________________________________________________________________ Other Features Marking by tutors: If users are given ‘marker’ status (EDIT CLASS LIST), then they will appear as potential markers when the allocation parameters are set up (SPECIFY ALLOCATIONS). This means that submissions can be marked by tutors as well as peers. Adjusting allocations: If you are not happy with the allocations (and this may happen if several extensions have been given), you can amend them (SPECIFY ALLOCATIONS, ADJUST ALLOCATIONS). Controlling access to reviews: Sometimes students do not bother to do all their reviews. You can prevent these students from seeing the reviews of their own work by selecting an appropriate option (EDIT ASSIGNMENT). Students who are prevented from seeing reviews are advised to contact the instructor to discuss the possibility of a reviewing extension. Review marking: A secondary assignment can be created that allows the reviews themselves to be marked (near the bottom of EDIT ASSIGNMENT, followed by Create Review Assignment on the main assignment page). The reviews from the main assignment will automatically become the submissions for this review-marking assignment, and a new rubric can be defined for evaluating the quality of the reviews. When specifying the allocations for a review marking assignment, you can specify whether markers will mark reviews of their own work (effectively enabling a ‘response to reviewers’ comments’ facility), randomly allocated individual reviews, or randomly allocated reviewers. 5 Aropa will re-do the allocation process whenever a submission extension is given, which will usually mean changing some of the existing allocations. It cannot, however, change an allocation after the submission date when the reviewer has already read or reviewed the submission. This has the side effect that if extensions are given very late after the submission deadline, most of the existing allocations will not be able to be changed – the result of this may be unequal allocations (for example, one or more students may have to do more than the specified number of reviews). Aropä instructors’ guide (v5) If reviews of a submission have been marked, then the marks and comments on these reviews are appended to the bottom of the page that shows the reviews themselves to the authors of the relevant submission. Downloading submissions and reviews: All reviews for an assignment can be downloaded as a formatted Word document. All submissions can be downloaded into folders named after the student identifier; the reviews of the submission are also stored in the folder. Getting marks for the assignment: Once the reviewing process is over, you can see aggregate grades for each student (CALCULATE GRADES) – these are based on the marks given by reviewers to radio buttons used in the rubric. You set the number of marks given for each radio button if you like (LABEL RUBRIC). Eliminating ‘rogue reviewers’: The ‘discrepancy’ value (CALCULATE GRADES) indicates the extent to which reviewers have disagreed over the quality of a student’s submission. By clicking on the student’s id, you can see the marks given by all the reviewers, and, indicate whether you wish the marks of any of the reviewers to be ignored in the calculation of the student’s final mark. Deleting an assignment: If you really want to totally remove an assignment, then the DELETE ASSIGNMENT button will appear when you make it inactive. Most of the time, though, all you would probably want to do is hide the assignment from students by making it inactive (press the green button) – students do not see inactive assignments. Access via Moodle2 (University of Glasgow only): Aropa is available from Moodle 2 by inserting a new activity of type ‘External Tool’ and then selecting ‘Aropa’ in the drop-down list labelled ‘External Tool Type’. The ‘Launch URL’ field should be left blank. About Aropa Aropä is a web-based system designed by Dr John Hamer and Dr Helen Purchase to support peer review activities in large, undergraduate classes. The tool has been used for over twelve years, initially in an introductory programming course and subsequently in a wide range of subjects, including Commercial Law, English, Music, Engineering, Film and Television, Information Management, Marine Science, Pharmacology, BioMolecular Science, Classics, Management, and Population Health. It is hosted at two sites: the University of Auckland and the University of Glasgow, and actively used worldwide by eight other institutions. Use of Aropä is free. Any questions? Contact John Hamer ([email protected]) or Helen Purchase ([email protected] ). Aropä instructors’ guide (v5) Appendix: Creating a rubric6 Creating the rubric is arguably the most important part of the peer-review process, as it determines both how the reviewers will read and think about their peers’ submissions, as well as the nature of the feedback the authors will receive. Aropa uses a WYSIWYG editor that has been adapted specifically for rubric creation. As the editor is WYSIWYG, the student reviewers will see exactly what you see when you create the rubric. Rubrics Every rubric must have at least one input element: there are two types of input elements in the editor: radio buttons (i.e. select one of N options) comment boxes (areas for the reviewer to type) Radio buttons will always appear in a group. For example, reviewers might be asked to indicate whether an essay is good bad ugly which is a group of three buttons. You can use several groups of radio buttons in one rubric, where each group must be separated by either: a horizontal line - looks like a long dash in the top right hand corner of the editor or a Heading (use the Format menu): The editor panel should automatically colour-code alternate groups of radio buttons. 6 Please do not cut-and-paste your rubric from a Word document or from previous (pre-2010) versions of Aropa. Aropä instructors’ guide (v5) Example rubric showing use of both radio buttons and comment boxes: Example rubric showing division line between two sets of radio buttons: After you have created the rubric, you can label the sections within it, and associate marks with the radio buttons (LABEL RUBRIC). This is particularly useful when you wish to confirm that radio buttons are associated with each other correctly, and if the marks given to the radio buttons are important in calculating final marks. Aropä instructors’ guide (v5) The rubric editor also allows you to specify that the reviewer can upload a file into the rubric – this is useful, for example, if you want the student to annotate the submission by hand, and then scan and load it, or if you want the reviewer to load in a picture from another file. The Rubric editor supports drag-and-drop of image files if you want to include a picture in your rubric: Aropä instructors’ guide (v5)