1
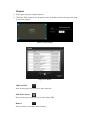
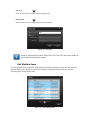
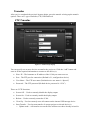
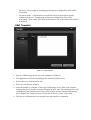
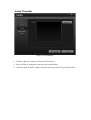
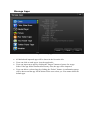
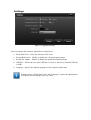
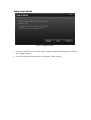
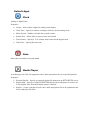
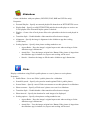
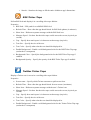
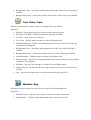
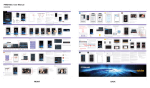
Version 1.1.0 Digital Signage with Apps Copyright © 2012 Syabas Technology, All Rights Reserved 2 Digital Signage with Apps Digital Signage with Apps: First Glance ................................................................................... 4 Project ........................................................................................................................................ 6 New Project ................................................................................................................................6 Scheduler ....................................................................................................................................6 Layout Panel...............................................................................................................................7 Property Panel ............................................................................................................................8 Transfer .................................................................................................................................... 12 FTP Transfer .............................................................................................................................12 USB Transfer ............................................................................................................................13 Local Transfer ..........................................................................................................................14 Manage Apps ........................................................................................................................... 15 Settings ..................................................................................................................................... 16 Help and about ......................................................................................................................... 17 Default Apps ............................................................................................................................ 18 .................................................................................................................................................18 Clock ........................................................................................................................................18 .................................................................................................................................................18 Date ..........................................................................................................................................18 .................................................................................................................................................18 Media Player ............................................................................................................................18 .................................................................................................................................................19 Slideshow .................................................................................................................................19 .................................................................................................................................................19 Flickr ........................................................................................................................................19 .................................................................................................................................................20 RSS Ticker Tape .......................................................................................................................20 .................................................................................................................................................20 Twitter Ticker Tape ..................................................................................................................20 .................................................................................................................................................21 Text Ticker Tape .......................................................................................................................21 .................................................................................................................................................21 Weather Bug .............................................................................................................................21 Copyright © 2012 Syabas Technology, All Rights Reserved 3 Digital Signage with Apps: First Glance Figure 1.1: Computer Application’s User Interface Menu Bar Create Project Create new project, clear and reset all fields back to default Open Project Opens a existing project for editing Close Project Closes currently open project, clear and reset all field back to default Clear Layouts Clear all layouts in the current timeline Ruler Toggle on/off horizontal and vertical rulers on stage Grid Toggle on/off horizontal and vertical grid on stage Transfer Transfer project configuration file to device for playback. Transfer modes include FTP, USB and local Preview Preview current selected layout. Note: Preview will not be trigger if layout is not selected or no app on current selected layout Manage Apps Import new apps, delete imported apps and view app details Settings Show all configurable settings for the computer application Help Shows the Digital Signage with Apps computer application version, check for software updates and access the user manual Project New Project 1. To start, click the “Create Project” button in the menu bar. 2. A popup will appear asking for the name of the project. Type a project name in and click create. NOTE: Project names only allow alphanumeric, dash (-), underscore (_) and space only. Figure 2.1: Create New Project Scheduler 1. There are two modes for the scheduler that can be selected. The daily option will repeat all layouts every day. The weekly option allows you to specify different schedules for each day of the week. Figure 2.2: Daily Scheduler Panel Figure 2.3: Weekly Scheduler Panel 2. Once the project is created, the scheduler's scrollbar will be enabled. 3. Drag the arrow or key in the specific timestamp for a layout. NOTE: the timeline is denoted in a 24 hour format. 4. Click on the plus button to add a layout to the current timestamp. Figure 2.4: Add Layout Add Create a layout on the timestamp where the arrow is pointing Standby Will set the device into standby at the current timestamp Remove Deletes the currently selected layout Duplicate To Duplicates current layout to another point on the timeline Layout Panel Figure 2.5: Layout Panel Once a layout is added, the layout panel will be enabled. All default and imported apps will be shown on the left side. To add an app to a layout, simply drag and drop it onto the stage. Once the app is added to the stage, an icon representing the app will be added to the layer panel on the right. The app’s position within the stage reflects the position it will have on the output screen when the playlist is running. When there are multiple apps stacked on each other, the app that being overlaid cannot be clicked on as the app on top of it will have priority instead. Selection is possible by clicking the icon that represents the app on layer panel on the right side of the stage. To copy an app and all its settings, simply right click on the app and select copy. Then right click anywhere in the stage and select paste. You can do this on the same layout or a different one. Although there is no limitation on the number of apps that can be added to a stage, it is recommended to keep the total number of apps to a minimum in order to maximize playback smoothness. Property Panel The property panel will show the information and the detailed configuration of currently selected app. Figure 2.6: App Info Panel Figure 2.7: App Properties Panel x - Shows the x-axis position of the selected app y - Shows the y-axis position of the selected app width - Shows the width of the selected app height - Shows the height of the selected app opacity - Shows the level of opacity of the selected app depth – Shows the depth of selected app. The app with the larger depth value will be shown on top of an app with the smaller value. Properties such as x, y and opacity can be configured. Properties such as width, height and depth may or may not be configurable depending on the app author’s configuration. Disabled fields will be greyed out and configurable field will be shown in a white box. Each app may have extra configuration fields depending on its function. Figure 2.8: Clock App Extra Properties Playlist Some apps may have a playlist option. Click the “Edit” button in the properties panel or double click on the app in the stage to open the playlist. Figure 2.9: Open Playlist Figure 2.10: Playlist Add Local File Press to bring up a file browser to add a local file Add Web Content Press to bring up a popup to key in web content URL Remove Press to remove currently selected item(s) Sort Up Press to move the currently selected item(s) up Sort Down Press to move the currently selected item(s) down Figure 2.11: Web Link Pictures with dimensions more than 1280x720 or file size more than 1MB will be scaled down before the transfer. Edit Multiple Items To edit multiple items within the same playlist, hold the control key down and left click all desired items. You can select consecutive items by holding down the shift key and left clicking on the first and last item. Figure 2.12: Edit Multiple Items Transfer After you’ve completed the project's layouts design, press the transfer to bring up the transfer options. There are 3 type of transfers; FTP, USB and local. FTP Transfer Figure 3.1: FTP Transfer Popup You can specify one or more devices to transfer the project to. Click the “Add” button and enter in all the required information to connect to the device(s). Host / IP – The hostname or IP address of the S-300 you want to access Port – The FTP port for connection (Default is 21; configured on device) User Name – The FTP user name (Default device user name is “ftpuser”) Password – The FTP password (Default device password is “1234”) There are 5 FTP functions. Screen Off – Used to remotely disable the display output Screen On – Used to remotely enable the display output Reboot – Used to remotely restart the S-300 Clean Up – Used to remotely erase all content on the internal USB storage device Start Transfer – Used to start transfer of current project to selected device(s) o Update mode – will transfer new media files and however those already existed in the device will be skipped. Existing apps and project configuration files will be overwritten o Overwrite mode – will transfer new media files and overwrite those already existed in the device. Existing apps and project configuration files will be overwritten. (Note: Other files in the device that are not in the transfer list will not be deleted) USB Transfer Figure 3.2: USB Transfer Plug in a USB storage device into your computer’s USB port. The application will detect and display the connected USB devices. Select a drive by clicking on the list. Press start to begin the transfer. Once the transfer is complete, remove the USB storage device from your computer and plug the device into the external USB port on the S-300. The transfer process will automatically start and the project files will be copied onto the internal USB storage drive. NOTE: The transfer process will not start if device is in the setup menu. The device will launch the new schedule once the transfer is completed. Local Transfer Figure 3.3: Local Transfer Click the “Browse” button to bring up a file browser. Select a folder to output the current project configuration. Click the “Start Transfer” button to transfer the project files to the selected folder. Manage Apps Figure 4.1: Manage Apps All default and imported apps will be shown in the list on the left. Users can click on each app to view the app details. Users can import new apps by clicking the “Import” button to browse for an app folder. If the app folder contains all necessary files, the app will be imported. Users can delete a selected app by clicking the “Delete” button. A confirmation popup will be shown and the app will be deleted if the user selects yes. You cannot delete the default apps. Settings Figure 5.1: Application Settings Users can change the computer application’s settings here. Week Start From – Select the first day of the week Prompt Before Exit – Enable or disable the exit application prompt Prompt For Update – Enable or disable the update notification prompt USB Size – Define the size of the USB drive in your S-300 device (Default USB size is 4GB) Language – Specify the display language for the computer application Settings such as “Week Start From” and “Language” require the application to be restarted for the changes to go into effect. Help and about Figure 6.1: Help and About Users can check for new versions of the computer application manually by clicking the “Update” button. Users can open the user manual by clicking the “Help” button. Default Apps Clock Analog or digital clock Properties: Layout – Select either a digital or analog clock display Clock Face – Specify a round or rectangle clock face for the analog clock Show Second – Enable or disable the seconds counter Pointer skin – Select either a green or blue clock hands Time Format – Specify a 12 or 24 hour time format for the digital clock Time Zone – Specify the time zone Date Shows the current date, day and month Media Player A media player for all S-300 supported video, audio and picture files in a specified playlist. Properties: External Playlist – Specify an external playlist file hosted on an HTTP/HTTPS server. Playlist Path – Specify a valid HTTP/HTTPS path for the media player to retrieve an S-300 playlist if the External Playlist option is checked. Playlist – Create a playlist of local video, audio and picture files to be uploaded to the device and played in order. Slideshow Create a slideshow with your photos (JPG/JPEG, PNG, BMP and GIF files only) Properties: External Playlist – Specify an external playlist file hosted on an HTTP/HTTPS server. Playlist Path – Specify a valid HTTP/HTTPS path for the media player to retrieve an S-300 playlist if the External Playlist option is checked. Playlist – Create a list of local picture files to be uploaded to the device and played in order. Transition Style – Enable/disable a fade transition effect between images Alignment – Specify the image’s alignment in the slideshow app after scaling (Left/Center) Scaling Options – Specify what picture scaling method to use: o Aspect Ratio – Keep the image’s original aspect ratio when resizing to fit the slideshow app’s dimensions. o Actual Size – Uses the images original size. NOTE: If the picture is larger than the slideshow app’s window size, aspect ratio scaling will be used. o Stretch – Stretches the image to fill the entire slideshow app’s dimensions. Flickr Display a slideshow using Flickr’s public photos or a user’s photos or user's photos. Properties: Public Photo – Set to use Flickr’s public photos for a slideshow Search Keyword – Specify a keyword to match against Flickr’s public photos. Screen Name – Specify a user's Flickr screen name to use their photos for a slideshow. Photo set name – Specify a Flickr user’s photo set to use for a slideshow. Transition Style – Enable/disable a fade transition effect between images Photo interval – Specify the duration for each image to be displayed. Scaling options – Specify what picture scaling method to use o Aspect Ratio – Keep the image’s original aspect ratio when resizing to fit the slideshow app’s dimensions. o Actual Size – Uses the images original size. NOTE: If the picture is larger than the slideshow app’s window size, aspect ratio scaling will be used. o Stretch – Stretches the image to fill the entire slideshow app’s dimensions. RSS Ticker Tape Pull an RSS feed and display it in a scrolling ticker tape fashion. Properties: RSS Path – URL path for a valid RSS XML feed Refresh Time – How often the app should check for RSS feed updates (in minutes) Show Icon – Delineate separate messages with the RSS feed icon Marquee Speed – Set how fast the ticker tape scrolls across the screen (in pixels per second) Gap – Specify how much space is in between each message (in pixels) Text Size – Specify the size of the text. Text Color – Specify what color the text should be displayed in. Enable Background – Enable a solid background color for the RSS Ticker Tape app (unchecked = transparent) Background Color – Specify the background color for the RSS Ticker Tape app if enabled. Background Opacity – Specify the opacity of the RSS Ticker Tape app if enabled. Twitter Ticker Tape Display a Twitter user’s tweets in a scrolling ticker tape fashion. Properties: Screen name – Specify which Twitter username to pull tweets from. Refresh Time – How often the app should check for new tweets (in minutes) Show Icon – Delineate separate messages with the user’s Twitter icon Marquee Speed – Set how fast the ticker tape scrolls across the screen (in pixels per second) Gap – Specify how much space is in between each message (in pixels) Text Size – Specify the size of the text. Text Color – Specify what color the text should be displayed in. Enable Background – Enable a solid background color for the Twitter Ticker Tape app (unchecked = transparent) Background Color – Specify the background color for the Twitter Ticker Tape app if enabled. Background Opacity – Specify the opacity of the Twitter Ticker Tape app if enabled. Text Ticker Tape Display a text message in either a static or scrolling ticker tape fashion. Properties: Message – Enter the message you want to scroll across the screen. Message is in HTML – Specify to render the message as HTML. Text Size – Specify the size of the text. Text Color – Specify what color the text should be displayed in. Enable Background – Enable a solid background color for the Text Ticker Tape app (unchecked = transparent) Background Color – Specify the background color for the Text Ticker Tape app if enabled. Background Opacity – Specify the opacity of the Text Ticker Tape app if enabled. Enable Marquee – Enable marquee scrolling (from right to left) Message Align – Specify the message alignment (left, center and right); only available if marquee is not enabled. Multiline – Specify if the message is a single line or multiline output. Marquee Speed – Set how fast the ticker tape scrolls across the screen (in pixels per second) Gap – Specify how much space is in between each message (in pixels) Weather Bug Display the current weather for a specific area; powered by WeatherBug.com. Properties: Search Keyword – Specify a city name to search for weather information. Search Result – Click the search button and select a city from result list Temperature Scale – Specify which format should be used; Fahrenheit or Celsius. Refresh Time – How often the app should check for updated weather information Skin – Specify which UI skin should be used (SilverBlack/Sea Green). Show Location – Enable to indicate the location in the app Show Today Weather – Enable to show the weather forecast for the entire day Show Forecast – Enable to show the weather forecast for the following days Show Forecast Duration – Specify how many days to display the weather forecast for.