1
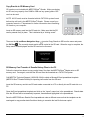
READER USER MANUAL [Intentionally left blank] [Intentionally left blank] Contents Introduction ..................................................................................................................................... 1 Intended Use .............................................................................................................................................. 1 Product Overview ....................................................................................................................................... 3 Box Contents.............................................................................................................................................. 5 Specifications ............................................................................................................................................. 5 Set Up .............................................................................................................................................. 6 Installation .................................................................................................................................................. 6 About MEDTOXScan Reader ..................................................................................................................... 6 Setting User-defined Options ..................................................................................................................... 7 Set Time/Date ............................................................................................................................................................. 7 Set Contrast ................................................................................................................................................................ 7 Set Beeper Volume ..................................................................................................................................................... 8 Set Backlight Timeout ................................................................................................................................................. 8 Set Results Beep ........................................................................................................................................................ 8 Set Auto Print .............................................................................................................................................................. 9 Set Auto Record Erase ............................................................................................................................................... 9 Set Auto Send ............................................................................................................................................................. 9 Update Firmware....................................................................................................................................................... 10 Set Results Type ....................................................................................................................................................... 10 Copy Results to SD Memory Card ............................................................................................................................ 11 Network Setup........................................................................................................................................................... 12 Default Settings ........................................................................................................................................ 15 Operation ....................................................................................................................................... 16 Power On ................................................................................................................................................. 16 Run Test .................................................................................................................................................. 17 Print Results ............................................................................................................................................. 20 Recall Results .......................................................................................................................................... 21 Clear History ............................................................................................................................................ 25 Quality Control .............................................................................................................................. 26 Calibration ................................................................................................................................................ 26 Maintenance and Troubleshooting.............................................................................................. 27 Routine Maintenance & Cleaning ............................................................................................................. 27 Troubleshooting ....................................................................................................................................... 27 Troubleshooting Flowchart Using QC Test Devices.................................................................................. 28 QC Test Devices Procedure ..................................................................................................................... 28 Cleaning Cassette Procedure................................................................................................................... 29 Auto Contamination Detection .................................................................................................................. 30 Error Messages ........................................................................................................................................ 31 Service Information .................................................................................................................................. 33 Return Procedure ..................................................................................................................................... 33 Appendix ....................................................................................................................................... 34 Warnings, Precautions and Limitations .................................................................................................... 34 Disclaimers .............................................................................................................................................. 34 FCC Class A Notice ................................................................................................................................. 34 Safety Certificate ...................................................................................................................................... 34 Introduction Intended Use The PROFILE®-V MEDTOXScan® Drugs of Abuse Test System consists of the PROFILE®-V MEDTOXScan® Test Devices and the MEDTOXScan® Reader. The PROFILE®-V MEDTOXScan® Test Devices are one-step immunochromatographic tests for the rapid, qualitative detection of one or more of the following in human urine: Amphetamine, Barbiturates, Benzodiazepines, Buprenorphine, Cocaine, Methadone, Methamphetamine, Opiates, Oxycodone, Phencyclidine, Propoxyphene, THC (Cannabinoids), and Tricyclic Antidepressants or their metabolites. The PROFILE®-V MEDTOXScan® Test Devices can only be used with the MEDTOXScan® Reader. The MEDTOXScan® Reader is an instrument used to interpret and report the results of the PROFILE®-V MEDTOXScan® Test Device. The PROFILE®-V MEDTOXScan® Test Devices cannot be visually read. The PROFILE®-V MEDTOXScan® Drugs of Abuse Test System is for in vitro diagnostic use and is intended for prescription use only. It is not intended for use in point-of-care settings. The PROFILE®-V MEDTOXScan® Drugs of Abuse Test System detects drug classes at the following cutoff concentrations: AMP Amphetamine (d-Amphetamine) 500 ng/mL OPI Opiates (Morphine) 100 ng/mL or 2000 ng/mL BAR Barbiturates (Butalbital) 200 ng/mL BZO Benzodiazepines (Nordiazepam) 150 ng/mL OXY Oxycodone (Oxycodone) 100 ng/mL BUP Buprenorphine (Buprenorphine) 10 ng/mL PCP Phencyclidine (Phencyclidine) 25 ng/mL COC Cocaine (Benzoylecgonine) 150 ng/mL MAMP Methamphetamine (d-Methamphetamine) 500 ng/mL MTD Methadone (Methadone) 200 ng/mL PPX Propoxyphene (Norpropoxyphene) THC Cannabinoids (11-nor-9-carboxy-9-THC) TCA Tricyclic Antidepressants (Desipramine) 300 ng/mL 50 ng/mL 300 ng/mL Configurations of the PROFILE®-V MEDTOXScan® Test Devices may consist of any combination of the above listed drug analytes. Test Devices will have an opiate cutoff of either 100 ng/mL or 2000 ng/mL. Refer to specific product labeling for the combination of drug tests included on that test device. THE PROFILE®-V MEDTOXScan® DRUGS OF ABUSE TEST SYSTEM PROVIDES ONLY A PRELIMINARY ANALYTICAL TEST RESULT. A MORE SPECIFIC ALTERNATE CHEMICAL METHOD MUST BE USED IN ORDER TO OBTAIN A CONFIRMED ANALYTICAL RESULT. GAS CHROMATOGRAPHY / MASS SPECTROMETRY (GC/MS), HIGH PERFORMANCE LIQUID CHROMATOGRAPHY (HPLC) OR LIQUID CHROMATOGRAPHY / TANDEM MASS SPECTROMETRY (LC/MS/MS) ARE THE PREFERRED CONFIRMATORY METHODS. CLINICAL CONSIDERATION AND PROFESSIONAL JUDGMENT SHOULD BE APPLIED TO ANY DRUG OF ABUSE TEST RESULT, PARTICULARLY WHEN PRELIMINARY POSITIVE RESULTS ARE OBTAINED. The MEDTOXScan® Reader includes a Positive QC Test Device, a Negative QC Test Device and a Cleaning Cassette. The MEDTOXScan® Positive and Negative QC Test Devices are intended to detect errors associated with the MEDTOXScan® Reader and a contaminated contact imaging sensor (CIS), and to verify that the CIS cleaning procedure using the MEDTOXScan® Cleaning Cassette effectively removed any contamination. 1 Principles of Operation The MEDTOXScan® Reader accepts the PROFILE®-V MEDTOXScan® Test Devices, which are designed specifically for use with the MEDTOXScan® Reader. Please refer to the PROFILE®-V MEDTOXScan® Drugs of Abuse Test System insert. PROFILE®-V MEDTOXScan® Test Devices are qualitative immunochromatographic lateral flow devices. The MEDTOXScan® Reader scans the device and utilizes a full color contact imaging sensor (CIS) to capture relative line intensities. Software algorithms and barcodes are used to identify the type of device to be read, the analyte(s) associated with the device and whether the presence or absence of a line is associated with a negative or positive result. The PROFILE®-V MEDTOXScan® Test Devices can be inserted into the MEDTOXScan® Reader as soon as the patient sample is added to the device. The MEDTOXScan® Reader times the reaction providing results after the required time has elapsed. The results of the scans will be printed automatically or may be displayed on the MEDTOXScan® Reader screen. According to good laboratory practice, the laboratory should follow the package insert instructions for performing the test, and follow government regulations for the running of QC material to ensure the accuracy and reliability of the instrument prior to use. 2 Product Overview 3 Keypad Overview 4 Box Contents MEDTOXScan® Reader 12V AC Adapter/Power Cord User Manual Quick Set Up Guide Essential accessories packaged separately - contact MEDTOX Diagnostics for replacements MEDTOXScan® QC Test Devices MEDTOXScan® Cleaning Cassette MiniPet pipettor Optional accessories packaged separately - contact MEDTOX Diagnostics Thermal Printer Bar Code Scanner Supplies packaged separately - contact MEDTOX Diagnostics ® PROFILE -V MEDTOXScan® Test Devices Thermal Printer Paper SD Memory Card Specifications Physical Size Weight Electrical input Electrical supply Keypad Display 3.5” x 5.5” x 8” H x W x D (86mm H x 128mm W x 192mm D) 1.2 pounds (0.6kg) 12V DC at 1 A supplied by AC/DC converter AC 100 -- 240V, 50Hz -- 60Hz, 0.3A Alphanumeric with special function keys (18 total) LCD screen Environmental Temperature Humidity Location 5°C – 40°C 10%RH – 90%RH Dry, clean, flat horizontal surface, indoors away from direct sunlight Memory Capacity 1000 Records Miscellaneous External Bar Code Scanner (rapid entry of numeric User, Patient or Lot ID numbers) External Thermal Printer Test Device Specifications ® Test device specific information is provided in the product insert accompanying the PROFILE -V MEDTOXScan® Drugs of Abuse Test System Device kit. The MEDTOXScan Reader analyzes immunoassay test devices manufactured only by MEDTOX Diagnostics, Inc. 5 Set Up Installation Refer to the Product Overview illustration to see the locations of various cable and cord connections on the MEDTOXScan® Reader. MEDTOXScan® READER: 1. Plug in the cable connector of 12V AC Adapter to the Power Jack on back of MEDTOXScan® READER. 2. Connect AC power cord to the inlet of the AC Adapter. 3. Insert AC power cord plug into an electrical outlet. ® NOTE: Save the original foam-padded box to return the MEDTOXScan Reader for service. MEDTOXScan® PRINTER (optional CT-S280 Printer): 1. Plug cable connector of printer AC adapter to power jack on back of PRINTER. 2. Connect printer AC power cord to inlet of printer AC adapter. 3. Insert printer power cord plug into an electrical outlet. ® 4. Attach 9-pin end of printer cable to Bottom Connector: Printer on back of MEDTOXScan Reader. 5. Attach 25-pin end of printer cable into connector on back of PRINTER. Secure connections. MEDTOXScan® BAR CODE SCANNER (optional LS2208 Barcode Scanning device): 1. Attach end of BAR CODE SCANNER cable to Top Connector: Bar code scanner on back of MEDTOXScan® Reader and secure. The Scanner is already programmed and ready for use with MEDTOXScan® Reader Set All Defaults (Code 39 is the standard barcode for all data entry). Do not reprogram. If any issues occur, scan the “Set Defaults” barcode in the Scanner quick start guide or at right to reset the Scanner to the appropriate settings for use with the MEDTOXScan® Reader. ® NOTE: The Scanner gets power from the MEDTOXScan Reader, not an electrical outlet. NOTE: Refer to the Printer User Manual and Scanner Quick Set Up for cautions and tips before using. About MEDTOXScan Reader User can get product information from About MEDTOXScan® Reader on the main menu. Use Up and Down Navigation Keys to select About MEDTOXScan® Reader from menu and press OK Key . 6 Setting User-defined Options User can define various options for the device by pressing the Menu Key and choosing Setup from the main menu screen. Use Up and Down Navigation Keys to select Setup and press OK Key . Set Up option screen appears. Set Time/Date Use Up and Down Navigation Keys to select Set Time/Date from the menu and press OK Key . Use numeric keypad to enter time and Up and Down Navigation Keys to toggle between “AM” and “PM”. Press OK Key when done. The Enter Date screen appears. Use numeric keypad to enter date. Press OK Key when done. Set Contrast Use Up and Down Navigation Keys to select Set Contrast from menu and press OK Key . Use Up and Down or Right and Left of the Navigation Keys to increase or decrease contrast. Press OK Key when done. 7 Set Beeper Volume Use Up and Down Navigation Keys to select Set Beeper Volume from menu and press OK Key . Use Up and Down or Right and Left of the Navigation Keys to increase or decrease volume. Press OK Key when done. Set Backlight Timeout Use Up and Down Navigation Keys to select Set Backlight Timeout from menu and press OK Key . Use Up and Down or Right and Left Navigation Keys to increase or decrease time. Press OK Key when done. Set Results Beep Use Up and Down Navigation Keys to select Set Results Beep from menu and press OK Key . Use Up and Down or Right and Left Navigation Keys to toggle between Results Beep On and Off options. Press the OK Key when done. 8 Set Auto Print Use Up and Down Navigation Keys to select Set Auto Print from menu and press OK Key . Use Up and Down or Right and Left Navigation Keys to toggle between Auto Print On and Off options. Press the OK Key when done. Set Auto Record Erase Use Up and Down Navigation Keys to select Set Auto Record Erase from menu and press OK Key . Use Up and Down or Right and Left Navigation Keys to toggle between Auto Erase On and Off options. Press the OK Key when done. NOTE: The Auto Record Erase function is applicable only when the MEDTOXScan® Reader has 1000 stored records. With this feature disabled, a History full warning message will be displayed when the 1000th record is created, and when the 1001st record is created the oldest record is automatically deleted and the History full warning is displayed. When this feature is enabled, the MEDTOXScan® Reader will automatically delete the oldest record to make room for the 1001st record without displaying a warning screen. Set Auto Send Use Up and Down Navigation Keys to select Set Auto Send from menu and press OK Key . Use Up and Down or Right and Left Navigation Keys to toggle between Auto Send mode On and Off options. Press the OK Key when done. NOTE: See Network Setup section to configure the MEDTOXScan® Reader to send data to a local network. With Network communication configured properly, records may be sent to the network automatically as each scan is completed or manually from the View Results screen or Recall Results menu. 9 Update Firmware Use Up and Down Navigation Keys to select Update Firmware from menu and press OK Key Follow the screen instruction to insert SD card to update firmware. Press OK Key when done. . Set Results Type Use Up and Down Navigation Keys to select Set Results Type from menu and press OK Key . Use Up and Down or Right and Left Navigation Keys to toggle between POS/NEG Results and Numerical Results display types. Press the OK Key when done. NOTE: Results printouts will be the same type as the results display. 10 Copy Results to SD Memory Card SD cards are not included with MEDTOXScan® Reader. When purchasing an SD card, any capacity from 32MB to 2GB and any speed grade of SD card can be used. NOTE: All SD cards must be formatted with the FAT32 file system format before they will work in the MEDTOXScan® Reader. Please consult your computer manual or IT department for further information about formatting SD cards on your computer. Insert an SD memory card into the SD card slot. Make sure that the SD card is pressed firmly in place. This is indicated by a “clicking sound”. Proper orientation of SD card Then use the Up and Down Navigation Keys to select Copy Results to SD from the menu and press the OK Key . The currently stored results will be copied to the SD card. When the copy is complete, the Setup menu will be displayed and the SD card can be removed. SD Memory Card Transfer of Results History Files to the PC Follow the instructions above to copy results history files from the MEDTOXScan® Reader onto an SD memory card. Once again, note that the SD card must be formatted as a FAT32 File System. Call MEDTOX Technical Support (1-800-832-3244) to obtain a Microsoft Excel spreadsheet template (MEDTOXScan® Reader Results) for importing test results from the SD card. Insert the SD memory card into an SD card reader connected to a PC or directly into an SD card slot on a PC. Open the Excel spreadsheet template and click on the “Import” macro box in the spreadsheet. Results data from the SD card will be automatically imported, formatted and highlighted in the spreadsheet. Save the MEDTOXScan® Results Excel spreadsheet under a different name so that the template can be used again to copy another data file without having to overwrite the last file that was copied. 11 Network Setup In order to access the Network menu, a password is required. This is to prevent non-authorized users from changing the network settings. Contact MEDTOX Technical Support to obtain a password. The reader software will communicate with a middle-ware server developed by a third party vendor using a local area network over Ethernet. Data is transmitted using TCP standard protocol. The middle-ware server provides an interface from the MEDTOXScan® Reader to a laboratory information system. Use Up and Down Navigation Keys to select Network from Setup menu and press OK Key the Network password and press OK Key when done. A Set Ethernet option appears. Press the OK Key . Enter . Set Ethernet Use Up and Down or Right and Left Navigation Keys OK Key when done. to toggle between Ethernet On or Off. Press If the Ethernet status is changed (OFF/ON), Applying configuration appears on screen. If the Ethernet is set to OFF, the Network setup is terminated and only the Set Ethernet Network menu option is listed on screen. When the Ethernet is set to ON and the IP source is set to DHCP, an error message “DHCP failed to obtain an IP address” will appear if the MEDTOXScan® Reader is not physically connected to a network. Press OK Key to continue. 12 If the Ethernet is set to ON and the IP source is set to DHCP, the Network Menu lists the following options: Set Ethernet, Set Server IP, Set Server Port, IP Source as shown below. Set Server IP Use Up and Down Navigation Keys to select Set Server IP and press OK Key address and press OK Key when done. . Enter the server IP Set Server Port Use Up and Down Navigation Keys to select Set Server Port and press OK Key number of the server and press OK Key when done. . Enter the Port IP Source This network menu allows the user to choose one of two protocols (DHCP and Static) that provides the MEDTOXScan® Reader its IP address. Dynamic Host Configuration (DHCP) protocol allocates IP addresses dynamically, while the Static protocol option allows the user to manually configure each reader with the required information. Use Up and Down Navigation Keys to select IP Source and press OK Key . Use Up and Down or Right and Left Navigation Keys to toggle between DHCP and Static. Press OK Key when done. If the IP Source is changed (DHCP/Static), Applying configuration appears on screen. 13 When the Ethernet is set to ON and the IP source is set to DHCP, an error message “DHCP failed to obtain an IP address” will appear if the MEDTOXScan® Reader is not physically connected to a network. Press OK Key to continue. To use DHCP, connect the MEDTOXScan® Reader to the local area network. If the Ethernet is set to ON and the IP source is set to Static, the Network Menu lists the following new options: Set IP address, Set Netmask, and Set Gateway. The Set Ethernet, Set Server IP, Set Server Port, IP Source menu options are the same as listed previously. The Set IP address, Set Netmask, and Set Gateway menu options, which appear only when the IP Source is set to Static, need to be set manually by the user. Contact your local Network Administrator to obtain the necessary information for each of these submenu parameters: Set IP Address Use Up and Down Navigation Keys to select Set IP Address and press OK Key address of the Reader and press OK Key . Enter the IP when done. 14 Set Netmask Use Up and Down Navigation Keys of the Reader and press OK Key to select Set Netmask and press OK Key . Enter the Netmask when done. Set Gateway Use Up and Down Navigation Keys to select Set Gateway and press OK Key address of the subnet’s gateway and press OK Key . Enter the IP when done. Default Settings The following table lists the default settings for each of the User-Defined Options. Option Set Time/Date Set Contrast Set Beeper Volume Set Backlight Timeout Set Results Beep Set Auto Print Set Auto Record Erase Set Results Type Set Auto Send Default value None 25% (5 bars) 70% (14 bars) 10 min On Enabled Disabled POS/NEG Disabled 15 Operation Power On Plug the power cord cable connector of 12V AC Adapter into the rear of the MEDTOXScan® Reader. Connect the AC power cord to the inlet of the AC Adapter. Insert the power cord plug into a standard wall outlet. Turn on the power with the power switch located on the rear of the reader. This startup screen indicates that MEDTOXScan® Reader is powered up. NOTE: It usually takes 1 to 2 minutes to load the operating system. The startup screen will remain on until the system is fully loaded. The device drawer needs to be closed for initialization. The MEDTOXScan® Reader goes through a brief initialization process. The progress bar indicates that the MEDTOXScan® Reader is running system checks and is not yet ready to test. A welcome screen appears when the MEDTOXScan® Reader is ready. 16 Run Test The welcome screen indicates that the MEDTOXScan® Reader is ready to accept a device and initiate a new test. . ONLY PROFILE®-V MEDTOXScan® Test Devices can be used with the MEDTOXScan® Reader. Tip: Follow the directions included with PROFILE®-V MEDTOXScan® Test Devices to insure their correct use. Do not attach any type of adhesive label to the device as this may interfere with reading test results. Wipe spills off the surface of the device before inserting in the reader to avoid contaminating the sensor. 1. Insert Device Press the Eject button to open the device drawer. Place the device with sample in the drawer and push to close. Once a test device is inserted, a progress bar will indicate that the MEDTOXScan® Reader is detecting the specific device type. This process will take 3-5 seconds. If a test device is not recognized, an error message will prompt for further actions. WARNING: Do not eject test device while MEDTOXScan® Reader is scanning. 2. Enter Lot Number Once device detection is complete, the Enter Lot Number screen appears. The test device Lot Number is entered using the MEDTOXScan® Reader keypad or optional barcode scanner. See next page for additional keypad explanation. 17 3. Enter User ID Next, the Enter User ID screen appears. The User ID is entered using the MEDTOXScan® Reader keypad or optional barcode scanner. 4. Enter Specimen ID Once User ID is entered, the Enter Specimen ID screen appears. The Specimen ID is entered using the MEDTOXScan® Reader keypad or optional barcode scanner. Tip: The PROFILE®-V MEDTOXScan® Test Device Lot Number, User ID and/or Specimen ID number can be entered by using the optional bar code scanner to scan the information from a related document or label. If the bar code scanner is configured to send a <CR> at the end of a barcode, then the MEDTOXScan® Reader will automatically advance to the next screen for data input. A-Z key - The default setting is for numeric entry. Pressing the A-Z key places the MEDTOXScan® Reader in alphanumeric entry mode. This allows the user to use the keypad to enter both letters and numbers as part of the User ID or Specimen ID. For example, when the MEDTOXScan® Reader is in alphanumeric entry mode the user can press the “2” key to cycle through the letters A, B, and C and the number 2. Pressing the A-Z key a second time returns the MEDTOXScan® Reader to numeric entry mode. Left and Right Navigation Keys delete the last character entered. Cancel key OK Key - Allow the user to move right to enter the next character and left to - Cursor goes back to previous character in current data entry field. - Enter the completed Lot number, User ID or Specimen ID number. 18 5. Scanning The scanning screen will appear after the Specimen ID has been entered. The timer at the bottom of the screen will indicate remaining time until the test is complete. The timing is set to allow the test lines to fully develop in the reader and then scan the results. Tip: Do not eject the test device during scanning. This may damage the reader. Scanning can be canceled by pressing the Cancel key on the keypad when the scanning progress/countdown screen is displayed. This will cause the test to be terminated prior to the determination of results. The test cannot be resumed and will have to be re-run on a fresh test cassette. When scanning is canceled, a message is displayed to indicate that the scan is being aborted. When scanning stops the device may be ejected. 6. Print Results If Auto Print mode is turned on, the results will be printed directly to the printer when the test is complete and the View Results screen will appear. If the Results Beep is turned on, a beeping sound will indicate that the results are ready. The View Results screen provides manual printing options at the bottom of the screen. 7. View Results The View Results screen appears when the test is complete. Use Navigation keys described below to review the results and print if desired. Up and Down Navigation Keys - Allow the user to scroll through the results. Left and Right Navigation Keys - Allow the user to move through the option bar at the bottom of the screen. Select Prt Result for the POS/NEG results printing option (or Prt Data to print numeric data). Select Done to exit the View Results screen. OK Key - Press to initiate the highlighted option in the option bar. 19 Print Results When the optional printer is installed the user has the option to print the results of a completed test. Left and Right Navigation Keys - Allow the user to move through the option bar at the bottom of the screen. Select Prt Result for the POS/NEG results printing option (or Prt Data to print numeric data). Select Done to exit the View Results screen. OK Key - Press to initiate the highlighted option in the option bar. A status screen appears to notify the user that the request to print is received and being fulfilled. If the printing operation is successful, the interface will return to the View Results screen. Cancel Key - Cancel the printing operation. Tip: If Auto Print mode is turned on, the results will be printed automatically as soon as the scan is complete. The View Results screen will be displayed with the option to print if desired. The Print Results option generates a printout that shows the test names and the POS/NEG result for each test. This is the default printout format. The Print Data option generates a printout that shows the test names and the POS/NEG result for each test as well as the threshold values and numeric test line data. If the MEDTOXScan® Reader detects any problems with printing, the interface will display a PRINT ERROR message to notify the user of the problem and steps to correct it. Common error messages are listed in the Maintenance and Troubleshooting section. 20 Recall Results User can review test results stored in the MEDTOXScan® Reader. Press the Menu Key to see the main menu. Use Up and Down Navigation Keys to select Recall Results and press OK Key . Last Test Use Up and Down Navigation Keys to select Last Test from the menu and press OK Key display the results of the most recent completed test. to The View Results screen appears. Up and Down Navigation Keys - Allow the user to scroll through the results. Left and Right Navigation Keys - Allow the user to move through the option bar at the bottom of the screen. Select Prt Result for the POS/NEG results printing option (or Prt Data to print numeric data). Select Done to exit the View Results screen. OK Key - Press to initiate the highlighted option in the option bar. Tip: Store up to 1000 records in the MEDTOXScan® Reader for ready recall. If records must be stored for a longer period, copy results to SD memory card and transfer to PC for storage. If Network capability is available, send records to your local network for storage. Then clear history to continue using the unit. If the maximum number of records is reached, the MEDTOXScan® Reader will automatically overwrite the oldest history record with the new record when the next scan is performed. 21 View All Use Up and Down Navigation Keys to select View All from the menu and press OK Key the list of all test results currently stored in the MEDTOXScan® Reader. Up and Down Navigation Keys OK Key to display - Allow the user to scroll through the tests. - Select the highlighted test in the list and display the results. Cancel Key - Return to the Recall Results menu. Left and Right Navigation Keys - Allow the user to scroll through the test records 10 at a time. (NOTE: If fewer than 10 records exist, the left/right keys will advance to the first or last record.) Print Data This selection prints, in numerical format, all records currently stored in the MEDTOXScan® Reader. Use Up and Down Navigation Keys to select Print Data from the menu and press OK Key . Print Results This selection prints, in POS/NEG format, all records currently stored in the MEDTOXScan® Reader. Use Up and Down Navigation Keys to select Print Results from the menu and press OK Key . Cancel Key - Cancel any printing operation. View POS Use Up and Down Navigation Keys to select View POS from the menu and press OK Key to ® display the list of all tests currently stored in the MEDTOXScan Reader that have positive results. Use keypad Up and Down Navigation Keys and Cancel Key as described under View All , OK Key above. 22 Print POS Data This selection prints, in numerical format, all tests with positive results currently stored in the MEDTOXScan® Reader. Use Up and Down Navigation Keys to select Print POS Data and press OK Key . Print POS Results This selection prints, in POS/NEG format, all tests with positive results currently stored in the MEDTOXScan® Reader. Use Up and Down Navigation Keys to select Print POS Results and press OK Key . Cancel Key - Cancel any printing operation. View NEG Use Up and Down Navigation Keys to select View NEG from the menu and press OK Key to ® display the list of all tests currently stored in the MEDTOXScan Reader that have only negative results. Up and Down Navigation Keys OK Key Cancel Key - Allow user to scroll through the tests. -Select the highlighted test in the list and display the results. - Return to the Recall Results menu. Print NEG Data This selection prints, in numerical format, all records currently stored in the MEDTOXScan® Reader containing only negative results. Use Up and Down Navigation Keys to select Print NEG Data and press OK Key . Print NEG Results This selection prints, in POS/NEG format, all records currently stored in the MEDTOXScan® Reader containing only negative results. Use Up and Down Navigation Keys to select Print NEG Results and press OK Key . Cancel Key - Cancel any printing operation. Tip: The Print Results options generate a printout that shows records with the test names and the POS/NEG result for each test. This is the default printout format. The Print Data options generate a printout that shows records with the test names and the POS/NEG result for each test as well as the threshold values and numeric test line data. 23 The following options are available only with proper Network Setup. The reader software will communicate with a middle-ware server developed by a third party vendor using a local area network over Ethernet. The middle-ware server provides an interface from the MEDTOXScan® Reader to a laboratory information system. Send Unsent Records This selection on the Recall Results menu sends all records that haven’t already been sent to the server. Send All Records This selection on the Recall Results menu sends all records currently stored in the Reader to the server. Send Record This option is located on the View Results screen, together with “Done”, “Prt Result”, and “Prt Data” scrollable selections. This menu selection will send the currently displayed record to the server. An error screen will alert the user to any problems during the record transmission across the network. 24 Clear History User can clear stored scan data from Clear History on the main menu. Press the Menu Key to see the main menu. Use Up and Down Navigation Keys to select Clear History and press OK Key . Clear All History User can clear all stored scan data. Use Up and Down Navigation Keys from menu and press OK Key . Follow the instruction on the screen to clear history by pressing OK Key Cancel Key . to select Clear All History , or to cancel action by pressing NOTE: To Clear History requires confirmation on a second pop-up screen. This action will permanently ® remove all results from the MEDTOXScan Reader memory. There is no recovery capability. Clear Older Than User can clear stored scan data older than a specified date and time. Use Up and Down Navigation Keys to select Clear Older Than from menu and press OK Key . Use the keypad to enter the time and date at the prompts. All records older than the time and date entered will be deleted from the MEDTOXScan® Reader. Follow the instruction on the screen to clear history by pressing OK Key Cancel Key . , or to cancel action by pressing Tip: If the maximum number of records is reached and Auto Erase mode is turned on, the MEDTOXScan® Reader will automatically overwrite the oldest history record with the new record when a scan is performed. If Auto Erase mode is turned off, the user will be prompted to take action after the maximum is reached; if no records are deleted, then the oldest record will be overwritten on the next scan. 25 Quality Control The purpose of quality control is to ensure accuracy and reliability of results and to detect errors. MEDTOX recommends a Quality Control Program for monitoring the performance of the PROFILE®-V MEDTOXScan® Test Devices and the MEDTOXScan® Reader that uses a combination of internal controls and external controls. Users should follow government regulations for the running of QC material. Internal controls ensure that the test is working and that you are performing the test correctly. A control line (internal control) is included on each PROFILE®-V MEDTOXScan® test strip. Whether or not drug is present in the sample, a line must form at the Control (C) position on the test strip to show that enough sample volume was used and that the reagents are migrating properly. If a Control line does not form, the test is invalid. The Control line consists of immobilized anti-mouse antibody that reacts with the antibodycolloidal gold as it passes this region of the membrane. Formation of a line detectable by the MEDTOXScan® Reader verifies the Control line antibody-antigen reaction occurred. External controls are urine-based control materials that contain the drugs to be tested at concentrations above the cutoff (positive control) or contain no drug (negative control). Run external controls as if they were patient samples. Refer to the instructions that accompany the external controls. You should run external controls routinely or as needed for any of the following reasons: (1) to practice the test with a known control, (2) when you open a new lot of test devices, (3) once a week, (4) if you suspect that the Reader or test device is not working properly, (5) if you have had a repeated unexpected test result, or (6) if you suspect that the test devices have been stored improperly. External quality control materials are available from MEDTOX and other commercial sources. Should control results indicate a problem with the PROFILE®-V MEDTOXScan® Drugs of Abuse Test System, please follow the instructions in the Troubleshooting Section below. External quality control materials are available from MEDTOX. Contact MEDTOX at 1-800-832-3244 for further information. Calibration The MEDTOXScan® Reader is calibrated and verified before shipping to the customer. No calibration is required of the operator. Reader calibration cannot be changed by users in the field. 26 Maintenance and Troubleshooting Routine Maintenance & Cleaning No maintenance other than periodic external cleaning is required of the operator. MEDTOX recommends using isopropyl alcohol wipes to clean the outside of the MEDTOXScan® Reader and the device drawer. Do not immerse the reader in water or other liquids. If service or maintenance is required, the MEDTOXScan® Reader should be sent to the manufacturer. The MEDTOXScan® Reader has been designed to provide you with reliable and worry-free service. If for any reason, you have a problem with your equipment, please call MEDTOX Technical Support at 1-800832-3244. Troubleshooting Use the QC Test devices provided with the MEDTOXScan® Reader to detect errors associated with the MEDTOXScan® Reader and a contaminated color contact imaging sensor (CIS), and to verify that the CIS cleaning procedure using the MEDTOXScan® Cleaning Cassette effectively removed any contamination (dirt, dust or sample). The QC Test Devices function as an optical performance system check for the MEDTOXScan® Reader only, not for the PROFILE®-V MEDTOXScan® Drugs of Abuse Test System, and are not intended to replace the need for the external controls. The QC Test Devices have been designed to simulate the end points that are generated in the PROFILE®-V MEDTOXScan® Test Device when external positive and negative QC controls are run. The QC Test Devices consist of artificial control lines and test lines (negative) or artificial control lines and no test lines (positive) printed on a membrane and placed in the PROFILE®-V MEDTOXScan® plastic housing. The QC Test Devices are not intended to evaluate all components of the test system from specimen preparation through generation of results. They are intended to function as a troubleshooting device to determine that the MEDTOXScan® Reader is functioning correctly. You should run the QC Test devices (1) if you suspect the MEDTOXScan® Reader is not functioning properly, or (2) if you suspect the CIS is dirty, or (3) if the MEDTOXScan® Reader has been dropped or damaged. Refer to the Cleaning Cassette Procedure for details on the cleaning procedure. Contact MEDTOX Technical Support if you need any additional help at 1-800-832-3244. 27 Troubleshooting Flowchart Using QC Test Devices QC Test Devices Procedure 1. Set up and power on the MEDTOXScan® Reader. 2. Remove devices from storage pouch. The Positive device has one line on each strip. Visually examine the devices to be sure the strips in the device window are clean (free of dust, fingerprints, smudges or discoloration/yellowing) and undamaged (scratched, torn, or bent). Do not add sample to the sample wells of the QC Test Devices. 3. Place device in MEDTOXScan® Reader tray and close. 4. At the prompt, enter test device Lot Number and press “OK”. 5. Enter User ID and press “OK”. 6. Scan POS or NEG barcode from pouch for Specimen ID and press “OK” (or manually enter). 7. Test results print out when QC Test device scan is complete. 8. Repeat steps 3-7 with second device. The Negative device has six lines on each strip. 9. Verify that test results are reported correctly: (see partial example printouts below) 28 All results are POS for the QCPOSCTRL device. Test Sample ID: QCPOSCTRL ~~~~~~~~ TCTRL1 VALID S1T1 POS S1T2 POS S1T3 POS S1T4 POS S1T5 POS ~~~~~~~~ etc. All results are NEG for the QCNEGCTRL device. Test Sample ID: QCNEGCTRL ~~~~~~~~ TCTRL1 VALID S1T1 NEG S1T2 NEG S1T3 NEG S1T4 NEG S1T5 NEG ~~~~~~~~ etc. 10. If the test results are all POS for the positive QC Test device and all NEG for the negative QC Test device, the MEDTOXScan® Reader is reporting results correctly. Resume normal operation. 11. If the test results do not match expected, then follow the flowchart to determine appropriate next steps which may include replacing the QC Test devices, cleaning the sensor, or calling Technical Support. Cleaning Cassette Procedure A MEDTOXScan® Cleaning Cassette is required for this procedure. Contact MEDTOX for resupply. This procedure is appropriate if you get incorrect results running the QC Test devices or if the MEDTOXScan® Reader displays the “CONTAMINATED SENSOR” error message. It is effective for cleaning contamination such as dirt, dust or sample accumulated on the contact imaging sensor (CIS). 1. DISCONNECT the MEDTOXScan® Reader from the power supply. 2. Prepare the MEDTOXScan® Cleaning Cassette by rinsing under running tap water. Apply one drop of mild liquid hand soap/detergent to the pad. Rinse thoroughly to remove any soap remnants. 3. Remove excess water by blotting Cleaning Cassette pad on paper towels. 4. Place moist cleaning cassette in MEDTOXScan® Reader drawer. While holding down the Eject button, slowly move the drawer in and out 10 times. Use the “tape tail” attached to the Cleaning Cassette to pull the drawer out while holding down the Eject button. 5. If visible dirt is observed on the Cleaning Cassette pad, wash, rinse and blot the Cleaning Cassette again. Place the Cleaning Cassette in the drawer of the MEDTOXScan® Reader and repeat Step 4. 6. When finished cleaning the CIS, remove the Cleaning Cassette from the MEDTOXScan® Reader drawer. 7. Re-connect power supply and power on the MEDTOXScan® Reader. 8. If the Welcome screen appears, then run the QC Test devices to confirm that any contamination has been removed from the sensor and the MEDTOXScan® Reader is functioning properly. 9. If the “CONTAMINATED SENSOR” error message displays again after the first cleaning procedure, repeat steps 1-7. 10. If the MEDTOXScan® Reader still displays the error message after the Cleaning Cassette procedure has been conducted twice, call Technical Support. 29 Auto Contamination Detection The MEDTOXScan® Reader software performs automatic contamination detection of the contact imaging sensor (CIS) without user intervention. Automatic contamination detection is performed at startup and before each scan of a test device. Startup - Every time the MEDTOXScan® Reader is powered up, the automatic detection of sensor contamination is performed before a Welcome screen appears indicating that the MEDTOXScan® Reader is ready for use. If the sensor is contaminated, normal operation is interrupted and a fatal error message is displayed. If the sensor is clean at startup, normal operation will continue. Each scan - Every time a test device is inserted in the MEDTOXScan® Reader, normal device detection is performed. When the first strip is ready to be scanned, automatic contamination detection is performed. If the sensor is contaminated, normal operation is interrupted and a fatal error message is displayed. If the sensor is clean before a device is scanned, normal operation will continue. When a sensor is determined to be contaminated, normal operation is interrupted and an error message is displayed. The MEDTOXScan® Reader will only resume normal operation when the contaminated sensor problem is adequately resolved. Proceed with Cleaning Cassette Procedure in order to remove contamination from the sensor or contact MEDTOX Technical Support if you need any additional help at 1-800-832-3244. 30 Error Messages Part Number Not Recognized - This error appears if the device code cannot be read by the internal scanner or is not recognized. The device code may be related to a new test type or the printed bar code may be damaged. The correct device code can be entered the same way as the Specimen ID. Press OK Key to continue once the code has been entered. If the code is recognized by the MEDTOXScan® Reader, the test procedure will resume and the User ID screen will appear. Update Needed - This error will appear if the device barcode is not found in the database. Pressing OK Key will return the interface to the welcome screen and cancel the test. Contaminated Sensor - This error will appear when the MEDTOXScan® Reader determines that the contact imaging sensor (CIS) is contaminated. Pressing OK Key will return the interface to the welcome screen and cancel the test. Follow the Cleaning Cassette Procedure to clean the contaminated sensor. Network Error messages similar to those above are displayed when the MEDTOXScan® detects a problem with network set up or communication with the server. The following table shows common Network error messages: Problem Error Message Solution No Ethernet Cable connected DHCP failed to obtain an IP address Upload Error Test results upload was unsuccessful. Connection to PC was not found. Refer to your user manual for more information Check cable connections and consult with your local computer Network Administrator. Check cable connections and Network setup parameters. Consult with your local computer Network Administrator to confirm appropriate network settings. 31 Hardware/Software Error messages are displayed similar to those above when the MEDTOXScan® Reader detects a problem with hardware or software functions. The following table shows common error messages: Problem Error Message Solution Initialization Failure The drawer is open. Initialization has failed. Please close the drawer to try again. Results history memory is full. Copy results to SD card and clear the history file to prevent oldest result from being lost on next scan. A fatal error occurred. Restart the ® MEDTOXScan Reader. Close the MEDTOXScan Reader device drawer. Memory Full Component error detected Restart required To complete this operation you must ® reboot the MEDTOXScan Reader. System failure Initialization has failed. Unit needs service. Downgrading software versions is not allowed. Please check that the SD card has the proper version of software and try again. An internal motor error has been detected. Press OK to re-scan the cassette. If this error persists, please return the Reader for service. Attempting software downgrade Motor step error ® Transfer records to alternate storage See Copy Results to SD Memory Card o Network Setup. Select records to delete - See Clear History. Turn off the power switch located at the rear of the Reader. Wait approx. 10 sec, and then switch power back on. Turn off the power switch located at ® the rear of the MEDTOXScan Reader. Wait approx. 10 sec, and then switch power back on. Contact MEDTOX Technical Support. Verify that the firmware upgrade on the SD card is higher than the S/W version listed on the About ® MEDTOXScan Reader screen. Contact MEDTOX Technical Support. Print Error messages are displayed when the MEDTOXScan® Reader detects a problem with printing. The following table shows common print error messages: Problem Error Message / Solution No Printer Connected Communication with the printer was unsuccessful. Please check that the printer is turned on and connected properly. Press OK to re-try printing. The printer door is open. Please close the printer door and try again. Printer Door Open No Paper Roll or Paper Ran Out Graphics Error Other Printer Errors The printer is out of paper. Please install a fresh roll of paper and try printing again. The printer has reported an error while printing the graphics logo. Please try printing again. Test results printout was unsuccessful. An error has been reported from the printer. Please try again. 32 Service Information All service will be performed by MEDTOX authorized personnel at a MEDTOX authorized facility. This will normally require a return of the component to MEDTOX per the Return Procedure. To provide flexibility and support, MEDTOXScan® Reader software upgrades may be required in the future. These can be performed by the user. MEDTOX will send the user a memory card that will be placed in the SD memory card slot on the back of the MEDTOXScan® Reader. The user will follow any on-screen prompts, if required, to complete the upgrade. Return Procedure NOTE: All components returned to MEDTOX Diagnostics, Inc. must have a RETURN MATERIAL AUTHORIZATION (RMA) number assigned prior to returning. 1. Call MEDTOX Technical Support or your sales representative at 1-800-832-3244 if you have difficulty with the MEDTOXScan® Reader. 2. If Technical Support determines the reader should be returned, you will be provided an RMA number and further instructions. 3. MEDTOX will normally send a replacement reader immediately after a return has been authorized. Return the malfunctioning reader to MEDTOX. 4. Pack the MEDTOXScan® Reader in the original foam-padded box along with the 12V AC Adapter/Power Cord. Returns must come back in the original box. If you do not have the original box, please let us know. Do not mark on the box. 5. Place the reader box in appropriate outer shipping container. 6. Mark the RMA number on the shipping documents and the outer shipping container. 7. Send the reader back to MEDTOX as soon as possible. 33 Appendix Warnings, Precautions and Limitations 1. Operate the MEDTOXScan® Reader on a level, dry surface away from direct sunlight and bright light sources. Do not move the reader while a test is in progress. 2. Do not immerse the MEDTOXScan® Reader or components (Printer, Scanner, etc.) in any liquid. 3. Wipe spills off the device before placing the cassette in the reader tray. Do not apply sticky adhesive labels to cassettes. This may contaminate the sensor and interfere with reading test results. 4. Do not drop, hit or place objects on top of the MEDTOXScan® Reader or components. 5. Do not open or tamper with the components. Only MEDTOX authorized personnel may service/repair the components. 6. Use only the AC/DC power adapter provided with the MEDTOXScan® Reader to power the reader. 7. Keep the components clean and serviceable to assure continued reliability and performance. 8. The MEDTOXScan® Reader system is designed to be used only with PROFILE®-V MEDTOXScan® Test Devices. 9. Refer to the Printer User Manual and Scanner Quick Start Guide for instructions and cautions before using these components. Disclaimers MEDTOX is not responsible for outcomes due to misuse of the components resulting in damages to personnel or property, which will be the responsibility of the end user. Use of the equipment in a manner not specified by the manufacturer may impair the protection provided by the equipment. FCC Class A Notice This device complies with Part 15 of the FCC Rules. Operation is subject to the following two conditions: 1. This device may not cause harmful interference. 2. This device must accept any interference received, including interference that may cause undesired operation. NOTE: This equipment has been tested and found to comply with the limits for a Class A digital device, pursuant to Part 15 of the FCC Rules. These limits are designed to provide reasonable protection against harmful interference when the equipment is operated in a commercial environment. This equipment generates, uses, and can radiate radio frequency energy, and if it is not installed and used in accordance with the instruction manual, it may cause harmful interference to radio communications. Operation of this equipment in a residential area is likely to cause harmful interference, in which case the user will be required to correct the interference at the user’s expense. Modifications not expressly approved by the manufacturer could void the user's authority to operate the equipment under FCC rules. Safety Certificate This device complies with requirements of UL 61010-1:2004, CAN/CSA C22.2 No.610101:2004 for electrical safety and mechanical safety. 34 Reader Manufactured for MEDTOX Diagnostics, Inc. 1238 Anthony Road, Burlington, North Carolina 27215 www.medtox.com Technical Support & Supplies: (800) 832-3244 Printed in USA © 2010 MEDTOX Diagnostics, Inc. All rights reserved. P/N 102005 Rev 5/10