1
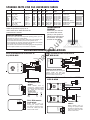
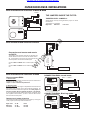
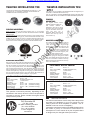
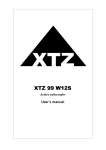
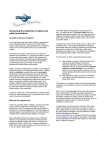
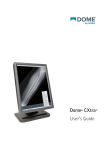
(044)361-05-06
ICQ:495-089-192
(067)469-02-12
ICQ:613-211-859
(099)048-99-03
(093)672-77-76
User's Manual
Midbass DLS R6A
In the online store Winauto you also can buy woofer DLS R6A . Delivery in Kiev and throughout Ukraine with payment
upon receipt!
http://winauto.ua
Car Receivers - Facia Plates - Head Units - Car TVs and Monitors - Antennas - Car Audio - DVR - GPS Navigation - Trip Computers - Alarm
Systems - Mechanical Locking - Parking Systems - Car Cameras - Optics and Light - Established Optics - Tuning - Car Heating and Cooling - Sound
Marine and Electronics - Car Accessories - Isolation - Installation Components - Batteries, Power - Oils and Fluids -
Car audio and car goods internet store Winauto
REFERENCE SERIES
CAR AUDIO SPEAKERS
PS4, PS4A
RS5, RS6, RS5A, RS6A
R4, R5A, R6A
MS5A, MS6A
R964, R1073
TWO-WAY SYSTEMS PS4/4A, RS5/5A & RS6/6A
Thank you for buying a DLS REFERENCE speaker.
This manual will show you how to do a correct installation. Please read the entire manual before beginning the
installation.
Install the speakers yourself if you feel confident with our
instructions and if you have the proper tools. However if
you feel unsure, turn over the installation job to someone
better suited to it.
These 2-way systems have a separate tweeter. The filters are either single filter box (PS4, RS5/6) or separate
lowpass and highpass in a plastic boxes with selectable
tweeter level inside (PS4A, RS5A/6A). This series have
small installation depth and fits mots modern vehicles.
Install the filter boxes in a dry place. Fasten them with
screws or wire ties. If installed in the door side face the
connections downwards to avoid moisture inside the filter
box.
On the following pages you can see how to connect the
filters.
The filters must be used, if you connect without them
the sound becomes bad and you will destroy the
tweeter.
INSTALLATION
TWO-WAY SYSTEMS R4, R5A & R6A
to
.u
Mount the speakers in the door or in the dashboard of
your car. Normally they will fit in the facory pre-made
mounting holes. If you want an improved sound reinforce
with a baffle of MDF-board or similar. An installation high
up on the door side is to be prefered. An alternative installation is in so called kick panels down on each side of
the floor with the speakers facing up- and inwards
towards the listener.
For two- or three way speaker systems with separate
tweeter an installation of the tweeter close to the bass/
mid element is to be prefered. The tweeter can also be
installed on the dash-board, or recessed in the door with
the accessories in the tweeter box.
It is important to fasten the speakers properly in order to
avoid bad sound or rattling.
For speakers with separate filters in boxes or similar it is
vital that they are attached properly to the interior of the
vehicle to avoid rattling. Don´t place them close to the
internal wiring of the car, this can cause interference.
Avoid to install filter boxes in the door sides because
they can easily be broken because of rattling or
moisture. Make sure the cables don´t get jammed
causing a short circuit to ground. This can damage the
output circuits of the head unit or amplifier.
The sealing strip coming with some of the kits can be
used for improved sealing between the bass element
and the mounting surface.
The tweeter installation for kits with separate tweeter is
described on last page, or in the instruction sheet
coming with the tweeters.
a
WELCOME
w
in
au
These 2-way systems have a separate tweeter. The filters are combined lowpass and highpass in a plastic box
with selectable tweeter level inside. R-series are spekers
with heavy magnet systems giving good speker control
but instead a larger installation depth.
On the following pages you can see how to connect the
filters.
The filters must be used, if you connect without them
the sound becomes bad and you will destroy the
tweeter.
SPEAKER ENCLOSURES
If you want to install the speaker in an enclosure the normal size for a sealed type is:
4” (10 cm) speakers
: 2-4 liters
5,25” (13 cm) speakers
: 6-8 liters
6,5” (16,5 cm) speakers
: 10-12 liters
8” (20 cm) speakers
: 15-20 liters
6 x 9” speakers
: 15-20 liters
7 x 10” speakers
: 20-25 liters
These volumes are only a guideline. The volumes can
vary between different speakers. Contact your local DLS
dealer for more exact information about your specific
speaker.
COAXIAL SPEAKERS R964 & R1073
These coaxial speakers have a separate filter box with
lowpass filter for the woofer and a highpass filter for the
tweeter. The tweeter level can be adjusted inside the filter
box in two steps(only R964), high and low. R964 has a biwiring option in the filter.
On the following pages you can see how to connect the
filter.
The filters must be used, if you connect without them
the sound becomes bad and you will destroy the
tweeter.
TWO-WAY SYSTEMS MS5A & MS6A
These 2-way systems have a separate 28 mm tweeter.
The filters are combined lowpass and highpass in a plastic
box with selectable tweeter level inside. MS-series are
spekers with heavy magnet systems. The woofers delivers a tight & controlled bass.
On the following pages you can see how to connect the
filters.
The filters must be used, if you connect without them
the sound becomes bad and you will destroy the
tweeter.
Car audio and car goods internet store Winauto
SPEAKER FACTS FOR DLS REFERENCE SERIES
Model
Woofer
Tweeter
Nom.
power
Max
power
Sensitivity
Magnet
size
Inst.
depth
Mounting
hole
Crossover
PS4/4A
RS5/5A
RS6/6A
R4
R5A
R6A
R964
R1073
MS5A
MS6A
10 cm / 4”
13 cm / 5,25”
16,5 cm / 6,5”
10 cm / 4”
13 cm / 5,25”
16,5 cm / 6,5”
6 x 9”
7 x 10”/ 50 mm mid.
13 cm / 5,25”
16,5 cm / 6,5”
20 mm / 0,8”
25 mm / 1”
25 mm / 1”
20 mm / 0,8”
25 mm / 1”
25 mm / 1”
25 mm / 1”
20 mm / 1”
28 mm / 1,1”
28 mm / 1,1”
50 W
50 W
50 W
50 W
80 W
80 W
80 W
100 W
80 W
100 W
80 W
80 W
80 W
80 W
120 W
120 W
120 W
150 W
120 W
150 W
90 dB
92 dB
92 dB
94 dB
94 dB
94 dB
93 dB
93 dB
90 dB
92 dB
80 mm / 3,15”
90 mm / 3,54”
90 mm / 3,54”
80 mm / 3,15”
90 mm / 3,54”
100 mm / 4”
120 mm / 4,7”
145 mm / 5,7”
90 mm / 3,54”
100 mm / 4”
50 mm /1,97”
45 mm / 1,77”
53 mm / 2,09”
60 mm / 2,36”
60 mm / 2,36”
76 mm / 3”
90 mm / 3,54”
80 mm / 3,15”
58 mm / 2,28”
67 mm / 2,64”
98 mm / 3,85”
117 mm / 4,6”
146 mm / 5,75”
102 mm / 4”
120 mm / 4,72”
140 mm / 5,5”
150x220 mm / 5,9x8,7”
156x225 mm / 6,15x8,86”
120 mm / 4,72”
140 mm / 5,5”
Separate boxes
Separate boxes
Separate boxes
Separate box
Separate box
Separate box
Separate box
Separate box
Separate box
Separate box
Make sure you connect
the cables with correct
polarity to the speakers.
Observe the markings on
the terminal. The small
terminal is minus.
to
.u
+
-
a
SPEAKER PHASING
To be sure to have the correct speaker polarity (phase) you can
check this by using a 1,5 Volt battery.
Connect a cable from the battery plus-pole to the speaker plus,
and a cable from the battery minus to the speaker minus.
If the speakers are correctly connected the speaker cone should
move outwards on both right and left channel.
This check must be made on the cables going from the speakers,
to the output terminals of your car stereo or amplifier.
-
CONNECTION OF
SPEAKERS
Allow the speakers to play for at
least 15-20 hours. After this time the
performance is correct.
+
RUNNING-IN PERIOD
FILTER/CROSSOVER INSTALLATIONS
+
Woofer
+
Tweeter
+
-
Silver
Silver/red
Black
-
+
-
+
Black/
blue
Tweeter level select:
-
+
+
Bass/mid
Head unit/amp.
Select tweeter level by moving the
jumper inside the filter box
between high, mid or low. Make
your own tests for best result.
-
Filter installation and connection of PS4A,
RS5A & RS6A
-
Tweeter
Head unit / amp
Black
Black/blue
+
Woofer
+
IN
Tweeter level
select:
Tw level
Select tweeter level by
moving the jumper inside
the filter box between high,
mid or low. Make your own
tests for best result.
Hi Mid Lo
Hi
Mid
Low
R5A, R6A tweeter
level select:
Tw
level
-
+
-
+
+
IN
-
-
Select tweeter level by
moving the jumpers inside
the filter box between high or
low. Make your own tests
for best result.
Tweeter level:
Jumper position J1
J2
High
Hi
Hi
Mid
Hi
Lo
Low
Lo
Lo
+
Silver
Silver/red
+
TWEETER
R4 tweeter level
select:
WOOFER
+
WOOFER TWEETER
-
Head unit / amp.
J2
J1
Hi Low Hi Low
INPUT
w
-
TWEETER
+
-
WOOFER
+
-
INPUT
Black/blue
+
2-way crossover
Silver
Silver/red
Black
+
-
Tw select
in
au
Tweeter
Hi Mid Lo
Filter installation and connection of
PS4, RS5 & RS6
-
Filter installation and connection of
R4, R5A & R6A
Select tweeter level by
moving the jumper inside
the filter box between high,
mid or low. Make your own
tests for best result.
Car audio and car goods internet store Winauto
FILTER/CROSSOVER INSTALLATIONS
Filter installation and connection of MS5A & MS6A
Tweeter
-
+
Woofer
THE JUMPERS INSIDE THE FILTER:
TWEETER LEVEL: JUMPER J1
Select tweeter level by moving the small jumper J1 inside
the filter box.
Three steps are available:
High level
Mid level
Low level
-
+
TWEETER
+
+
Black
Black/blue
+
-
WOOFER
Silver
Silver/red
+
INPUT
2-way crossover
-
a
Tw
level
J1
Hi
Mid
Low
Head unit / amp.
Blue
Black _
WF
+
TW
Red +
_
to
.u
Filter installation and connection of R1073
Black
in
au
Connection and tweeter and woofer
on R1073:
TW
IN
w
Connect Blue and Black wire to woofer (WF) terminal.
Connect Red and Black wire to tweeter (TW) terminal.
WF
2-way
cable filter
The speaker has separate terminals for tweeter and
woofer. Please be sure to connect to correct terminals. If connected in wrong way the sound will be bad
and the speaker or filter can be destroyed.
Blue
Car stereo / amp.
Black
Bi-wiring
on-off
IN OUT
IN OUT
+
+
+
+
+
coaxial
2-way crossover
-
OUT IN
J3 J4
+
J4: IN
J4: OUT
J4: OUT
Car stereo / amp.
Amp. for tweeter
-
J3: IN
J3: IN
J3: OUT
Tweeter
level
J2 J1
High level:
Mid level:
Low level:
IN OUT
+
The tweeter level can be adjusted in three steps by moving the
small jumpers (J2 and J3) inside the filter box.
IN OUT
Black = -
CONNECTION R964, Bi-wiring mode:
OUT IN
Tweeter level: jumper J3 and J4
Bi-wiring
on-off
J2 J1
2. Bi-wiring mode.
Bi-wiring means that the signal is separated to the woofer and
the tweeter. For example, when using separate amplifiers for
woofer and tweeter. Both filter inputs are used. Set jumper J1
and J2 in position OUT to separate the filters + and ground.
If you connect the speaker element with active crossover, using
the amplifiers internal filters, you don´t need the filter boxes.
Use 3,5 kHz as X-over point.
-
coaxial
2-way crossover
Red = +
+
J3 J4
INPUT
OUT
WOOFER TWEETER WOOFER TWEETER
Tweeter
level
INPUT
OUT
WOOFER TWEETER WOOFER TWEETER
1. Normal mode.
In normal use (not Bi-wiring) connect the input from head unit or
amplifier to the woofer input.
Jumper J1 and J2 must be in position IN.
OUT IN
How to connect R964:
CONNECTION R964, normal mode:
OUT IN
Filter installation and connection of R964
Amp. for woofer
Car audio and car goods internet store Winauto
TWEETER INSTALLATION T20
TWEETER INSTALLATION T25/
UP1C
T20 can be mounted on the dashboard with the plain cup (1), the
angled cup (2), or recessed in a doorside. These tweeters are
included in the R4 and PS4 speaker kits.
T25 /UP1C can be installed on the dashboard with the angled cup or
recessed in a doorside with the flush cup.
T25 are included in the DLS REFERENCE speaker kits RS5, RS6,
R5A and R6A. UP1C are included in the MS5A and MS6A speaker kits.
SURFACE
MOUNTING:
3
2
1
SURFACE MOUNTING:
A
B
RECESSED MOUNTING:
w
Drill a hole in the door side with a diameter of 48 mm /1,89". The installation becomes easier if the door side is removed from the door.
Put the two metal wings through the two tracks in the center of the
cup, just as the picture shows, and attach them with the M4 screw
and nut through the center hole. Put the tweeter element into the cup
with the cable going out through the bottom hole. Attach the tweeter
element to the plain cup using the mounting ring (C) attached between
the cup and the tweeter element. The metal wings (B) should be on
the back side of the door panel, holding the cup in place.
FACTS ABOUT DLS T20 TWEETER
Size
Nom. power (RMS)
Freq. range
Sensitivity
Magnet diameter
Mounting depth
Mounting hole
Cone material
You need a hole with a diameter of 46 mm
/ 1,81" in the door side (for UP1C 48 mm /
1,89”). Put the two metal wings through
the two tracks in the center of the cup, just
as the picture shows, and attach them
with the M4 screw and nut through the
center hole. The cup is attached to the
door side when the metal wings is pressed to the back side of the door.
Put the tweeter element into the cup with
the cable going out through the bottom
hole. Then attach the element into the cup
and turn it clockwise to attach to the cup.
When removing the element from the cup,
turn it ccw and lift it out
in
au
C
RECESSED MOUNTING:
to
.u
Plain mounting: Use only the plain mounting cup (1) (it´s normally
mounted at delivery). Attach to surface with the two screws or double
adhesive tape.
Angled mounting: Remove the plain mounting cup by bending with a
small screw driver in the gap (A). Attach the tweeter element to the
angled cup (2) as shown on picture 3. Pull the cable through the center hole. Now the tweeter can be mounted in two different angles.
Attach to the surface with the two screws or double adhesive tape.
For angled surface mount
together with the angled cup:
The tweeter element is
attached to the cup by fitting
the three wings on the angled
cup into the tracks of the element and then turn it
clockwise. When removing the
element from the cup, turn it
ccw and lift it up.
a
A
20 mm / 0,8"
50 Watts, 80 Watts max
1,5 kHz-20 kHz
93 dB
20 mm / 0,8" neodymium magnet
20 mm / 0,8" (recessed mounting)
48 mm / 1,89" (recessed mounting)
Silk
WARRANTY SERVICE
This speaker is covered by warranty, depending on the
conditions in the country where it is sold. If the speaker is
returned for service, please include the original dated
receipt with the product.
DLS Svenska AB
P.O. Box 13029
SE-40251 Göteborg, Sweden
Tel: +46 31 840060
Fax: +46 31 844021
E-mail: [email protected]
www.dls.se
FACTS ABOUT DLS T25 TWEETER
Size
Nom. power (RMS)
Freq. range
Sensitivity
Magnet diameter
Mounting depth
Mounting hole
Cone material
25 mm / 1"
50 Watts (80 Watts max)
1,5 kHz-20 kHz
93 dB
28 mm / 1,1"
18 mm / 0,71"
46 mm / 1,81"
Hand treated fabric
FACTS ABOUT DLS UP1C TWEETER
Size
Nom. power (RMS)
Freq. range
Sensitivity
Magnet diameter
Mounting depth
Mounting hole
Cone material
28 mm / 1,1"
50 Watts (80 Watts max)
1,5 kHz-20 kHz
93 dB
28 mm / 1,1"
18 mm / 0,71"
48 mm / 1,89"
Hand treated fabric
Technical Assistance
For technical assistance ask the shop where the product
was sold or the distributor in your very country.You can
always phone the DLS Helpdesk in Sweden + 46 31
840060 or send an e-mail to [email protected]
Information can also be found on our WEB-site www.dls.se
We follow a policy of continuous advancement in
development. For this reason all or part of specifications
& designs may be changed without prior notice.