1
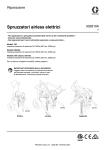
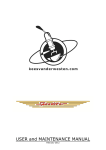
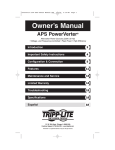
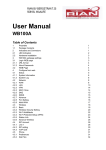
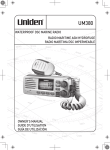
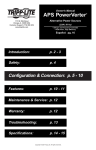
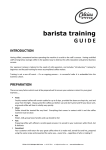
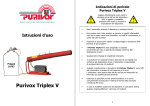
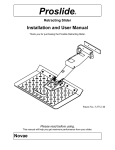
Installation manual Spirit Document ID: Sup-Rim-Eng Date of issue: October 22, 2015 Revision date: May 8, 2015 CONTENTS Installation quickstart ........................................................................................................................... 2 1. Connect water ................................................................................................................................. 2 2. Connect water disposal ................................................................................................................... 3 3. Open water mains ........................................................................................................................... 3 4. Make sure that machine is switched “OFF”..................................................................................... 4 5. Connect electricity ........................................................................................................................... 4 6. Fire up and adjust ............................................................................................................................ 5 Check if coffee pressure gauges indicate line pressure. ................................................................ 5 Turn mains switch to “ NO HEAT” ................................................................................................... 5 Turn mains switch to “OFF” and back to “NO HEAT” (repeatedly) ................................................. 5 Switch machine “ON” ...................................................................................................................... 5 Flip controller switches upwards ..................................................................................................... 5 Set coffee brewing pressure............................................................................................................ 5 Set hot water temperature (when machine is at operational temperature) ..................................... 5 Set dosages for brew shots and hot water ...................................................................................... 5 Welcome ................................................................................................................................................. 6 Parts identification ............................................................................................................................... 6 Note on this manual ............................................................................................................................ 7 Prior to installation ................................................................................................................................ 8 Area preparation .................................................................................................................................. 8 Upon arrival .......................................................................................................................................... 12 Parts included in standard shipment ................................................................................................. 12 Extra materials needed ..................................................................................................................... 12 Unpack and place .............................................................................................................................. 12 Installation ............................................................................................................................................ 14 Precaution ......................................................................................................................................... 14 Connect water supply ........................................................................................................................ 15 Connect water discharge ................................................................................................................... 18 Connect electrics ............................................................................................................................... 19 Single- versus three-phase machines ........................................................................................... 19 Mains switch .................................................................................................................................. 20 Note on phase shift of 120VAC (or 115VAC)! ............................................................................... 22 Filling the machine with water from empty ........................................................................................ 23 Expel air from coffee system ......................................................................................................... 24 First use ................................................................................................................................................ 25 Heating up ......................................................................................................................................... 25 Set hot water dosage ........................................................................................................................ 25 Adjust coffee system pump pressure ................................................................................................ 26 Set hot water temperature ................................................................................................................. 27 More information in the USER MANUAL ........................................................................................... 29 More information on the USB flash drive .......................................................................................... 29 Contact information ............................................................................................................................ 29 Spirit installation manual page 1 INSTALLATION QUICKSTART Installation quickstart If the information in this section is not sufficient, we refer to the “installation manual” which you can find in a following section (page 14 onwards) of this manual, or contact your local installation technician. 1. Connect water water treatment pumps Spirit T-fitting tap Install water treatment system (not in shipment) and connect water treatment system to both pumps. (Lay-out is different for machine with individual pumps per group.) outlet inlet adjust pump pressure Spirit installation manual page 2 INSTALLATION QUICKSTART Standard Spirit has markings C and S: C= coffee boilers S= steam boiler Spirit with individual pump per boiler has markings: L, (C,) R and S: L = left coffee boiler C = centre coffee boiler (Triplette only) R= right coffee boiler S = steam boiler coffee boilers steam boiler Connect high pressure hoses of both pump outlets to Spirit. 2. Connect water disposal machine waste Attach both drain hoses to Spirit. discharge pipe on drip tray e 3. Open water mains Check for leaks at all connections just made. Spirit installation manual page 3 INSTALLATION QUICKSTART 4. Make sure that machine is switched “OFF” Mains switch = “OFF” and … controller switches all temperature controller switches point down. 5. Connect electricity steam boiler pump coffee system pump back light switch mains supply yellow/green blue black Connect coffee pump cable(s) to coffee pump(s) and steam boiler pump cable to steam boiler pump. Double check that steam boiler cable and steam boiler hose are connected to the same pump, idem for coffee system. Spirit installation manual page 4 INSTALLATION QUICKSTART 3-phase grey, black, brown yellow/ green USA brown black white* L1 brown L2 black L3 grey Neutral N blue blue P E yellow/ yellow/ Earth green green Live blue 1phase green Mount cable directly in wall connection box or attach plug to mains power cable and plug in wall socket. Shown above is the 3-phase plug used in Europe. * The white lead in the USA cable must be hooked up to the anti-phase 115VAC live (anti-phase w.r.t. the black 115VAC live). 6. Fire up and adjust Check if coffee pressure gauges indicate line pressure. If not, check water connections. Turn mains switch to “ NO HEAT” Pumps are engaged and boilers will start to fill. Engage groups until water runs from group. After 2 minutes, pump(s) will disengage. Turn mains switch to “OFF” and back to “NO HEAT” (repeatedly) Repeat (3-6 times) until pumps stop before 2 minutes have past. Switch machine “ON” And switch back light “on” Flip controller switches upwards Boilers will heat up (this takes about 20-30 minutes). Set coffee brewing pressure By adjusting coffee system pump pressure (use coffee puck, not blind filter). Set hot water temperature (when machine is at operational temperature) Increase hot water temperature by decreasing steam boiler pump pressure. Decrease hot water temperature by increasing steam boiler pump pressure. Set dosages for brew shots and hot water See user manual for details. If the information in this section is not sufficient, we refer to the “installation manual” which you can find in a following section of this manual (page 14 onwards), or contact your local installation technician. Spirit installation manual page 5 WELCOME Welcome Parts identification 9 10 11 12 14 13 15 16 17 A 8 7 6 B 5 4 3 2 1 Figure 1. Showing main operational parts of the Spirit Duette Bastone version. The Spirit Triplette is wider since it has three groups but its functions are identical to the Duette. On the Touchpad version, the group brewing lever units are replaced with touchpads (see Figure 3). 1. 2. 3. 4. 5. 6. 7. 8. 9. 10. 11. 12. 13. 14. 15. 16. 17. A. B. Mains switch Coffee boiler PID temperature controller (right group) Coffee boiler heating on-off switch (right group) Steam boiler temperature controller Steam boiler heating on-off switch Volume switch (left group) Program button (left group) Group indicator light (left group) Group brewing lever (left group) Pressure gauge coffee boiler (left group) Group (left) Hot water spout Hot water lever Steam power adjustment lever (right) Steam lever (right) Steam wand (right) Steam tip (right, with protective cap) Cup warmer tray Drip tray Not visible on this photo: Green indicator lights for heating spirals (one for each spiral; see user manual) Switch for illumination of transparent back panel (see p. 19). Spirit installation manual page 6 WELCOME Note on this manual Work on the Spirit manual started in March 2012 and is a continuing process. Photographs in the manual are taken in the shop from (pre-production) machines being built at the time. For that reason, body panels and/or parts from the machines on display may be missing and parts in the machine you bought may not look identical to the parts shown in the manual. Over time, sections are added and/or improved, sometimes as result of readers making comments. If you have suggestions for improvements, do not hesitate to send them to: [email protected]. The printed version of the manual only comprises the installation manual. For more information, we refer you to the manual on the USB-stick that came with the machine. If the manual on the USB-stick does not give enough information, please contact us for an update of the manual and/or more information. Figure 2. The “customer” side of the Spirit Duette, shown with standard-logo. Figure 3. A Spirit Triplette Touchpad version seen from the front. NEW PHOTO NEEDED Spirit installation manual page 7 INSTALLATION Prior to installation Area preparation Before unpacking the machine, you must be sure that the area where the machine will be placed has been prepared properly. The countertop should be level and firm enough to carry the weight of the machine (up to 135 kg, 300 lbs), even when force is applied to it (to lock in the filter holders, tamp the coffee bed, etc.). A countertop height of 85-100 cm (33-40”) is suitable for most baristas. The water supply and water treatment system must be nearby (max. 1.5 meter; 5 feet) the machine. Discharge may not be further away than 1.5 meters, have an internal diameter of at least 40 mm (1 1/2”) (to accommodate two somewhat flexible hoses with external diameter 20 mm) and must be fitted with a syphon. There must be space nearby to locate the two (or more) water pumps with their individual electric motors (depth x width x height: 30 x 20 x 25 cm each; 12” x 8” x 10”). A wall socket or power mains outlet box must be nearby (max. 1.5 meter). Depending on the machine ordered, the power mains is 230 VAC 3-phases (120° phase shift) with neutral, 230 VAC 1-phase with neutral or 115 VAC 2-phases (180° phase shift; also called split-phase) without neutral. All power mains must have an earth connection and should be able to safely deliver the maximum power consumption of 7200 Watts; 31.5 Amps (Duette) or 9300 Watts; 40.5 Amps (Triplette). You may want to have the water, drain and power fed through one or more openings in the countertop (see Figure 4: Footprints of the Duette and Triplette). As the Spirit has full free space underneath, the opening(s) in the countertop can be positioned anywhere. For a visually pleasing result we recommend feeding the pump and drain hoses through an opening located just behind the front left foot, and the mains and pump cables through an opening just behind the front right foot, of the machine. Notes! Make sure that the mains and pump cables “bend-upwards” in the cabinet below the machine to prevent the possibility that water dripping along these feeds reaches the wall socket or pump-motors. Be aware of the location and functioning of the knock-box when planning the design of the connections to your machine. General tips Install the knock-box centred underneath the espresso machine or near the grinder(s) in the back of the bar. This will result in a favourable routing of the filter holder (knock empty, fill, tamp, lock into group). Have your cabinet-maker fit the knock-box prior to installing the espresso machine. Whoever installs the machine may not be able or equipped to do so. Have approximately 10 cm (4”) of free countertop space at the barista’s side of the machine. This is useful working space for cups and saucers. Have a fridge installed as close to the espresso machine as possible. Cold milk is essential for the proper preparation of a cappuccino. Spirit installation manual page 8 INSTALLATION hoses cables hoses cables Figure 4. Footprints of Spirit Duette (top) and Triplette (bottom). Measurements in millimetres. Black circle……………………… Machine foot (diameter = 50 mm) White rectangles………………... Suggested locations for openings behind front feet to feed connections through the countertop Minimum sizes of countertop openings Pump hoses 2 drain hoses Pump + drain hoses Electric cables All feeds through 1 opening Spirit installation manual 35 mm (connector diameter is 22 mm, hose is 12 mm) 40 mm (20 mm each) 40 mm (insert pump hoses first) 20 mm (mains cable plus 2 pump cables, no plug) 55 mm (insert pump hoses first) page 9 WITHOUT RUBBER FEET 20 mm high WITHOUT RUBBER FEET 20 mm high INSTALLATION Figure 5. Measurements of Spirit Duette. Note that the rubber feet are not present, these are 20 mm high and have a diameter of 50 mm. Spirit installation manual page 10 WITHOUT RUBBER FEET 20 mm high WITHOUT RUBBER FEET 20 mm high INSTALLATION Figure 6. Measurements of Spirit Triplette. Note that the rubber feet are not present, these are 20 mm high and have a diameter of 50 mm. Spirit installation manual page 11 INSTALLATION Upon arrival Parts included in standard shipment Spirit espresso machine Accessories 2* water pumps with electric motors 2* high-pressure, steel webbed, hoses, each 1.5 m (5 ft) 3* high-pressure, steel webbed, hoses, each 0.5 m (1 ft 8 in) 1* T-fitting (3/8M connections) 2 discharge hoses, inner diameter 15 mm (5/8”) with stainless steel hose clamps Filter holders with filter baskets: Duette 2x; Triplette 3x Stainless steel “Kees van der Westen” tamper; compliant with VST specifications Blind filter: Duette 2x, Triplette 3x Jar with cleaning powder Group brush 2 “Kees van der Westen” shot glasses 1 T-shirt “Spirit” Kit with consumable parts to facilitate service and routine maintenance, composition depends on whoever is responsible for installation and maintenance * Machines ordered with an individual pump per group have different amounts of these items. Extra materials needed Water treatment system (at least an effective de-scaler) Materials to connect the water treatment system to the T-fitting on the hoses to the water pumps Coffee grinder Knock box Pitcher … Unpack and place Tools needed Phillips screw driver no. 2, preferably a power tool. Procedure 1. Remove the lid of the crate. 2. Remove the four side panels of the crate. 3. Lift the machine by its legs and place on the countertop. Caution! Lifting the machine other than by its legs may cause damage. For that reason you have to remove the side panels from the crate. Warning! The machine has a considerable weight. Make sure you have assistance while lifting the Spirit to its place. 4. When necessary, adjust the feet such that the machine is level and all feet are firmly touching the countertop. The rubber feet can be individually lowered: loosen the cover nut first, then “unscrew” the foot from the leg. When correct height is achieved, tighten the cover nut (see Figure 7a). Spirit installation manual page 12 INSTALLATION cover nut rubber foot coffee boilers steam boiler Figure 7a (left). Adjust the height of an individual leg. Loosen the cover nut, “unscrew” the foot from the leg until correct height is reached, then tighten cover nut. Figure 7b (right). Location of water supply connections between left legs of machine; C=coffee system, S=steam boiler. Machines with individual pumps per group have 3 (Duette) or 4 (Triplette) water connections marked L, C (Triplette only), R and S: left boiler, centre boiler, right boiler and steam resp. Spirit installation manual page 13 INSTALLATION Installation Precaution Installation of and maintenance on the Spirit should only be undertaken by a qualified technician. Parts of the machine can reach a temperature of close to 130 °C (266 °F). The steam/hot water boiler contains water and pressurised steam at 125 °C and 1.35 Bar overpressure (257 °F and 20 PSI), temperature and pressure in the coffee boiler system may reach up to 96 °C and 12 Bar overpressure (205 °F and 175 PSI). Danger We cannot be held responsible for damage and/or injuries resulting from actions performed on our machines by non-qualified personnel. Caution! Always ensure water supply to the machine is in perfect working order before connecting electric power. Parts needed, included in shipment Machine 2* high pressure hoses, 1.5 m (5 ft) 3* high pressure hoses 0.5 m (1 ft 8 in) 1* T-fitting 3/8M 2* pumps with motor, 30x20x25 cm (length x width x height; 12x8x10 inch) 2 discharge hoses with stainless steel clamps * more for machines with individual pump per group (see Figure 10). Parts needed, not included in shipment Fitting that connects hose (3/8F thread) to water treatment system Water treatment system with supplies to connect it to the water mains Tools needed Spanner 20-22 mm Spanner 30 mm or adjustable spanner Teflon tape Screw drivers (flat no. 2 and 4; Phillips no.2) Sharp knife Bucket Quick response temperature sensor and appropriate meter Spirit installation manual page 14 INSTALLATION Connect water supply Connect your water mains to the inlet of an efficient device to remove calcium and magnesium ions and Chlorine from the water entering your machine. Scale and Chlorine are the worst enemies of an espresso machine. Be sure to rinse the water treatment system or de-scaling device thoroughly before use, also when new. Figure 10 shows schematically how to connect the hoses, T-fittings and pumps to your machine. Described below is the standard lay-out for machines with 2 pumps. 1. Use a 20 mm spanner to attach the elbow end of the two long high pressure hoses to the water supply of the steam boiler (rear fitting) and coffee water system (front fitting) on the Spirit respectively (3/8 connections; see Figure 7b). There is no need for any type of gasket. The rounded end of the hose fits snugly onto the fitting, providing a leak free connection when turned tightly. When your is machine is equipped with individual pump per group, these are marked L, C (Triplette only), R and S: left group, centre group, right group, and steam. 2. Attach the other ends of the long high pressure hoses to the outlet of an individual pump (3/8 connections). No need for gaskets. Note! The outlet of the pump is marked with an arrow pointing up, away from the pump-housing (see Figure 8). 3. Attach the loose ends of two of the short high pressure hoses to the inlets of the water pumps. No need for gaskets. Note! The inlet of the pump is marked with an arrow pointing down, towards the pump-housing (see Figure 8). outlet inlet Figure 8. Pump with inlet and outlet shown. Below, under 4 to 6, the procedure to include a water treatment system is described. Make sure that you install a water treatment system or de-scaler in between the incoming tap water and the high pressure pumps. 4. Attach the T-fitting on the two short high pressure hoses. 5. Attach the third short hose at one end to the T-fitting and the other end to the outgoing side of the water treatment system (see Figure 9). A gasket and/or fitting may be necessary, depending on the materials used. 6. Use a suitable hose to connect the inlet of the water treatment system to your water mains. Spirit installation manual page 15 INSTALLATION 7. Fill/rinse the water treatment system (also when new) until the water runs clear (see the manual of your water treatment system for this procedure). 8. Where appropriate: check the quality of your incoming tap water and adjust the “bypass” on your water treatment system accordingly. 9. Open the water supply tap and check the earlier made connections for leakage. Tighten when needed but do not use excessive force. water softener pumps T-fitting not included in shipment Figure 9. Water treatment system on right is connected to the pumps on left. Flow is shown by the short arrows. Water supply tap is right of figure, Spirit will be to left of figure. The water treatment system and the rightmost hose are not included in your shipment. Note! The coffee boilers will start to fill immediately when the tap is opened, even when there is no power (yet) to the machine. Filling will stop as the air inside the boilers is compressed to water mains pressure. Note! It takes a while for a new filter cartridge to stabilise. If you want to check the treated water (after filtering) use the new cartridge for a while before taking a water sample. Spirit installation manual page 16 INSTALLATION T-fitting Not in shipment pump 2 steam Standard Duette and Triplette Water faucet 1 1 Water filter 3 all groups 2 steam Duette with individual pumps 2 3 1 Water faucet group L 1 Water filter 4 group R 2 steam Triplette with individual pumps 3 3 2 group L 4 1 Water faucet group M 1 Water filter 5 group R # 0.5m hose # 1.5m hose Figure 10. Lay-out of hoses, fittings and pumps for the standard Spirit (one pump for steam/hot water system, one pump for the coffee-system) and for Spirits with an individual pump for each group. Spirit installation manual page 17 INSTALLATION Connect water discharge The machine is equipped with two discharge hoses of small diameter. This allows for “hiding” of the discharge behind the left hand front leg of the machine. 1. Position the stainless steel hose clamp on one end of the discharge hose. Slide the end of the hose over the machines waste-pipe (see Figure 11) and tighten the hose clamp. 2. Do the same with the discharge hose of the drip-tray. 3. Insert the other ends of the discharge hoses into the drain or a discharge container. Note! To prevent sedimentation of sludge, the discharge hoses should slope down to your drain or discharge container over the entire length of the hoses. 4. If necessary, cut the discharge hoses to desired length. machine waste discharge pipe on drip tray Figure 11. Spirit seen from bottom front without hoses attached to the machine-waste and drain pipe e on the drip dray. Spirit installation manual page 18 INSTALLATION Connect electrics Single- versus three-phase machines The Spirit is designed to operate on 220-240VAC with three-phase mains power (3x 230VAC) so as to divide power consumption over three different mains leads. The mains cable has five wires (2.5 mm 2 each): three phases, neutral and earth. For safe operation of the machine, a phase shift of 120° per phase (which is common in Europe) is essential, as this 120° phase shift reduces the power flux through the common “neutral” lead of the mains cable. The earth lead to the frame is a 6 mm2 wire. (When a three-phase machine is to be converted to a single-phase machine, the mains cable has to be exchanged and some modifications on the inside connections have to be made.) In order to accommodate different electrical systems around the world, we also produce a so-called “single-phase” version of the machine. When we speak of a single-phase machine, the mains cable has 3 wires (North America: AWG 10 = 5.26 mm2 each, rest of the world: 3G6 = 6 mm2 each). Within the machine, power is divided into three separate circuits, exactly as in three-phase machines. In some countries where our single-phase machines are used the mains voltage is in fact 230VAC (e.g. Australia, New Zealand), the blue wire in the mains cable is connected to the neutral in the machine, the brown wire in the mains cable is powering the different circuits in the machine. The yellow/green lead in the mains cable is the earth lead. In other countries where our single-phase machines are used the mains voltage is in fact 120VAC or 115VAC (e.g. USA, Canada), the white and black wires in the mains cable should be connected to a two-phase mains (120/115VAC, 180° phase-shift; see note on phase-shift at end of paragraph). The possibly present neutral wire of the electric power mains is not used. The green lead in the mains cable is the earth lead. steam boiler pump coffee system pump mains supply LED light switch Figure 12a (left). Showing mains switch in “OFF” position. In position “NO HEAT” the machine is functional except that no power is fed to the heating elements (used for testing etc.). Figure 12b (right). Showing cables for mains and pumps plus the on/off switch for the LED light. The switch is in “off” position (lever pointing down). Note! Depending on model and type, the Spirit has a maximum power consumption of 8400-9300 Watts from your AC-outlet. This occurs when all heating elements and pumps are active simultaneously. At 230 Volts this is equivalent to approximately 31.6-40.5 Amps. We therefore insist that the machine has its own power circuit breaker(s). Spirit installation manual page 19 INSTALLATION Mains switch The function of position “NO HEAT” of the mains switch is that only a small portion of the machine (pumps, main controller, back-side LED-light) will get power which allows for testing without heat. Only in position “ON”, can power be fed to the heating elements. Procedure 1. Make sure that the mains switch is in position “OFF” (see Figure 12a). 2. The thinner electrical cables attached to the Spirit are the pump cables. Attach each pump cable to its corresponding pump motor by connecting it inside the box on top of the pump motor (see Figure 13). Make sure that the cable for the coffee system pump is connected to the pump that feeds the coffee system and the cable for the steam/hot water boiler pump is connected to the pump that feeds the steam/hot water boiler. connect to yellow/green lead in pump cable connect to blue lead in pump cable connect to black lead in pump cable Figure 13. Pump cables must be mounted on the connector inside the black installation box on top of the pump motor. In this picture, the lid of the installation box has been removed and the capacitor has been laid aside for better view. Caution! When you accidentally swap the electric cables to the pumps (or the water supply lines from the pumps to the machine), the pumps may remain running and/or brewing coffee is impossible. 3. Attach the (thick) mains cable directly to a 230 VAC earthed power outlet (three phases or one phase, depending on model and type) or to a suitable plug (see Figure 14). Spirit installation manual page 20 INSTALLATION 3-phase grey, black, brown yellow/ green USA Brown Black White* L1 brown L2 Black L3 Grey Neutral N Blue Blue P E Yellow/ Yellow/ Earth green green Live blue 1phase Green Figure 14. Shown here is the 3-phase plug (3P+N+E 16A 400V) used in Europe. * The white lead in the USA cable must be hooked up to the anti-phase 115VAC live (anti-phase w.r.t. the black 115VAC live). Danger! When your machine was ordered without a mains plug or when the mains plug has been removed to fit the cable through a small countertop opening, have a qualified electrician connect your Spirit to the mains. The yellow/green or green lead must be connected to earth to properly ground the machine. This is essential to work safely with the machine. Note! If your machine is equipped with a 5 wire cable (3 phases 230VAC with 120° phase shift): blue is neutral, grey, brown and black are phases (hot; live), yellow/green is earth. If your machine is equipped with a 3 wire cable: Australia and New Zealand (single phase 230VAC): brown is phase (hot; live), blue is neutral, yellow/green is earth. USA and Canada (2 phases 120VAC -or 115VAC- with 180° phase-shift): white is phase (hot; live), black is phase (hot; live), green is earth. Connect all wires to the appropriate outlet. Spirit installation manual page 21 INSTALLATION Note on phase shift of 120VAC (or 115VAC)! When you want to use your machine in a 120VAC or 115VAC environment, check whether the mains is a 180 degrees phase shift (most houses) or a 120 degrees phase shift (most commercial buildings). You can measure the resulting voltage between two phase leads of the mains with a common voltage meter set to measure VAC. The resulting voltage should be 220-240VAC. With a 120 degrees phase shift you will measure 201-208VAC. The machine will only work well with a resulting voltage of 220240VAC. If your location is powered with three-phase 120VAC with a 120 degrees phase shift we suggest to use a 10% booster (a so-called auto-transformer or buck-booster) on two leads of the three phase mains which will raise 208VAC to 239VAC (and 201VAC to 221VAC). Have a qualified electrician install the necessary equipment as the booster must be able to supply 37-41 Amps. The 120VAC three-phase may lead to erratic behaviour of the machine when no booster is installed although the machine will seem to function properly for a while. Without booster the heating elements are reduced in power to 82% of its original rating (at 208VAC instead of 230VAC) thus 736W for the coffee boilers (was 900W) and 4907W (was 6000W in a Triplette) or 3925W (was 4800W in a Duette) for the steam boiler. Spirit installation manual page 22 INSTALLATION Filling the machine with water from empty Several jets and restrictors are present within the machine. These jets and restrictors slow down the flow within the machine in order to optimise the coffee extraction process in terms of pressure profiling and temperature stability. While filling the machine from empty, these jets and restrictors hamper free flow to the steam/hot water and coffee boilers which may thus not fill up as quickly as you possibly expect. As a safety measurement, the main controller shuts the machine down when any solenoid valve in the machine (apart from the steam solenoid valves) is open for more than 2 minutes continuously (to prevent flooding of the establishment in case of a malfunction). Caution! Although the coffee boilers start filling as soon as the water mains are opened, the boilers cannot completely fill up because the air inside cannot escape from the groups. The boilers will only fill until the air inside is compressed to water mains pressure. Therefore, engage the temperature controller on a coffee boiler only after water has run from the group. coffee boiler controller steam boiler controller coffee boiler controller on/off switches Figure 15. Showing the temperature controllers and their on/off switches of the steam boiler and both groups on a Spirit Duette. Switches are in “off” position with levers pointing down, displays are not lit. Procedure 1. If present, remove the filter holders from all groups. 2. Make sure that all temperature controller switches (PID’s for all groups plus the controller for the steam boiler) are in the “off” position (lever pointing down, see Figure 15). 3. Make sure that coffee pressure gauges indicate line pressure. If not, check water connections. 4. Turn the mains switch on the machine to “NO HEAT”. The mains switch is mounted on the right hand side of the machine (see Figure 12a). The machine will wait for approximately 3 seconds before activating the pump and starting to fill the steam/hot water boiler. (Power to the heating elements is disconnected for 3 reasons: 1- mains switch is in position “NO HEAT”, 2- The temperature controllers are not switched “on” yet, 3- Safe water level in the steam/hot water boiler is not yet reached.) Note! As the machine shuts down when the filling valve is active for more than 2 minutes continuously, the operating level will not be reached yet because the machine shuts down and filling will stop. 5. While the steam boiler is filling activate the groups (Bastone-autostop: tap brewing lever downwards; Touchpad: shortly press top button) one by one to engage the group solenoid valve and pump and bleed all air from the corresponding coffee boiler. Deactivate the group (again tap brewing lever down or shortly push upper button) when water flow from the group is more or less continuous. Note! The electronic temperature controllers just behind the drip tray can only be activated when the safety water level inside the steam boiler is reached. (The heating elements should of course at all times be immersed in water when operated.) Spirit installation manual page 23 INSTALLATION 6. Turn the mains switch to “OFF” (to reset the main controller) and back to “NO HEAT”, the steam/hot water boiler will continue filling after a 3 second delay. 7. Repeat step 5 and 6: Continue activating the groups (one by one) until water flow from all groups is more or less continuous. 8. Turn the mains switch to “OFF” and then to “ON” and then switch the steam boiler controller “on” (lever pointing up). The display will light up after about 3 seconds and the steam boiler heating elements are now engaged. 9. You may now switch the coffee boiler temperature controllers “on” (levers pointing up). The displays will light up after about 3 seconds and the coffee boiler heating elements are now engaged. Check if the machine is leaking. Expel air from coffee system You now have to expel remaining air from the coffee system. Procedure 1. While the machine heats up, let each group run for approximately 10 seconds to expel any remaining air pockets. Check if the machine is leaking. Spirit installation manual page 24 FIRST USE First use Heating up Heating up all of the boilers takes about 25 minutes after the temperature controllers are turned “on”. When the temperature in the steam boiler reaches boiling point, some steam will escape through the anti-vacuum valve and is discharged into the drain. The escaping steam makes a hissing or sputtering sound inside the machine and will stop when the valve is shut by the increasing pressure inside the boiler. The main steam boiler is adjusted at the factory to 125 degrees Celsius (centre digital controller) corresponding to approximately 1.35 Bar. When heating up from cold, the coffee boiler PID’s will initially “overshoot” the set temperature, for example: it will heat up to 94.7 °C instead of 93.0 °C. Although the PID parameters could be set such that this initial overshoot is (nearly) absent, this setting would reduce the temperature stability once the corresponding group is warm and will increase the time it takes to reach the set temperature. The initial overshoot will be taken up by the steel mass of the group which is also heating up from cold. Check if the machine is leaking. Even when the boilers have reached their correct operating temperature after firing up the machine from cold, it takes some more time until the groups are at their optimum temperature. You can speed up this process by making 2-cups of coffee 5 times per group to get the groups at the correct temperature (you may use the same coffee puck each time). Set hot water dosage The hot water lever (central lever with red knobs) activates a timer which, in turn engages the pump and opens valves in the hot water system so that water will start flowing from the hot water spout. After the set amount of time, the flow will stop automatically. The delivered quantity of water depends on pressure in the steam/hot water boiler and the flow of added cold water. Because these may fluctuate slightly, the quantity of water delivered in the set time may vary a little as well. You can adjust the amount of time that the water will run from the hot water spout. Procedure Touchpad version Press and hold the upper button of the left hand touchpad for 6 seconds, the main controller is now in programming mode. The LED in the upper button of all touchpads will be flashing but no water will flow from the groups. Within 4 seconds, activate water dispensing by pressing down the hot water lever and releasing it. The hot water lever (red knobs) is located on top of the front panel between the groups. As long as the water is running, all upper LED’s will remain lit. If you wait longer than 5 seconds, the controller will leave the programming mode automatically (all LED’s unlit). Use of a stopwatch is advised. Press down and release the hot water lever again when the desired quantity of water has been dispensed. The electronic timer has now been set. The programming mode will last for another 45 seconds after you have set the timer, therefore refrain from handling buttons or levers for another 6 seconds. Procedure Bastone-autostop version Make sure that the 2-way switch underneath the left hand group lever is pointing to the left. Press and hold the program button (push button underneath left group lever) for 6 seconds, the control LED will start flashing and the main controller is now in programming mode. Within 4 seconds, activate water dispensing by pressing down the hot water lever and releasing it. The control LED’s on all groups will be lit. The hot water lever (red knobs) is located on top of the front panel between the groups. Spirit installation manual page 25 FIRST USE If you wait longer than 5 seconds, the controller will leave programming mode automatically (all LED’s unlit). Use of a stopwatch is advised. Press down and release the hot water lever again when the desired quantity of water has been dispensed. The electronic timer has now been set. The programming mode will last for another 45 seconds after you have set the timer, therefore refrain from handling buttons or levers for another 6 seconds. During delivery of hot water some cold water is mixed in to obtain a non-spattering, quiet flow at the right temperature for preparing Americanos. A secondary goal of this added cold water is to lower the strain on the steam boiler as less hot water is needed from the boiler to get the same quantity. The pump is activated whilst dispensing hot water. After hot water has been dispensed, the steam boiler will start to re-fill to its pre-determined level automatically. The incoming cold water needs to be heated to 125 °C quickly to retain full steam capacity. For that reason, a jet with a diameter of 1.0 mm is installed at the entrance of the boiler fill valve which restricts the flow of cold water to the boiler which allows the heating to (partially) keep up. The pump is activated whilst the steam boiler is being filled. The filling procedure is automatically delayed when hot water is dispensed. This prevents changes in steam boiler and (cold) water supply pressure and thus ensures temperature stability of the dispensed hot water. Adjust coffee system pump pressure The pressure gauge just left of each group displays the pressure in the corresponding coffee boiler. At idle, the minimum value is the pressure of the incoming tap water (as in other water taps in your establishment). Factory setting of the maximum pressure in the boilers is 12 Bar. Above this value an expansion valve on the machine will open such that excess pressure is relieved until the maximum value is no longer exceeded (this occurs when water with a lower temperature than the set value enters the coffee boiler, heats up and thus expands). A restrictor in the coffee system reduces the flow when a group is activated. This restrictor is placed in between the heat exchanger and the coffee boiler. The diameter of the tubing in the group head has the larger opening such that water can more easily flow “out of the group” than “into the boiler”. While brewing espresso, with the group valve “open” and the pump activated, water will first fill the empty infusion tube and dispersion plate and wet the coffee bed such that pressure in the corresponding group will quickly drop to practically zero. After wetting of the coffee grinds, the pressure will gradually increase to the set pump pressure (ideally 9 Bar). The pressure at the outgoing side of the pump is proportional to the pressure at the ingoing side of the pump (the pump simply multiplies the incoming pressure by a set amount). Therefore, you should check and possibly adjust the pump pressure after installation. Adjustments are made by turning the set screw on the right hand side of the brass pump housing (see Figure 16). Procedure 1. Place a filter with ground coffee in a filter holder (this can be used coffee). 2. Activate that group by pressing and releasing the upper button (Touchpad; Bastone-autostop: press down and release the brew lever). 3. Observe the pressure gauge of the activated group to check how the pressure evolves and wait until it no longer increases. 4. To increase the pump pressure turn the set screw in the pump housing clockwise (see Figure 16). Turn the screw counter-clockwise to decrease the pump pressure. 5. De-activate the group when the pressure is correctly set at 9 Bar. Warning! The set screw is made from brass, to avoid damage use a screw driver that fits the slot snugly. Spirit installation manual page 26 FIRST USE set screw Figure 16. Showing the set screw on the pump to change pump pressure. Notes! Do not set the pump pressure with a blind filter in the filter holder. When a blind filter is used, water in the system is trapped between a one-way valve and the blind filter. Therefore, the coffee boiler pressure will not drop when the set screw is turned counter-clockwise. When pump pressure exceeds approximately 12 Bar, the expansion valve will open. Increasing the pump pressure further will not result in higher coffee boiler pressure. Do not set the operational pressure above 9 Bar since this will reduce the life-span of valves, etc. in your machine. Set hot water temperature Hot water from the steam/hot water boiler is mixed with some cold water before it is dispensed. Water temperature at the hot water spout depends on the temperature and amount of the mixed-in cold water. The temperature of the incoming cold water differs from place to place and possibly by season as well. The amount of cold water inflow is related to the pressure and can thus be adjusted by changing the (outgoing) pressure of the steam/hot water boiler pump. Increasing the pump pressure decreases the temperature at the spout and vice versa. steam boiler pump decrease temperature increase temperature Figure 17. the steam boiler pump pressure is used to set the hot water temperature. Procedure 1. Wait for the machine to be completely warmed up: at least “ON” and heating for 25 minutes and used to dispense hot water at least 5 times over the last 5 minutes. Spirit installation manual page 27 FIRST USE 2. Get the main controller in programming mode (to get a long lasting flow of hot water): Touchpad: press and hold upper button on left hand touchpad; Bastone-autostop: two-way switch of left hand group in left position, press and hold program button for 6 seconds (LED’s will start flashing). 3. Within 4 seconds, activate water dispensing by pressing down and releasing the hot water lever. Water will start flowing (LED’s are now lit). 4. Measure the temperature of the outflowing water with a quick-response temperature sensor* and then de-activate the hot water by pressing down and releasing the lever again. We recommend a water temperature of around 95 °C. 5. If the temperature is too low: decrease pump pressure of the steam/hot water boiler pump. If the temperature is too high: increase pump pressure (see Figure 17). 6. After adjusting the pump pressure, make sure that the boiler is at operational temperature and measure the hot water temperature again. 7. When the required temperature is reached, reset the hot water timer to the desired amount of water (see section “set hot water dosage”). * If you do not have a quick response temperature sensor, decrease the pump pressure until boiling water is flowing from the spout (flow will sputter instead of dispensing a calm flow). Then increase the pump pressure a little until a calm flow is obtained. Note! Do not adjust the temperature of the hot water by changing the temperature of the steam/hot water boiler as this will decrease the temperature stability of the machine. Spirit installation manual page 28 INFORMATION More information in the USER MANUAL Please check the “SPIRIT USER MANUAL” for information on how to operate the machine (set brew volumes and remarks thereabouts, adjust steam power, change temperature settings, etc.). More information on the USB flash drive Included in the shipment is a USB flash drive with comprehensive information on the Spirit espresso machine. Besides this installation manual it includes the user manual, an explanation of how the machine works, some notes on (tap) water quality, detailed descriptions of materials needed and procedures to follow whilst performing maintenance routines, electrical schemes and a troubleshooting guide. Contact information Kees van der Westen ~ Espressonistic Works B.V. Van Elderenlaan 6 5581WJ WAALRE The Netherlands Telephone +31 40 2223433 Email [email protected] Website www.keesvanderwesten.com Ordering replacement parts Check our website if the webshop is already up and running. If not, order via: [email protected] Spirit installation manual page 29