1
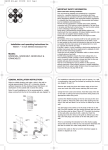
Technical Specifications
Inputs:
1/4” mono jack connector (Tip hot, sleeve ground) or 3-pin XLR
connector (pin 2 hot), unbalanced.
Parallel link output 1/4" jack connector for feeding to other equipment,
direct or via Buffer Amplifier.
Attenuator
Impedance :
Max Input Level before clip
at 0dB:
1 Mohm
+9dBu
at 20dB:
47 kOhm
+29dBu
at 40dB:
47 kOhm
+49dBu
Output:
3-pin XLR connector, transformer balanced output. Will drive lines
from 600 Ohm upwards. Maximum output level before clip greater
than +9dBu with battery or phantom supply.
Frequency Response:
30Hz to 20kHz , +0/-1dB
Noise:
< -105dBu, unweighted, 22Hz to 22kHz, rms*
Harmonic Distortion:
Less than 0.005% at 1kHz, 0dBu output.
Power:
Phantom Power Requirements: +20 Volts DC to +48Volts DC
Current Drain:
Phantom Power, less than 8mA. Battery, less than 2mA
Dimensions:
Weight:
145mm x 125mm x 59mm (5.7 " x 4.9" x 2.3")
650gm (22oz) excluding battery.
* Noise measured relative to maximum output
Warranty Information
When sold to an end user by BSS Audio or a BSS Audio Authorised Reseller, this unit is warranted by the seller to the
purchaser against defects in workmanship and the materials used in its manufacture for a period of one year from the date
of sale. Faults arising from misuse, unauthorised modifications or accidents are not covered under this warranty. No other
warranty is expressed or implied. If the unit is faulty it should be sent to the seller of the equipment, in its original
packaging with shipping prepaid. The unit will be returned to you when the repair has been completed. You should
include a statement listing the faults found. The unit’s serial number must be quoted in all correspondence relating to a
claim. We recommend that you record your purchase information for future reference.
In keeping with our policy of continued improvement, BSS Audio reserves the right to alter
specifications without prior notice. The AR-133 was designed and developed by BSS Audio,
Hertfordshire, England.
BSS Audio, Linkside House, Summit Road, Potters Bar, Herts EN6 3JB England
Tel +44 (0)1707 660667 Fax +44 (0)1707 660755 World Wide Web: http://www.bss.co.uk
Part Number ZM0199-01
Issue 1
BSS Audio
User Manual
AR-133
Active DI Box / Line Balancer
Using a DI box eliminates the need for miking of the backline speakers, providing a clean
feed to both console and amplification. The AR-133 has a parallel feed from the input
connector so that the instrument may be simultaneously connected to the AR-133 and the
amplifier. This means that no special splitter cables are needed.
The striking visual design of the AR-133 also has functional qualities. For example, cables
can be run underneath to keep cable runs neat on stage, and all from one end of the unit.
The moulded sides make stacking of multiple units easier, and help isolate the case of the
AR-133 from the stage both electrically and mechanically.
Input Connectors and switches
Input 1/4" Jack:
Unbalanced, Tip hot (+ve), sleeve ground;
Main input for instruments
Impedance (Pad setting)
1MOhm (0dB)
47kOhm (20dB)
47kOhm (40dB)
3 - pin XLR Socket:
Unbalanced, parallel link with main 1/4" jack socket. Pin 2 hot, Pins 1 and 3 ground.
Link 1/4" Jack:
Output, parallel wired with main 1/4" input, or fed via a buffer amplifier from main input.
Tip hot, Sleeve ground.
Output Connector and switches
3-pin XLR Output:
Balanced (via transformer)
Pin 2 Hot (+ve)
Pin 3 Cold (-ve)
Pin 1 Ground
Ground Lift Switch:
By switching to the LIFT position, the
internal connection to the output pin 1 is
removed, isolating the AR-133’s grounding system from that of the rest of the system.
Functions and Facilities
The Link Connector
Normally, the 1/4" LINK socket carries a parallel-wired direct feed from the input. Optionally,
an internal link passes this signal through an active isolating buffer amplifier. This link must
be changed by an Authorised Technician only. Please consult your Distributor/Dealer for
details.
The On/Off Switch
The On/Off switch is used for both phantom power and battery. To avoid battery drain when
the unit is not in use, ensure that this switch is set to the upper OFF position when storing or
packing the AR-133. Optionally, an internal link can allow phantom power to activate the
AR-133 regardless of the On/Off switch setting. This link must be changed by an Authorised
Technician only. Please refer to your Dealer/Distributor for details.
Phantom Power
The AR-133 can work reliably on a wide range of phantom power voltages, although of
course the typical supply provided by modern consoles is +48 volts. The AR-133 accepts
supply voltages of +48 volts down to +20 volts without loss in performance.
Typical Applications
The most widespread use of DI boxes is with guitar
pick-ups or keyboards. The optimal setting for this is most
likely with the pad switch set to 0dB, although with some
high-output pick-ups the performance of the AR-133 may
be improved if the pad switch is set to 20dB to prevent
possible clipping of the input. The instrument is
connected to the 1/4” jack socket, and a parallel feed taken
from the other jack socket to the instruments' own
amplifier.
Interfacing additional equipment such as DJ
mixers with the house console and PA may
cause level and connector difficulties. Connect
the DJ mixer to either the jack or XLR input of
the AR-133 (this will depend on the interface
cables to hand which match the output of the DJ
mixer) and then the AR-133's output XLR to the
house console.
Where 2 or 3 keyboards are used by a
single performer, it is possible to reduce the
number of DI’s needed if a mixer/amplifier
is used by the performer for his or her
personal monitoring. A single AR-133 can
be fed either from a line-level output from
the head (pad set to 20dB) or from the
amplifier power output (speaker output)
(pad set to 40dB).
While the AR-133 is receiving good phantom power, the power LED is lit continuously.
Should the supply fail for any reason, the AR-133 will switch over automatically to run from
the internal battery (as long as one is fitted!). Under these conditions, the power LED flashes
approximately every 2 seconds.
Installing a battery
To install or replace the internal battery, first undo the knurled screw on the battery compartment - DO NOT undo the flush panel screws. The battery cover should now fold back
towards the edge of the unit, revealing the compartment. Attach the flying lead battery
terminals to your battery, and slide the battery into the compartment, with the connector
towards the outside of the AR-133. For best reliability and long life, we recommend you use
only high quality alkaline batteries in your AR-133.
Cable Management
To keep cables tidy on stage and in the studio, both input and output cables can be arranged
to run in the same direction by bringing one cable back under the AR-133.
Using the amplifier's output means that the
signal being fed to the console is post any
effects units and the power stage of the
amplifier, and so will be more
representative of the signal being fed to the
speaker, including any deliberately
introduced overdrive etc. Use the 40dB
setting for this application.