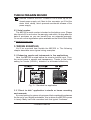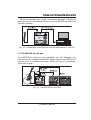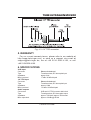
1
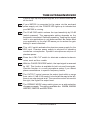
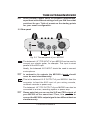
Version 1.0 November 2003 ENGLISH TUBE ULTRAGAIN MIC200 Users Manual IMPORTANT SAFETY INSTRUCTIONS CAUTION: To reduce the risk of electric shock, do not remove the top cover (or the rear section). No user serviceable parts inside; refer servicing to qualified personnel. WARNING: To reduce the risk of fire or electric shock, do not expose this appliance to rain and moisture. This symbol, wherever it appears, alerts you to the presence of uninsulated dangerous voltage inside the enclosurevoltage that may be sufficient to constitute a risk of shock. This symbol, wherever it appears, alerts you to important operating and maintenance instructions in the accompanying literature. Please read the manual. DETAILED SAFETY INSTRUCTIONS: 1) Read these instructions. 2) Keep these instructions. 3) Heed all warnings. 4) Follow all instructions. 5) Do not use this device near water. 6) Clean only with a dry cloth. 7) Do not block any ventilation openings. Install in accordance with the manufacturers instructions. 8) Do not install near any heat sources such as radiators, heat registers, stoves, or other apparatus (including amplifiers) that produce heat. 9) Do not defeat the safety purpose of the polarized or grounding-type plug. A polarized plug has two blades with one wider than the other. A grounding type plug has two blades and a third grounding prong. The wide blade or the third prong are provided for your safety. If the provided plug does not fit into your outlet, consult an electrician for replacement of the obsolete outlet. 10) Protect the power cord from being walked on or pinched particularly at plugs, extension cords, and the point at which they exit the unit. 11) Only use attachments/accessories specified by the manufacturer. 12) Use only with the cart, stand, tripod, bracket, or table specified by the manufacturer, or sold with the device. When a cart is used, use caution when moving the cart/device combination to avoid injury from stumbling over it. 13) Unplug this device during lightning storms or when not used for long periods of time. 14) Refer all servicing to qualified service personnel. Servicing is required when the unit has been damaged in any way, such as power supply cord or plug is damaged, liquid has been spilled or objects have fallen into the device, the unit has been exposed to rain or moisture, does not operate normally, or has been dropped. TUBE ULTRAGAIN MIC200 Welcome to the BEHRINGER family! Thank you for the confidence you have placed in us by purchasing the MIC200. Your MIC200 is a professional mic preamp that can be used in a variety of applications. Due to its incredible functionality and the broad range of connection options, the MIC200 can even be used as a preamp for electric and bass guitars, keyboards and percussion instruments. No matter where you use your MIC200, you always get optimal performance, be it live or on the stage, in a professional recording studio or at home! 1. INTRODUCTION With the MIC200, you have purchased an extremely musical mic preamp that is equipped with a 12AX7 vacuum tube. Thanks to BEHRINGERs preamp modeling, its main advantages are the number of preamp settings you can select. Additionally, features like an integrated limiter, phase reverse function, phantom power supply, highly accurate LED meter, switchable pad function and low cut filter make the MIC200 a very powerful piece of equipment. 1.1 The design concept The heart of the TUBE ULTRAGAIN is an extremely low-noise microphone preamp circuitry that uses discrete components and produces a highly transparent sound. In combination with our BEHRINGER tube technology, state-of-the-art 4580 operational amplifiers and a sophisticated circuit topology, the TUBE ULTRAGAIN yields excellent noise and distortion properties. The innovative UTC circuitry that has been developed by our engineering team offers an abundance of sound-shaping possibilities. Absolute musicality was our main goal when we designed the TUBE ULTRAGAIN. The result is a device that, due to our tube circuitry, can produce an incredible punch in percussion instruments. On the other hand, instruments that are rich in upper harmonics will receive more transparency. The sound will be warm, detailed and brilliant. You get better low-end differentiation which will help you locate individual instruments. With the help of the TUBE ULTRAGAIN, vocals gain in presence and volume without masking other instruments. As a result, your voice will be perfectly integrated in the mix. 1. INTRODUCTION 3 TUBE ULTRAGAIN MIC200 2. CONTROL ELEMENTS Fig. 2.1: User interface of the MIC200 2.1 User interface The GAIN control allows you to control the gain from +26 to +60 dB to the input signal. This control should be set all the way to the left when (dis)connecting a sound source from the MIC200. When all connections are made, slowly start raising the gain control. We recommend using the LED meter to adjust gain. The LED chain displays the output signal level in dB. Please make sure that the clip LED never lights up permanently. 4 2. CONTROL ELEMENTS TUBE ULTRAGAIN MIC200 It should light up only at peak signals, but it should never be on all the time. If your MIC200 is connected to the mains via the enclosed power supply unit, the POWER LED lights up to indicate that your MIC200 is running. The 20 dB PAD switch reduces the input sensitivity by 20 dB (switch pressed). The appropriate setting depends on the equipment connected. Generally speaking, lowering the signal level in mic applications is not recommended. No matter what your application is, the clip LED warns you to reduce the gain setting to avoid distortion. This +48 V switch activates the phantom power supply for the XLR input. Phantom power supply is required for operating condenser microphones. Dynamic microphones require no phantom power. Press the LOW CUT switch to eliminate undesired subsonic noise, such as floor rumble. With the PHASE REVERSE switch, the input signal is reversed by 180°. This function is available for both mic and line signals. Use this function in a multi-microphone setup if you detect phase cancellations in specific frequency bands. The OUTPUT control governs the output level within a range from -oo to +10 dB. If the control is turned all the way to the left, there is no output signal at all. The more the control is turned to the right, the higher the output level. The PREAMP MODE rotary switch gives you a wide selection of preamp presets. The options available are: WARM, WARM/ LIMITER, LIMITER and NEUTRAL: 2. CONTROL ELEMENTS 5 TUBE ULTRAGAIN MIC200 WARM (moving clockwise, starting at 9 oclock): These settings make sense if you wish to add that typical warmth associated with analog signals. KEYB: E-GTR: VOCAL: VALVE: For electronic keyboard instruments of all types. Electric guitar. Speech and vocals. Warm, analog tube sound. WARM + LIMITER (moving clockwise, starting at 12 oclock): Use these settings when working with high volumes or with sounds with frequent signal peaks, and if directly recording an instrument with a mic (e. g. drums) to insert additional warmth. MULTI: VOCAL: A-GTR: PIANO: Various applications. Speech and vocals. Acoustic guitar. Piano/grand piano. LIMITER (moving clockwise, starting at 3 oclock): Select these settings if you wish to use the limiter function without adding tube warmth. BASS: A-GTR: PERC: LIMIT: Bass guitar. Acoustic guitar. Percussion and drums. Neutral limiter setting. NEUTRAL (moving clockwise, starting at 6 oclock): These settings are ideal for neutral and natural sound reproduction without limiter and without tube sound. NEUTRAL: VOCAL: GUITAR: BASS: 6 Neutral sound setting. Optimized setting for speech and vocals. Optimized setting for guitars and guitar amps. Optimized setting for electric bass guitar. 2. CONTROL ELEMENTS + TUBE ULTRAGAIN MIC200 Since presets cannot cover all possible applications, experiment with different settings until you find those that work best for you. Think of presets as the starting points for your sound configuration. 2.2 Rear panel Fig. 2.2: The rear panel of your MIC200 The balanced 1/4" TRS INPUT of your MIC200 can be used to connect your electric guitar, for example. This input is wired parallel to the XLR input. + Ideally, the balanced XLR INPUT should be used to connect a microphone. In contrast to its outputs, the MIC200s inputs should never be used simultaneously! This is the balanced XLR OUTPUT of your MIC200. Use this connector to feed the XLR input of your mixing console, multitrack recorder or power amp. + The balanced 1/4" TRS OUTPUT of your MIC200 can also be connected to a mixer, recording system or power amp. Please note that you can use the XLR and TRS outputs of your MIC200 at the same time! Thus, it is possible to connect the MIC200s output signal to two different devices simultaneously. 2. CONTROL ELEMENTS 7 TUBE ULTRAGAIN MIC200 Use the POWER SUPPLY CONNECTOR to hook up the enclosed power supply unit. Next to this connector youll find the strain relief clamp, which prevents accidental release of the power supply. 2.3 Serial number The MIC200s serial number is located on the bottom cover. Please take time to fill in and return the warranty card within 14 days after the date of purchase, so you can benefit from our extended warranty. Or use our online registration option available on the World Wide Web at www.behringer.com. 3. WIRING EXAMPLES Youll be surprised how flexible the MIC200 is. The following chapter describes some typical wiring examples. 3.1 Enhancing vocals and instruments in live applications Here, the MIC200 is wired before the mixers channel input. Thus, the sound gains in warmth and transparency. Thanks to the limiter setting for vocals (VOCAL), distortion is eliminated effectively. Fig. 3.1: Standard live application 3.2 Direct to disk application in studio or home recording environments If you are looking for a piece of equipment that considerably enhances the sound of your digital workstation, this is where the MIC200 comes in handy. Many hard disk recorders lack that typical liveliness. 8 3. WIRING EXAMPLES TUBE ULTRAGAIN MIC200 Some workstations have noisy microphone preamps. Turning the preamps on your workstation off and using the MIC200 will solve this common problem. Fig. 3.2: Connection of the MIC200 and the soundcard of your PC 3.3 The MIC200 as a DI-box Your MIC200 is suited for this application too. For example, you can connect an unbalanced acoustic guitar signal to the MIC200 to prevent hum or interference noise. What you get is a balanced, noise-free signal. Fig. 3.3: The MIC200 as a DI-box 3. WIRING EXAMPLES 9 TUBE ULTRAGAIN MIC200 4. AUDIO CONNECTIONS Fig. 4.1: XLR connectors Fig. 4.2: 1/4" TS connector 10 4. AUDIO CONNECTIONS TUBE ULTRAGAIN MIC200 Fig. 4.3: 1/4" TRS connector 5. WARRANTY For our current warranty terms, please refer to our website at http://www.behringer.com, or send us a request via e-mail at [email protected], fax at +49 2154 9206 4199, or call +49 2154 9206 4166. 6. SPECIFICATIONS XLR input Connector Type Impedance Max. input level Balanced/unbalanced Transformerless, DC-decoupled input approx. 2 kΩ +7 dBu / 20 dB with pad 1/4" TRS input Connector Type Impedance Max. input level Balanced/unbalanced Transformerless, DC-decoupled input approx. 1 MΩ +16 dBu / 20 dB with pad Audio outputs Connectors Type Impedance Max. output level XLR and 1/4" TRS connector bal./unbal. Transformerless, DC-decoupled output approx. 700 Ω bal. / approx. 350 Ω unbal. approx. +26 dBu @ 100 kΩ 6. SPECIFICATIONS 11 TUBE ULTRAGAIN MIC200 System specifications Frequency response Function controls Gain Output Preamp mode control Function switches 20 dB pad +48 V Low Cut Phase reverse Indicators Input level Power-LED Power supply Mains voltage Mains supply Physical Dimensions Weight Mic input <10 Hz - 47 kHz (+/-3 dB) Line input <10 Hz - 55 kHz (+/-3 dB) variable (+26 to +60 dB) variable (-oo to +10 dB) Selection of various preamp settings for microphone and instruments Level attenuation (20 dB) Activates the phantom power High pass filter (cut-off frequency 90 Hz) Reverses phase (180 degrees) 8-segment LED meter: -24, -18, -12, -6, 0, +6, +12, clip Indicates operation USA/Canada 120 V~, 60 Hz U.K./Australia 240 V~, 50 Hz Europe 230 V~, 50 Hz Japan 100 V~, 50 - 60 Hz external power supply 9 V AC/1300 mA approx. 2 1/2" (64 mm) x 5 1/4" (135 mm) x 5 1/4" (135 mm) approx. 1.1 lbs (0.5 kg) (w/o power supply) BEHRINGER is constantly striving to maintain the highest professional standards. As a result of these efforts, modifications may be made from time to time to existing products without prior notice. Specifications and appearance may differ from those listed or illustrated. Technical specifications and appearance subject to change without notice. The information contained herein is correct at the time of printing. The names of companies, institutions or publications pictured or mentioned and their respective logos are registered trademarks of their respective owners. Their use neither constitutes a claim of the trademarks by BEHRINGER® nor affiliation of the trademark owners with BEHRINGER®. BEHRINGER® accepts no liability for any loss which may be suffered by any person who relies either wholly or in part upon any description, photograph or statement contained herein. Colors and specifications depicted may vary slightly from product. No part of this book may be reproduced or transmitted in any form or by any means, electronic or mechanical, including photocopying and recording of any kind, for any purpose, without the express written permission of BEHRINGER Spezielle Studiotechnik GmbH. BEHRINGER® is a registered trademark. ALL RIGHTS RESERVED. © 2003 BEHRINGER Spezielle Studiotechnik GmbH. BEHRINGER Spezielle Studiotechnik GmbH, Hanns-Martin-Schleyer-Str. 36-38, 47877 Willich-Münchheide II, Germany Tel. +49 2154 9206 0, Fax +49 2154 9206 4903 12 6. SPECIFICATIONS