1
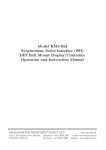
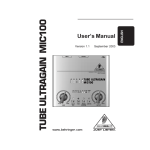
RM4 Manual 2
9/9/02
11:47 AM
Page 1
RM4 Manual 2
9/9/02
11:47 AM
Page 2
A M P L I F I E R S
RM4
MODULAR TUBE PREAMP
O W N E R S M A N U A L
RM4 Manual 2
9/9/02
11:47 AM
Page 3
Dear Randall Owner,
Congratulations on the purchase of your new Randall Amplifier, and thank you for the support of our product line. Randall amps are made
to strict quality and consistent performance standards, that will provide you with years of musical satisfaction. Please read the following
manual, before operating your new Modular preamp. The innovation of the new MTS series, will take tube versatility to new heights, and
your journey begins today. The quick start guide should help get you going, but if you ever have any questions or comments, please contact
us anytime.
Enjoy your new purchase!
Warnings:
-Do not block any ventilation openings on the sides or rear of the preamp. Always give four inches of proper ventilation to the rear of the
preamp.
-Do not expose the amplifier to rain, moisture, dripping or splashing water. Do not place objects filled with liquids on or nearby the amplifier.
-Do not expose the amplifier to direct sunlight or extremely high temperatures. Always unplug the AC power cord before changing fuses or
tubes. When replacing fuses, use only the same type and rating.
-Be sure to connect to an AC power supply that meets the power supply that meets the power supply specification, listed on the rear fuse
holder.
-If there is any danger of lightning occurring nearby, remove the power plug from the wall socket in advance.
-Do not use excessive force in handling control buttons, switches and controls. Do not use solvents to clean the unit, wipe off the exterior
with soft cloth.
!
EXCLAMATION POINT: The exclamation point
within an equalateral triangle, is intended to alert
the user of the presence of IMPORTANT
OPERATING AND MAINTENANCE OR
SERVICE INSTRUCTIONS in the literature
accompanying the product.
GROUNDING: To prevent electric shock, DO
NOT DEFEAT THE 3 PRONG GROUNDING
PLUG on product’s power cord. Do not use an
adapter, extension cord or outlet unless the
blades can be fully inserted to prevent blade
exposure.
IMPORTANT SAFEGUARDS
THESE WARNINGS APPLY TO ALL RANDALL ELECTRONIC PRODUCTS. PLEASE READ AND OBSERVE ALL
WARNINGS AND INSTRUCTIONS CONTAINED IN THIS SERVICE MANUAL AND THOSE ON YOUR RANDALL
PRODUCT PRIOR TO ITS USE.
WARNINGS AND SYMBOLS:
WARNING GRAPHIC ON PRODUCT:
WARNING
RISK OF ELECTRIC SHOCK
DO NOT OPEN
!
ATTENTION
RISQUE DE CHOC ELECTRIQUE NE PAS OUVRIR
WARNING GRAPHIC ON PRODUCT:
CAUTION:
TO PREVENT FIRE OR ELECTRICAL SHOCK,
DO NOT EXPOSE TO RAIN OR MOISTURE
LIGHTNING FLASH: The lightning flash with
an arrowhead within an equalateral triangle, is
intended to alert the user of the presence of
uninsulated DANGEROUS VOLTAGE within
the product’s enclosure that may be of
significant magnitude to constitute risk of
electric shock to persons.
PRECAUTIONARY WARNING:
RAIN AND MOISTURE: To reduce the risk of
fire or electric shock, DO NOT EXPOSE THIS
UNIT TO RAIN OR MOISTURE. Operators of
electronic products should in no way be in
contact with water.
RM4 Manual 2
9/9/02
11:47 AM
Page 4
Replacing modules: When exchanging modules, simply turn
both thumbscrews to the left until they fill loose.(Do not
remove the screw completely). Remove the module pulling
out on the thumbscrews. Slide in a new module, and push in
on the center knobs until flush with the front panel. Tighten
the thumbscrews, by turning to the right until snug.
Quick start guide:
Hooking up your gear:
After plugging in the AC power cord, connect a 1/4” instrument cable from the pre or post loop output to the input of your power amp. If
your using your effects loop, use only the post loop output. If you have the foot controller(optional), connect the foot controller to the
MIDI In on the rear panel. After turning on the unit, plug your guitar into the front panel input. Select the desired preamp module, and
adjust each level to 12 o’clock to start. Slowly bring up the master level until your reach the desired volume level. Then adjust the EQ settings on the module to your desired setting. Select the next module and repeat this process.
Channel Switching:
If there are four preamps installed, pressing & releasing the channel select switch will change the channel from 1 to 2, pressing &
releasing again 2 to 3, and again 3 to 4.
Saving a Preset:
Pressing and holding the channel select switch for 2 seconds will store your current settings. When used with the foot controller, select
button 1 on the foot controller, then set to channel 1 using the front panel channel switch button. (both the footswitch and channel 1 light
should be lit). Press and hold the channel select switch for 2 seconds, and this will store your current settings with the footswitch. The
footswitch will not select any preferred channel. To reset, simply turn the preamp off/on, and repeat the above steps.
RM4 Manual 2
9/9/02
11:47 AM
Page 5
Front panel Features and controls:
The RM4 front panel consists of 1/4” input, channel switch, effects level and Master level. Read below for descriptions of each.
Channel switching:
Each module can be changed by either pressing the front panel button, or the optional 4-button MIDI footswitch. Simply press and release
the front panel button to change modules. When using the footswitch, please program first. To program, plug in the
footswitch,
and press button one. Make sure the preamp has also switched to channel 1, if not, press the front panel button until your at channel 1.
Now that channel 1 on your footswitch and front panel are lit, press and hold the front panel button for 3 seconds and release. Your
footswitch will not be programmed to you preamp, so you can switch to any desired channel with your footswitch. To reset, please turn off
the unit off, than back on.
Front panel Effects level:
This knob controls the amount of effects when used with the parallel effects loop on the back panel. Simply plug in your outboard effects
unit into the parallel effects loop on the back panel, and adjust the level on RM4 front panel.
Front panel Master level:
The master level is a master volume for all the preamps. adjust each preamp level to your desired level, than adjust the master level for
overall volume.
The Preamp Modules:
At print of this manual there are 12 different preamp modules available. Please check our website or call for information on new modules
to date.
The Tone Controls:
Each module consists of 5 different controls with bright switch. Please read below for description of each.
Gain control- Adjusts the amount of desired distortion and gain. Each module has different levels of distortion.
Bass control - Adjusts the amount of desired bass frequency. To get started set each knob straight up.
Middle control- Adjusts the amount of mid-range frequency. Also set straight up to get started.
Treble control- Adjusts the amount of high frequency. Set straight up to get started.
Level control- Adjusts the amount of volume for each module. Set each module to a similar level, and adjust the master level to the
desired volume.
Bright switch- The bright switch adds additional high end presence to your tone. Each module has a different level of bright adjustment.
Turn the bright switch on or off depending on your desired tone.
RM4 Manual 2
9/9/02
11:47 AM
1 2
3
4
Page 6
5
6
7
8
9
10 11
1. Input jack: Connects directly to your instrument.
2. Channel switch: Push and release button to switch between channels 1-4. This button is also used to program when the footswitch is
used. Please read the footswitch programming section.
3. Gain control: Each preamp module has a gain control, which can be adjust for the desired amount of gain and distortion. Each module
has different levels of gain.
4. Bright switch: Acts as a presence switch, and adds in additional high frequency. Each module has different level of bright adjustment.
5. Bass control: Controls the amount of low frequency for each module, adjust to your desired level. Each module has a different low end
frequency response.
6. Middle control: Controls the amount of mid-range frequency for each module, adjust to the desired level. Each module has a different
mid-range frequency response.
7. Treble control: Controls the amount of high frequency for each module, adjust to the desired level. Each module has a different high
frequency response.
8. Master level: Each module has it own level control. This adjusts the desired amount of volume for each module. Please adjust each
module to similar volume level, than use the chassis master to adjust overall volume.
9. Thumbscrews: Each module has two thumbscrews that securely lock in each module. To change modules, simply loosen the two
thumbscrews until they feel loose. Carefully slide the module out using the thumbscrews to pull, and slide in a new module. Press in the
new module in using the control knobs, until the module is flush with the front panel. Push in the two thumbscrews, and turn to tighten
until tight.
10. Effects control: This knob is used when using the parallel effects loop on the rear panel. Hook up your external effects processor in
the parallel effects loop, and control the amount of effects with this knob. Turn to dry for no effects, or wet for maximum effects. You
RM4 Manual 2
9/9/02
11:47 AM
Page 7
Rear panel features and controls:
Rear input:
The RM4 has both front and rear 1/4” inputs. The rear input is commonly used with wireless systems, that have rear outputs for a rack
system.
Pre-loop output:
1/4” signal output before the effects loops. Used to connect to input of power amplifier, or recording unit. Use when the effects loops
are not being used.
Post-loop outputs:
Dual 1/4” outputs after the effects loops. Used to connect to input of power amplifier, or recording unit. Use when the effects loop is
being used.
MIDI in/thru:
To be used with any MIDI controller and outboard switching system. Connect your RF4 MIDI footswitch to the IN jack, and connect the
THRU jack to the MIDI IN of your RT2/50 power amplifier. The MIDI thru jack can also be connected to the M
Parallel effects loop:
Used to connect any outboard effect processors. Use the parallel effects loop when you want to use the front panel mix control.
Series effects loop:
Also used to connect your outboard effect processors. Not to be used with the front panel mix control.
Effects loop tubes:
Each effects loop utilizes two 12AX7 tubes to buffer your processing gear. Any outboard effects processing used through the effects
loops, go through the tubes to warm the sound of any signal processing.
Common Input tube:
Each module also utilizes one common input tube, installed in the rear of the RM4 preamp. Your guitar signal always passes through the
input tube first before each module, so each preamp modules uses three 12AX7 preamp tubes to help generate the pure tube tone.
Ground Lift:
Switch to eliminate grounding hums. Reverses the polarity of the voltage to eliminate unwanted ground noise.
RM4 Manual 2
9/9/02
11:47 AM
1
2
3
Page 8
4
5
6
7
8
9
10
11
12
1- AC Power/Voltage Selector: The RM4 can operate at AC currents of 100V, 110V, 120V, 230V. Simply remove the fuse with a
small screwdriver, and line up the correct voltage with the arrow, and plug back in. After selecting the correct voltage, connect the AC
power cord the wall socket.
2- Power Switch: This switch turns the unit on/off.
3- Ground Lift:
Push button to lift, and eliminate unwanted ground hum.
4- MIDI in: Input for the RF4 foot controller, or any external MIDI switching system.
5- MIDI thru: Connect the Thru output to the MIDI in of the RT2-50 power amp, or any external MIDI effects processor.
6- Post loop out: Connects to input of power amplifier, use when either effect loops is being used.
7.- Parallel loop return: Connects to the output of any external effects processor, which should be used with time base effects such as
echo, reverb, delay, etc. Use the front effects knob mix control to mix in the desired amount of effect. A specialized loop that retains the
direct (dry) signal at all times. It is imperative that the effects unit is programmed for 100% effects output.
8- Parallel loop send: Connects to the input of any external effects processor. Use the front effects knob for desired level of effects
9- Series loop return: Connects to the output of additional external effects processor. Used for effects that require processing 100% of
the signal, such as compressors, equalizers, noise reduction, etc.
10- Series loop send: Connects to the input of additional external effects processor.
11- Pre loop out: Connects to input of power amplifier. Use when the effects loops are not being used.
12- Rear panel input: Additional input to the front panel input. Commonly used with rack systems, and wireless units.