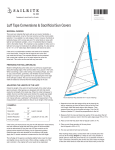
1
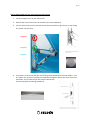
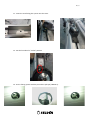
1(11)
597-144-E
2013-06-25
MANUAL: HOW TO REPLACE THE SELDÉN LINE WHEEL
ON SENSE 55 & OCÉANIS 58
Your kit includes:
Torx‐screw bits Grease New line wheel Sticker to fix on the furling gear Manual how to use a Seldén Furlin mast Furling line + splicing tools kit Tools needed Screw driver Cleaning Product + paper Knife A pair of pliers (with a long “noz”) 2(11)
How to disassemble the line wheel on the Furling system 1. Cut the Furling line on the line wheel level. 2. Remove the access hole covers on the side of the mast (TRAPPE B). 3. Put out of the mast the main sail and remove the tack shackle to give access on the furling line system into the mast. Trappe A
Trappe B
Trappe C
4. Unscrew the scrub‐screw and push the Locking Tube upwards above the Sail Feeder. Lock the Tube in this position by putting a screwdriver through the hole at the lower end of the Sail feeder. The screwdriver will also stop the luff Section from turning while tensioning (TRAPPE A). 3(11)
5. Put the wheel on ”free” position. 6. Turn the Reefing winch with the winch handle until the luff is correctly tensioned. (TRAPPE A) (WARNING: make sure to be in « Free » position on the line wheel). 7. Remove the split pin + pin (TRAPPE C). 4(11)
8. Unscrew the 8 torx screws (M8x25). 9. Put the furling system out of the mast. 10. Replace the furling stainless line wheel with the new one received in the replacing kit. 5(11)
6(11)
11. Insert the new furling line system into the mast. 12. Put the line wheel in ”rachet” position. 13. Fix the furling system with the pin and the split pin (TRAPPE C). 7(11)
14. Grease the 8 torx‐screws M8x25 + nuts and screw them on the furling system to fix it on the mast, but without to much power. (They have to be fix but no block. Please screw by hand). 15. Put the line wheel in ”free” position. 8(11)
16. Tie the furling profile into the mast, Turn the Reefing winch with the winch handle until the luff is correctly tensioned (TRAPPE A), WARNING: Do no tie too hard the furling profil because that can cause some furling sail problems in the future. 17. Adjust so that the Locking Tube fits over the lower part of the Luff Section. Lower the Locking Tube to locking position. (TRAPPE B) 18. Make sure that the wheel is spinning correctly with the winch handle, and correctly assembly with the furling profil inside the mast that should turn as well. (WARNING: the main sail shouldn’t be furled inside the mast when you are testing it). 9(11)
19. Remove the sticker and then clean it to replace it with the new sticker that was in your replacing kit. 20. Install the new furling line that was included in your replacing kit, you can use the winch handle for helping and then insert it in the 2 mast blocks and 2 stoppers on the roof (use the old line like a messenger if needed). 21. Test the furling and unfurling system. (WARNING: Wheel in “free” position). 10(11)
22. Make the splice with the splicing kit that was included in the replacing kit. 23. Please make sure that the owner will keep onboard and read the manual 597‐081‐EF “QUICK USER MANUAL FOR SELDÉN FURLING MAST” 11(11)
24. Test the furling and unfurling sail after connecting the tack sail on the furling system. If needed your can contact SELDÉN France Phone: +33251362110 Mail: [email protected]