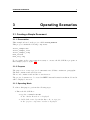
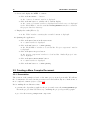
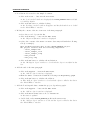
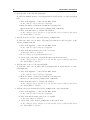
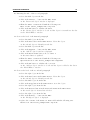
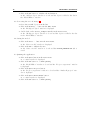
1
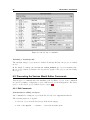
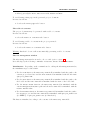
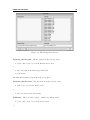
Atelier B
Model Editor
User Manual
version 3.1
ATELIER B
Model Editor—User Manual
version 3.1
Document made by CLEARSY.
This document is the property of CLEARSY and shall not be copied, duplicated or
distributed, partially or totally, without prior written consent.
All products names are trademarks of their respective authors.
CLEARSY
ATELIER B Maintenance
Europarc de PICHAURY
1330 Av. J.R. Guilibert Gauthier de la Lauzière - Bât C2
13856 Aix-en-Provence Cedex 3
France
Tel: +33 (0)4 42 37 12 99
Fax: +33 (0)4 42 37 12 71
Email: [email protected]
CONTENTS
iii
Contents
1 Description of the Manual
1
1.1
Scope . . . . . . . . . . . . . . . . . . . . . . . . . . . . . . . . . . . . . . .
1
1.2
Prior Knowledge . . . . . . . . . . . . . . . . . . . . . . . . . . . . . . . . .
1
1.3
Overview of the Manual . . . . . . . . . . . . . . . . . . . . . . . . . . . . .
1
1.4
How to Use this Manuel . . . . . . . . . . . . . . . . . . . . . . . . . . . . .
1
1.5
Notation and Syntax . . . . . . . . . . . . . . . . . . . . . . . . . . . . . . .
2
2 Program Presentation
3
2.1
Mission . . . . . . . . . . . . . . . . . . . . . . . . . . . . . . . . . . . . . .
3
2.2
Operating Environment . . . . . . . . . . . . . . . . . . . . . . . . . . . . .
3
2.3
Description of Pre-defined Models
. . . . . . . . . . . . . . . . . . . . . . .
4
2.4
Services Offered . . . . . . . . . . . . . . . . . . . . . . . . . . . . . . . . . .
5
2.4.1
Documentation Model Creation Service . . . . . . . . . . . . . . . .
5
2.4.2
Documentation Model Modification Service . . . . . . . . . . . . . .
5
2.4.3
Document Creation Service . . . . . . . . . . . . . . . . . . . . . . .
5
3 Operating Scenarios
3.1
3.2
Creating a Simple Document . . . . . . . . . . . . . . . . . . . . . . . . . .
7
3.1.1
Presentation . . . . . . . . . . . . . . . . . . . . . . . . . . . . . . .
7
3.1.2
Purpose . . . . . . . . . . . . . . . . . . . . . . . . . . . . . . . . . .
7
3.1.3
Operating Mode . . . . . . . . . . . . . . . . . . . . . . . . . . . . .
7
Creating a More Complex Document . . . . . . . . . . . . . . . . . . . . . . 10
3.2.1
Presentation . . . . . . . . . . . . . . . . . . . . . . . . . . . . . . . 10
3.2.2
Purpose . . . . . . . . . . . . . . . . . . . . . . . . . . . . . . . . . . 11
3.2.3
Operating Mode . . . . . . . . . . . . . . . . . . . . . . . . . . . . . 11
4 Using the Program
4.1
7
17
Presentation of the Various Objects Handled by the Model Editor . . . . . 17
4.1.1
Objects Used for the Page Layout . . . . . . . . . . . . . . . . . . . 17
4.1.2
Project Related Information . . . . . . . . . . . . . . . . . . . . . . . 17
iv
Model Editor—User Manual
4.1.3
4.2
Various Information . . . . . . . . . . . . . . . . . . . . . . . . . . . 21
Presenting the Various Model Editor Commands . . . . . . . . . . . . . . . 22
4.2.1
Edit Commands . . . . . . . . . . . . . . . . . . . . . . . . . . . . . 22
4.2.2
Display Commands . . . . . . . . . . . . . . . . . . . . . . . . . . . . 24
4.2.3
File Management Commands . . . . . . . . . . . . . . . . . . . . . . 25
4.2.4
Document creation command . . . . . . . . . . . . . . . . . . . . . . 26
4.2.5
Miscellaneous Commands . . . . . . . . . . . . . . . . . . . . . . . . 27
5 Glossary
33
A LITTLE EXAMPLE Project Documentation
35
LIST OF FIGURES
v
List of Figures
3.1
Simple document . . . . . . . . . . . . . . . . . . . . . . . . . . . . . . . . .
8
3.2
More complex document . . . . . . . . . . . . . . . . . . . . . . . . . . . . . 11
4.1
Objects handled by the Model Editor
4.2
Model editor commands . . . . . . . . . . . . . . . . . . . . . . . . . . . . . 22
4.3
File management window . . . . . . . . . . . . . . . . . . . . . . . . . . . . 29
. . . . . . . . . . . . . . . . . . . . . 18
vi
Model Editor—User Manual
DESCRIPTION OF THE MANUAL
1
1
Description of the Manual
1.1 Scope
This user’s manual applies to the Model Editor program version V3.5.4. The purpose of
this user’s manual is to make the required knowledge available to persons who may need
to operate the program.
To this end, the required level of prior knowledge, how to access the manual according to
the user’s needs and the presentation conventions used will be described.
1.2 Prior Knowledge
We will assume that readers of this manual are trained in the use of B language, as well
as in the use of Atelier B. A knowledge of Atelier B tools is necessary.
1.3 Overview of the Manual
Chapter 2 presents the aim of the Model Editor, the environment required for it to operate
properly, as well as the services that it provides.
Chapter 3 uses a simple and a more complex document to illustrate how to easily use the
Model Editor program.
Chapter 4 presents the objects processed by the Model Editor program, as well as the
program’s commands.
Finally, chapter 5 explains the technical terms used in this document.
1.4 How to Use this Manuel
A novice user of the Model Editor may, when reading the manual for the first time, simply
study chapters 2 and 3. Implementation of the examples presented in the latter chapter
provides a complete illustration of the use of the program and should allow progressive
and complete familiarization with the Model Editor.
Once familiar with the program, experienced users will find a complete description of all
of the Model Editor’s functions in chapter 4.
2
Model Editor—User Manual
1.5 Notation and Syntax
• The ”computer objects” such as names of files, windows or the choice of options in
the menus are shown in a non-proportional font, as shown in the example below:
The /home/PROJECT/bdp/little_example_MCH.mch file.
• In chapter 3, the result of the actions performed in the various steps to achieve the
aim, is shown using a proportional font in italics and preceded by a double arrow,
as shown in the example below:
⇒ the ”Atelier B project” window is displayed.
• Words with meanings that are explained in the Glossary (chapter 5) are followed by
an asterisk, as shown in the example below:
The MMI * user
PROGRAM PRESENTATION
2
3
Program Presentation
2.1 Mission
The purpose of the Model Editor is to create or modify a model of B project documentation
managed by Atelier B. This model may then be passed to the Documentor * program in
order to generate a document in the internal format of the selected word processor (LATEX *
or Interleaf *).
A model allows the construction of a structured document, with titles, headings, subheadings. The information contained in the document relates to the B project currently
being processed.
The data is of the following types:
• data dictionary
• component sources
• project or component status
• rules added for component proof checking
• free-format text
• PostScript files
To generate a model document, the Model Editor program allows adding, modifying or
deleting the above data, in order to generate the required project documentation.
The Model Editor is supplied with a set of pre-defined documentation models. These
models are described in the 2.3 section.
2.2 Operating Environment
The Model Editor program is part of the project documentation tools. It is directly
integrated into Atelier B. The operating environment of the Model Editor program is
identical to that of Atelier B.
In order to simplify the use of the program, it is necessary to install pre-defined basic models. These models will allow a novice user to easily create their first project documentation
models.
4
Model Editor—User Manual
2.3 Description of Pre-defined Models
These pre-defined basic models are installed in the following directory
<Atelier B directory>/AB/press/lib/bdoc and are as follows:
• modele_vide.mdl: this model only contains a title page with as its title, the name
of the B project being processed.
• modele_sources.mdl: this model contains a cover page.
For each B project component processed:
– A chapter containing the B source of the component. The mathematical formulas are shown in a font that is easily understood by any mathematician.
It also contains a table of contents.
• modele_sources_norm.mdl: this model is identical to the previous one, except that
the B source does not retain its original presentation.
• modele_preuves.mdl: this model contains a title page.
For each B project component processed:
– a chapter containing the source of the rules added to the component’s proof.
The mathematical formulas are shown in a font that is easily understood by
any mathematician.
It also contains a table of contents.
• modele_preuves_norm.mdl: this model is identical to the previous one, except that
the source does not retain its original presentation.
• modele_dico.mdl: this model contains the cross-references of the B project being
processed.
• modele_metriques.mdl: this model contains a title page as well as the table showing
the overall status of the B project processed.
For each component of the B project processed:
– a chapter containing the table showing the status of the component
It also contains a table of contents.
• modele_complet.mdl: this model contains all of the information described previously.
PROGRAM PRESENTATION
5
2.4 Services Offered
The Model Editor program offers three types of services:
• Creating a documentation model for a B project from a pre-defined basic model
• Modifying a documentation model for a pre-existing B project
• Creating a project document from a documentation model. This creation may comprise document display (on-screen) or a print-out of the project generated.
2.4.1 Documentation Model Creation Service
To create a documentation model for a B project, simply select as the input for the Model
Editor, one of the pre-defined basic modules (described in section 2.3).
This pre-defined basic module is then interpreted according to the information that makes
up the B project processed. The pre-defined basic model therefore becomes a documentation model for the processed B project.
As its output, the Model Editor produces a documentation model file. By default, the
name proposed for the file is: <project name>.mdl and the file host directory is the data
base for the processed project. The user may change the name of the file to produce.
2.4.2 Documentation Model Modification Service
To modify a B project documentation model file, simply choose as the Model Editor input,
a model file created using the previous service.
The Model Editor then provides a set of functions that allow the user to modify their
model:
• Adding/deleting chapters or data from the B project processed
• Modifying chapters or data in the B project processed
The output from the Model Editor produces a documentation model file. The default file
name is the name of the input file. The user may change or retain the file name proposed.
2.4.3 Document Creation Service
To create a project document, simply chose as the input to the Model Editor a documentation model for the B project processed, created or modified using the previously described
services.
The output from the Model Editor produces a file that contains the project document in
the internal format used by the word processor (LATEX * or Interleaf *). The name of the file
produced is by default, <project name>.tex (for LATEX *) or <project name>.doc (for
Interleaf *). The host directory used by the file is the data base of the project processed.
The user may change the file name but must retain the .tex or .doc extensions.
The file produced may be displayed only when the LATEX * word processor is used.
6
Model Editor—User Manual
The file produced may be printed-out. The print-out may be made in two different modes:
the entire document or a few successive pages at a time.
OPERATING SCENARIOS
3
7
Operating Scenarios
3.1 Creating a Simple Document
3.1.1 Presentation
This example is based on the project called LITTLE_EXAMPLE.
This project contains the following components:
little_example.mch
little_example_1.ref
little_example_3.imp
main_ltx.mch
main_ltx_1.imp
No processing on the components is necessary to execute the Model Editor program on
this example (refer to figure 3.1).
3.1.2 Purpose
The purpose is to create a project documentation model that contains two paragraphs.
The first contains a title and some text.
The second contains a title and the cross-references.
The project document is to be created in LATEX * internal format from this model and it
will be displayed on-screen.
3.1.3 Operating Mode
To achieve this purpose, perform the following steps:
1. Enter the Model Editor:
• type the command lanceAB
⇒ the ”Atelier B window” is displayed.
• double click on an object in the list to choose a project
⇒ the ”projects components” window is displayed.
8
Model Editor—User Manual
Figure 3.1: Simple document
• click on the Model editor button in theDocument... menu
or place the cursor on the list and press Control M
⇒ the “Model Editor” window is shown but shaded and the “projects components” window is iconized.
2. Create a model from a blank basic model.
• click on the Create model... button in the File menu
⇒ the “load a model” window is displayed.
• in the Files list double click on the modele_vide.mdl file
⇒ the “load a model” window is closed and the “Model Editor” window is no
longer shaded.
3. Adding the title of the first paragraph.
• click on the Append... button in the Edit menu
⇒ the “add an object” window is displayed.
• fill-in the Value of macro field with the following text:Introduction
• click on the OK button to validate the addition made
⇒ the “add an object” window is closed and the object is added in the list
displayed in the “Model Editor” window.
OPERATING SCENARIOS
9
4. Add the free form text of the first paragraph.
• click on the Append... button in the Edit menu
⇒ the “add an object” window is displayed.
• click on the Macro menu button, choose paragraph
⇒ the menu button is updated.
• fill-in the Value of macro data entry field with the following text (for example):
This document presents the cross-references of the LITTLE_EXAMPLE
project.
The project is built with the following components:
. little_example.mch
. little_example_1.ref
. little_example_3.imp
. main_ltx.mch
. main_ltx_1.imp
• click on the OK button to validate the addition made
⇒ the “add an object” window is closed and the object is added in the list
displayed in the “Model Editor” window.
5. Add the title of the second paragraph.
• click on the Append... button in the Edit menu
⇒ the “add an object” window is displayed.
• fill-in the Value of macro field with the following text: Cross references
• click on the OK button to validate the addition made
⇒ the “add an object” window is closed and the object is added to the list in
the “Model Editor” window.
6. Adding the cross references.
• click on the Append... button in the Edit menu
⇒ the “add an object” window is displayed.
• click on the Macro menu button, choose dictionary
⇒ the menu button is updated.
• click on the OK button to validate the addition made
⇒ the “add an object” window is closed and the object is added to the list in
the “Model Editor” window.
7. Save the model.
• click on the Save... button in the File menu
⇒ the “Save a model” window is displayed.
• click on the OK button to validate the save
⇒ the “save a model” window is closed and the LITTLE_EXAMPLE.mdl file is
created in the project data base directory.
10
Model Editor—User Manual
8. Create and display the LATEX. document
• click on the Document... button
⇒ the “create a document” window is displayed.
• click on the OK button to validate the document display
⇒ the “create a document” window is displayed and a watch cursor is displayed
in the “Model Editor” window until the LITTLE_EXAMPLE.tex file is created in
the project data base directory.
9. Display the result (Xdvi tool).
• ⇒ the “Xdvi” window containing the created document is displayed.
10. Quitting the application.
• click on the Quit button in the File menu
⇒ a confirm window is displayed.
• click on the OK button to confirm quitting
⇒ the “Model Editor” window is closed and the “Project components” window
is displayed.
• click on the Quit Project button
⇒ the “project components” window is closed and the “Atelier B project” window is displayed.
• click on the Quit Environment button
⇒ a confirm window is displayed.
• click on the OK button to confirm quitting
3.2 Creating a More Complex Document
3.2.1 Presentation
The creation of the example is based on the same project as used previously. We will use
the document model created in the previous section and will modify it to make it into a
more complex document (refer to figure 3.2).
Before making the modification, first:
• generate the dependency graph for the project and create the LITTLE_EXAMPLE.ps
file in the project data base directory, containing the project dependency graph.
• proof for the little_example.mch component.
OPERATING SCENARIOS
11
Figure 3.2: More complex document
3.2.2 Purpose
Retrieving the simple document and enriching it with additional data.
Initially, modify the free-form text for the first paragraph.
Then, add two new paragraphs in between the two existing paragraphs.
The first paragraph comprises a title and the PostScript file containing the project dependency graph.
The second paragraph comprises a title and two sub-paragraphs. One contains the title
and the B source of the little_example.mch component and the other contains a title
and the table representing the status of the little_example.mch component.
Entry errors will be made deliberately in order to show the use of the various Model Editor
commands.
3.2.3 Operating Mode
To achieve the purpose, perform the following steps:
1. Enter the Model Editor:
• type the lanceAB command
⇒ the “Atelier B project” window is displayed.
• double click on an object in the list to choose a project
⇒ the “project components” window is displayed.
12
Model Editor—User Manual
• click on the Model editor button in the Document... menu
or place the cursor on the list and type Control M
⇒ the “Model Editor” window is displayed shaded and the “Project components”
window is iconized.
OPERATING SCENARIOS
13
2. Load the model created for the simple document.
• click on the Load... button in the File menu
⇒ the “load a model” window is displayed, the LITTLE_EXAMPLE.mdl model file
is loaded by default.
• click on the OK button to validate loading
⇒ the “Loading a model” window disappears and the file listed above is loaded
in the “Model Editor” window.
3. Modify the content of the free form text of the first paragraph.
• select the second object in the list
• click on the Modify... button in the Edit menu
⇒ the “Object modification” window is displayed.
• replace the contents of the Value of macro data entry field with the following
text (for example):
This document presents data on the LITTLE_EXAMPLE project.
The project is built with the following components:
. little_example.mch
. little_example_1.ref
. little_example_3.imp
. main_ltx.mch
. main_ltx_1.imp
• click on the OK button to validate the modification
⇒ the “Modify an object” window is closed and the object is modified in the
list.
4. Add the title of the first paragraph.
• click on the Append... item in the Edit menu
⇒ the “Add an object” window is displayed.
• fill-in the Value of macro field with the following text :Dependency graph
• click on the OK button to validate the addition
⇒ The “Add an object” window is closed and the object is added to the list in
the “Model Editor” window.
5. Add the PostScript file that contains the project dependency graph.
• click on the Append... button in the Edit menu.
⇒ the “Add an object” window is displayed.
• click on the Macro menu button, choose include PS
⇒ the menu is updated.
• double click on the LITTLE_EXAMPLE.ps file in the Files list
⇒ the “Add an object” window is closed and the object is added to the list in
the “Model Editor” window.
14
Model Editor—User Manual
6. Add the title of the first sub-paragraph.
A deliberate mistake is made. A paragraph title is added in place of a sub-paragraph
title.
• click on the Append... button in the Edit menu
⇒ the “Add an object” window is displayed.
• fill-in the Value of macro field with the following text:
Specifications of the little_example.mch component
• click on the OK button to validate the addition
⇒ the “Add an object” window is closed and the object is added to the list in
the “Model Editor” window.
7. Add the B source for the component little_example.mch.
A deliberate entry error is made. The main_ltx.mch file is added in place of the
little_example.mch file
• click on the Append... button in the Edit menu
⇒ the “Add an object” window is displayed.
• click on the Macro menu button, choose B file
⇒ the menu button is updated.
• move to the project specifications directory
• double click on the main_ltx.mch file that is in the Files list
⇒ the “Add an object” window is closed and the object is added to the list in
the “Model Editor” window.
8. Add the title of the second sub-paragraph.
A deliberate entry error is made and a paragraph title is added instead of a subparagraph title.
• click on the Append... button in the Edit menu
⇒ the “Add an object” window is displayed.
• fill-in the Value of macro field with the following text:
Metric for the little_example.mch component
• click on the OK button to validate the addition
⇒ the “Add an object” window is closed and the object is added to the list in
the “Model Editor” window.
9. Add the table representing the little_example.mch component status.
• click on the Append... button in the Edit menu
⇒ the “Add an object” window is displayed.
• click on the Macro menu button, choose status
⇒ the menu button is updated.
• double click on the little_example file in the Files list
⇒ the “Add an object” window is closed and the object is added in the list in
the “Model Editor” window.
OPERATING SCENARIOS
15
10. Inserting the title of the second paragraph.
• select the fifth object in the list
• click on the Insert... button in the Edit menu
⇒ the “Insert and object” window is displayed.
• fill-in the Value of macro field with the following text:
Data on the little_example.mch component
• click on the OK button to validate the insert
⇒ the “Insert object” window is closed and the object is inserted into the list
in the “Model Editor” window.
11. Correct the level of the first sub-paragraph
• select the sixth object in the list
• click on the Cut button in the Edit menu to delete the object
⇒ the selected object is deleted from the list.
• select the fifth object in the list
• click on the Append... button in the Edit menu
⇒ the “Add an object” window is displayed.
• click on the Macro menu button, choose title 2
⇒ the menu button is updated.
• fill-in the Value of macro field with the following text:
Specification of the little_example.mch component
• click on the OK button to validate the correction
⇒ the “Add an object” window is closed and the object is added to the list in
the “Model Editor” window.
12. Correct the level of the second sub-paragraph
• select the eight object in the list
• click on the Cut button in the Edit menu to delete the object
⇒ the selected object is deleted from the list.
• select the sixth object from the list
• click on the Copy button in the Edit menu to store the object
• select the eight object from the list
• click on the Before button in the Paste sub-menu in the Edit menu
⇒ the stored object is inserted into the list.
• select the eight object from the list
• click on the Modify... button in the Edit
⇒ the “Modify an object” is displayed.
• replace the contents of the Value of macro field with the following text:
Metric for the little_example.mch component
16
Model Editor—User Manual
• click on the OK button to validate the modification
⇒ the “Add an object” window is closed and the object is added to the list in
the “Model Editor” window.
13. Correcting the error from step 7
• select the seventh object from the list
• click on the Modify... button in the Edit menu
⇒ the “Modify an object” window is displayed.
• double click on the little_example.mch file in the Files list
⇒ the “Modify an object” window is closed and the object is added to the list
in the “Model Editor” window.
14. Saving the model.
• click on the Save... button in the File menu
⇒ the “Save a model” window is displayed.
• click on the OK to validate the save
⇒ the “Save a model” window is closed and the LITTLE_EXAMPLE.mdl file is
saved.
15. Quitting the application.
• click on the Quit button in the File menu
⇒ a confirm window is displayed.
• click on the OK button to confirm quitting
⇒ the “Model Editor” window is closed and the “Project components” window
is displayed.
• click on the Quit Project button
⇒ the “Project components” window is closed and the “Atelier B project” window is displayed.
• click on the Quit Environment button
⇒ a confirm window is displayed.
• click on the OK button to confirm quitting
USING THE PROGRAM
17
4
Using the Program
4.1 Presentation of the Various Objects Handled by the Model
Editor
A number of objects enable building a project documentation model. Some are used to
make up the document’s page layout such as titles and page breaks. Others comprise
data relating to the project being processes such as cross-references, specifications or rules
added to the proof. The latter comprise diverse data such as the inclusion of free-form
text or PostScript files (refer to figure 4.1).
4.1.1 Objects Used for the Page Layout
Titles
The title 1 to title 5 type objects are used to manage the different paragraph title
levels.
The title 1 object is a level 1 title. The title 2 object is a level 2 title, and so on until
level 5.
For example:
• object: title 1
INTRODUCTION
is translated in the project document as: 1 INTRODUCTION
• object: title 3
Presentation
is translated in the project document as: 2.1.3 Presentation
Paragraph numbering is automatically performed by the Model Editor.
New Pages
The newpage object is used to start a new page.
4.1.2 Project Related Information
The table showing global project status
The global status type object is used to include in the project document model a table
showing the global status of the project.
18
Model Editor—User Manual
Figure 4.1: Objects handled by the Model Editor
For example the table showing the global status of the simple document project will be as
follows:
Component
little example
little example 1
little example 3
main ltx
main ltx 1
TOTAL
TC
OK
OK
OK
OK
OK
OK
GOP
OK
OK
OK
OK
OK
OK
nbObv
7
7
12
3
16
45
nbPO
1
4
5
0
5
15
nUn
0
2
0
0
0
2
%Pr
100
50
100
100
100
86
B0c
OK
OK
OK
OK
OK
OK
Reminder: The table showing the global status of the project comprises the following
information:
• column 1 shows the name of the project component
• column 2 shows a Type Checker execution indicator
• column 3 shows a Generating proof obligations execution indicator
• column 4 shows the number of trivial proofs
• column 5 shows the total number of proofs (excluding trivial proofs)
• column 6 shows the number of proofs (excluding trivial proofs) that are not proven
USING THE PROGRAM
19
• column 7 shows the percentage of proofs (excluding trivial proofs) that are proven
• column 8 shows the name B0 Checker execution indicator
The table showing the status of a project component
The status object is used to include in the project document model, the table that
represents the status of a project component.
For example, the table showing the status of the little_example component in the simple
document project (object: status little_exemple) is translated in the project document
by:
Initialisation
enter
maximum
little example
NbObv
0
5
2
7
NbPO
1
0
0
1
NbPR
1
%Pr
100
1
100
Reminder: The table showing the status of a project component is made up as follows:
• column 1 shows the name of the component operation
• column 2 shows the number of trivial proofs
• column 3 shows the total number of proofs (excluding trivial proofs)
• column 4 shows the total number of proofs (excluding trivial proofs) proven
• column 5 shows the percentage of proofs (excluding trivial proofs) that are proven
• the last line gives the totals of the above columns
20
Model Editor—User Manual
Cross-References
The dictionary type object is used to include in the project document model, the
project’s cross references.
For example, the project cross references for the simple document project are translated
in the project document by:
... B ...
BASIC ARITHMETIC
machine
used in main ltx 1 (IMPORTS)
BASIC IO
machine
used in main ltx 1 (IMPORTS)
.
.
.
... Z ...
zz
variable
defined in little example 1
used in little example 1 (INVARIANT)
used in little example 1 (enter)
used in little example 1 (maximum)
used in little example 3 (INVARIANT)
modified in little example 1 (INITIALISATION)
modified in little example 1 (enter)
Reminder: The cross-references list in alphabetical order the identifiers (variable, operation, machine, ...) for all project components. For each identifier, the tool shows:
• components that define it
• components that use it
• components that modify it
In the latter two cases, the tool shows:
• in which clause the identifier is used or modified
• in which operation the identifier is used or modified
USING THE PROGRAM
21
B sources
The B file and Normalized B file type objects serve to include in the project document
model the B source of a project component or the sources of rules added to the proof of
a project component.
For example:
• the B source of the main_ltx.mch component in the simple document (object name:
B file main_ltx.mch) is translated in the project document as:
MACHINE
main ltx
OPERATIONS
main = skip
END
In this case the user presentation is retained.
• the B source for component main_ltx.mch in the simple document
(object: Normalized B file
ment as:
main_ltx.mch) is translated into the project docu-
MACHINE
main ltx
OPERATIONS
main = skip
END
In this case the user presentation is standardized.
4.1.3 Various Information
Including free form text
The paragraph and include text type objects are used to include free form text in the
project document model.
For example:
• free form text from a simple document file
the include text
little_example.txt object is translated into the project document by including the contents of the file as is into the document.
• newly entered free form text
the paragraph ... object is translated into the project document by including into
the document any text entered.
22
Model Editor—User Manual
Figure 4.2: Model editor commands
Including a PostScript file
The include PS type object is used to include PostScript files into the project document
model.
In the simple document, the include PS LITTLE_EXAMPLE.ps object is translated into
the project document by inclusion the dependency graph for the project generated using
the vcg tool.
4.2 Presenting the Various Model Editor Commands
Various types of commands allow the handling of Model Editor objects. Some commands
are used for printing or displaying objects. Others serve for file management. The latter
serve to create the project document (refer to figure 4.2).
4.2.1 Edit Commands
Commands for adding an object
The commands for adding an object in the Model editor are: Append and Insert.
The following usage mode applies:
• select an object from the list (except if the list is empty)
• click on the Append... or Insert... button in the Edit menu
USING THE PROGRAM
23
or place the cursor on the list and type Control A or Control I
• fill-in the add modification window
• validate the addition
The object is added to the list after the selected object when the Append command is
used and before it when the Insert command is used.
The object modification command
The command used to modify an object in the Model editor is: Modify.
It is used as follows:
• select an object from the list
• click on the Modify... button in the Edit menu
or place the cursor on the list and press Control M
• modify the parameters of the add-modification window
• validate the modification
The modified object replaces the selected object in the list.
The object delete command
The command used to delete objects from the Model editor is: Cut.
It is used as follows:
• select one or more objects from the list
• click on the Cut button in the Edit menu
or place the cursor on the list and press Control X
The selected objects are deleted from the list and stored, they can then be called back
using the Paste-Before and Paste-After commands.
Adding object commands
The commands that can be used to add an object to the Model editor are: Paste-Before
and Paste-After.
They are used as follows:
• select an object from the list (except when the list is empty)
• click on the Before or After button in the Paste sub-menu of the Edit menu or
place the cursor on the list and press Control T or Control D
Objects are added to the list after the selected object when the Paste-After command
is used and before when the Paste-Before command is used.
Objects are only added if there are objects in memory (Cut or Copy command used first).
24
Model Editor—User Manual
The copy objects command
The command used to copy objects in the Model editor is: Copy.
It is used as follows:
• select one or more objects from the list
• click on the Copy button in the Edit menu
or place the cursor on the list and type Control C
The selected objects are now saved in memory and can be retrieved later using the
Paste-Before or Paste-After commands.
4.2.2 Display Commands
These commands are used when there are a number of paragraphs in the project documentation model, to reduce their number in order to have a better view of the project
document.
The commands used to display objects in the Model editor are: Fold, Unfold and
Unfold all.
The Fold command enables displaying objects in fold mode. The Unfold and Unfold all
commands enable displaying objects in the unfold mode.
The fold-unfold modes
The fold mode enables displaying only the paragraph title (selected for display in fold
mode) and not its contents. The unfold mode is used to display the paragraph title and
its contents.
For example:
• the following paragraphs are displayed in unfold mode
>>
>>
>>
>>
title 2
title 3
status
title 3
B file
title 2
Component little_example
Metric
little_example
Source B
/home/PROJECT/LITTLE_EXAMPLE/little_example.mch
Component little_example_1
• the Metric paragraph is displayed in fold mode
>>
<<
>>
>>
title 2
title 3
title 3
B file
title 2
Component little_example
Metric
Source B
/home/PROJECT/LITTLE_EXAMPLE/little_example.mch
Component little_example_1
USING THE PROGRAM
25
• the Component little_example paragraph is displayed in fold mode
<<
>>
title 2
title 2
Component little_example
Component little_example_1
The display command in fold mode
The command is used as follows:
• select an object from the unfolded title type list
• click on the Fold button in the View menu
or place the cursor on the list and press Control F
Folded objects are no longer shown in the list.
Display commands in unfold mode
The Unfold command mode is used as follows:
• select an object from the title and folded type list
• click on the Unfold button in the View menu
or place the cursor on the list and type Control U
The unfolded objects become visible in the list.
The Unfold all command is used as follows:
• click on the Unfold all button in the View menu
or place the cursor in the list and press Control S
All of the objects in the list are displayed in unfolded mode.
4.2.3 File Management Commands
The Load command
The command used to load a documentation model into the Model editor is: Load.
It is used as follows:
• click on the Load... button in the File menu
• fill-in the file management window
• valide loading
The objects from the chosen documentation model file are loaded into the list.
26
Model Editor—User Manual
The Create command
The command used to create a new documentation model in the Model editor is: Create
model.
It is used as follows:
• click on the Create model... button in the File menu
• fill-in the file management window
• validate creation
Objects created from the basic model are loaded into the list.
The Save command
The command used to save a documentation model in the Model editor is: Save.
It is used as follows:
• click on the Save... button in the File menu
• fill-in the file management window
• validate the save
The objects in the list are saved. The documentation model file is created.
4.2.4 Document creation command
The command used to create a project document is: Document.... Its parameters are
determined by the type of word processor chosen to generate the project document and
by the project document output mode.
The word processor
There is a choice between two possible word processors: LATEX * or Interleaf *.
LATEX * is used as follows:
• select the Latex radio button from the document sub-window
Interleaf * is used as follows:
• select the Interleaf radio button from the document sub-window
USING THE PROGRAM
27
The output mode
A choice between three output modes is possible: creating a project document, displaying
on-screen (for LATEX * only) and printing-out.
For creation, it is used as follows:
• select the Create radio button from the document sub-window
For display, it is used as follows:
• select the Show radio button from the document sub-window
For printing-out, it is used as follows:
• select the Print radio button from the document sub-window
The print-out may be a full or partial one.
For a full print-out, it is used as follows:
• select the All the Pages radio button from the print sub-window
For a partial print-out, it is used as follows:
• select the Some Pages radio button from the print sub-window
• fill-in (optional) the Printer Name, from and to fields (by default from and to are
set to 1)
Creating a document
It is used as follows:
• project documentation parameter setting
• click on the Document... button in the sub-document window
• fill-in the file management window
• validate the action
The project document is generated and displayed or printed depending on the parameters
chosen.
4.2.5 Miscellaneous Commands
The first page
The project document may be generated with a first page.
It is used as follows:
• select the First page radio button
28
Model Editor—User Manual
• fill-in (optional) the Title, Sub title fields, Author and Date
To avoid having a first page in the generated project document.
It is used as follows:
• de-select the First page radio button
The table of contents
The project document may be generated with a table of contents.
It is used as follows:
• select the Table of contents radio button
To avoid having a table of contents in the project generated.
It is used as follows:
• de-select the Table of contents radio button
Warning: Interleaf * does not allow automatically generating a table of contents.
The file management window
The files management window is used to choose a file (refer to figure 4.3).
It is called-up by the following commands: Load, Save, Create model or Document.
Initialization Depending on the command used to call-up the file management window,
the initializations procedures differ.
• For the Load function, the Directory name field is initialized with the path to the
current project data base and the File name field is initialized with the file name:
<project_name>.mdl.
• For the Save function, the Directory name field is initialized with the path to the
file loaded and the File name file is initialized with the name of the loaded file.
• For the Create model function, the Directory name field is initialized with the
<atelierB>/press/lib/bdoc path and the File name field is initialized with the
modele.mdl file name.
• For the Document function, the Directory name field is initialized with the path to
the current project and the File name field is initialized with <project_name>.tex
(for LATEX *) or <project_name>.doc (for Interleaf *).
The lists are initialized according to the contents of the Directory name field.
USING THE PROGRAM
29
Figure 4.3: File management window
Updating the file path The file path is updated in two ways:
• double click on an object in the Directories list
or
• enter the path in the Directory name field
• press enter
The lists and the Directory name field are updated.
Updating the file name The file name is updated in two ways:
• click on an object in the Files list
or
• enter the name in the File name
Validation
There are three ways to validate the full file name:
• double click on an object in the Files list
or
30
Model Editor—User Manual
• type enter in the File name field
or
• click on the OK button
The file comprising the path from the Directory name field and the name from the
File name field is chosen.
The add-modify window
The add-modify window is used to add or modify an object in the list.
It is called-up by the following commands: Append and Insert to add an object and by
the Modify command to modify an object.
The add and modify actions are performed on the objects described in the 4.1 paragraph.
In the remainder of this section, the manner of choosing the file is identical to that described in the 4.2.5 paragraph.
Initialization Depending on the command used to call-up the add-modify window, the
initialization procedure varies.
• For the Append or Insert commands, all of the fields are blank except for the
Directory name field that points to the project specifications for the status object
and that points to the project data base in other cases. The lists are updated
according to the Directory name field.
• For the Modify commands, the fields are assigned with the values of the macro to
modify.
Action on objects: page layout
objects.
This window is used to add or modify title type
It is used as follows:
• click on the Macro manu button, choose a title from 1 to 5
• fill-in the Value of macro field
• click on the OK button to validate the action
Action on the object: new page
object.
This window is used to add or modify a newpage
It is used as follows:
• click on the Macro menu button, chose newpage
• click on the OK button to validate the action
USING THE PROGRAM
31
Action on the object: table showing global project status This window is used
to add or modify a global status type object.
It is used as follows:
• click on the Macro menu button, chose global status
• click on the OK button to validate the action
Action on the object: table showing component status This window is used to
add or modify a status type object.
It is used as follows:
• click on the Macro menu button, choose status
• choose a file
• validate the action
Action on the object: cross references This window is used to add or modify a
dictionary type object.
It is used as follows:
• click on the Macro menu button, choose dictionary
• click on the OK button to validate the action
Action on objects: B source This window is used to add or modify B file or
Normalized B file type objects.
It is used as follows:
• click on the Macro menu button, choose B file or Normalized B file
• choose a file
• validate the action
Action on objects: PostScript files This window is used to add or modify an object
of type include PS.
It is used as follows:
• click on the Macro menu button, chose include PS
• fill-in (option) the Height, Width and Angle of rotation fields
• choose a file
• to validate the action
32
Model Editor—User Manual
Action on objects: free form text
or include text type objects.
This window is used to add or modify paragraph
It is used as follows for the paragraph object:
• click on the Macro menu button, choose paragraph
• fill-in the Value of macro data entry field
• click on the OK field to validate the action
It is used as follows for the include text object:
• click on the Macro menu button, choose include text
• choose a file
• validate the action
GLOSSARY
5
33
Glossary
MMI Man Machine Interface.
LATEX Document composition method.
Interleaf Software used to manage, and create documents.
Documentor An Atelier B tool used to generate project documentation from a document
model.
34
Model Editor—User Manual
LITTLE EXAMPLE PROJECT DOCUMENTATION
A
35
LITTLE EXAMPLE Project
Documentation