1
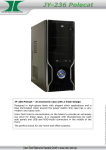
iSR series iSR 10, iSR 11, iSR 20 User Manual isel Germany AG, D-36124 Eichenzell, Bürgermeister-Ebert-Str. 40 (06659)981-0 (06659)981-776 The information, technical data and dimensions contained in this print have been up-to-date when published. Any eventually existing misprints and mistakes cannot be excluded however. We are thankful for any suggestion for improvement and indication of mistakes. Please note that the used software- and hardware descriptions of each individual company are generally subject to protection of trademarks and patent law. All rights reserved. It is not permitted to reproduce or electronically process, duplicate or spread any part of our prints in any way (print, copy etc.) without written permission of isel Germany AG. Manufacturer: isel Germany AG Bürgermeister-Ebert-Straße 40 D-36124 Eichenzell Tel.: (06659) 981-0 Fax: (06659) 981-776 Email: [email protected] http://www.isel.com Status: 09/2009 CB Table of contents 1 Introduction ......................................................................................................................... 1 1.1 Safety symbols ............................................................................................................... 1 1.2 Safety instructions .......................................................................................................... 1 2 Types ..................................................................................................................................... 2 3 Product description ............................................................................................................. 3 3.1 Technical data ................................................................................................................ 3 3.2 Dimension drawings ....................................................................................................... 5 3.3 Power supply and control connectors............................................................................. 7 3.3.1 3.3.2 3.3.3 4 Power supply and control connectors - iSR10 ...................................................................... 7 Power supply and control connectors - iSR10 ...................................................................... 8 Power supply and control connectors – iSR20 ..................................................................... 9 Interfaces ............................................................................................................................ 10 4.1.1 4.1.2 4.1.3 PC interfaces iSR10 ............................................................................................................ 10 Schnittstellen - iSR11 ......................................................................................................... 11 PC interfaces iSR20 ............................................................................................................ 14 5 Mounting ............................................................................................................................ 15 6 Switch on the control PC .................................................................................................. 15 7 Maintenance and Cleaning ............................................................................................... 16 8 EC Declaration of Conformity ......................................................................................... 17 9 Bibliography ...................................................................................................................... 18 iSR series User Manual 1 Introduction 1.1 Safety symbols Attention This symbol signalizes that there is danger for peoples life und health. Danger This symbol signalizes that there is danger for material, machine and environment. Information This symbol signalizes important information. 1.2 Safety instructions The Control PC series iSRxx are designed to current technical and recognized rules. The device may only be used if it is in correct condition. Any faults have to be eliminated immediately. Neither children nor non-authorized persons are allowed to put the device into operation. The device may only be used for the intended use. All work on the module must be executed from authorized personal regarding electrical industry rules and accident prevention regulations. Assembly and use of operating material has to be according to the standards of conformity declaration. In case of in proper use even the observation the respective rules and standards does not protect against physical damages and damage to property. Do not expose the device to high humidity or high vibrations. Please take care of the instruction manual. Be sure that all users know the instructions. Ignoring the instruction manual can lead to damage, heavy physical damage or to death. Page - 1 iSR series User Manual 2 Types The CAN-PC´s iSR 10/11 are PC-based control computers on a favorable price-performanceratio. The housings are optimized for control box installation. They vary in different configuration features: Typ iSR10 Form-Faktor Part.-No.: 371060 MiniITX CAN-Interface 1 x PCI CAN Interface – 1 x RJ45 CAN Out iSR11 Part.-No.: 371062 MiniITX 1 x PCI CAN Interface – 1 x RJ45 CAN Out 1 x CAN IO (16x In, 8xOut, 1x Analog Out) µATX 1 x PCI CAN Interface – 1x RJ45 CAN Out option: 2 x RJ45 CAN Out, 2 Kanal CAN Out Interface iSR20 Part.-No.: 371057 Page - 2 iSR series User Manual 3 Product description 3.1 Technical data dimensions (L x H x W): weight: admissible ambient: humidity: safety class: power supply voltage: use: iSR10 210 x 75 x 200 mm 1,2 kg 12 V DC desk controller / control box mounting form-factor: Mini-ITX CPU: Intel® ATOM 230, 1,6 GHz 1 x DDR2-RAM socket RAM: DDR2-RAM ≥ 1 GB expansion slots: 1 x PCI HDD: 2,5“ HDD ≥ 160GB,SATA external power supply, DC-DC power supply unit: 12V/ min. 80W Windows® Embedded operating system(optional): POSReady 2009 iSR11 210 x 75 x 200 mm 1,4 kg 0°C bis 55°C max. 90% non condensable IP20 12 V DC desk controller / control box mounting Mini-ITX Intel® ATOM 230, 1,6 GHz 1 x DDR2-RAM socket DDR2-RAM ≥ 1 GB 1 x PCI 2,5“ HDD ≥ 160GB,SATA external power supply, DC-DC 12V/ min. 80W Windows® Embedded POSReady 2009 Page - 3 iSR20 280 x 70 x 180 mm 2,6 kg AC 115/230 V 60/50Hz control box mounting µATX Intel® ATOM 230, 1,6 GHz 1 x DDR2-RAM socket DDR2-RAM 512 MB 1x PCI 2,5“ HDD ≥ 160GB,SATA PC power supply unit max. 180 Watt Windows® Embedded POSReady 2009 iSR series User Manual connectors: iSR10 1 x VGA (On Board) 2 x PS2 (mouse, keyboard) 4 x USB 2.0 case front: 1 x LAN 10/100MBit 1 x COM , RS232 1 x RCA, Audio 1 x LPT (parallel-port) power supply connector: 1 x 9-pin Sub-D connector for PC power supply and external PC-start switch iSR11 1 x VGA (On Board) 2 x PS2 (mouse, keyboard) 4 x USB 2.0 1 x LAN 10/100MBit 1 x COM , RS232 1 x RCA, Audio 1 x LPT (parallel-port) 1 x 9-pin Sub-D connector for PC power supply, CAN-IO power supply and external PCstart switch iSR20 1 x VGA (On Board) 2 x PS2 (mouse, keyboard) 4 x USB 2.0 1 x LAN 10/100MBit 1 x COM , RS232 1 x RCA, Audio 1 x LPT (parallel-port) 230/115V AC main power supply connector 1 x socket 8-pin for external PCStart switch, HDD-LED, PWRLED, power supply TFT CAN-I/O board with 16 x digital inputs 8 x digital outputs 1 x 8-bit analog output CAN interface cards: front side: 1 x CAN PCI interface, RJ45 CAN Out, 1-channel 1 x RJ45 CAN-Out, 1- channel bottom side: 1 x RJ45 CAN-In 1- channel (connector not used) 1 x CAN PCI interface, RJ45 CAN Out, 1-channel 1 x RJ45 CAN-Out 1- channel 1 x RJ45 CAN-In 1- channel for CAN-IO module Page - 4 1 x CAN PCI interface, RJ45 CAN Out, 1(2)-channel iSR series User Manual 3.2 Dimension drawings dimension drawing iSR10 dimension drawing iSR11 Page - 5 iSR series User Manual dimension drawing iSR20 Page - 6 iSR series User Manual 3.3 Power supply and control connectors 3.3.1 Power supply and control connectors - iSR10 9-Pin Sub-D connector Pin 1 2 3 4 5 6 7 8 9 function PC-start + PC-start not used not used not used +12 V DC GND not used not used description PC-start make contact + PC-start make contact - Power supply voltage +12V DC for PC 12 V – GND The pins 1 and 2 will be used if the iSR is mounted in a control box or a machine. In this case you cannot use the PC start button on the front side of the case. Please connect functionally the same button with a make contact to the pins. Page - 7 iSR series User Manual 3.3.2 Power supply and control connectors - iSR10 RJ45 connector, CAN-input for mounted CAN-IO-16/16 Baugruppe RJ45 connector, CAN-output for CAN devices (iMD10, iMD20) Anschlussstecker SubD9 Pin 1 2 3 4 5 6 7 8 9 function PC-start + PC-start not used not used not used +12 V DC GND GND + 24 V DC description PC-start make contact + PC-start make contact - Power supply voltage +12V DC for PC 12 V – GND 24 V – GND Power supply voltage +24V DC for CAN-IO module The pins 1 and 2 will be used if the iSR is mounted in a control box or a machine. In this case you cannot use the PC start button on the front side of the case. Please connect functionally the same button with a make contact to the pins. Page - 8 iSR series User Manual 3.3.3 Power supply and control connectors – iSR20 CAN PCI – interface card, 1 x RJ45 CAN-Out line optional: CAN PCI – interface card, 2 x RJ45 CAN-Out lines Phoenix contact 8-pin Socket Pin Function 1 PWR BTN + 2 PWR BTN GND 3 PWR LED GND 4 PWR LED +5VDC 5 HDD LED GND 6 HDD LED +5VDC 7 +12VDC 8 GND Description Connector for Power button + Connector for Power button GND Connector for PWR status LED GND Connector for RUN status LED + Connector for HDD activity LED GND Connector for HDD activity LED + Power supply for LCD monitor +12V Power supply for LCD monitor GND main power supply line 115/230V AC, 60/50 Hz Page - 9 iSR series User Manual 4 Interfaces 4.1.1 PC interfaces iSR10 Nr. Schnittstelle 1 PS/2 Mouse Connector for PS/2 Mouse 2 PS/2 keyboard Connector for PS/2 keyboard 3 Serial Interface COM1 Connector for a serial interface, type RS232 4 VGA Connector 15-pin VGA monitor 5 LAN 2x RJ45 connector for network 6 USB-Slots 4 x USB 2.0 Interface slots to connect peripheral USB devices 7 Sound-On-Board Line In, Line Out and Micro Input 8 isel-CAN-Interface Integrated CAN-PCI interface card with RJ45 CAN Out connector to communicate with isel CAN-bus components (e.g. IMDxx, CAN-IO-xx/xx) The ProNC/Remote installation CD contains the hardware driver for the CAN-PCI card. Normally the drivers will be installed during the initial operation of the control PC. . 9 LPT connector SubD25-pin socket printer port 10 PC-Start button Switch on iSR10, green lighting of the button signalizes “computer is on“ Page - 10 iSR series User Manual 4.1.2 Schnittstellen - iSR11 Nr. Schnittstelle 1 PS/2 Mouse Connector for PS/2 Mouse 2 PS/2 keyboard Connector for PS/2 keyboard 3 Serial Interface COM1 Connector for a serial interface, type RS232 4 VGA Connector 15-pin VGA monitor 5 LAN 2x RJ45 connector for network 6 USB-Slots 4 x USB 2.0 Interface slots to connect peripheral USB devices 7 Sound-On-Board Line In, Line Out and Micro Input 8 isel-CAN-Interface Integrated CAN-PCI interface card with RJ45 CAN Out connector to communicate with isel CAN-bus components (e.g. IMDxx, CAN-IO-xx/xx) The ProNC/Remote installation CD contains the hardware driver for the CAN-PCI card. Normally the drivers will be installed during the initial operation of the control PC. . 9 LPT connector SubD25-pin socket printer port 10 PC-Start button Switch on iSR10, green lighting of the button signalizes “computer is on“ Page - 11 iSR series User Manual CAN-IO-module No. 1 description CAN-Out RJ45 – connector for additional isel CAN bus components No. 5 description GND pin 1 2 2 digital input port 1 pin 1 2 3 4 5 6 7 8 3 4 (left to right) In1 In2 In3 In4 In5 In6 In7 (für Start-Taste) In8 (für Stop-Taste) +24VDC pin 1 2 3 4 6 (left to right) +24V +24V +24V +24V (left to right) In9 In10 In11 In12 In13 In14 In15 In16 Page - 12 (left to right) Out1 Out2 Out3 Out4 Out5 Out6 (Spindel Start) Out7 (Lampe Start) Out8 (Lampe Stop) analog output 8-Bit pin 1 2 digital input port 2 pin 1 2 3 4 5 6 7 8 digital output port Pin 1 2 3 4 5 6 7 8 7 (left to right) GND GND (left to right) +Analog GND iSR series User Manual Digital input wiring The binary user inputs are realized using 24V-DC process voltage. Do not short 24V DC reference potential of the PC with GND or case ground. The binary user inputs must be wired as shown opposite. (InX means Input 1 to 8). The current load amounts 8mA per Input. Digital output wiring The binary user inputs are realized using 24V-DC process voltage. Integrate outputs in your application as follows: The maximum load of the relay outputs is 5A. Analog output wiring Use this 0 … 10V output to drive a frequency inverter for a working spindle. Maximum current load is about 15mA! Page - 13 iSR series User Manual 4.1.3 PC interfaces iSR20 No. Interface 1 PS/2 Mouse Connector for PS/2 Mouse 2 PS/2 keyboard Connector for PS/2 keyboard 3 Serial Interface COM1 Connector for a serial interface, type RS232 4 VGA Connector 15-pin VGA monitor 5 LAN 2x RJ45 connector for network 6 USB-Slots 4 x USB 2.0 Interface slots to connect peripheral USB devices 7 Sound-On-Board Line In, Line Out and Micro Input 8 isel-CAN-Interface Integrated CAN-PCI interface card with RJ45 CAN Out connector to communicate with isel CAN-bus components (e.g. IMDxx, CAN-IO-xx/xx) The ProNC/Remote installation CD contains the hardware driver for the CAN-PCI card. Normally the drivers will be installed during the initial operation of the control PC. 9 LPT connetcor SubD25-pin socket printer port Page - 14 iSR series User Manual 5 Mounting Please use the mounting holes on the iSRxx cover plates and fixate it on the control box base plate. Pay attention that there is enough free zone on the louvers for air circulation. Ignoring this fact causes overheat and potential defect of the iSRxx. Please avoid extreme environment conditions. Protect the control PC for dust, humidity and heat. Do not cover the louvers!! 6 Switch on the control PC Depending on type power up of the control PCs is realized over the 8-pin connector (iSR20), the integrated PC-start button on case front side or the 9-pin Sub-D connector on the case bottom side. If the operating system is installed you can switch on the iSR and run the operating system. If not you have to buy an operating system license and install the operating system yourself. Switch on iSR10, iSR11 Press the green button on the front side of the case shortly to switch on iSR10 / iSR11. If the computer runs the button is green lighted (chapter Fehler! Verweisquelle konnte nicht gefunden werden. and 4.1.2). In case of mounting the iSR10 / iSR11 into a control box or a machine you have to connect an external PC-start button (make contact) as described in chapters 3.3.1 and Fehler! Verweisquelle konnte nicht gefunden werden.. If the iSR cannot be switched on please check the power supply lines and power supply units. Therefore have a look at chapters 3.3.1 and Fehler! Verweisquelle konnte nicht gefunden werden.. Switch on iSR20 via 8-pin connector Connect a button (make contact) to the pins 1 and 2. Furthermore you can connect your own LEDs (+5VDC) to show run status and HDD activity. Pay attention to the pin allocation. Pay attention to the pin allocation described in chapter Fehler! Verweisquelle konnte nicht gefunden werden.. Using the iSR20 with a isel Control-Panel To use the iSR20 with an isel CNC-Control Panel connect the 8-pin plug of the Control-Panel with the 8-pin Socket of the iSR20 (see also /1/ CNC-control panel - user manual). This connection is necessary for the Power-button, the status LEDs and the power supply of the TFT. To switch the iSR20 on/off use the button on the right side of the control panels case. Page - 15 iSR series User Manual The power LED (green) on the front side of the control panel should be on if the iSR20 is running. 7 Maintenance and Cleaning Maintenance The control computers iSRxx series are maintenance free. Cleaning Switch off the connected computer and remove the power supply. Use a wet, soft cloth to clean the display. Don’t use cleaning agents or abrasives. This causes scratches on the LCD monitor. Be sure that no dampness comes into the case. Page - 16 iSR series User Manual 8 EC Declaration of Conformity EC - Declaration of Conformity Der Hersteller The manufacturer isel Germany AG Bürgermeister-Ebert-Str. 40 D-36124 Eichenzell erklärt hiermit, dass folgendes Produkt hereby declares that the following product Geräteart: Steuerrechner iSR Device: control PC iSR Typ: iSR10, iSR11, iSR20 Type: Art.-Nr.: iSR10: 371060 iSR11: 371062 iSR20: 371057 Product - No.: mit den Vorschriften folgender Europäischer Richtlinien übereinstimmt: complies with the requirements of the European Directives: EG-Richtlinie 2004/108/EG EMV Richtlinie EC-Directive 2004/108/EC EMC directive EG-Richtlinie 73/23/EWG Niederspannungsrichtlinie EC-Directive 73/23/ECC low voltage directive Folgende harmonisierte Normen wurden angewandt: Following harmonized standards have been applied: EN 61000-6-2:2005 EMV - Fachgrundnorm - Störfestigkeit für Industriebereich EMC - Generic standards - Immunity for industrial environments EN 61000-4-2:2007 EMV - Prüf- und Messverfahren - Prüfung der Störfestigkeit gegen Entladung statischer Elektrizität (ESD) EMC - Testing and measurement techniques; Electrostatic discharge immunity test EN 61000-4-4:2004 EMV - Prüf- und Messverfahren - Prüfung der Störfestigkeit gegen schnelle transiente elektrische Störgrößen (Burst) EMC - Testing and measurement techniques - Electrical fast transient/burst immunity test EN 61000-4-5:2006 EMV - Prüf- und Messverfahren - Prüfung der Störfestigkeit gegen energiereiche Impulse (Surge) EMC - Testing and measurement techniques - Surge immunity test EN 61000-4-11:2004 EMV - Prüf- und Messverfahren - Prüfung der Störfestigkeit gegen Spannungseinbrüche / Spannungsunterbrechungen EMC - Testing and measurement techniques - Voltage dips, short interruptions and voltage variations immunity tests EN 61000-6-4:2007 EMV - Fachgrundnorm - Störaussendung Industriebereich EMC - Generic standards - Emission standard for industrial environments DIN EN 55011:2007 Industrielle, wissenschaftliche und medizinische Hochfrequenzgeräte (ISM-Geräte) Funkstörungen - Grenzwerte und Messverfahren Industrial scientific and medical (ISM) radio-frequency equipment - Electromagnetic disturbance characteristics - Limits and methods of measurement Dermbach, 13.01.2009 __________________________________ Hugo Isert, Vorstandsvorsitzender / chairman Page - 17 iSR series User Manual 9 Bibliography /1/ CNC-Control panel – user manual, status 09/2009 User manuals and operating instructions for download you can find on: www.isel-data.de/manuals Page - 18