1
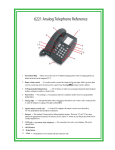
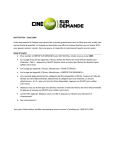
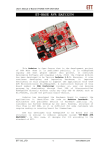
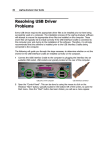
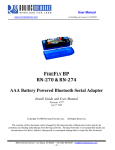
Universal MultiCharging Station CR32 Tablets SCD (Smart Current Detection) Technology FM Clock Radio With Alarm & MIDs Charge 4 Devices While Holding 3 in Cradles LED Night Light Contents Thank you for purchasing our product. For operation and security, read this manual carefully and keep it handy for future reference. Contents............................................................................................................................................................................01 Features............................................................................................................................................................................01 Warnings and Precautions..............................................................................................................................................02 Important Safety Instructions.........................................................................................................................................03 Quick Start On Charging Your Device......................................................................................................................04-09 What’s in the Gift box......................................................................................................................................................10 Location of Functions................................................................................................................................................11-12 Operations...................................................................................................................................................................13 -16 Setting up the unit..............................................................................................................................................................13 Using the unit................................................................................................................................................................13-16 Troubleshooting...............................................................................................................................................................17 Features Charge any 4 portable devices at once • Features SCD Technology Smart Current Detection ensures proper device protection by adjusting the current flow needed to each device. • Charges 4 Devices, 3 in Cradles Charge any 4 devices, with capability of 3 standing upright, simultaneously. • FM Clock Radio Alarm Listen to FM radio or play music from your Smart device and still wake up with Alarm Clock. • LED Night Light Note: Charges all smart phones and tablets of 5V from 0~2.1A. 01 MOISTURE AND CONDENSATION If unit is exposed to moisture and extreme cold temperatures, then moved to a warm environment, condensation may form on internal components. Under these circumstances, powering the unit on may cause damage to the unit or cause harm to the user. Allow the unit to stand in a warm environment for 1 to 3 hours and allow the unit to air dry safely. WARNING: To reduce the risk of fire or electric shock, do not expose this apparatus to rain or moisture. CAUTION: Use of controls or adjustments or performance of procedures other than those specified may result in hazardous radiation exposure. *Caution Marking and rating plate was located at bottom enclosure of the apparatus WHEN IN USE Do not use this unit in extremely hot, cold, dusty, or humid conditions. Do not restrict the air flow of the unit by placing it on carpet or covering. CAUTION RISK OF ELECTRIC SHOCK DO NOT OPEN FCC Information This device complies with part 15 of FCC Rules. Operation is subject to the following two conditions: (1). This device may not cause harmful interference. (2). This device must accept any interference received, including interference that may cause undesirable operation. Main plug is used to disconnect device and it should remain readily operable during intended use. In order to disconnect the apparatus from the mains completely, the mains plug should be disconnected from the mains socket outlet completely. (for apparatus with power cordset as disconnect device) Battery shall not be exposed to excessive heat such as sunshine, fire or the like. Location of label on the apparatus if that label was affixed under a lid or on the bottom of the apparatus with a mass not exceeding 7kg. SAFETY When connecting or disconnecting the AC cord, grip the plug and not the cord itself. Pulling the cord may damage it and create a hazard. When you are not going to use the unit for a long period of time, disconnect the AC cord. 02 03 Quick Start On Charging Your Device Remove items from package Install 2pcs of AAA batteries Connect unit to power outlet AC 100 V~ 240 V How to use the CR32 to charge your device 1. Connecting your devices and the unit; a) Flip open back panel b) Connect your device to a USB port OPEN Flat Bott om Phon es OPEN Tablets Round Bo ttom Ph ones 04 & MIDs Other D evices Quick Start On Charging Your Device 2. Connect your device to any of the 4 USB ports available For phones and small devices, 4pcs of USB ports can be applied Tablets must be connected to these designated red USB ports (DC 5V/2.1A) "~ 7" 3. Wrap your cord: Leave 6 05 Quick Start On Charging Your Device 4. Your phone's shape will determine if an insert is needed. Use the insert for flat bottom phones. Round bottom phones do not need the insert. Optional Insert A B For FLAT bottom phones For ROUND bottom phones 5. Wrap excess cable around cable organizer leaving enough cable to allow phone to be inserted into cradle. a. For FLAT bottom phones 1. PUSH 2. LOCK CLOSE 06 Quick Start On Charging Your Device b. For ROUND bottom phones, take out the insert. 1. PUSH 2. LOCK CLOSE c. For other devices CLO SE 07 Quick Start On Charging Your Device AUX IN cable d. For TABLETS & MIDs AUX IN port is available to listen to any device's media. Connect headphone jack to AUX IN with provided cable. 1. PUSH 2. LOCK CLOS Close rear panel after connection is complete, then put the device into the cradle. 08 E Quick Start On Charging Your Device 6. Disconnect and leave the USB cord for easy re-connection If necessary, disconnect your USB cable from your existing smart phone power adaptor, then use the charging cable that comes with your phone. Remove USB cable from 120V adaptor NOTE: Old model phones may not come with a USB charging cable. Contact your phone's service provider or review the cables available in this catalog. 09 What’s in the Gift box? CR32 BASE UNIT 3 Device Cradles & 3 Cradle Inserts Speaker (AUX IN) Cable USB Phone Charging Cable User’s Manual Quick Guide 10 Location of Functions 1. LED night light 4 . Back Cover 2. Function key panel 5. LCD display 3. Speakers 1 4 2 3 3 5 6. Holes and Nuts 7. Battery compartment 6 6 6 6 7 CR32 6 6 8 . FM antenna 6 9. Power cord 8 9 11 Location of Functions 10. AUX IN jack 11. USB charge ports(5V/2.1A) 10 AUX IN 11 11 LED NIGHT LIGHT LED NIGHT LIGHT LED NIGHT LIGHT CLOCK DISPLAY 10 SEC. OFF DIMMER MODE ON ON OFF CLOCK AUX IN FM RADIO ALARM ON / OFF MASTER VOLUME+ AUX IN / RADIO SET CLOCK CLOCK VOLUME- VOLUME EQUALIZER SET–HOLD ALARM1 ALARM2 ALARM1 ALARM2 SETTING FM OR BUZZER RADIO PRESET FM RADIO EQUALIZER FM / BZ TUNE+ TUNE- TUNE/TIME MEMORY PRESET SNOOZE / DIMMER SNOOZE 12. Cable Organizers 12 12 Operations SETTING UP THE UNIT 1. Install 2 AAA batteries (for backup only). 2. Plug the AC adaptor cable into a standard 120V AC wall socket. Adaptor is required to operate unit. Batteries are for backup only. 3. Time setting: a. Press and hold CLOCK button, until the Time/(Hour) display begins flashing; b. Press and release TUNE/TIME + or - to adjust Hours; c.Press and release CLOCK button switch to Minute adjusts mode(when it flashing); d. Do the same as hour adjusting(hold for faster setting). e. Press and release CLOCK to finish setting. USING THE UNIT Using the Alarms This unit has a dual alarm system so you can set two separate alarms to different alarm times. • Setting the Alarms Note: Alarm1 and Alarm2 are set the same way. 1. Press and hold the ALARM(1 or 2) button until the alarm time flashes display; 2. Adjust the alarm time like clock setting; 3. Press and release TUNE/TIME + or - to adjust alarm volume. 4. Select FM(radio) or BZ (buzzer) by FM/BZ as an alarm tone; 5. Press and release the related alarm button to finish setting; (you can see alarm icon shows on the display). • Reviewing, Arming and Disarming Alarm(Turn Alarm function On and Off) 1. Alarms are automatically armed when set. Active alarms are indicated by alarm types on the display. 2. To review the alarm time, press and release the ALARM button once. The related wake to source and alarm time will show on the display. 3. Press and release the ALARM ON/OFF button once to toggle it on or off. If the alarm is armed, the alarm type will light up. To Turn one of the alarms Off 1. Press and hold the related alarm button until it flashes on the display; 2. Skip the hour and minute adjust and go to the alarm tone type setting; 3. Press and release the FM/BZ to select alarm tone until no tone icon shows on the display. • Stop the Alarms When the alarm is sounding, press any key except the VOLUME+ or - and SNOOZE/ DIMMER to stop the alarm and reset it to next day. (The BUZZER alarm will last one hour if you do not stop it; The RADIO alarm will not stop) • Snooze Operation Default snooze time is 9 minutes. Press and release the SNOOZE/DIMMER after an alarm sounds. The alarm will be silenced for the snooze time then sound again. Snooze can be pressed several times. Charging your smart devices or other personal devices: USB ports are provided to charge up to 4 devices simultaneously. Connect the USB cable between your device and the unit. USB cable(s) are provided. 13 Operations • Smart devices stand: CR32 comes with 3 cradles for holding round bottom devices upright while charging. An insert for each cradle is provided to allow flat bottom devices to rest correctly in the cradle. Tablets 14 & MIDs Operations • Cable Organizer 1 2 CR32 has 2 cable organizers on the rear of unit to help keep cables wrapped and neatly organized. • Using the AUX IN Jack AUX IN jack is provided to hear your device's audio through the unit speakers. 1. Using the 3.5mm cable provided, connect one end to your device's audio-out or headphone jack and the other end to the CR32 AUX IN jack on the rear of unit. 2. Press and release the AUX IN/RADIO button until AUX appears in the screen. 3. Turn on and play your device. 4. Press and release the VOLUME + or – to adjust the system volume. You may need to adjust the volume on your external device as well. 5. Press and release the EQUALIZER button as needed to select CLASSIC, POP, JAZZ, R&B and ROCK. 6. To turn off the music, just turn off your device and un-plug the AUX IN cable. AUX IN LED NIGHT LIGHT LED NIGHT LIGHT LED NIGHT LIGHT CLOCK DISPLAY 10 SEC. OFF DIMMER Listening to Radio MODE ON ON OFF CLOCK ALARM ON / OFF MASTER VOLUME+ AUX IN FM RADIO AUX IN / RADIO SET CLOCK CLOCK VOLUME- VOLUME EQUALIZER SET–HOLD ALARM1 ALARM2 ALARM1 ALARM2 SETTING FM OR BUZZER RADIO PRESET FM RADIO EQUALIZER FM / BZ TUNE+ TUNE- TUNE/TIME MEMORY PRESET SNOOZE / DIMMER SNOOZE • Setting up Antenna Extend FM wire antenna fully for best reception. Do not strip, alter or attach to other antennas. • Tuning and Playing the Radio 1. Press and release the AUX IN/RADIO button as needed to turn on the unit and cycle through AUX IN, FM and TIME. 2. When the desired FM mode is selected, press and release the TUNE/TIME+ or – to tune the radio to a desired station. The current radio frequency appears in the display. Press and hold the TUNE/TIME + or – for a few seconds to scan for the next clear station. 3. You can set up to 10 presets. 15 Operations To memorize a station as a preset. A. Press and release the FM RADIO PRESET button as needed to step through the 10 presets(P01 –P10) to the number you wish to assign, and then hold the FM RADIO PRESET button until the selected preset number begins flashing in the display. B. Press and release the TUNE/TIME + or – to tune the radio to a desired station. C. Press and release the FM RADIO PRESET button to confirm the setting. Repeat A-C to preset up to 10 stations per band. 4. Press and release the VOLUME + or – to adjust the system volume. You may need to adjust the volume on your external device as well. 5. Press and release the EQUALIZER button as needed to select CLASSIC, POP, JAZZ, R&B and ROCK. • Dimmer Operation During normal operation (when no alarm is sounding ). Press and release the SNOOZE/DIMMER button to control the brightness of the LCD display. Replacing the Backup Batteries We recommend the use of alkaline batteries for longer life. Insert 2 AAA alkaline (recommended) batteries to store alarm and clock settings in the event of power failure. As battery charge decreases, the display will become dimmer. 1. Open the battery compartment cover located on the bottom of the unit. 2. Please make sure the AC adaptor is connected, otherwise all settings may be lost during battery replacement. 3. Insert 2 AAA batteries, checking that the polarity(+ and - of the battery) , the – should hit the springs. 4. The tolerance of the clock is +/- 1 sec. per day. 5. Battery Warning Do not mix with used or other battery types/brands Replace all batteries at the same time Do not open batteries Do not dispose of in fire Do not heat above 75°C Do not expose contents to water Do not charge or recharge Do not install backwards 16 Troubleshooting Symptom Possible Problem Solution AC adaptor does not plug into the wall socket and the other end is not pluged into the power supply jack at back of the unit Plug the adaptor into a working wall socket and plug the connector into the supply jack on the unit CR32 doesn't respond CR32 requires a reset If unit is plugged in and doesn't respond, try resetting following these steps: a) unplug unit from the power source b) remove back up batteries c) wait a few minutes, then resume use AUX IN sound is too low System or your personal device volume setting is too low Turn up the unit or your personal device volume Volume level is set too high Decrease the volume Sound source is distorted If the smart phone/tablet or other device sound source is old or of poor quality, distortion and noise are easily noticed with high-power speakers. Try a different audio file from a trusted source. FM band radio is very noisy FM loop antenna isn't located properly Move the FM loop antenna away from the main unit and rotate it for best reception Alarm not working (AM)/PM time/alarm time not set correctly When setting clock or alarm time, take note of the PM indicators Tablet won’t charge Wrong USB port is pluged in Only the center red USB port provides 5V/ 2.1A power for most of the tablet charging Unit does not turn on Sound is distorted 17 ORDER FORM ACCESSORY USB CHARGING CORDS USB charging cords for pre-Smart Phone generations AP Devices Price: $5.00 Sku: UCAP Buy Now q Samsung/Tablet Price: $5.00 Sku: UC800 Buy Now q Mini USB Price: $5.00 Sku: UCMV3 Buy Now q Micro USB Price: $5.00 Sku: UCMV8 Buy Now q Make Checks or Money Orders Payable to: DOK Solution, LLC. Add $3.00 S&H. PLEASE PRINT CLEARLY Name: Address: State: City: Phone: Email: Brand of Phone: Model No.: q Visa q MasterCard q Discover q AMEX CC# Exp Date: / CVV (3 Digits) Signature: Zip: