1
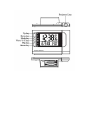
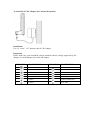
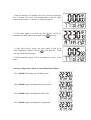
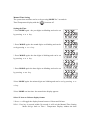
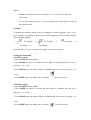
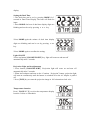
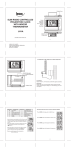
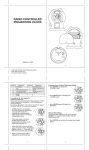
Radio Controlled
Projection Clock
With Foreign Time Display, Summer/Winter
Time Display, Dual Alarm, Dual Time display,
Snooze and Light, Temperature
Instruction Manual
(PCR156)
To install the AC-DC adapter for Continue Projection:-
Installation:
Use 2 x “AAA”, 1.5V batteries and AC-DC adapter.
Important:
Please make sure your household voltage matched with the voltage supported by the
adapter, or it will damage your clock and adapter.
INDICATOR
STANDING FOR
INDICATOR
STANDING FOR
RADIO SIGNAL
RADIO SIGNAL WEAKLY
DATE
REPEAT ALARM INDICATION
FOREIGN TIME INDICATION
MONTH
PM(12 HR DISPLAY ONLY)
SUMMER TIME INDICATION
AM(12 HR DISPLAY ONLY)
DEGREE CELSIUS
ALARM1
DEGREE FAHRENHEIT
ALARM2
DUAL TIME
* After the batteries are installed, the LCD will turn on and beep
for 2 seconds. The clock will automatically search the radio
signal. It takes about 3-5 minutes to finish this process.
* If the radio signal is received, the date & time will be set
automatically with radio control signal icon [
] turns on.
* If the clock fails to receive the time signal, it will be in
Time/Temperature display with the [
] icon turns off. Then
user can set the time manually.
* Radio-controlled signal will be scheduled to receive every
hour.
Selecting Temperature/Alarm 1/Alarm 2/Dual time Display
* Press MODE will display the ALARM 1 time:
* Press MODE again will display the Alarm 2 time:
* Press MODE again will display the Dual Time:
* Press MODE again will display the Temperature:
Manual Time Setting
The system date and time can be set by pressing MODE for 3 seconds in
Time/Temperature display with the [
] icon turn off.
Setting the Time
* Press MODE again : the year digits are blinking and can be set
by pressing ▲ or ▼ key.
* Press MODE again: the month digits are blinking and can be
set by pressing ▲ or ▼ key.
* Press MODE again: the date digits is blinking and can be set
by pressing ▲ or ▼ key.
* Press MODE again: the hour digits are blinking and can be set
by pressing ▲ or▼ key.
*Press MODE again: the minute digits are blinking and can be set by pressing ▲ or
▼ key.
*Press MODE one last time: the normal time display appears.
Select 12 hour or 24 hour display format
* Press ▲ will toggle the display format between 12 hour and 24 hour.
N.B.:1. If no key is pressed within 30 seconds, it will exit the Manual Time Setting
Mode and go back to Time / Temperature Display without the data
update.
2. During any setting mode, press and hold ▲ or ▼ key for 2 seconds for
fast setting.
3. View week of the year, press ▼ key will toggle between the day of week and
the calendar week.
Calendar
To change the weekday display from one language to another language, press ▼ key
for 3 seconds - the display will show the current language (GE for German display,
EN for English display).
1
“
“
” for English → 2
” for Italian → 5
“
“
” for German → 3
“
” for French → 4
” for Spanish.
Press & Hold ▼ key for 2 seconds will toggle to the other languages.
Setting the Alarm time
ALARM 1 setting
-In the ALARM 1 Display [AL 1] ,
* Press MODE for about 3 seconds: the hour digits are blinking and can be set by
pressing ▲ or ▼ key.
* Press MODE again: the minute digits are blinking and can be set by pressing ▲ or
▼ key.
* Press MODE again, the Alarm time is set and [
] icon will turn on.
ALARM 2 setting
-In the ALARM2 Display [AL 2],
* Press MODE for about 3 seconds: the hour digits are blinking and can set by
pressing ▲ or ▼ key.
* Press MODE again: the minute digits are blinking and can be set by pressing ▲ or
▼ key.
* Press MODE again, the Alarm time is set and [
] icon will turn on.
Enable Alarm 1/Alarm 2:
* Press ALARM will enable ALARM 1 with [
turns on.
* Press ALARM again will enable ALARM 2 with [
icon turns on.
] icon
]
* Press ALARM again will enable both ALARM 1 and
ALARM 2 with [
] and [
] icons to turn on.
* Press ALARM again will disable both ALARM 1 and
ALARM 2 with [
] and [
] icons to turn off.
Activating the Alarm
When the ALARM 1/ALARM 2 is ringing, the relative alarm icon [
]/[
]
will be flashing.
* Press ALARM key to turn the alarm off.
* Press button [SNOOZE/LIGHT] alarm stops and the backlight will turn on for 5
seconds with deleted, the repeat alarm indicator (
) flashing. The alarm sounds
again after 4 minutes.
* If the alarm is not turned off, it will stop automatically after 4 minutes.
Foreign Time Display & setting
* Press and hold ▲ key for 3 seconds, the icon “
” will turn on.
* Press and hold MODE for 3 seconds in Foreign Time & Temperature display.
The Foreign time can be set as described above by pressing ▲ or ▼ key.
* Press MODE key again to confirm the setting of foreign time.
* Press and hold ▲ key for 3 seconds to choose between local and foreign time
display.
Setting the Dual Time
* The dual time can be set by pressing MODE for 3
seconds in Dual Time Display. The hour will flash for
input.
* Press MODE: the hour of dual time display digits are
blinking and can be set by pressing ▲ or ▼ key.
*Press MODE again: the minute of dual time display
digits are blinking and can be set by pressing ▲ or▼
key.
*Press MODE again to confirm the setting.
Light ON/OFF
*Press top button [SNOOZE/LIGHT] key- light will come on and turn off
automatically after 5 seconds
Projection Light and its adjustment
* Press button [SNOOZE/LIGHT] -Projection light will come on and turn off
automatically after 5 seconds.
* When insert adapter and turn on the “Continue - Projection” button, projection light
will turn on continuously until the button is switched off or the AC adapter is pulled
off.
* Press [FLIP] key to rotate the projection image in 180˚orientation clock wise.
Temperature function
Press [ WAVE/˚C/˚F ] to select the temperature display
between Celsius or Fahrenheit.
Receiving the DCF Time Code
The projection clock will automatically receive the DCF time code every hour.
Besides, you can force the clock to receive the signal by pressing“Wave” for 3
seconds. It will take 3-5 minutes to receive the radio signal. It the time signal is
received, the [
] icon will be on otherwise it will be off.
Attention! Please dispose of used batteries in an ecologically safe manner.
Liability Disclaimer:
-The electrical and electronic wastes contain hazardous substances. Disposal of electronic waste in wild
country and/or in unauthorized grounds strongly damages the environment.
-Please contact your local or/and regional authorities to retrieve the addresses of legal dumping grounds with
selective collection.
-All electronic instruments must from now on be recycled. User shall take an active part in the reuse,
recycling and recovery of the electrical and electronic waste.
-The unrestricted disposal of electronic waste may do harm on public health and the quality of environment.
-As stated on the gift box and labeled on the product, reading the “User manual” is highly recommended for
the benefit of the user. This product must however not be thrown in general rubbish collection points.
-The manufacturer and supplier cannot accept any responsibility for any incorrect readings and any
consequences that occur should an inaccurate reading take place.
-This product is designed for use in the home only as indication of the temperature and other weather data.
-This product is not to be used for medical purposes or for public information.
The specifications of this product may change without prior notice.
-This product is not a toy. Keep out of the reach of children.
-No part of this manual may be reproduced without written authorization of the manufacturer.