1
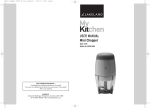
USER MANUAL
ELECTRIC SLICER
Model: 13665
Helpline No: 015394 88100
The Lakeland Guarantee....
is probably the simplest guarantee in the world!
If you are not satisfied at any time, you receive your money back!
This is our promise.
Lakeland
Alexandra Buildings, Windermere, Cumbria LA23 1BQ
Tel: 015394 88100 Web: www.lakeland.co.uk
INTRODUCTION
Thank you for choosing this slicer from My Kitchen, a hard-working range of everyday
cooks’ essentials by Lakeland. This easy-to-use machine has been designed to cut
varying thicknesses of cold or roast meats, bread, vegetables and cheese, slicing from
1mm to 15mm. Please take a few moments to read these instructions before using the
slicer for the first time, and keep them in a safe place for future reference.
10
9
FEATURES
1.
Serrated stainless steel blade
2. Blade lock
3. Guide plate
4. On/off switch
5. Thickness guide
6. Thickness control knob
7.
Food plate
8. Food pusher
9. Platform
10. Sliding food tray
Operating voltage: 230V~50Hz
Power: 200W
IMPORTANT SAFEGUARDS
When using this slicer, please follow these basic safety precautions.
1.
Please read all instructions before using.
2.
Make sure your electricity supply matches the voltage shown on the appliance.
3.
This slicer is for household use only. It is not suitable for commercial use, or for
use outdoors. It must only be used for its intended purpose.
4.
Do not let the power cord hang over the edge of the worktop or table, where a
child could grab it.
5.
Place the slicer on a sturdy, level surface, well away from hot gas or electric
burners and ovens.
6.
The serrated blade is extremely sharp. It must be firmly locked into place before
slicing. When removing the blade for cleaning, hold it by the blade lock and handle
with great care.
7.
To protect against electric shock, do not immerse the slicer, power cord or plug
in water or any other liquid. Never allow the cord or plug to get wet.
8.
Keep hands, hair, clothing and utensils well away from moving parts.
9.
Always use the sliding food tray and the food pusher to protect your fingers from
the blade. Never guide food towards the blade with your bare hands. Take care
not to overload the motor by pushing too hard.
10.
If food sticks to the blade, switch off and unplug the slicer before removing it.
11.
Always switch off the slicer and unplug from the socket before adding or
removing parts, after use and before cleaning. Grasp the plug, not the cord.
12.
Using attachments not supplied by the manufacturer may lead to electric shock,
fire or injury.
13.
The slicer MUST NOT BE USED BY CHILDREN. It is not intended for use by infirm
people unless they have been adequately supervised by a responsible person to
ensure they can use it safely. Children should be supervised to ensure they do not
play with the slicer. It must not be left unattended during use.
SLICING
1.
Select the required thickness by turning the thickness control knob. The
thickness guide on top of the slicer gives suggestions for bread, cheese and cold
meats. The slicer can be adjusted from 1mm up to 15mm.
14.
Do not use the slicer if the power cord or plug show any signs of damage, or if
the appliance is dropped, damaged or working incorrectly. Call the helpline on
015394 88100 to arrange a repair by an authorised repairer, or a replacement.
Never try to repair the slicer yourself as this may cause electric shock.
2.
Slide the food tray along to the left. Place your food onto the tray and press it
against the guide plate with the food pusher.
3.
Plug in the slicer. Switch on the slicer by pressing the on/off switch with your left
thumb. The button must be continuously held down as you slice.
4.
With your right hand, press the pusher into the food and slide the food tray back
and forth, to slice. Always keep your hand well away from the blade, and apply
even pressure, without pressing too hard.
5.
From time to time you may need to clear food from the blade. Always switch off
and unplug the slicer first.
6.
To stop slicing, release the on/off button. Unplug and turn the thickness knob to
its minimum setting, to conceal the blade edge.
BEFORE USING YOUR SLICER FOR THE FIRST TIME
Carefully unpack the slicer, remove any packaging and clean all the parts. See CARE
AND CLEANING.
ASSEMBLING THE SLICER
1.
First, make sure the slicer is unplugged. Place it on a level, firm and dry surface.
The slicer has rubber feet to help keep it steady on your worktop. Position the
slicer so that your left thumb can operate the on/off switch.
2.
Turn the thickness control knob to its minimum setting by turning clockwise. This
will ensure the blade edge is concealed.
3.
Place the sliding food tray onto the platform. Line up its front edge with the
PUT ON arrow on the platform. Push down firmly to lock the tray into place. Slide
the tray back and forth a few times to check that it moves freely.
4.
Slide the food pusher onto the food tray, so that its plastic spikes face the blade.
5.
Place the food plate in the recess at the front of the slicer, to catch sliced food.
HELPFUL HINTS
•
Large joints of meat may need to be cut in half before slicing, to fit on the food
tray.
•
Before slicing cheese, unplug the slicer and carefully wipe the blade with a damp
cloth. This will help prevent the cheese from sticking to the metal.
•
Please do not use the slicer for frozen food, stale bread, meat with bones, or fruit
with stones.
•
Always remove foil, clingfilm and any wrappings from food before slicing.
•
After 10 minutes’ slicing, let the motor rest for 30 minutes.
1.
Slide the food pusher off the food tray. Align the food tray with the TAKE OFF
arrow and lift off firmly. Release the guide plate by turning the thickness knob
clockwise. Carefully remove the blade by turning the blade lock clockwise.
2.
Wipe the slicer body and platform with a soft cloth moistened in warm, soapy
water. Never immerse the slicer in water or any other liquid.
3.
Wash the food tray, guide plate, food pusher and food plate in warm, soapy water,
or in the dishwasher. Rinse, then dry. Avoid abrasive cleaners and scourers.
4.
Carefully wash the blade in hot, soapy water using a washing-up brush to protect
your hands. Dry with care, then replace the blade, holding it by the blade lock and
turning it anticlockwise to lock into position.
ELECTRICAL CONNECTIONS
THIS APPLIANCE MUST BE EARTHED
This appliance is fitted with a fused three-pin plug to BS1363 which is suitable for use in all homes
fitted with sockets to current specifications. If the fitted plug is not suitable for your socket
outlets, it should be cut off and carefully disposed of. To avoid an electric shock, do not insert the
discarded plug into a socket.
Fitting a new plug
If for any reason you need to fit a new plug, the flexible mains lead must be connected as shown
here. The wires in the mains lead fitted to this appliance are coloured in accordance with the
following code:
Earth(green/yellow)
E
L
Neutral(blue)
13amp FUSE
CARE AND CLEANING
Before cleaning, always check the slicer is unplugged and turn the thickness knob to
its minimum setting, to conceal the blade edge. For ease of cleaning, the slicer can be
easily dismantled.
13amp fuse
N
Live(brown)
PLEASE NOTE: the metal blade is not dishwasher-safe.
5.
Refasten the guide plate by turning the thickness control knob anticlockwise.
Line the food tray up with the PUT ON arrow and press down firmly. Slide the food
pusher onto the food tray.
6.
Ensure the thickness knob is turned to its minimum setting, to conceal the blade
edge before storing the slicer away well out of children's reach.
RECYCLING YOUR ELECTRICALS
Along with many other high street retailers, Lakeland has joined a scheme whereby
customers can take their unwanted electricals to recycling points set up around the
country. Visit www.recycle-more.co.uk to find your nearest recycling point.
Connect BLUE to Neutral (N)
Connect GREEN & YELLOW to Earth (E)
Connect BROWN to Live (L)
13 amp fuse to be used
If the colours of the wires in the mains lead of this appliance do not correspond with the coloured
markings identifying the terminals in your plug, proceed as follows. The wire which is coloured
green and yellow MUST be connected to the terminal which is marked with the letter E (Earth) or
coloured green. The wire which is coloured blue MUST be connected to the terminal which is
marked with the letter N (Neutral) or coloured black. The wire which is coloured brown MUST be
connected to the terminal which is marked with the letter L (Live) or coloured red.
Before refitting the plug cover, check that there are no cut or stray strands of wire inside the plug.
Use a 13 amp BS1362 fuse. Only BSI or ASTA approved fuses should be used. If you are at all unsure
which plug or fuse to use, always refer to a qualified electrician.
Note: after replacing or changing a fuse on a moulded plug which has a fuse cover, the cover must
be refitted to the plug; the appliance must not be used without a fuse cover. If lost, replacement
fuse covers can be obtained from an electrical shop. This appliance complies with the following
EEC Directives: 73/23 EEC (Low Voltage Directive) and 89/336 EEC (EMC Directive).
0001