1
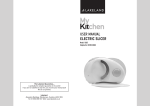
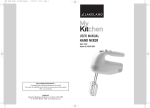
Digital 2 Slice Toaster IB 05_10:Layout 1
26/5/10
15:29
Page 1
USER MANUAL
The Lakeland Guarantee....
is probably the simplest guarantee in the world!
If you are not satisfied at any time, you receive your money back!
This is our promise.
Lakeland
Alexandra Buildings, Windermere, Cumbria LA23 1BQ
Tel: 015394 88100 Web: www.lakeland.co.uk
D I G I TA L 2 - S L I C E TOA S T E R
Model: 13654
Helpline No: 015394 88100
Digital 2 Slice Toaster IB 05_10:Layout 1
26/5/10
15:29
Page 3
INTRODUCTION
Thank you for choosing this contemporary 2-slice toaster, complete with LED countdown lights and digital
browning display. Please take a few moments to read these instructions before using the toaster for the first
time, and keep them in a safe place for future reference.
IMPORTANT SAFEGUARDS
When using this toaster, please follow these basic safety precautions.
1.
Please read all instructions before using.
2.
Make sure your electricity supply matches the voltage shown on the appliance.
3.
This toaster is for household use only. It is not suitable for commercial use, or for use outdoors. The toaster
must only be used for its intended purpose.
4.
Place the toaster on a level surface. Do not let the power cord touch any hot surfaces or hang over the
edge of your worktop or table, where a child could grab it.
5.
Do not place the toaster on or near a hot gas or electric burner, or in or near a heated oven.
6.
To avoid the risk of fire, never leave the toaster unattended during use. Keep it well away from curtains,
wall cabinets, clothing, tea towels etc. Do not place anything on top of the toaster.
7.
The toaster will get very hot during use; take care not to touch the surfaces.
8.
Clean the crumb tray regularly to prevent crumbs from burning. Never toast over-sized foods or items that
may drip when heated e.g. pizza or fruit pastries, as they may catch fire.
9.
Never put your fingers, metal utensils or foil-wrapped food into the toaster slots. Always unplug the toaster
before dislodging stuck food.
10. To avoid electric shock, do not let the toaster, power cord or plug get wet. Never immerse the toaster in
water or any other liquid. Do not touch with wet hands.
FEATURES
1.
LED countdown lights
2.
Slide-out crumb tray
3.
Cord storage
4.
+/– browning controls
5.
Digital browning display
6.
High-lift lever
7.
Reheat button with indicator light
8.
Stop button
9.
Defrost button with indicator light
Operating voltage: 220/240V~50/60Hz
Power: 1000W
11. Always unplug the toaster when not in use, before moving or cleaning. Grasp the plug, not the cord. Allow
the toaster to cool completely before cleaning.
12. Using accessories that are not recommended by the manufacturer may cause fire, electric shock or injury.
13. The toaster is not intended for use by children or infirm people unless they have been adequately
supervised by a responsible person to ensure they can use it safely. Children should be supervised to
ensure they do not play with the toaster. It must not be left unattended during use.
14. Do not use the toaster if the power cord or plug show any signs of damage, or if the appliance is dropped,
damaged or working incorrectly. Call the helpline on 015394 88100 to arrange a repair by an authorised
repairer, or a replacement. Never try to repair the toaster yourself as this may cause electric shock.
Digital 2 Slice Toaster IB 05_10:Layout 1
26/5/10
15:29
Page 5
BEFORE USING FOR THE FIRST TIME
Carefully unpack the toaster and remove any packaging. Wipe the outside of the toaster with a slightly damp
cloth, then dry. Before you begin to toast, operate the toaster once without any bread. This will remove any
residue from the factory.
TOASTING
1.
Place the toaster on a sturdy, flat surface, well away from the edge and a few inches from the wall.
2.
Make sure the crumb tray is in place and the lever is up.
3.
Plug the toaster into the socket. Place bread, crumpets, sliced bagels, muffins etc. into the toasting slots.
4.
Push down the lever until it locks into place. If toasting frozen bread, press the defrost button after lowering
the lever. The indicator light will come on.
5.
To select your desired toasting level, press the + or – buttons. There are 9 settings: the higher the number,
the darker the toast. See TOASTING TIPS. Your chosen setting will be clearly shown on the digital display.
6.
The blue LED countdown lights will glow, to show that toasting has begun. They will go off one by one to
indicate your toast’s progress.
7.
The toast will pop up automatically when ready. To stop the toasting cycle earlier, press the stop button.
For easier retrieval of crumpets or muffins, lift up the lever.
8.
To warm toast that has already popped up and cooled down, push down the lever and press the reheat
button. The indicator light will come on.
9.
Unplug the toaster after use.
TOASTING TIPS
•
For best results, choose bread slices of the same thickness, size and freshness.
•
For dry or thinly cut bread, choose a lower browning setting.
•
Very fresh or wholewheat bread requires a higher setting, as does unevenly textured bread e.g. English
muffins.
•
Sliced bagels and thickly cut bread take longer to toast because of the time required to evaporate their
moisture content. They may need two toasting cycles.
•
Remove any loose raisins etc. from fruit loaf before toasting.
•
Choose a lower setting than normal when toasting a single slice, to prevent over-toasting. You may notice
the toast is lighter on one side; this is normal.
•
We recommend waiting at least 30 seconds between toasting cycles, or simply select a lower setting for
your next round of toast.
CARE AND CLEANING
•
Before cleaning, unplug the toaster and let it cool down. Wipe the outside with a soft, slightly damp cloth,
then dry. Never immerse in water.
•
Slide out the crumb tray. Wipe, then replace.
•
Please do not use abrasive cleaners, wire wool or scourers as they will damage the toaster.
SAFETY NOTES
To dislodge any bread stuck in the toaster, unplug the appliance and let it cool down, then turn it upside down
and shake gently. Never insert sharp or metal utensils, or your fingers, into the slots as this may cause electric
shock or damage.
Please do not wrap the power cord around the toaster body; use the storage cleats on the underside.
RECYCLING YOUR ELECTRICALS
Along with many other high street retailers, Lakeland has joined a scheme whereby customers can take their
unwanted electricals to recycling points set up around the country. Visit www.recycle-more.co.uk to find your
nearest recycling point.
Digital 2 Slice Toaster IB 05_10:Layout 1
26/5/10
15:29
Page 7
ELECTRICAL CONNECTIONS
THIS APPLIANCE MUST BE EARTHED
This appliance is fitted with a fused three-pin plug to BS1363 which is suitable for use in all homes fitted with
sockets to current specifications. If the fitted plug is not suitable for your socket outlets, it should be cut off and
carefully disposed of. To avoid an electric shock, do not insert the discarded plug into a socket.
Fitting a new plug
If for any reason you need to fit a new plug, the flexible mains lead must be connected as shown here. The wires
in the mains lead fitted to this appliance are coloured in accordance with the following code:
Earth(green/yellow)
Neutral(blue)
13amp FUSE
E
L
13amp fuse
N
Live(brown)
Connect BLUE to Neutral (N)
Connect GREEN & YELLOW to Earth (E)
Connect BROWN to Live (L)
13 amp fuse to be used
If the colours of the wires in the mains lead of this appliance do not correspond with the coloured markings
identifying the terminals in your plug, proceed as follows. The wire which is coloured green and yellow MUST
be connected to the terminal which is marked with the letter E (Earth) or coloured green. The wire which is
coloured blue MUST be connected to the terminal which is marked with the letter N (Neutral) or coloured black.
The wire which is coloured brown MUST be connected to the terminal which is marked with the letter L (Live)
or coloured red.
Before refitting the plug cover, check that there are no cut or stray strands of wire inside the plug. Use a 13 amp
BS1362 fuse. Only BSI or ASTA approved fuses should be used. If you are at all unsure which plug or fuse to
use, always refer to a qualified electrician.
Note: after replacing or changing a fuse on a moulded plug which has a fuse cover, the cover must be refitted
to the plug; the appliance must not be used without a fuse cover. If lost, replacement fuse covers can be
obtained from an electrical shop. This appliance complies with the following EEC Directives: 73/23 EEC (Low
Voltage Directive) and 89/336 EEC (EMC Directive).
This appliance is not intended to be operated by means of an external timer or separate remote-control system.
0003