1
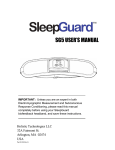
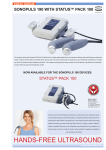
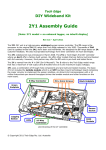
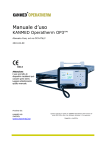
877.518.2323
[email protected]
BMR Distribution, Inc.
PO Box 5179
Hoboken, NJ 07030
Designed by & Manufactured for:
Bio-Medical Research Ltd., Parkmore Business Park West, Galway, Ireland.
Copyright: © 2012, Bio-Medical Research Ltd. All Rights Reserved
Part No: 2401-5506 Rev.: 1 Date of Issue: 1/12
Instruction Manual
MODE D’EMPLOI
MANUAL DE USARIO
www.bmrbeauty.com
I N D I C AT I O N S F O R U S E
BMR Face is intended for facial stimulation and is indicated for over the counter cosmetic use.
C O N T R A I N D I C AT I O N S , P R E C A U T I O N S & W A R N I N G S
Your BMR product is suitable for use by all healthy adults. However, some care is needed
when using it, so always follow the points below and read your user manual carefully before use.
Some of the points below are gender specific.
! CONTRAINDICATIONS
Do not use if:
• You have an electronic implant (e.g. cardiac pacemaker or defibrillator) or suffer from any other
heart problem.
• You suffer from cancer, epilepsy or are under medical supervision for cognitive dysfunction.
• You should not use BMR Face if you have difficulty reading this manual or seeing the information on the display.
• The unit is in close proximity (e.g. 1m) to shortwave or microwave therapy equipment.
• You are connected to high-frequency surgical equipment.
• Wearing the device necessitates placement over areas at which drugs/medicines are administered
by injection (short term or long term) e.g. hormone treatment.
• Please do not increase the intensity to levels that cause facial muscle contractions.
! PRECAUTIONS
Please wait before using BMR Face until:
• At least 24 hours after the administration of facial Botox® or injectable fillers - and you should
consult your physician first. For further information on using BMR Face with these treatments,
see page 16.
Please get your physician’s permission before using BMR Face if:
• You have any serious illness or injury not mentioned in this guide.
• You have a tendency to bleed internally, such as following an injury or fracture.
• You have recently undergone surgical procedures, when stimulation may disrupt the healing process.
• You take insulin for diabetes.
• You suffer from facial muscle problems, for example Bell’s Palsy.
• If you have had recent medical or cosmetic facial surgery.
Please read these precautions before using your BMR Face product.
• The long-term effects of using electrical stimulation are unknown.
• The safety of electrical stimulators for use during pregnancy has not been established.
2
• We advise using this product while in a relaxed, seated or lying position.
• Always place the applicator on your face before turning on the control unit.
• The design of BMR Face assures that no current flows across the head. Do not alter the wiring of
the applicator in any way, or otherwise cause stimulation to be applied across the head.
• You must always place the adhesive gel pads on the applicator paddles before using BMR Face.
• Always wash your face before use and ensure it is free from moisturizer, fake tan and make-up.
Tie back your hair if it’s long or use a hair band (failure to remove creams, oils, make-up etc.
from your face will result in the product being less effective and will also shorten the life of the
gel pads).
• Keep your unit in your hands, on your lap or stored in a pocket during each session.
• Nobody under the age of 18 should use this product.
! WARNINGS
Possible adverse reactions:
• A small number of isolated skin reactions have been reported by people using electrical stimulation
devices, including skin allergies, a prolonged reddening of the skin, acne, broken blood vessels,
thread veins, a rash and affected fillings/ toothache.
• If allergic reactions last for several hours, you should stop using the product as this product may
not be suitable for you.
• Users may experience headache and other painful sensations, which have been reported during
or following the application of electrical stimulation near the eyes and to the head and face.
• Users may experience transient muscle twitching in the face after a session.
• Users should not apply stimulation over or in proximity to cancerous lesions.
• Do not use the BMR Face unit in or near water, including a bathtub, shower, hot tub or swimming
pool.
When applying the gel pads and applicator, always remember to:
• Place the gel pads and applicator ONLY as indicated in this manual.
• Avoid placing the pads or applicator on the front or sides of the neck, over the temples, across
or through the heart (i.e. one pad on the front of the chest and one on the back) or in the
genital region. (Other units are available for other areas of the body - details are available at
www.bmrbeauty.com or from your local retailer).
• Application of electrodes near the thorax may increase the risk of cardiac fibrillation.
• Avoid any recent scars, broken or inflamed skin, areas of infection or susceptibility to acne, thrombosis
or other vascular problems (e.g. varicose veins), or any parts of the body where feeling is limited.
• Avoid areas of injury or restricted movement (e.g. fractures or sprains).
• Avoid placing the pads directly over metal implants, dental implants or metal fillings.
To reposition pads during a session:
• Make sure the unit is Paused or Off first.
3
Note:
• No serious adverse effects have been reported, however you may wish to consult your
doctor before use.
- On very rare occasions, first-time users of EMS have reported feeling light-headed or faint.
We recommend that you use the product while seated until you become accustomed to the
sensation.
Note:
• An effective treatment should not cause undue discomfort.
Contact the careline if:
• Your unit is not working correctly. Do not use it in the meantime.
• You experience any irritation, skin reaction, hypersensitivity or other adverse reaction.
- You should, however, note that some reddening of the skin can appear under the paddles during
and for a short time after a session.
Important:
• Keep your unit out of the reach of children.
• The paddles and gel pads must not be connected to other objects.
• Do not use your unit at the same time as any other device which transfers an electrical current
into the body (e.g. another stimulator).
• Cease using your unit if you are feeling light headed or faint. Consult your doctor if this happens.
• Do not touch the gel pads or paddles while the unit is delivering stimulation. Always pause
before moving the applicator.
• Do not use while driving, operating machinery or cycling.
• For first time users, electrical stimulation can be an unusual sensation. We recommend that you
begin with low stimulation intensities to familiarize yourself with the sensation before progressing
to higher stimulation intensities.
• For hygiene reasons the gel pads should be used by only one person. Do not share your gel pads
with anyone else.
• Do not over-exert yourself when using electrical stimulation. Any session should be at a level
comfortable for you. Please follow our recommendations for using the product.
• BMR will not accept responsibility if the guidelines and instructions supplied with this unit are
not followed.
• Although compliant with applicable EMC requirements, this device may still interfere with more
sensitive equipment, please move away or switch off.
N.B. If you are in any doubt about using BMR products for any reason, please consult your
doctor before use.
4
WHERE
N E V E R T O P L A C E T H E PA D S
5
WELCOME
Congratulations on purchasing BMR Face.
BMR Face is a lightweight applicator, which delivers gentle stimulation to the face. Our innovative technology enhances the natural beauty of the face.
With over 40 years experience in the industry, BMR is proud to offer you this unique, discreet
and easy-to-use product. A Face product that really delivers results.
To get the most from your new Face unit, we recommend that you use it for no more than 20
minutes a day, 5 times a week. You should always use Face at an intensity you find comfortable
and you must leave 24 hours between sessions. Do not exceed the recommended usage. After
this 12-week period, you should, of course, keep using BMR Face in order to maintain the
improvement. We recommend a maintenance program of at least twice a week to sustain
optimum results.
Use BMR Face as part of a normal, healthy lifestyle for noticeable results:
Please read the manual fully before using this product. If you need further information visit our
website at www.bmrbeauty.com.
W H AT
DOES IT FEEL LIKE?
When you turn your Face unit on, you will feel a
light tingling sensation in key areas of your face.
You may find these sensations unusual at first,
but with use you should find the sensation
becomes quite comfortable.
6
W H AT ' S I N T H E B O X
1. Face Control Unit
The unit generates signals which are
sent, via the pads, to stimulate your
face. The unit is rechargeable and takes
3 hours tocharge fully.
2. Face Applicator
The applicator band is placed around
your neck to hold the conductive paddles in their correct position on your
face.
3. Gel Pads x 24 (12 pairs)
One pair of pads must be placed on the
applicator paddles before use, as they
conduct the signal from the applicator
to your face.
5
1
4
2
3
6
4. Battery Charger
Plug the charger into a wall outlet and then connect it to your Face unit to charge its battery. A
full charge takes approximately 3 hours. Please ensure you only use the charger supplied by BMR.
5. Carry Box
This sturdy, magnetically sealed box protects your BMR Face between sessions and can also
be used at weekends so you can take your Face product with you where ever you go.
6. Instruction Literature
This consists of a detailed guide for using your BMR Face and an additional quick start
guide to help get you started.
If you require any assistance setting up your unit or have any other questions, please call your
local Careline number or send us an email:
Tel: 877.518.2323
Email: [email protected]
7
UNIT CONTROLS
1
1. On/Off Button ( )
Press and hold this button for 2 seconds to turn your unit on
or off. You may also pause the exercise by briefly pressing
this button.
2. Increase Stimulation Intensity ( + )
Press and hold these buttons to increase the intensity of the
signal. The right-hand buttons on the keypad control the
right side of your applicator. The left-hand buttons control the
left side.
4
2
5
3
3. Decrease Stimulation Intensity ( - )
Press and hold these buttons to decrease the intensity of the
signal on either side of your face.
4. Program Button ( P )
Press this button to select the program you wish to use. There are 3 programs, which are
explained later in this manual (page 11).
5. Information Button ( i )
Press this button to check your program information i.e. the maximum intensity for your current or
last session and the number of sessions you have completed.
U N I T D I S P L AY
Stimulation intensity from the left side of
the applicator
Stimulation intensity from the right side of
the applicator
Counts down the remaining time in the
current session. Also displays error
messages (see page 12).
Appears when the exercise has been
paused.
Indicates that the sound is off.
Key lock is active - you cannot accidentally
change the intensity levels or the program.
8
This symbol indicates poor contact between
the unit and the applicator, between the
paddles and the gel pads or between the gel
pads and your skin (see page 14 for details).
Shows the battery power remaining.
Number of sessions completed.
Shows the program currently running (1 - 3).
This symbol appears during each
stimulation phase.
Maximum intensity for the current/
last session.
G E T T I N G S TA R T E D
1. Plug the charger into a wall outlet. Connect the control unit to the battery charger (Fig. a). It will take 3 hours to fully charge the battery. Your
unit is fully charged when all three sections of the battery icon on the display are full. You must charge the unit for at least 3 hours before using
Face for the first time. Disconnect the control unit from the charger.
Fig. a
Fig. b
2. Remove the gel pads from their pack. You will notice that there is a
plastic cover on either side of each gel pad. One of these covers is a
light blue with trash can symbols and the other one is clear with “Face”
marked in white.
3. Carefully remove the cover from the side with “trash can” symbol off
one gel pad and place it on the black part of one of the paddles as
shown in Fig. c. Be sure to press the pad firmly against the paddle to
ensure good adhesion. Repeat with a second gel pad, placing it on the
other paddle.
4. Remove the covers from the other side of the gel pads (Fig. d). Do not
throw these covers away as you will need to put them back onto the gel
pads at the end of your session.
Note:
- You should only use BMR gel pads, as others may reduce the safety
and effectiveness of the product.
5. Connect the control unit to the applicator as shown in Fig. e. The control unit and applicator must be properly connected for your BMR Face
product to work.
Note: Before turning on your Face unit, make sure the gel pads completely
cover the black paddle contacts.
6. With the paddles facing forwards, bring the applicator from behind
your head and below your ears, until the gel pads sit on your face. When
correctly positioned, the paddles should lie directly below your cheekbones about one finger’s width in front of each ear (Fig. f ). Use a mirror
to help you position the applicator correctly.
Note: Only position the paddles as shown in Fig. f. Avoid placing them
directly onto the cheekbones, as this can lead to an uncomfortable
sensation.
Fig. c
Fig. d
Fig. e
Fig. f
9
The paddles should always be positioned in a line between the middle of
your ear and your nose (Fig. g). Do not try to place the paddles on the
temples or across the throat.
7. Press and hold the on/off button (
your unit on.
Fig. g
- Fig. h) for two seconds to switch
8. Choose your desired program by pressing the program button ( P ). That
program is automatically selected every time you switch your unit on until
you decide to change it.
9. Increasing the intensity
Using the intensity buttons, increase the intensity to a level that is
comfortable for you (Fig. i). The intensity goes from 0-99. If you increase
the intensity to a level where you can see small facial muscle contractions,
please reduce the intensity one step at a time until this stops.
Note:
- If you find the signal is uncomfortable, check that the gel pads are clean
and that they are correctly positioned on the applicator paddles.
Fig. h
Fig. i
Important:
- If you feel a twitching around the eye, or if you feel any discomfort during
a session, just pause the exercise by briefly pressing the on/off button
(the display will show the pause symbol - ). Then position the applicator
slightly lower on your face and resume the session by briefly pressing the
on/off button again.
- Some people may experience a twitching in their muscles after a session.
If this happens, you should reduce the intensity during your next session.
However, if the problem persists, you should stop using the product.
10. When you have completed your session, switch off the unit, remove the applicator from your
face and replace the covers marked ”Face” on the gel pads. Leave the gel pads on the paddles
and store the product safely in its carry-box until your next session.
Important:
Ensure the control unit is switched off before removing the applicator from your face.
If you have any questions or are unsure about anything just call:
Tel: 877.518.2323
Email: [email protected]
10
FA CE PRO G RA M S
BMR Face has three programs - 1, 2 & 3. Your desired program can be
selected by pressing the program button ( P - Fig. a) until the program
icon appears on the display. You cannot change a program during a
session. You must first switch the unit off and then on again to select a
new program.
Fig. a
You should use the product no more than five times a week and always
leave at least 24 hours between sessions.
Program
Duration
Intensity
Prog. 1
Icon
20 minutes
0-99
Prog. 2
10 minutes
0-99
Prog. 3
15 minutes
0-99
11
ADDITIONAL UNIT FUNCTIONS
Fig. a
Information Button ( i )
Press the information button any time during a session to see the highest
intensity level you have reached for that session (Fig. a). Pressing the
information button twice shows you the total number of sessions you
have completed.
Mute Function ( )
If you want to turn off the sound effects of your controller, press and
hold the program button for two seconds (Fig. b). The mute function
remains active indefinitely unless manually changed. Deactivate the
mute function by pressing the program button for two seconds again.
Fig. b
Key lock Function (
)
When you find a comfortable intensity level, press and hold the
information button for two seconds to lock that intensity (Fig. c). This
function only remains active during the session in which it is activated.
If you wish to increase the intensity further during a session, deactivate Fig. c
the key lock function by again pressing the information button for two
seconds.
Error Messages
In the unlikely event of your unit developing a problem, the display
shown in Fig. d will flash. If this occurs, you should switch the unit off
and then switch it back on again. It should now operate properly. If
the problem persists, please call your local Careline for further assistance:
Tel: 877.518.2323
Fig. d
Email: [email protected]
12
B AT T E RY P O W E R / R E P L A C I N G T H E B AT T E RY
Fig. a
The battery icon on the display will flash when the battery is low and needs
to be recharged. After a period of time, you may find that your battery will
only power your control unit for a limited number of sessions, requiring you
to charge the battery more frequently. This is because rechargeable batteries
have a limited number of charge cycles and may eventually need to be
replaced.
Should you need to replace the rechargeable battery, remove the small
rubber plug from the back cover of your unit (Fig. a), unscrew the back cover Fig. b
and remove it. Replace the existing battery pack with a new battery pack
(Fig. b) and replace the battery cover. You can purchase a new battery pack
by contacting the BMR Careline.
Battery Care
A new battery comes in a discharged condition and must be charged before
use. It will take 3 hours to fully charge the battery. Upon initial use (or
after a prolonged storage period) the battery may require two to three
charge/ discharge cycles before achieving maximum capacity.
To ensure optimum battery performance and best results you should ensure regular usage of the
product e.g. perform 1 session a day, 5 days a week.
A rechargeable battery will eventually lose its charge if unused. If the battery is not going to be
used for a long time, it is recommended that it be removed from the device and stored in a cool,
dry, clean place.
Should your rechargeable battery need to be replaced contact the BMR Careline to purchase a new
rechargeable battery pack.
Tel: 877.518.2323
Email: [email protected]
13
TROUBLE SHOOTING CHECKLIST
If you have problems getting your product to work, you should go through the following checklist:
Have you charged your battery?
It takes 3 hours to fully charge your battery.
Is your applicator fully connected to the control unit?
Push the connector on your applicator fully into the socket on the control unit.
Are the gel pads completely covering the paddles on the applicator?
Double-check the gel pads on your applicator to ensure that they are fully covering the paddles.
Before starting a session, check that all plastic covers have been removed from both sides of the
gel pads. Remember to keep the covers marked “Face” to protect the gel pads between sessions.
When did you last change your gel pads?
The gel pads need to be changed periodically. Call the Careline or visit www.bmrbeauty.com
to order new gel pads, or just ask at the retail outlet in which the product was
Fig. a
purchased. We recommend that you replace the gel pads at least once a week.
If the display in Fig. a begins flashing on your screen, it indicates a contact
problem with one of the following:
- The control unit and applicator are not properly connected.
- The gel pads have not been placed onto the paddles before starting a session.
- The gel pads are not fully covering the paddles on the applicator. *
- The covers marked “Face” have not been removed from the pads.
- The gel pads are worn. *
* This display always appears with the left/ right paddle indicators. If the left
indicator appears (Fig. b), there is a problem with the left paddle or gel pad. The
right indicator (Fig. c) indicates a problem with the right paddle or gel pad and if
both indicators appear (Fig. d), there is a problem on both sides.
Still having trouble? Call
Tel: 877.518.2323
Email: [email protected]
Visit www.bmrbeauty.com for all our latest innovations!
14
Fig. b
Fig. c
Fig. d
U S I N G BM R F A C E
IN CONJUNCTION WITH
BOTOX®?
You should always wait for 24 hours after the administration of Botox® before using your BMR Face
product.
Botox® reduces stubborn frown lines and brow furrows by chemically reducing muscle activity
in the area between the eyes (the ‘glabella’) and just above this. Sometimes it is also used to
reduce ‘crows feet’ around the eyes, but Botox® is rarely used in the mid and lower part of
the face, so therefore it does not impact the majority of facial muscles.
The effect of Botox® is also temporary (i.e., the muscles gradually recover their movement
over several weeks) and the level of paralysis of the treated muscles depends on the amount
of Botox® injected (i.e., there may still be some movement of the injected muscles even early
on, depending on the dose administered).
U S I N G BM R F A C E
IN CON J UN CTION WITH FACIAL FILL ERS?
You should always wait for 24 hours after the administration of facial fillers (e.g., Restylane™,
Perlane™, Juvederm™) before using your BMR Face product.
Restylane™, Perlane™ and Juvederm™ are facial fillers used to help reduce the signs of
ageing. They are made from hyaluronic acid, a substance naturally occurring in the body.
Restylane™, Perlane™ and Juvederm™ are various brands of hyaluronic acid, designed for
injection under the skin. They help to fill hollows in the facial skin, which result from the
ageing process, such as lines under the eyes (also known as tear trough deformity), smile
lines and marionette lines. It is important that a trained physician delivers the filler to ensure
a smooth, even appearance. The effects of this treatment are temporary and most patients
will require treatment every six months.
15
C A R I N G F O R T H E G E L PA D S
Your BMR Face unit contains 12 pairs of gel pads, which should allow you to complete a
12-week treatment course. We recommend that you replace the gel pads at least once a
week.
• The gel pads are for single person use only.
• The durability and effectiveness of the gel pads depends entirely on the proper use, storage
and care on the part of the user, certain skin types, the number and duration of sessions and
the intensity used.
• You should ensure your skin is clean and free of oils, creams and other lotions before use.
• Ensure your hands are clean before handling the gel pads. You should avoid touching the skin
side of the gel pads with your fingers as much as possible when applying or removing them
from the applicator, as this can transfer oils and skin particles to the adhesive surface.
• After use, replace the covers marked “Face” on the gel pads and store your product in the
carry box until the next use.
• The gel pads will need to be replaced periodically as the surface picks up skin debris and
becomes dry over time.
CARING
F O R Y O U R U N I T A N D A P P L I C AT O R
• Your unit and applicator should not be allowed to get wet or be left in excessive sunlight. It may
be cleaned regularly using a soft cloth, lightly dampened in soapy water. Do not allow the
interior of your unit to become wet. Do not use detergents, alcohol, spray aerosols or strong
solvents on your unit.
16
P R O D U C T WA R R A N T Y
Dear Customer,
Thank you for purchasing your BMR product ("Product"). To be covered by this Limited Warranty, the
Product must have been purchased directly from SDI, or its authorised retailers in the United States,
Canada or Mexico. This Limited Warranty extends only to the original purchaser and cannot be
transferred to anyone. Please read this carefully before using the Product.
Our Limited Warranty to you
SDI warrants to you, the original purchaser, that under normal use and service, the Product will be free
from defects in material and workmanship for a period of two (2) years from the date of purchase
("Warranty Period"). If you discover a defect covered by this Limited Warranty during the Warranty
Period, and return the Product to us, we will repair or replace the Product, at our option, using new
or remanufactured components. There is no warranty or condition of any kind as to any defects
discovered after the Warranty Period expires.
Certain Product failures not covered
This Limited Warranty covers defects in manufacture that arise from correct use of the Product per
the product manual and instructions. It does not cover damage caused by abuse, misuse, accidents,
modification or repair by any person other than SDI, moisture, extreme heat or cold, corrosive
environments, high voltage surges from external sources or an unsuitable power supply. This
Limited Warranty does not cover normal wear and tear on consumable items (e.g. GelPads etc.).
This Limited Warranty does not apply to any battery provided with the Product, or if the Product has
an altered or defaced serial number.
How to obtain service under this Limited Warranty
To obtain service under this Limited Warranty, please contact SDI’s Customer CareLine at
877.518.2323 to obtain return instructions. You must submit proof of purchase in the form of a bona
fide, dated bill of sale, receipt, or invoice (or copy thereof) evidencing that your request for
service is made within the Warranty Period.
Except as may otherwise be required by legislation in your State, SDI will not be responsible for the
cost of returning the Product or for any damage to or loss of the Product while it is in transit to us.
We recommend that you use a carrier that will track your shipment and ensure the Product’s safe
delivery. SDI cannot accept any returns sent C.O.D.
17
THIS LIMITED WARRANTY IS THE ONLY WARRANTY FOR THE PRODUCT, AND THERE ARE NO OTHER
EXPRESS WARRANTIES, ORAL OR WRITTEN, PROVIDED BY SDI. ANY IMPLIED WARRANTIES
APPLICABLE TO THE PRODUCT, INCLUDING ANY WARRANTIES OF MERCHANTABILITY OR FITNESS
FOR A PARTICULAR PURPOSE, ARE LIMITED TO THE DURATION OF THE WARRANTY PERIOD SET
FORTH ABOVE.
Limitation of Remedies
YOUR EXCLUSIVE REMEDY, IN LIEU OF ALL INDIRECT, INCIDENTAL, CONSEQUENTIAL,
EXEMPLARY, SPECIAL OR OTHER DAMAGES OF ANY KIND, INCLUDING FOR NEGLIGENCE, IS
LIMITED TO THE REPAIR OR REPLACEMENT OF THE PRODUCT, IF DEFECTIVE, UNDER THE TERMS
AND CONDITIONS OF THIS LIMITED WARRANTY.
SDI will bear no other expenses.
SDI reserves the right to refuse to repair or replace the Product if it is returned in an unsanitary
condition. SDI reserves the right to substitute a product of equal or better quality if an identical
product is not available at the time of replacement. This Limited Warranty is non-transferable.
Applicability of state law
Some states do not allow limitations on the duration of implied warranties, or the exclusion or
limitation of incidental or consequential damages, and so the related limitations and exclusions
stated above may not apply to you.
Governing law
This Limited Warranty is valid in the United States, Canada and Mexico only and is not applicable
in other countries. If you acquired the Product in the United States, the laws of the State of New
York will apply to this Limited Warranty.
THIS LIMITED WARRANTY GIVES YOU SPECIFIC LEGAL RIGHTS AND YOU MAY ALSO HAVE
OTHER RIGHTS, WHICH VARY FROM STATE TO STATE.
18
T E C H N I C A L S P E C I F I C AT I O N S
Caring for your unit
If your unit is damaged, you should not use it but should return it to BMR or your local distributor for replacement or repair.
Repairs, service and modifications may not be carried out by anyone other than qualified service personnel authorized by
BMR.
Access to the interior of the unit is not required for maintenance purposes.
Important:
Under no circumstance should anything other than the correct type of batteries (rechargeable batteries 3.6V NiMH) be used
with your unit. These can be purchased from the BMR Careline.
Disposing of the gel pads and batteries
Used gel pads and batteries must never be disposed of in a fire but in accordance with your state’s laws governing the disposal
of such items.
Notes:
The signal gradually increases to a peak intensity level at the start of the contraction phase (i.e. ramp up) and gradually
decreases to nothing at the start of the relaxation phase (i.e. ramp down). When the
symbol is flashing, the stimulus is
significantly reduced.
Accessories:
You can purchase all accessories at www.bmrbeauty.com. Under no circumstances should anything other than BMR accessories
be used with your BMR charger or BMR unit (Type 371). Any others may not be compatible with your unit and could degrade
the minimum safety levels.
Set of 24 gel pads Type 724
Battery Pack: (3.6V, NiMH)
Battery Charger: (2504-5500)
Charger complies to EN 60950, Input: nominal voltage 100-240V, frequency 50-60Hz, current 125mA. Do not use any other
chargers or any other power supplies.
Adaptor: (UK/Irl - 2504-5501) - Adaptor: (US/Japan - 2504-5502) - Adaptor: (EU - 2504-5503)
Product Type: 371
Intended Use: TENS stimulator
Waveform: Symmetrical bi-phasic square waveform when measured into a resistive load.
Classification: Internally powered equipment, Class II charger, Type BF applied parts.
Environmental Specifications:
Operating Range:
Temperature: 0 - 35°C (32 - 95°F)
Humidity: 20 - 65 % RH
Storage Range:
Temperature: 0 - 35°C (32 - 95°F)
Humidity: 20 - 85 % RH
Attention:
This unit can deliver currents in excess of 2mA/cm2 if used with incorrect gel pads.
19
Description of your unit’s symbols:
There are a number of technical markings on your unit. These can be explained as follows:
The unit and applicator are manufactured for Bio-Medical Research Ltd, Parkmore Business Park West, Galway, Ireland.
The unit requires 1 x 3.6 volt (NiMH) DC battery pack DC is indicated by the symbol:
The Output Frequency indicates the number of pulses per second transmitted by the unit. This is measured in hertz, which
is indicated by “Hz”.
Output (RMSA) means the maximum output root mean square current for each channel.
Output (RMSV) means the maximum output root mean square voltage for each channel.
!
This symbol means “Attention, consult the accompanying documents”.
This symbol means type BF equipment.
0366
This symbol on your unit is to indicate conformity to the requirements of the Medical Device Directive (93/ 42/EEC).
0366 is the number of the notified body (VDE).
SN stands for serial number. Inside the box, on the back of the unit is the serial number specific to this unit. The letter preceding
the number indicates the year of manufacture, where ‘N’ denotes 2008, ‘O’ denotes 2009 etc.
At the end of the product lifecycle, do not throw this product into the normal household garbage, but bring it to a
collection point for the recycling of electronic equipment.
Some product materials can be re-used if you bring them to a recycling point. By re-using some parts or raw materials
from used products you make an important contribution to the protection of the environment. Please contact your local
authorities if you need more information about collection points in your area.
Waste Electrical and Electronic Equipment can have potentially harmful effects on the environment. Incorrect disposal
can cause harmful toxins to build up in the air, water and soil and can be harmful to human health.
Conforms to UL STD 60601-1.
Certified to CAN/CSA.
STD C22.2 NO 601.1
Rated Outputs / Voltage/Currents (Average over 5 seconds): Type 371
Parameter
500Ω
1KΩ
1K5Ω
Output RMSV
0.9V
1.7V
2.6V
Output RMSA
1.7mA
1.7mA
1.7mA
Output Frequency
70-80Hz
70-80Hz
70-80Hz
DC Component: Approx.
0C
0C
0C
Positive Pulse Width:
80-100 µs
80-100 µs
80-100 µs
Negative Pulse Width:
80-100 µs
80-100 µs
80-100 µs
Interphase Interval:
100 µs
100 µs
100 µs
Max. Current
30mA
30mA
30mA
20
21