1
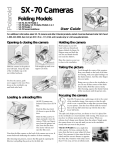
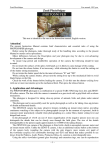
SX-70 FAQ 1 sur 11 http://www.chemie.unibas.ch/~holder/sxfaq.html Frequently asked Questions about the SX-70 How to open / close the SX-70 Where do I get a user's manual for my SX-70 Where are the batteries ? How do I replace them ? What happens when you press the red button ? How does exposure-control work? How much does the camera stop down with distance in flash mode ? Can I use type 600-film in a SX-70 camera ? How to disassemble a SX-70 ? Flashbars-FAQ What is the purpose of the two hole socket at the right side of the SX.70? How to make double (multiple) exposures with a SX-70 What is the purpose of the four contacts at the rear of the flashbar slots of Sonar SX-70 cameras ? How to make very long timed exposures ? Who still repairs SX-70 cameras ? Q: How to open / close the SX-70 A: Q: Where do I get a user's manual for my SX-70 ? 11/01/2012 17:41 SX-70 FAQ 2 sur 11 http://www.chemie.unibas.ch/~holder/sxfaq.html Q: Who still repairs Polaroid cameras ? A: Call Polaroid's customer service to get a free copy or look at their online SX-70 user's guide Q: Where can I buy Time Zero SX-70 Film and flashbars for my old One Step or my folding SX-70 camera? A: (From the Polaroid web site) Time Zero has been dead for a long time. Now and then one surfaces on ebay but they are very expensive and usually the image quality due to age is worse then TIP Color shade film. Q: Where are the batteries ? How do I replace them ? The battery is built into each film pack. It is a laminated mercury-free 6V zinc-carbon battery. Newer TIP films contain a Lithium battery. Please recycle the battery. Q: What happens when you press the red button? A: The shutter closes. The fresnel-mirror is unlatched and springs up in front of the viewing-mirror. On its back is the taking-mirror, which reflects light from the lens to the film. The electric eye in the front of the camera measures the light and sets aperture and opens the shutter according to the calculated values. The exposed picture is ejected through a pair of rollers that break a pod with chemicals that start development. Mirrors flip back to idle position. THE SX-70 EXPOSURE-CONTROL Look at the beginner's guide / frequently made mistakes-page . Q: How does exposure-control work? A: The SX-70 contains a set of electronic circuits that use the data of an electronic light-sensor in the front of the camera to calculate aperture and time of exposure. Note that light is not measured through the lens (TTL). A dial at the front of the camera lets you change the picture to brighter or darker. Usually there is no need to change this dial. Note that the dial springs back to neutral when the camera is folded. If you are photographing in a low-contrast contrast environment, the automatic exposure works perfectly. If there is a lot of bright light close to the camera, even if it does not enter the lens, it may influence the electronic exposure-control which may need some compensation. If the contrast of the motive is greater than the film can take, you may use the control to select, which part of the picture is exposed correctly. (If you shoot a bright flower in front of a dark background, you may dial into the dark, so the flower is not overexposed as the automatic decides on average measurement). Q: When I want to use a flashbar to brighten up a counter-light-shot, the SX-70 refuses to flash, creating a silhouette. How come? A: Fill-in flash operation is not possible with certain early models (see list above) Q: How does exposure-control work with flash? 11/01/2012 17:41 SX-70 FAQ 3 sur 11 http://www.chemie.unibas.ch/~holder/sxfaq.html A: Shutter speed is fixed, aperture is based on focused distance max. 20 ft / 6,5 m Baz writes ..I moved back towards a regular operation of camera when on flash mode. Now the riddle is: how much, in stops, a SX70 (mine is a Alpha 1 model 2) closes with the decreasing of focusing distance? The answer when fiddling with those little devices that won't stick back in place. The follower cam has two parts: one move toghether with focus knob, the other is a little flat thing hinged to the follower, operated by a second little solenoid (via a flat spring), and this second sol is located over the big one that move the shutter. The second solenoid hangs the two blades of shutter/iris in a certain position and thus determinates the effective aperture according to the different positions of focus dial. In few words, when I press the red button first the main solenoid closes shutter, mirror raises, the main sol opens shutter, the second sol stops the back travel of blades to a position (if necessary), the main sol disengages the second sol devices, the shutter closes, the mirror goes flat again, the shutter remains closed until I depress the red button. All this when I'm on flash operations. I was able to fix the crucial position manually: closing the shutter blades by pushing on the white plastic swinging arm with a little screwdriver and pressing on the spring of the second solenoid with another. The shutter holds and when you move the focus knob you can see the iris closing and opening. Then shining a light from viewfinder and putting a ground glass over the lens I could take a measure of how much light passes through lenses when varing distance. here a table stating the start aperture as f8: at infinity f8 at 2 meters f8/0.8 at 1 meter f11/0.5 v at 0.6 meter f16/0.6 at 0.4 meter f22/0.3 at 0.3 meter f32/0.3 another table with fixed stops: f8 f11 f16 f22 f32 at infinity at 2 meters between 1 and 0.6 meter between 0.6 and 0.4 meter (at 0.5 I guess) between 0.4 and 0.3 meter. The lighter/darker knob puts a variation of about one and a half stop plus/minus when full turned right or left, this allow a finer tune of exposure. Every mark puts a variation of about a half stop plus/minus. Q: Can I use type 600-film in a SX-70 camera ? A: The SX-70 (time-zero) film has a speed of 125 ASA whereas the 600 has (guess)600 ASA. The 600 Film has four little plastic nubs at the bottom that prevent them from being loaded in a camera designed for type 600-film. You can either trim them off with a knife or use the following method (Thanks, Pat !): One can use a piece of exposed film, or the plastic cover off a pack to load it without removing the tabs. Hold the sheet under and slightly beyond the pack while loading it. The idea is to have something smooth that covers the tabs as the pack is inserted. Remove the sheet once the pack is in far enough and off you go. Now you have the problem, that the film is four times too fast, which is more than what you can compensate with the exposure-control: Even if you turn it 11/01/2012 17:41 SX-70 FAQ 4 sur 11 http://www.chemie.unibas.ch/~holder/sxfaq.html fully into dark, your pictures will still be overexposed. There are two ways to correct this: A temporary solution: Reduce the incoming amount of light : Affix (glue / tape / clip) a 1 stop neutral grey filter in front of the lens and set the lighten/darken control 1.5 stops to darken. This will also darken the View in your finder. Use a coated filter to get best results. Remember the L/D control returns to zero when you fold the camera. NEW: An easy way to modify the SX-70 to use 600 film: To use 600 film in a SX70 camera, simply remove the 4 protruding black pieces of plastic from the leading edge of the pack of film. With no film in the camera, remove the front cover of the camera ( the one that surrounds the lens ). This is done by gently easing outwards the housing sides nearest to the bottom hinge ( I do this with my thumb nail so no crowbar work needed! ). Once the cover is removed you can then pop out the neutral density filter from the inside of the cover. Replace with a similarly thin piece of clear plastic. Re fit the housing, insert film, turn the exposure compensation to its darkest setting and enjoy the results. Each time the camera is closed, the exposure compensation dial will reset to the neutral position. An irreversible modification can be done to fix this by means of cutting off the plastic tongue at the top right hand corner of the name plate. I must stress that this is advise only and is totally done at your own risk, both in terms of any possible resulting personal injury or damage to equipment. Laird Kelly writes: I think I found an easier modification: Since the tabs on the 600 pack catch on the flat spring on the bottom of the film compartment, I used a pair of bent-nosed hemostats (any needle-nosed pliers slim enough to fit would work) to crimp the corners of the spring thus allowing the unmodified pack to insert freely. By the way, I was able to use a pocket knife blade to (carefully) pry off the retaining ring over the light sensor and change the filter *without* removing the front cover - much easier when dealing with a Sonar model or one with screws holding the cover on. Laird Kelly Another solution: Modify the exposure-electronics for 600 ASA The key component is the capacitor of the exposure integration circuit. If this capacitor replaced by one four times smaller, that would correspond to a four times faster film. Jerry Rebold writes: I boldly modified my SX-70 to use 600 film. The suggestion to change the capacitor to one that's 4 times smaller worked like a champ. Here's how: It would have been simple on the manual-focus models, but on the Sonar the focusing mechanism prevents the shutter housing from popping off as shown on your page, even though mine isn't screwed on from the back. So I ground a good-quality jeweler's screwdriver to fit the square-recess screws that hold the shutter housing, and found it was not too difficult to remove them; they self-thread into plastic so they were not overly tight. You can get to the back of the circuit board after you 11/01/2012 17:41 SX-70 FAQ 5 sur 11 http://www.chemie.unibas.ch/~holder/sxfaq.html A) carefully trim the heat-staked fin that holds the end of the board with the light sensor and B) unsolder 7 soft flat tabs bent over the board at the other end. After using solder-wick to get rid of most of the solder, a long needle was used to pry up the tabs while unsoldering - under a 20X industrial microscope. It's a bit awkward working with all the parts strung together, but the board hinges up to give access to the back side with the resistor and capacitor. They were painted over, but with a little acetone and scraping and an ohmmeter I determined that the resistor is indeed 330K but the capacitor measured 1100 pF, not the 740 pF shown on your page. I first tried replacing the 330K resistor with 82K, but the pictures were still way too light. So I restored the 330K resistor and replaced the capacitor with a tiny 270 pF one from Radio Shlock, and voila... a 600-speed SX-70! We used a small ceramic disc of unknown specs from our junk box. To do it right, use a NPO or COG type (less sensitive to temperature changes) like Digi-Key cat no P4930 or BC101BCT, 50 volts 270 pF COG type. They cost less than 15 cents. Here's how www.rwhirled.com identified my SX-70: The complete serial number you entered is 5d940853525. Your camera has the Alpha 1 shutter design with the Alpha "K" focus wheel. Your camera is probably an SX-70 Sonar OneStep. The serial number itself is: 8535 Your camera was made on April 9, 1979 during the A shift. Jerry Rebold P.S. I experimented with the new black & white 600 film (it's cheaper) and here's the first successful pic. The out-of-focus look is from the scanner: Tony Wong writes: I would like to give you some feedback about your update information for converting an older SX-70 to use the newer 600 speed film. I have a Sonar model and the modifications described worked well. I have taken about 20 pictures with the new mods and they came out great. Enclosed is a sample of the pictures I took. First, I started at the beginning by removing the main body and roller assembly, this I did not need to do. I should have started with section C:, 11/01/2012 17:41 SX-70 FAQ 6 sur 11 http://www.chemie.unibas.ch/~holder/sxfaq.html the shutter housing. Everything Marty Kuhn described is pretty much the same. I replaced both the resistor and capacitor since the resistor measured about 275 K ohm which means it drifted about 18%, a bit much for my preference. The only comment about choosing a replacement component is, the capacitor should be as small as possible since there is a recess in the housing a bit wider than a resistor and about 2 resistors deep. The capacitor I bought was too tall. After I replaced the components, I had to paint the whole area black. Both sides of the circuit board around the photo diode were painted black. On my SX-70 Sonar, the circuit board was held in place by soldered connections for the shutter release button, LED, and a plastic tab melted down to provide a cheap lock-down. I had no screws holding my circuit board. From the pictures I have taken with the new mods on my camera, the pictures appear better exposed than before with the standard SX-70 film. I feel the color and contrast is a bit better and perhaps the film is a bit sharper too. Overall, I like the new Platinum film. I hope that the new film does not leak the white development paste that the old film did, that was quite annoying. In order to use the new 600 Platinum film (Polaroid 32 ) I had to trim the center two tabs protruding from the bottom corner of the film magazine (it's on the bottom of the side that you insert first into the camera.) The center two tabs which are barely noticeable, will catch on the spring mounted on the bottom of the camera which holds the magazine up in the film bay. Otherwise, there are no other obstructions or differences that I have noticed. If I like the camera enough, I will build the flash adapter. I think the camera is really worth it. Thanks for posting such great information Georg, I found it very helpful and I like my SX-7- more for it. Keep up the good work! Tony Wong 11/01/2012 17:41 SX-70 FAQ 7 sur 11 http://www.chemie.unibas.ch/~holder/sxfaq.html Jim Meyers writes: have a few old SX-70 cameras and I love to experiment. I could not resist trying the electronic modification to convert some of my cameras to 600 speed. I found that the Sonar OneStep converts the best. I had to use a 150pf capacitor. Since I originally measured my capacitor at 1024pf, I thought 270 or 220 might be best, but they were all overexposed. I found that changing the resistor does not do what I intended. I am not sure if this is an RC combination. I am beginning to think the resistor may be part of a meter calibration circuit. Perhaps one day I'll find a schematic. I also tried the conversion on an Alpha-series model 1 (not Sonar). I could not get good results at all. This makes no sense to me yet, since the exposure control module is the same part as the sonar models. I will try it again some day, with smaller capacitors and see if I can get into the correct range. I wonder if anyone has had good results with trying to convert a non-sonar camera? It seems to be, there should be no difference in the late model cameras. Oh well. It took me a while to figure out how to remove the shutter housing from the camera. It is difficult on the Sonar model because the cover has additional clips at the top on each side and not only on the bottom. You have to be more aggressive to spread the sides of the cover to release the clips. No screws were involved. Also, it is not necessary to remove or open the Sonar the unit at all. Here are some hints for your site: To remove the leather from an SX-70, use HEAT. Don't try to just pry it off. I use a hair dryer and a small, flexible putty knife. When desoldering components, don't bother trying to use a plunger type vacuum desoldering tool. These just make a mess and require too much heat. Desoldering braid works the best and with the least damage. Make tools from wooden sticks for prying, pressing pins, etc. They don't scratch the camera. Best regards, The cause of the overexposure problem was shutter drag. A slight amount of drag does not cause problems when used with Time Zero film but will cause problems 11/01/2012 17:41 SX-70 FAQ 8 sur 11 http://www.chemie.unibas.ch/~holder/sxfaq.html when converted to 600 speed. This variable is why the mod works well on some camera and not so well for others. A good cleaning of the shutter assembly clears up most of the problem. I found on all the models I converted that I had to substitute a clear filter for the tinted photo cell cover. The cameras now take beautifully exposed photos with 600 speed film without having to dial in compensation for normal lighting. Jim Meyers There are at least three different electronic circuits, which work on the same principle but have different capacitor values. This modification requires good electronics- and mechanical skills. The flexible printed circuits Polaroid uses in the SX-70 disintegrate when they are heated too much while soldering. Be aware that you may destroy your camera when you try this modification. George Q: Anybody knows how to open a SX-70 ? A: See the article How to disassemble a SX-70 Camera Flashbars-FAQ I have added an article about Flashbars that includes schematics for an adapter that connects electronic flashes to a flashbar-socket. Q: What is the purpose of the two hole socket at the right side of the SX.70? A: The camera can be triggered by shorting the two contacts, which happen to be the same contacts that go to the red button internally. Q: How to make multiple exposures with a SX-70 ? Marcus Brooks writes: The trick is to defeat the little hook thingy that shoves the film into the rollers. See the notch on the back left corner of the cassette? Cut a strip of thin steel that just slides into that notch on top of the film (maybe 3/16 wide and 1.5 inches long), and bend it into a cross-section something like the following: _________________________ \ \ | I cut the strip out of the lifter "spring" from an old cassette. I guess I made the 11/01/2012 17:41 SX-70 FAQ 9 sur 11 http://www.chemie.unibas.ch/~holder/sxfaq.html "ramp" angle about 45 degrees. Its height should match the depth of the notch in the back of the cassette, so the vertical skirt is restrained by the back wall. (It's easier to do than to describe.) You start with the cassette already loaded in the camera. In total darkness, pull the cassette back out of the camera and slide this device into the slot, with the bent part down and snugly against the back of the cassette. Then put the cassette back in the camera. Instead of ejecting the top sheet as usual, the hook should now ride up over the ramp and slip along the top. Now take as many exposures as you want. When you're done, go back in the dark, pull the cassette out, pull out the strip of metal, and pop the cassette back in the camera. The top sheet now ejects normally, developing your multiple exposure. Why would anybody go to all this trouble? Well, in my case I was working with a 3D ray tracing program back in the late '80s. I wanted a quick way to view the program's 24-bit output, but the company hadn't gotten any 24-bit displays yet. So I saved a separate 8-bit indexed file for each of the Red, Green, and Blue channels, hacked the color look-up tables to display linear red, green, or blue, and "photo composited" on the SX-70 by displaying each channel in turn and doing a multiple exposure. For grins, I'm attaching some example shots. In the plane photo you can see where my cheater slipped out onto the film. The Newton's cradle shot on the left is a joke I played on the photo lab. I was also shooting 35mm negatives, so I thought it might be amusing to have one "positive" image on the film. I just reversed the order of the 11/01/2012 17:41 SX-70 FAQ 10 sur 11 http://www.chemie.unibas.ch/~holder/sxfaq.html color palettes. Q: What is the purpose of the four contacts at the rear of the flashbar slots of Sonar SX-70 cameras ? A: The contacts give handshaking information to attached flash units. This especially important if the flash unit is powered from the battery in the camera's film pack because it cannot focus or eject pictures and recycle the flash at the same time. It also makes sure the shutter button is blocked until the flash is ready. Flash socket, top view from rear of camera: (1 )(2 )(3 )(4 )(5 )(6 )(7 ) (1')(2')------------(6')(7') (1)(2)(3)(4)(5)(6)(7)(8)- flashbulb 5 flashbulb 4 Power supply from Flash IC (+6V) flashbulb 3 flashbulb 2 flashbulb 1 connect to GND for flash mode (camera) GND The contacts with ( ' ) are opposite to the respective contacts (1')- + voltage when focusing(shutter button slightly depressed) (2')- + voltage when taking (shutter button fully depressed) (7')- + voltage when camera unfolded (8')- + voltage when camera focus not in park position Also see the article 636 Flash for SX-70 Sonar for further explanation of how the contacts can me used. name="link09" If anyone out there repairs / services / modifies SX-70 and other Polaroid cameras I'd gladly put your address and e-mail on this page. Q:How do I make very long timed exposures ? Since exposure is controlled by the electric eye, covering the light sensor leads to longer exposure times, with a maximum of 30 seconds - 1 minute. If this is not long enough for you ,you can extend exposure infinitely using the following method (Thanks Gavin Blake !) when you are in a low light situation with the SX-70 and you expose, the shutter will open for 15-20 seconds...during this time if you simply open the front panel (i.e. as if to load film) then you interrupt and shut down the exposure circuits without closing the shutter.  This will then keep the shutter open until you close the panel again which should then eject the film.  If the film will not immediately eject then simply fire the exposure button again and it will.  Simple hey.  This should be carried out with the camera on a tripod for obvious (camera shake) reasons Q:Who still repairs SX-70 cameras ? Vintage Instant in Amsterdam repairs SX-70 and other Polaroid cameras and sells 11/01/2012 17:41 SX-70 FAQ 11 sur 11 http://www.chemie.unibas.ch/~holder/sxfaq.html spare parts. Someone called Fastcat99 offers SX-70 repairs on ebay. Instant Photographic Repair in New Jersey, USA phone: 1-973-831-8616 This address was given by a reader. I don't know anything about this company. If you know other companies that repair SX-70 cameras please let me know. 11/01/2012 17:41