1
English
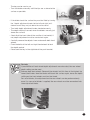
• Clean the nylon distance collars; they will be put back in place on the axle with the new blades.
If the axle shows heavy wear at the location of the blades
it must be replaced as well.
• Thoroughly clean the bare axle. Use sandpaper if necessary.
• Check both bearings for signs of play. Rotating the bearings axles will quickly reveal any bearing noise. If there is any, replace the bearings together with the blades.
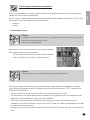
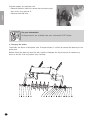
• Place the new blades on the blade axle in the correct order.
• Ensure that the blade points correspond to their spinning direction.
• Two adjacent blades are always offset at 60 degrees.
c. Placement of the blade axle
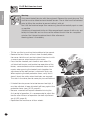
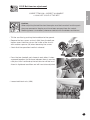
• Once the blade axle is reassembled it can be replaced into the chassis.
The bearing holders must be fitted on the inside of the chassis plate.
• The two bolts of each bearing holder are temporarily put in place without securing them
tightly.
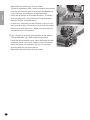
• Replace the pulley on the axle. Don’t forget the intermediate ring and make sure to place the
wedge in the axle. Ensure that the seam of the pulley is always at the tip side of the axle.
• Tighten the pulley with centre bolt M10. This simultaneously tightens the entire axle-assembly.
• Rotate the blades a couple of times. If the axle runs freely without stopping immediately, the
bearing holders can be secured tightly. If not, tick the axle tips with a plastic hammer while the
axle rotates. Once the axle rotates freely, the bearing holders can be fastened.
• Replace the belt on the pulley.
d. Performing checks and finishing
• Check the depth setting and set it correctly (see § 11.4.4, page 34). Verify that the rear wheels
are mounted in the centre bolt holes. After all: the wheels were mounted in the uppermost bolt
holes to use up the blades.
• Check the belt tension and set it correctly (see § 11.5.5, page 41).
• Replace the belt protection cover.
• Reposition the machine on all four wheels.
46