1
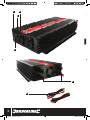
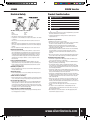
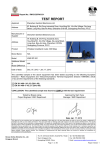
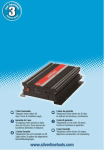
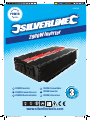
S
444658
ERLIN
E
ILV
POWER
RA
NGE
II
I
II
I
NL
NL
NL
NL
NL NL
2000W Convertidor
2000W Inverter
2000W Omvormer
uaran
rG
3
EG
R
D
D
D
ESP
ESP
ESP ESP
ESP ESP
ISTE
E*
FF
F
Inverter
FF
2000W
Convertisseurs
F
D
2000W Wechselrichter
D
D
tee
GB
GB
GB
GB
GB GB
2000W
Yea
er
t
r
e
v
n
I
2000W
R ONL
IN
www.silverlinetools.com
444658_instructions.indd 3
8/6/09 09:05:09
3
1
P
2
4
5
6
2
444658_instructions.indd 2
8/6/09 09:05:15
GB
Explanation of Symbols
• Wear breathing protection.
• Wear eye protection.
• Wear hearing protection.
• Wear gloves.
• Do not dispose as unsorted waste.
•Risk of electrocution
Specification
Input voltage range...............................12V DC
Output voltage.......................................230V
Output frequency..................................50Hz
Waveform..............................................Modified sine
Max continuous output power...............2000W
Surge capacity/time..............................4000W for one second
Efficiency..............................................>90%
No load current draw............................ <1.0A
Low voltage shutdown.......................... 10V
As part of our ongoing product development, specifications of
Silverline products may alter without notice.
General Safety
Carefully read and understand this manual and any label attached to
the tool before use. Keep these instructions with the product for future
reference. Ensure all persons who use this product are fully acquainted
with this manual.
Even when used as prescribed it is not possible to eliminate all residual risk
factors. Use with caution. If you are at all unsure of the correct and safe
manner in which to use this tool, do not attempt to use it.
Keep guards in position
• Always keep guards in position, in good working order, correctly adjusted
and aligned. Never attempt to use a tool if any of the supplied guards are
missing. If any guards are damaged, replace before use.
Remove adjusting keys
• Always check to see that keys and adjusting devices are removed from
the tool before use.
Clean the work area
• Accidents can occur where benches and work areas are cluttered or
dirty, floors must be kept clear, avoid working where the floor is slippery.
If working outdoors, make yourself aware of all potential slip and trip
hazards before using this tool.
Children and pets
• Children and pets should always be kept at a safe distance from your
work area. Lock tools away where children can’t get access to them. Do
not allow children, or untrained persons to use this tool.
Use the correct tool
• Don’t force, or attempt to use a tool for a purpose it was not designed.
• This tool is not intended for industrial use.
Wear suitable clothing and footwear
• Don’t wear loose fitting clothing, neckties, jewellery, or other items which
may become caught. Wear non slip footwear, or footwear with protective
toe caps where appropriate. Long hair should be covered or tied back.
Keep your balance
• Don’t over reach, keep proper footing at all times, do not use tools when
standing on an unstable surface.
Accessories
• The use of any attachment or accessory other than those mentioned
in this manual could result in damage or injury. The use of improper
accessories could be dangerous, and may invalidate your warranty.
Secure work
• Where possible, always secure work. If appropriate use a clamp or vice, it
will allow you to use both hands to operate your tool.
Check for damaged or missing parts
• Before each use, check if any part of the tool is damaged or missing,
check carefully that it will operate properly and perform its intended
function. Check alignment of moving parts for binding. Any guard or other
part that is damaged should be immediately repaired or replaced by an
authorised service centre. DO NOT USE IF DEFECTIVE.
4
444658_instructions.indd 4
8/6/09 09:05:16
2000W Inverter
444658
Electrical Safety
The wires in this product are coloured:
Blue
Neutral
Brown
Live
Green & Yellow Earth
• This appliance must be protected by a suitable fuse.
• To prevent fire or shock hazard, do not expose this product to rain, water
or moisture.
• There are no user serviceable parts inside except those referred to in
this manual.
• Always refer servicing to qualified service personnel. Never remove any
part of the casing unless qualified to do so; this unit contains dangerous
voltages.
• Use of a residual current device will reduce the risk of electric shock.
Dangerous environment
• Do not use power tools in damp or wet conditions, or expose them to
rain. Provide adequate surrounding work space and keep area well lit.
Do not use power tools where there is a risk of explosion or fire from
combustible material, flammable liquids, flammable gases, or dust of
an explosive nature. When using power tools avoid contact with any
earthed items such as pipes, radiators, cookers, refrigerators, metal
baths and taps.
Protect yourself from vibration
• Hand held power tools may produce vibration. Vibration can cause
disease. Gloves to keep the operator warm may help to maintain good
blood circulation in the fingers. Hand held tools should not be used for
long periods without a break.
Maintain your power tool
• Ensure all ventilation holes are kept clear at all times. Overheating and
fire may otherwise result.
Always Disconnect
• Before changing fittings or accessories, always ensure that your tool is
disconnected from the power source.
Switch off before connecting
• Ensure that the power tool is switched off before connecting to the power
source. If the power tool stops unexpectedly, turn the power switch to off.
Do not abuse the power cord
• Be sure your cable or extension cable is in good condition. Always have
a damaged cable or extension cable replaced at an authorised service
centre before using it. Never yank or pull the cable to disconnect it from
the power socket. Never carry your tool by its cable. Keep the cable away
from damp, heat, oil, solvents, and sharp edges.
Don’t leave the tool running unattended
• Always wait until your tool has completely stopped functioning, and has
been unplugged, before leaving it.
Product Familiarisation
1
Power Indicator Light
2
Low Battery Indicator Light
3
230V Output Sockets
4
Power Switch
5
12V Input Connectors
6
12V Supply leads
Unpacking Your Inverter
• Carefully unpack and inspect your inverter. Fully familiarise yourself with
all features and functions of the product.
• If any parts are damaged or missing, have these parts repaired or
replaced before use.
Placement of your inverter
• Always place the inverter on a level surface.
• Do not use the inverter in any damp environment, or any position where
the inverter could accidentally come into contact with water.
• Always position the inverter away from direct sunlight and other
heat sources. The inverter should only be used when the ambient air
temperature is between 10-30˚C.
• Allow for adequate ventilation around the inverter. There should always
be at least 25mm of clear space around the inverter. Do not place
anything on top of the inverter. Ensure that ventilation holes are not
obscured.
• Do not use the inverter in any location where flammable gasses may be
present. This includes inside engine bays, and battery compartments.
Connecting to the power supply
• This inverter is supplied with a 12V supply lead (6). This allows you to
connect the inverter directly to a 12V battery.
• Do not attempt to connect the inverter to any form of 230V distribution
system (e.g. building or caravan wiring).
• The 12V system must be capable of supplying an adequate current to the inverter. To calculate the approximate current requirement, divide the inverter power rating (W) by 10. Consult the vehicle user manual for electrical supply information.
• This inverter should only be used with 12V DC positive earth electrical systems. Use with any other type of system may be dangerous and could cause permanent damage to electrical components.
• This inverter is equipped with dual 12V input connectors. This enables
two batteries to be used to feed the inverter. The inverter can be run from
one battery, but battery life will be reduced, and the inverter may shut
down under high load.
• Remove the screws of the 12V input connecters (5) and attach one end
of each 12V supply lead to the connectors. Tighten the screws. Ensure
that the positive and negative (red and black) leads are connected to the
correct terminals as indicated on the inverter
• The free ends of the 12V supply leads can now be connected to the
battery.
• To reduce the risk of accidental short circuiting, always have the
12V supply leads securely attached to the inverter when connecting or
disconnecting the battery.
• Do not attempt to connect the inverter to the 12V supply by any other means than the supplied connector.
www.silverlinetools.com
444658_instructions.indd 5
5
8/6/09 09:05:17
GB
Operating Instructions
Maintenance
Connecting a load
Cleaning
• Before connecting any appliance to the inverter, switch power switch (3) to the ON position. After a few moments the green power indicator light (1) will illuminate. The inverter is now ready to be used.
• Do not connect loads greater than the rated maximum continuous power output of the inverter (see specifications).
• Some appliances (televisions, stereos, motors, neon lights etc) may require a much higher starting power than their rated power. If the appliance will not start, the maximum output of the inverter has been exceeded. Reduce the total load on the inverter.
• If the appliance to be connected does not have its wattage (W) indicated on it, the wattage can be calculated by multiplying the amperage (A)
by 230.
• Electrical appliances can be connected to the 230V outlet sockets (3).
• Disconnect the inverter from the power supply before cleaning.
• Keep your inverter clean. Always clean dust or particles away, and never
allow ventilation holes to become blocked. Use a soft brush, or dry cloth
to clean the inverter, if available blow through the ventilation holes with
clean, dry, compressed air.
Low battery protection
• In order to prevent your vehicle battery from being run flat, this inverter is equipped with a low voltage alarm and automatic low battery shutdown.
• Do not connect loads greater than the rated maximum continuous power output of the inverter (see specifications).
• If the supply voltage drops to 10.5V the low battery alarm will sound and the low battery indicator light (2) will illuminate. This indicates that the battery should be charged. If the supply voltage is allowed to drop to 10V, the inverter will automatically cut out. To restart the inverter, switch off, charge the battery, and switch back on.
• A typical 12V battery will have an operating time of at least 1-2 hours. It is recommended that the vehicle’s engine is started and run once every hour to “top up” the battery.
Note: the inverter may shut down as the engine is started due to the
high electrical load generated by the vehicle starter motor.
Overload protection
• This inverter is equipped with an in-built high temperature cut out. If an overload causes the internal parts of the inverter to overheat it will automatically shut down.
• To restart, switch off, reduce the load, allow the inverter to cool, and
switch back on.
Trouble shooting
Problem
Inverter will not operate
Possible cause
Suggested Remedy
Low battery voltage
Charge or replace battery
Inverter in thermal shutdown
Allow inverter to cool before switching on
12V lead not properly connected
Check lead for proper connections
Internal fuse “blown”
Have inverter serviced at an authorised service centre
Electrical appliance will not
operate
Starting load of appliance is too great
Reduce load
Low voltage alarm on
continuously
Poor electrical connections
Check/clean electrical connections
Inadequate power supply
Check 12V system capacity
Low output voltage
Inverter is overloaded
Reduce load
Input voltage is below 11V
Charge or replace battery
Inverter is located to close to aerial
Move inverter/aerial
Aerial cable is not shielded
Use shielded cable
Television/stereo interference
6
444658_instructions.indd 6
8/6/09 09:05:17
2000W Inverter
444658
Silverline Tools Guarantee
This Silverline product comes with a 3 year guarantee.
To qualify you must register this product at silverlinetools.com within 30
days of purchase. The guarantee period begins on the date of purchase as
detailed on your sales receipt.
Registering your purchase
Registration is made at silverlinetools.com by selecting the Guarantee
Registration button. You will need to enter:• Your personal details
• Details of the product and purchase information
Once this information is entered your guarantee certificate will be created in
PDF format for you to print out and keep with your purchase.
Terms & Conditions
This Guarantee and guarantee period becomes effective at the date of retail
purchase as detailed on your sales receipt.
PLEASE KEEP YOUR SALES RECIEPT
If this product develops a fault within 30 days of purchase, return it to the
stockist where it was purchased, with your receipt, stating details of the
fault. You will receive a replacement or refund.
If this product develops a fault after the 30 day period, return it to:
Silverline Tools Service Centre
PO Box 2988
Yeovil
BA21 1WU, UK
The guarantee claim must be submitted during the guarantee period.
You must provide the original sales receipt indicating the purchase date, your
name, address and place of purchase before any work can be carried out.
You must provide precise details of the fault requiring correction.
All claims will be verified by Silverline Tools that the deficiencies are of a
material or manufacturing fault within the guarantee period.
We do not refund carriage. All products should be in a suitably clean and
safe state for repair, and should be packaged carefully to prevent damage or
injury during transportation. We may reject unsuitable or unsafe deliveries.
All work will be carried out by Silverline Tools or its authorised repair agents.
The repair or replacement of the product will not extend the period of
guarantee.
Defects recognised by us as being covered by the guarantee shall be
corrected by means of repair of the tool free of charge (excluding carriage
charges) or by replacement with a tool in perfect working order.
Retained tools, or parts, for which a replacement has been issued, will
become the property of Silverline Tools.
EC Declaration of Conformity
The undersigned: Mr Philip Ellis
as authorized by: Silverline Tools Ltd
Declares that the
Name/ model: 2000W Inverter
The repair or replacement of your product under guarantee provides benefits
which are additional to and do not affect your statutory rights as a consumer.
What is covered:
The repair of the product, if it can be verified to the satisfaction of the
Silverline Tools that the deficiencies were due to faulty materials or
workmanship within the guarantee period of purchase.
If any part is no longer available or out of manufacture, Silverline Tools will
replace it with a functional replacement part.
Use of the product in the EU.
What is not covered:
Silverline Tools does not guarantee repairs required as a result of:
Normal wear and tear caused by use in accordance with the operating
instructions eg blades, brushes, belts, bulbs, batteries etc.
The replacement of any provided accessories drill bits, blades, sanding
sheets, cutting discs and other related items.
Accidental damage, faults caused by negligent use or care, misuse, neglect,
careless operation or handling of the product.
Use of the product for anything other than normal domestic purposes.
Change or modification of the product in any way.
Use of parts and accessories which are not Silverline Tools genuine
components.
Faulty installation (except installed by Silverline Tools).
Repairs or alterations carried out by parties other than Silverline Tools or its
authorised repair agents.
Claims other than the right to correction of faults on the tool named in these
guarantee conditions are not covered by the guarantee.
The technical documentation is kept by: Silverline Tools Ltd
Notified body: China Ceprei (Sichuan) Labratory
Place of declaration: China
Date: 28/5/09
Signed by:
Type/ serial no: 444658
Position in Company: Director
Name and address of Manufacturer or Authorised representative:
Conforms to the following Directives:
• 2006/95/EC Low Voltage Directive
Silverline Tools Ltd, Boundary Way, Lufton Trading Estate, Yeovil,
Somerset, BA22 8HZ United Kingdom
www.silverlinetools.com
444658_instructions.indd 7
7
8/6/09 09:05:18