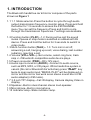
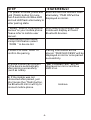
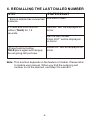
1
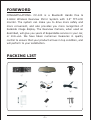
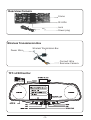
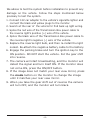
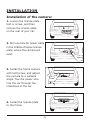
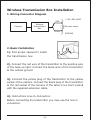
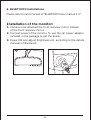
User manual
Bluetooth Hands free & 2.4Ghz
Wireless Rearview Mirror System
Model No.: CC-120
TRE -BS-132
CONTENTS
1.Foreword
1
2.Packing List
1
3.Structure
2
4.Installation
4
5.Specifications
9
*Comfortcam is not responsible for any damage resulting from
installation and use of this product.
*2.4 GHz devices as e.g. cell phones, navigation, bluetooth and
Wi-Fi system scan have influence on the performance of this
product.
FOREWORD
CONGRATULATIONS. CC-120 is a Bluetooth Hands free &
2.4GHz Wireless Rearview Mirror System with 3.5" TFT-LCD
monitor. The system can make you to drive more safely and
more convenient, and also provides you more recognition of
backside image display. The Rearview Camera, when used as
described, will give you years of dependable service in your car,
or mini-van. We have taken numerous measures in quality
control to ensure that your product arrives in top condition, and
will perform to your satisfaction.
PACKING LIST
①
②
③
④
⑤
⑥
⑦
⑧
⑨
-1-
1.Rearview Camera: Wired Camera with Night Vision.
2.Monitor: 3.5 inch TFT-LCD, with 960*240 resolution
3.Earphone
4.Wireless Transmission Box : Connected to wired camera, car
power wire. It transmits signals to monitor.
5.Power Adapter: 12 Volt Car Power Adapter and built in 2.4GHz
wireless receiver
6.Audio cable for listening MP3.
7.3Fuse and sticker. Fuse is accessory for power adaptor, and
sticker is for wireless receiver if necessary.
8.In-Line Wire Connectors: To expose reverse light wires.
9.Sheet Metal Screws: To install camera.
Earphone
Charge port
Power switch
No function
Indicator LED
(RED FOR POWER ON,
GREEN FOR CHARGING)
-2-
Rearview Camera
Frame
IR LEDs
Lens
Power plug
Wireless Transmission Box
Wireless Transmission Box
Power Wire
Connect Wire
Rearview Camera
TFT-LCD Monitor
-3-
We advise to test the system before installation to prevent any
damage on the vehicle. Follow the steps mentioned below
precisely to test the system.
1. Connect 12V car adaptor to the vehicle's cigarette lighter and
connect the black and yellow plugs to the monitor.
2. Search at the rear of the vehicle for find back up light wiring.
3. Splice the red wire of the Transmission Box power cable to
the reverse light's positive (+) wire of the vehicle.
4. Splice the black wire of the Transmission Box power cable to
the reverse light's negative (-) wire of the vehicle.
5. Replace the reverse light bulb, and then re-install the light
socket. Re-attach the negative battery cable to the battery.
6. Engage the parking brake and turn the ignition key to the
ON position. DO NOT start the vehicle. Put the gear shift
into reverse.
7. The camera will start broadcasting, and the monitor will
detect the signal and turn itself ON. If the monitor does
not come ON, press the ON/OFF button.
8. If the image does not match your rear view mirror, press
the mode button on the monitor to change the image
until it matches your rear view mirror.
9. When you take the gear shift out of reverse the camera
will turn OFF, and the monitor will turn black.
-4-
INSTALLATION
Installation of the camera:
1. Loosen the license plate
bolt or screw, and then
remove the license plate
on the rear of your car.
TRE-BS-132
2. Drill one hole for power cable
in the middle of below license
plate, where the camera will
exist.
3. Install the frame camera
with bolt/screw, and adjust
the camera to a suitable
angle. Tow the power wire
into the car through the
interstices of the car.
TRE-BS-132
4. Install the license plate
to the frame.
-5-
Wireless Transmission Box Installation
1. Wiring Connector Diagram
+12VDC REV LAMP
RED
Camera
Wireless
Transmission
Box
Reverse Lamp
BLACK
GROUND
2. Basic Installation
1). Find proper spaces for install
the transmission box.
2). Connect the red wire of the transmitter to the positive wire
of the back up light. Connect the black wire of the transmitter
to the vehicle ground.
3). Connect the yellow plug of the transmitter to the yellow
socket of the camera. Connect the black plug of the transmitter
to the red socket of the camera. If the cable is too short extend
with the supplied extension cable.
4). Instructions Line-In-Connection
Before connecting the transmitter you may use the line-in
connection.
-6-
Insert the existing
wire to be tapped.
Insert the wire to
be attached.
-7-
Crimp tap then
close lock
3. BLUETOOTH installations
Please refer to extra manual of “BLUETOOTH User manual 3.0”.
Installation of the monitor:
1. Camera is be attached the front rearview mirror instead
of the front rearview mirror.
2. Connect power of the monitor. To use the car power adapter
included in the package to get the power.
3. Power ON and adjust brightness etc. according to the details
manuals of Bluetooth.
1
-8-
SPECIFICATIONS
CC-120
Monitor
Camera
Items
Imaging Sensor
Total Pixels
Horizontal View Angle
CMOS
720×480(NTSC)720×576(PAL)
80 degree
Transmission Power
2mW/FCC,10wm/CE
0 Lux (IR ON)
Minimum Illumination
IR Night Range
Power Supply
Consumption Current(Max.)
Dimensions(W×D×H )
Weight(about)
LCD Screen Type
Effective Pixels
Received Sensitivity
Power Supply Voltage
Consumption Current (Max.)
Unobstructed Effective Range(Min.)
Dimensions(W×D×H)
Weight(about)
Transmission Frequency
4m
Supplied By Transmission Box
120mA
525×148×45(mm)
264g
3.5″TFT-LCD
960 × 240
≤-85dBm
+12VDC
600mA
40m
285 ×90×24(mm)
370g
ISM 2,400~2,483 MHz
*Actual transmission range may vary according to the weather,
location, interference and building construction.
*All the specifications are subject to minor change without prior
notice.
-9-
CAUTIONS
1.The system voltage is 9V~15V. Do NOT use the system for
vehicles with voltage system higher than 15V; this will cause
irreparable damage.
2.The apparatus shall not be exposed to dripping or splashing
and that no objects filled with liquids, such as vases, shall be
placed on the apparatus.
3.The transmitter is integrated in the car adaptor. Do not make
any adjustments.
4.The adapter built in wireless transmission mould, don't
change it in any situation.
5.The camera/receiver can only be completely disconnected
from the mains by unplug the adapter.
6.Do not cut the DC power cable of the apparatus to fit with
another power source.
7.Attention should be drawn to the environment aspects of
battery disposal.
-10-
Declaration of Conformity:
We, Trebs BV, declare under our sole responsibility that this
product is in conformity with the essential requirements and
other relevant requirements of the R&TTE Directive (1999/5/EC).
The product is compliant with the following standards and/ or
other normative documents:
EN 50371 : 2002
EN 60065 : 2002 + A1 : 2006
EN301 489-3 vl. 4.1 (2002-08)
EN300 440 -2 vl. 2.1 (2008-05)
Trebs BV.
Thermiekstraat 1
6361 HB Nuth
The Netherlands
Website: www.trebs.nl
email: [email protected]
Trebs Comfortcam is a brand of Trebs BV. All other brands in this
manual and/ or packaging do not belong to Trebs BV and have
another justified holder.
EU Environmental Protection
Waste electrical products should not be
disposed of with household waste. Please
recycle where facilities exist. Check with
your Local Authority or retailer for
recycling advice.
BLUETOOTH User manual 3.0
for model CC-120
CONTENTS
WELCOME & DRIVE SAFELY ------------------------------------------2
ILLUSTRATION: Figure 1 ----------------------------------------------- 3
INTRODUCTION ---------------------------------------------------------4
INSTALLATION -----------------------------------------------------------5
POWER ON / OFF & PAIRING -----------------------------------------6
VOICE DIAL ----------------------------------------------------------------7
REDIALLING THE LAST DIALED NUMBER -------------------------8
CALL ANSWER AND CALL HANG UP ---------------------------------9
CALL REJECT -----------------------------------------------------------10
AUDIO TRANSFER------------------------------------------------------10
VOLUME CONTROL ----------------------------------------------------10
MUTE CONTROL --------------------------------------------------------10
ANSWER MODE SET ---------------------------------------------------11
SELECT RING TONE----------------------------------------------------11
BLUETOOTH AV DEVICE OPERATION------------------------------11
SWITCH AUDIO OUTPUT MODE AND PICTURE ADJUSTMENT--- 12
FM HEADSET USE ------------------------------------------------------13
To Set Audio On and Off-------------------------------------------------14
To Resume Factory Default Mode-------------------------------------14
WIRELESS CAMERA SYSTEM---------------------------------------14
PHONE BOOK------------------------------------------------------------15
SELECT LAST 10 CALLS DIAL-BACK FROM MIRROR-----------15
Frequently asked questions--------------------------------------------15
SPECIFICATION---------------------------------------------------------16
-1-
Welcome
Thank you for the purchase of this Bluetooth Handsfree Car Kit.
For the sake of making full use of the functions of Bluetooth Car
Kit, please read the user manual carefully in advance.
Drive safely
It is dangerous to use cellphone when driving a car. It will increase
the possibility of accident.
Please reduce conversation time by mobile as possible as you
can while driving. It is good for you not to do any record or read.
You'd better observe the surroundings before using the mobile
first. When it's necessary (if the weather is bad;there is traffic jam;
there are children in the car or something wrong with the car),You
should leave the road and stop the car before dialing or receiving
a call.
-2-
ILLUSTRATION: Figure 1
DC+12V OUTPUT
MP3/MP4 cable(white)
VIDEO(YELLOW)
CHARGE HOLDER
VIDEO(YELLOW)
POWER
B l uetooth S y stem
SPEAKER
CALL I N
075 5 123456 7 8
JAC K
SPEAKER
INDICATOR LAMP
MODE
PLAY
MICROPHONE
VOL+
VOLSEND/TALK
ON/OFF
CIGARETTE POWER
ANTENNA BOX
YELLOW — YELLOW
BLACK — RED
GND
BACKUP LIGHT
-3-
CAMERA
1. INTRODUCTION
The Bluetooth handsfree car kit mirror compose of the parts
shown as Figure 1
1.1 1.1 Mode selector-Press the button to cycle through audio
output-transmission frequency-monitor setup, Press and hold
the button for 1.5 seconds to access the FM CHANNEL
menu.You can set the frequency.Press and hold to cycle
through the transmission frquencies.7 settings are available.
1.2 Function button (PLAY)--1.2 During active call the sound
mutes if pause or stop mode is selected on a Bluetooth AV
device. Press and hold the button for 3 seconds to switch to
video mode.
1.3 Multi-function button(TALK)-- 1.3 Turn mirror on/off,
answering a call, hanging up a call, voice dialing, last number
redialing, rejecting a call.
1.4 Volume (VOL+/VOL-)--Set volume, select-ring tone; track
skip +/- if Bluetooth-compatible audio device plays.
1.5 Power connector (PWR) --DC+12V input.
1.6 Audio input connector (AUDIO)--Connect to audio source,
such as MP3, MP4, or CD player. While handsfree system is
vacant (No call or Bluetooth AV activities),press “PLAY” key
twice to open audio input,“MEDIA PLAY” will be displayed on
mirror and the mirror can work as an stereo sound box or FM
audio adapter(in FM mode).
1.7 3.5 inch TFT display--Call ID display, Camera display,Video in
display.
1.8 Speaker--Built-in dual channel stereo loud-speaker.
1.9 Microphone--Built-in microphone.
1.10 Indicator lamp--State indicator lamp.
-4-
2. INSTALLATION
Easy installation, step as following:
2.1 Hook bottom-stator of the mirror on original rearview mirror
bottom edge. Ensure perpendicular bisector of the mirror is
congruent with perpendicular bisector of original rearview
mirror. Pull up-stator of the mirror until it is fix on original
rearview mirror (up and bottom stator will adjust by spring).
Then release hand.
2.2 Check if the mirror has been firmly clipped to the original
rearview mirror, the congruence of the mirror compare to
Original rearview mirror, and adjust accordingly.
2.3 If there is any loose, repeat above steps.
2.4 Plug the power adapter into the cigarette socket.
3. Turn mirror ON / OFF
Press multi-function button(TALK) and hold for 1.5 seconds,until
“POWER ON”.The mirror sounds a brief beep tone,then release it.
The device is turned on. Once power on the device will auto
connect the latest used cellphone, if never paired with any
cellphone yet, the device will enter pairing state.
Press multi-function (TALK) key and hold for more than 5
seconds. Until “POWER OFF” is displayed on mirror.The mirror
sounds a brief beep tone. The device is turned off.
4. PAIRING
“Pair” means the handsfree system and mobile phone
authenticate each other and store the authentication information.
Only paired devices can establish link and audio connection.
-5-
STEP
STATE/RESULT
1. In power off state, press and Blue LED and red LED will flash
hold (TALK) button for more
alternately, “PAIR ON”will be
than 5 seconds until Blue LED
displayed on mirror.
and red LED flash alternately to
enter pairing state.
2. Select “Search for Bluetooth
devices”on your mobile phone.
Please refer to mobile user
manual.
3. According to the mobile
prompt Information,select
“ WINS ” in device list.
After searching finished, the
mobile will display all found
Bluetooth devices.
4. Enter Pin code “0000” to
confirm the pairing.
Pairing information will be
stored. “PAIR SUCCESS” will be
displayed on mirror once paired
successfully.
a) Some mobile can connect
to the device automatically
after pairing successfully
(such as nokia).
“MB CONNECTED” will be
displayed on mirror and blue
LED is on.
B) If the mobile was not
connected after paired, just
short press the (TALK) button,
the Bluetooth mirror will try to
connect mobile phone.
As above.
-6-
5. VOICE DIAL
STEP
STATE/RESULT
1. Ensure mobile has connected Blue LED is flash.
to device.
2. Short press function button
(TALK).
“VOICE DIAL”will be
displayed on mirror.
The device will send voice dial
prompt.
3 Bring out a pre-recorded voice The mobile will dial number,
“CALL OUT” will be displayed
tag.
on mirror.
Note : This function used only the user mobile phone supports
the voice dial function. Please refer to mobile user manual for
details.
-7-
6. REDIALLING THE LAST DIALED NUMBER
STEP
STATE/RESULT
1. Ensure mobile has connected Blue LED is flash.
to device.
2. Press and hold function
button (TALK) for 1.5
seconds.
“REDIAL” will be displayed on
mirror.
Dial the last number.
“CALL OUT” will be displayed
on mirror.
“HANG UP” will be displayed on
mirror.
3 Press function button
(TALK)once again will hangup
the out going call just now.
Note: This function depends on the feature of mobile. Please refer
to mobile user manual. When you find the outgoing call
number is not the desired, use Step 3 to cancel it.
-8-
7. CALL ANSWER AND CALL HANG UP
STEP
1. Ensure mobile has
connected to device.
STATE/RESULT
Blue LED is flash.
The mirror shows who is calling
and the device rings.
2. Incoming call.
If the caller is unknown the
device only rings.
3. Short press function button
(TALK)once.
“ANSWER” “CALL ACTIVE”
will be displayed on mirror.
4. Short press function button
(TALK) once again to hang
up a call during call active.
“HANG UP” will be displayed
on mirror.
Note: Some mobile is in disconnected state after pair. it will
automatically connect to the device when has an incoming
call. Some mobile phone may not support the caller ID
indication function and the caller ID will not be displayed.
-9-
8. CALL REJECT
STEP
STATE/RESULT
1. Ensure mobile has connected Blue LED is flash.
to device.
The mirror displays,which ring
tone is set.
2. Incoming call.
Or only ring, but doesn't display
caller ID.
3 Press and hold function button “REJECT” will be displayed on
(TALK) for 1.5 seconds reject. mirror.
9. AUDIO TRANSFER
During call active or call out going state, Press and hold function
(TALK)button and hold for 1.5 seconds to switch the call between
Bluetooth handsfree and mobile, “MIRROR PHONE” “MOBILE
PHONE” will be displayed on mirror.
10. VOLUME CONTROL
Press “VOL+” to increase volume, press “VOL-“ to decrease
volume.
11. ANSWER MODE SET
In idle state hold both “VOL+” and “VOL-” for 1.5 seconds to set
the answer mode as auto answer or manual answer.
12. MUTE CONTROL
During active call,press “PLAY” button and hold for 1.5 seconds to
mute microphone,“MUTE ON” will be displayed on mirror, long
press “PLAY” button 1.5S again to release mute,“MUTE OFF” will
be displayed on mirror.
-10-
13. SELECT RING TONE
Press the “VOL+” or ”VOL-“ key and hold for 3 seconds to select
the ring tone, total 16 sorts of ring tones are available.
14. BLUETOOTH AV DEVICE OPERATION
STEP
STATE/RESULT
1. If AV not connected, shortly
press “PLAY” key to connect.
“BT STEREO” will be displayed
on mirror.
2. Shortly press “PLAY” key
to play or pause playback.
“AV PLAY” or “AV PAUSE” will
be displayed on mirror.
3 Press and hold “PLAY” key
for 1.5S to stop playback.
“AV STOP” will be displayed on
mirror.
4. Long press “VOL+” or
“AV FORWARD” or
“VOL-” button for 1.5 seconds, “AV BACKWARD” will be
and release once heard an
displayed on mirror.
prompt tone to skip forward or
skip.
-11-
15. SWITCH AUDIO OUTPUT MODE
AND PICTURE ADJUSTMENT
STEP
STATE / RESULT
“SPEAKER” will be displayed on
mirror and green LED will be on.
1. The default mode of audio
output is speaker mode.
2. Shortly press“MODE”key to “FM” will be displayed on mirror
switch to FM transmitter mode. and right red LED will be on.
3. At FM transmitter mode,press
and hold “MODE” key to select
to the desired transmitting
frequency, then tune your car
radio to receive the frequency
accordingly.
Selected transmitting frequency
will be displayed on mirror :
87.7, 87.9, 88.1, 88.3, 88.5,
88.7, 88.9.
4. Shortly press “MODE” key to Picture menu will be displayed
switch to picture adjustment
on mirror,press and hold
mode.
“MODE” key to select item
“BRIGHTNESS” or
“CONTRAST” or “COLOR”,use
“VOL+” and “VOL-” to change
the value.
-12-
16. FM HEADSET USE
CHARGE PORT
POWER SWITCH
NO FUNCTION
INDICATOR LED
( RED FOR POWE ON,
GREEN FOR CHANGING)
To make use of the Fm headset from the charging point on the
mirror take them from the mirror. In the case the audio output
mode automatically change to FM 107.9(the receiving frequency
of the FM headset).Then press the headset button to turn on the
headset(red led on) to start talk. The operation range is about 1m.
Once headset put back to the charging socket, the audio output
mode will be auto restored to the mode before headset unplug.
Attention:Keep volume below 11 to avoid noise when using FM
headset.If there is a radio station 107.9MHZ,it may
interfere with FM headset.
-13-
17.To Set Audio On and Off
When the handsfree system is vacant(no call in or call out), you
can open the audio input by shortly pressing “PLAY” key twice,
“MEDIA PLAY” will be displayed on mirror, shortly press “PLAY”
key twice again to shut the audio input , “MEDIA OFF” will be
displayed on mirror.
18.To Resume Factory Default Mode
Press and hold “VOL+”and “VOL-” key together for 10 seconds to
resume factory defaule mode , “DEL ALL BT” will be displayed on
mirror,all bluetooth device will be cancelled.
19.REARVIEW SYSTEM
While car backward, the rearview system auto start working, the
image of back around from camera will be displayed on mirror.
There will be several different transmitting and receiving
frequency, the box will be marked 1,2,3,4, to represent different
frequencies 2414MHz, 2432MHz, 2450MHz, 2468MHz . The
same tag can be used in conjunction with transmitting and
reveiving.
-14-
20. PHONE BOOK
1.First store phone number into your mobile with English name.
2.Press “MODE” button twice to enter address list transfer, “B
CARD READY” will be displayed on mirror .To choose address
list transfer by bluetooth from mobile phone.
3.The English name will be displayed on mirror if transfer
success.
4.Max.200 address can be stored .If over 200 address,the new
address will cover the earlier.
5.To delete address list:Press and hold “PLAY” button for 6
seconds,“DELETE PB” will be displayed on mirror,press
“PLAY” button twice within period of 15 seconds to delete
phone book.
21. SELECT LAST 10 CALLS DIAL-BACK
FROM BLUETOOTH MIRROR
Press “TALK” button twice to resume the last answered call, then
press “VOL+” or “VOL-” button to scroll the last 10 calls, press
“TALK” button to dial the number.
22. SWITCH TO VIDEO INPUT MODE
Press and hold “PLAY” key for 3 seconds to switch to video input
mode,you can connect the video in socket to a video source.Press
and hold “PLAY” key for 3 seconds again to exit video input mode.
23. Frequently asked questions
23.1 Can Bluetooth mirror connect to any bluetooth devices?
Re: Bluetooth mirror can connect with any bluetooth devices
which support headset profile or handsfree profile. But different
bluetooth devices may have different operation. For the mobile
supporting headset profile, it disconnects normally, but it can
connect to handsfree automatically and cannot display caller ID.
23.2 What is useful distance between Bluetooth mirror and
phone?
Re: Usually distance between device and phone is 10M.
23.3 Does any interference when use Bluetooth mirror?
Re: Wireless and wireless network devices may have interference
during communication. Use bluetooth devices and keep away
from RF generator will reduce interference.
-15-
SPECIFICATION
SECTION
DATA
UNIT
1.Blue tooth Standard:Blue tooth 2.0+EDR
2.Blue tooth Frequency:2.4GHz ISM band
3.Blue tooth Transmit Power:≤4dBm,cla ss 2 (communica tion dista nce:10 meters)
4.3.5 inc h TFT LCD with vesolutio n:960X240
5.Power Supply: 9V~15V
6.Operating Temperature:-1 0°C~60°C
7.Audio Disto rti on(1KHZ/1000mv inp ut)
%
0.3
8.Speaker Output Power(1 KHZ/1000mv inp ut,m ax,vo lum e)
W
0.5
9.Transmiss ion Frequency(F1\F2\F3\F4)
MHZ
10.FM Transmitter Output Level
NW
40
11.Wirele ss earphone receivin g fre quency
MHZ
107.9
12.Wirele ss earphone receivin g dista nce
ISM 2414\2432\2450\2468
M
1.0
13.Wirele ss earphone output power
MW
60
14.Wirele ss earphone charging time
H
2
15.Wirele ss earphone working time
H
4~6
16.Receive d Sensitity
DB
≤-85
17.Mirror Consumption Curre nt(M AX.)
MA
600
18.Unobstru cted Effe ctive Range(Min)
M
40
MM
285X90X24
19.Mirror Dimension s(W X D X H)
20.Mirror Weigh t(a bout)
370
G
CMOS
21.Camera Imaging Sensor
720x480(NTSC) 720x576(PAL)
22.Camera Total Pixe ls
23.Camera Horizo ntal View Angle
Degree
24.Camera Transmiss ion Power
MW
80
2/FCC,10/CE
0 Lux(IR ON)
25.Camera Minim um illum ina tion
26.Camera IR Nigh t Range
M
27.Camera Power Supply
4
Supplied By Transmiss ion Box
28.Camera Consumption Curre nt(M ax.)
MA
120
29.Camera Dimensions(WxDxH)
mm
525x148x45
G
264
30. Camera Weight (about)
*Actual transmission range may vary according to the
weather,location,interference and building construction.
*All the specifications are subject to minor change without prior notice.
-16-
Declaration of Conformity:
We, Trebs BV, declare under our sole responsibility that this
product is in conformity with the essential requirements and other
relevant requirements of the R&TTE Directive (1999/5/EC). The
product is compliant with the following standards and/ or other
normative documents:
EN301 489-1 V1.8.1 (2008-04)
EN301 489 -17 V2.1.1 (2009-02)
EN300 328 V1.7.1 (2006-10)
Trebs BV.
The Netherlands
Website: www.trebs.nl
email: [email protected]
CE
Trebs Comfortcam is a brand of Trebs BV. All other brands in this
manual and/ or packaging do not belong to Trebs BV and have
another justified holder.
EU Environmental Protection
Waste electrical products should not
be disposed of with household waste.
Please recycle where facilities exist.
Check with your Local Authority or
retailer for recycling advice.
-17-