1
USER’S MANUAL
VERSION
DATE
PROJECT MANAGER
EDITORIAL STAFF
AUTHORS STAFF
Copyright
2.8
November 2011
Frédéric Desprez.
Yves Caniou, Eddy Caron and David Loureiro.
Abdelkader Amar, Raphaël Bolze, Éric Boix, Yves Caniou, Eddy
Caron, Pushpinder Kaur Chouhan, Philippe Combes, Sylvain
Dahan, Holly Dail, Bruno Delfabro, Benjamin Depardon, Peter Frauenkron, Georg Hoesch, Benjamin Isnard, Mathieu Jan,
Jean-Yves L’Excellent, Gal Le Mahec, Christophe Pera, Cyrille
Pontvieux, Alan Su, Cédric Tedeschi, and Antoine Vernois.
INRIA, ENS-Lyon, UCBL, SysFera
DIET User’s Manual
Contents
Introduction
1 A Diet platform
1.1 Diet components . . .
1.2 Communications layer
1.3 Diet initialization . .
1.4 Solving a problem . .
1.5 Diet Extensions . . .
1.5.1 Multi-MA . . .
1.5.2 CoRI . . . . . .
8
.
.
.
.
.
.
.
.
.
.
.
.
.
.
.
.
.
.
.
.
.
.
.
.
.
.
.
.
.
.
.
.
.
.
.
.
.
.
.
.
.
.
.
.
.
.
.
.
.
.
.
.
.
.
.
.
.
.
.
.
.
.
.
.
.
.
.
.
.
.
.
.
.
.
.
.
.
.
.
.
.
.
.
.
.
.
.
.
.
.
.
.
.
.
.
.
.
.
.
.
.
.
.
.
.
.
.
.
.
.
.
.
.
.
.
.
.
.
.
.
.
.
.
.
.
.
.
.
.
.
.
.
.
.
.
.
.
.
.
.
.
.
.
.
.
.
.
.
.
.
.
.
.
.
.
.
.
.
.
.
.
.
.
.
.
.
.
.
.
.
.
.
.
.
.
.
.
.
.
.
.
.
.
.
.
.
.
.
.
.
.
.
.
.
.
.
.
.
.
.
.
.
.
.
.
.
.
.
.
.
.
.
.
.
.
.
.
.
.
.
.
.
.
.
.
.
.
.
.
.
.
11
12
12
13
13
14
14
14
2 Diet installation
2.1 Dependencies . . . . . . . . . . . . . . . . . . . . . . . . . . . . . .
2.1.1 General remarks on Diet platform dependencies . . . . . .
2.1.2 Hardware dependencies . . . . . . . . . . . . . . . . . . . .
2.1.3 Supported compilers . . . . . . . . . . . . . . . . . . . . . .
2.1.4 Operating system dependencies . . . . . . . . . . . . . . . .
2.1.5 Software dependencies . . . . . . . . . . . . . . . . . . . . .
2.2 Compiling the platform . . . . . . . . . . . . . . . . . . . . . . . .
2.2.1 Obtaining and installing cmake per se . . . . . . . . . . . .
2.2.2 Configuring Diet’s compilation: cmake quick introduction .
2.2.3 A ccmake walk-through for the impatients . . . . . . . . . .
2.2.4 Diet’s main configuration flags . . . . . . . . . . . . . . . .
2.2.5 Diet’s extensions configuration flags . . . . . . . . . . . . .
2.2.6 Diet’s advanced configuration flags . . . . . . . . . . . . .
2.2.7 Compiling and installing . . . . . . . . . . . . . . . . . . . .
2.3 Diet client/server examples . . . . . . . . . . . . . . . . . . . . . .
2.3.1 Compiling the examples . . . . . . . . . . . . . . . . . . . .
.
.
.
.
.
.
.
.
.
.
.
.
.
.
.
.
.
.
.
.
.
.
.
.
.
.
.
.
.
.
.
.
.
.
.
.
.
.
.
.
.
.
.
.
.
.
.
.
.
.
.
.
.
.
.
.
.
.
.
.
.
.
.
.
.
.
.
.
.
.
.
.
.
.
.
.
.
.
.
.
.
.
.
.
.
.
.
.
.
.
.
.
.
.
.
.
.
.
.
.
.
.
.
.
.
.
.
.
.
.
.
.
.
.
.
.
.
.
.
.
.
.
.
.
.
.
.
.
15
15
15
15
15
16
16
16
16
16
18
18
19
19
20
21
22
3 Diet data
3.1 Data types . . . . . . .
3.1.1 Base types . . .
3.1.2 Composite types
3.1.3 Persistence mode
3.2 Data description . . . .
3.3 Data management . . .
3.3.1 Data identifier .
.
.
.
.
.
.
.
.
.
.
.
.
.
.
.
.
.
.
.
.
.
.
.
.
.
.
.
.
.
.
.
.
.
.
.
.
.
.
.
.
.
.
.
.
.
.
.
.
.
.
.
.
.
.
.
.
23
23
23
23
24
24
24
24
.
.
.
.
.
.
.
.
.
.
.
.
.
.
c INRIA, ENS-Lyon, UCBL, CNRS, SysFera
.
.
.
.
.
.
.
.
.
.
.
.
.
.
.
.
.
.
.
.
.
.
.
.
.
.
.
.
.
.
.
.
.
.
.
.
.
.
.
.
.
.
.
.
.
.
.
.
.
.
.
.
.
.
.
.
.
.
.
.
.
.
.
.
.
.
.
.
.
.
.
.
.
.
.
.
.
.
.
.
.
.
.
.
.
.
.
.
.
.
.
.
.
.
.
.
.
.
.
.
.
.
.
.
.
.
.
.
.
.
.
.
.
.
.
.
.
.
.
.
.
.
.
.
.
.
.
.
.
.
.
.
.
.
.
.
.
.
.
.
.
.
.
.
.
.
.
.
.
.
.
.
.
.
Page 3
DIET User’s Manual
3.4
3.5
3.6
3.7
3.3.2 Data file . . . . . . . . . . . . .
Manipulating Diet structures . . . . .
3.4.1 Set functions . . . . . . . . . .
3.4.2 Access functions . . . . . . . .
Data Management functions . . . . . .
3.5.1 Free functions . . . . . . . . . .
Problem description . . . . . . . . . .
Examples . . . . . . . . . . . . . . . .
3.7.1 Example 1: without persistency
3.7.2 Example 2: using persistency .
4 Building a client program
4.1 Structure of a client program . .
4.2 Client API . . . . . . . . . . . .
4.3 Examples . . . . . . . . . . . . .
4.3.1 Synchronous call . . . . .
4.3.2 Asynchronous call . . . .
4.4 Compilation . . . . . . . . . . . .
4.4.1 Compilation using cmake
5 Building a server application
5.1 Structure of the program .
5.2 Server API . . . . . . . . .
5.3 Example . . . . . . . . . . .
5.4 Compilation . . . . . . . . .
.
.
.
.
.
.
.
.
.
.
.
.
.
.
.
.
.
.
.
.
.
.
.
.
.
.
.
.
.
.
.
.
.
.
.
.
.
.
.
.
.
.
.
.
.
.
.
.
.
.
.
.
.
.
.
.
.
.
.
.
.
.
.
.
.
.
.
.
.
.
.
.
.
.
.
.
.
.
.
.
.
.
.
.
.
.
.
.
.
.
.
.
.
.
.
.
.
.
.
.
.
.
.
.
.
.
.
.
.
.
.
.
.
.
.
.
.
.
.
.
.
.
.
.
.
.
.
.
.
.
.
.
.
.
.
.
.
.
.
.
.
.
.
.
.
.
.
.
.
.
.
.
.
.
.
.
.
.
.
.
.
.
.
.
.
.
.
.
.
.
.
.
.
.
.
.
.
.
.
.
.
.
.
.
.
.
.
.
.
.
.
.
.
.
.
.
.
.
.
.
.
.
.
.
.
.
.
.
.
.
.
.
.
.
.
.
.
.
.
.
.
.
.
.
.
.
.
.
.
.
.
.
.
.
.
.
.
.
.
.
.
.
.
.
.
.
.
.
.
.
.
.
.
.
.
.
.
.
.
.
.
.
.
.
.
.
.
.
.
.
.
.
.
.
.
.
.
.
.
.
.
.
.
.
.
25
25
26
26
27
28
29
29
29
30
.
.
.
.
.
.
.
.
.
.
.
.
.
.
.
.
.
.
.
.
.
.
.
.
.
.
.
.
.
.
.
.
.
.
.
.
.
.
.
.
.
.
.
.
.
.
.
.
.
.
.
.
.
.
.
.
.
.
.
.
.
.
.
.
.
.
.
.
.
.
.
.
.
.
.
.
.
.
.
.
.
.
.
.
.
.
.
.
.
.
.
.
.
.
.
.
.
.
.
.
.
.
.
.
.
.
.
.
.
.
.
.
.
.
.
.
.
.
.
.
.
.
.
.
.
.
.
.
.
.
.
.
.
.
.
.
.
.
.
.
.
.
.
.
.
.
.
.
.
.
.
.
.
.
.
.
.
.
.
.
.
.
.
.
.
.
.
.
33
33
34
34
34
35
37
37
.
.
.
.
39
39
41
42
43
.
.
.
.
.
.
.
.
.
.
.
.
.
.
.
.
.
.
.
.
.
.
.
.
.
.
.
.
.
.
.
.
.
.
.
.
.
.
.
.
.
.
.
.
.
.
.
.
.
.
.
.
.
.
.
.
.
.
.
.
.
.
.
.
.
.
.
.
.
.
.
.
.
.
.
.
.
.
.
.
.
.
.
.
.
.
.
.
.
.
.
.
6 Batch and parallel submissions
6.1 Introduction . . . . . . . . . . . . . . . . . . . . . .
6.2 Terminology . . . . . . . . . . . . . . . . . . . . . .
6.3 Configuration for compilation . . . . . . . . . . . .
6.4 Parallel systems . . . . . . . . . . . . . . . . . . . .
6.5 Batch system . . . . . . . . . . . . . . . . . . . . .
6.6 Client extended API . . . . . . . . . . . . . . . . .
6.7 Batch server extended API and configuration file .
6.8 Server API . . . . . . . . . . . . . . . . . . . . . .
6.8.1 Registering the service . . . . . . . . . . . .
6.8.2 Server configuration file . . . . . . . . . . .
6.8.3 Server API for writing services . . . . . . .
6.8.4 Example of the client/server ’concatenation’
. . . . .
. . . . .
. . . . .
. . . . .
. . . . .
. . . . .
. . . . .
. . . . .
. . . . .
. . . . .
. . . . .
problem
.
.
.
.
.
.
.
.
.
.
.
.
.
.
.
.
.
.
.
.
.
.
.
.
.
.
.
.
.
.
.
.
.
.
.
.
.
.
.
.
.
.
.
.
.
.
.
.
.
.
.
.
.
.
.
.
.
.
.
.
.
.
.
.
.
.
.
.
.
.
.
.
.
.
.
.
.
.
.
.
.
.
.
.
.
.
.
.
.
.
.
.
.
.
.
.
.
.
.
.
.
.
.
.
.
.
.
.
.
.
.
.
.
.
.
.
.
.
.
.
.
.
.
.
.
.
.
.
.
.
.
.
.
.
.
.
.
.
.
.
.
.
.
.
45
45
45
46
46
46
46
47
47
48
48
48
49
7 Cloud submissions
7.1 Introduction . . . . . . . . . . .
7.2 Compatibility and requirements
7.3 Configuration for compilation .
7.4 Server configuration file . . . .
7.5 Registering the service . . . . .
7.6 Service API . . . . . . . . . . .
.
.
.
.
.
.
.
.
.
.
.
.
.
.
.
.
.
.
.
.
.
.
.
.
.
.
.
.
.
.
.
.
.
.
.
.
.
.
.
.
.
.
.
.
.
.
.
.
.
.
.
.
.
.
.
.
.
.
.
.
.
.
.
.
.
.
.
.
.
.
.
.
.
.
.
.
.
.
51
51
51
52
52
54
54
c INRIA, ENS-Lyon, UCBL, CNRS, SysFera
.
.
.
.
.
.
.
.
.
.
.
.
.
.
.
.
.
.
.
.
.
.
.
.
.
.
.
.
.
.
.
.
.
.
.
.
.
.
.
.
.
.
.
.
.
.
.
.
.
.
.
.
.
.
.
.
.
.
.
.
.
.
.
.
.
.
.
.
.
.
.
.
.
.
.
.
.
.
.
.
.
.
.
.
.
.
.
.
.
.
Page 4
DIET User’s Manual
7.7
Example of client/server . . . . . . . . . . . . . . . . . . . . . . . . . . . . . . . . 54
8 Scheduling in Diet
8.1 Introduction . . . . . . . . . . . . . . . . . . . . . . . . . . . . .
8.2 Default Scheduling Strategy . . . . . . . . . . . . . . . . . . . .
8.3 Plugin Scheduler Interface . . . . . . . . . . . . . . . . . . . . .
8.3.1 Estimation Metric Vector . . . . . . . . . . . . . . . . .
8.3.2 Standard Estimation Tags . . . . . . . . . . . . . . . . .
8.3.3 Estimation Function . . . . . . . . . . . . . . . . . . . .
8.3.4 Aggregation Methods . . . . . . . . . . . . . . . . . . .
8.4 Example . . . . . . . . . . . . . . . . . . . . . . . . . . . . . . .
8.5 Scheduler at agents level . . . . . . . . . . . . . . . . . . . . . .
8.5.1 Scheduling from the agents side. . . . . . . . . . . . . .
8.5.2 Aggregation methods overloading . . . . . . . . . . . . .
8.5.3 The UserScheduler class . . . . . . . . . . . . . . . . . .
8.5.4 Easy definition of a new scheduler class . . . . . . . . .
8.5.5 Creation and usage of a scheduler module . . . . . . . .
8.5.6 SeD plugin schedulers and agent schedulers interactions
8.5.7 A complete example of scheduler . . . . . . . . . . . . .
8.6 Future Work . . . . . . . . . . . . . . . . . . . . . . . . . . . .
.
.
.
.
.
.
.
.
.
.
.
.
.
.
.
.
.
.
.
.
.
.
.
.
.
.
.
.
.
.
.
.
.
.
.
.
.
.
.
.
.
.
.
.
.
.
.
.
.
.
.
.
.
.
.
.
.
.
.
.
.
.
.
.
.
.
.
.
.
.
.
.
.
.
.
.
.
.
.
.
.
.
.
.
.
.
.
.
.
.
.
.
.
.
.
.
.
.
.
.
.
.
.
.
.
.
.
.
.
.
.
.
.
.
.
.
.
.
.
.
.
.
.
.
.
.
.
.
.
.
.
.
.
.
.
.
.
.
.
.
.
.
.
.
.
.
.
.
.
.
.
.
.
.
.
.
.
.
.
.
.
.
.
.
.
.
.
.
.
.
55
55
55
56
56
56
58
58
59
61
61
62
62
67
71
72
73
74
9 Performance prediction
9.1 Introduction . . . . . . . . . . . . . . . . .
9.1.1 Example with convertors . . . . .
9.2 CoRI: Collectors of Ressource Information
9.2.1 Functions and tags . . . . . . . . .
9.2.2 CoRI-Easy . . . . . . . . . . . . .
9.2.3 CoRI batch . . . . . . . . . . . . .
9.3 Future Work . . . . . . . . . . . . . . . .
.
.
.
.
.
.
.
.
.
.
.
.
.
.
.
.
.
.
.
.
.
.
.
.
.
.
.
.
.
.
.
.
.
.
.
.
.
.
.
.
.
.
.
.
.
.
.
.
.
.
.
.
.
.
.
.
.
.
.
.
.
.
.
.
.
.
.
.
.
.
.
.
.
.
.
.
.
.
.
.
.
.
.
.
.
.
.
.
.
.
.
.
.
.
.
.
.
.
.
.
.
.
.
.
.
.
.
.
.
.
.
.
.
.
.
.
.
.
.
.
.
.
.
.
.
.
.
.
.
.
.
.
.
.
.
.
.
.
.
.
.
.
.
.
.
.
.
.
.
.
.
.
.
.
75
75
76
77
77
79
79
79
10 Deploying a Diet platform
10.1 Deployment basics . . . .
10.1.1 Using CORBA . .
10.1.2 Diet configuration
10.1.3 Example . . . . . .
10.2 GoDiet . . . . . . . . . .
10.3 Shape of the hierarchy . .
.
.
.
.
.
.
.
.
.
.
.
.
.
.
.
.
.
.
.
.
.
.
.
.
.
.
.
.
.
.
.
.
.
.
.
.
.
.
.
.
.
.
.
.
.
.
.
.
.
.
.
.
.
.
.
.
.
.
.
.
.
.
.
.
.
.
.
.
.
.
.
.
.
.
.
.
.
.
.
.
.
.
.
.
.
.
.
.
.
.
.
.
.
.
.
.
.
.
.
.
.
.
.
.
.
.
.
.
.
.
.
.
.
.
.
.
.
.
.
.
.
.
.
.
.
.
.
.
.
.
.
.
81
81
81
83
86
87
92
. .
. .
file
. .
. .
. .
.
.
.
.
.
.
.
.
.
.
.
.
.
.
.
.
.
.
.
.
.
.
.
.
.
.
.
.
.
.
.
.
.
.
.
.
.
.
.
.
.
.
11 Diet dashboard
93
11.1 LogService . . . . . . . . . . . . . . . . . . . . . . . . . . . . . . . . . . . . . . . . 93
11.2 VizDIET . . . . . . . . . . . . . . . . . . . . . . . . . . . . . . . . . . . . . . . . 95
12 Multi-MA extension
99
12.1 Function of the Multi-MA extension . . . . . . . . . . . . . . . . . . . . . . . . . 99
12.2 Deployment example . . . . . . . . . . . . . . . . . . . . . . . . . . . . . . . . . . 99
12.3 Search examples . . . . . . . . . . . . . . . . . . . . . . . . . . . . . . . . . . . . 101
c INRIA, ENS-Lyon, UCBL, CNRS, SysFera
Page 5
DIET User’s Manual
13 Workflow management in Diet
13.1 Overview . . . . . . . . . . . . . . . . . . . . . .
13.2 Quick start . . . . . . . . . . . . . . . . . . . . .
13.3 Software architecture . . . . . . . . . . . . . . . .
13.4 Workflow description languages . . . . . . . . . .
13.4.1 MADAG language . . . . . . . . . . . . .
13.4.2 Gwendia language . . . . . . . . . . . . .
13.5 Client API . . . . . . . . . . . . . . . . . . . . .
13.5.1 Structure of client program . . . . . . . .
13.5.2 The simplest example . . . . . . . . . . .
13.6 Scheduling . . . . . . . . . . . . . . . . . . . . . .
13.6.1 Available schedulers . . . . . . . . . . . .
13.6.2 SeD requirements for workflow scheduling
.
.
.
.
.
.
.
.
.
.
.
.
.
.
.
.
.
.
.
.
.
.
.
.
.
.
.
.
.
.
.
.
.
.
.
.
.
.
.
.
.
.
.
.
.
.
.
.
.
.
.
.
.
.
.
.
.
.
.
.
.
.
.
.
.
.
.
.
.
.
.
.
.
.
.
.
.
.
.
.
.
.
.
.
.
.
.
.
.
.
.
.
.
.
.
.
.
.
.
.
.
.
.
.
.
.
.
.
.
.
.
.
.
.
.
.
.
.
.
.
.
.
.
.
.
.
.
.
.
.
.
.
.
.
.
.
.
.
.
.
.
.
.
.
.
.
.
.
.
.
.
.
.
.
.
.
.
.
.
.
.
.
.
.
.
.
.
.
.
.
.
.
.
.
.
.
.
.
.
.
.
.
.
.
.
.
.
.
.
.
.
.
.
.
.
.
.
.
.
.
.
.
.
.
103
. 103
. 104
. 105
. 106
. 106
. 107
. 112
. 112
. 112
. 115
. 116
. 116
14 Dagda: Data Manager
14.1 Overview . . . . . . . . . . . . . . . . . .
14.2 The Dagda configuration options . . . .
14.3 Cache replacement algorithm . . . . . . .
14.4 The Dagda API . . . . . . . . . . . . . .
14.4.1 Note on the memory management
14.4.2 Synchronous data transfers . . . .
14.4.3 Asynchronous data transfers . . .
14.4.4 Data checkpointing with Dagda .
14.4.5 Create data ID aliases . . . . . . .
14.4.6 Data replication . . . . . . . . . .
14.5 On the correct usage of Dagda . . . . . .
14.6 Future works . . . . . . . . . . . . . . . .
.
.
.
.
.
.
.
.
.
.
.
.
.
.
.
.
.
.
.
.
.
.
.
.
.
.
.
.
.
.
.
.
.
.
.
.
.
.
.
.
.
.
.
.
.
.
.
.
.
.
.
.
.
.
.
.
.
.
.
.
.
.
.
.
.
.
.
.
.
.
.
.
.
.
.
.
.
.
.
.
.
.
.
.
.
.
.
.
.
.
.
.
.
.
.
.
.
.
.
.
.
.
.
.
.
.
.
.
.
.
.
.
.
.
.
.
.
.
.
.
.
.
.
.
.
.
.
.
.
.
.
.
.
.
.
.
.
.
.
.
.
.
.
.
.
.
.
.
.
.
.
.
.
.
.
.
.
.
.
.
.
.
.
.
.
.
.
.
.
.
.
.
.
.
.
.
.
.
.
.
.
.
.
.
.
.
.
.
.
.
.
.
.
.
.
.
.
.
.
.
.
.
.
.
.
.
.
.
.
.
.
.
.
.
.
.
.
.
.
.
.
.
.
.
.
.
.
.
.
.
.
.
.
.
.
.
.
.
.
.
.
.
.
.
.
.
.
.
.
.
.
.
119
. 119
. 121
. 122
. 122
. 122
. 122
. 124
. 126
. 126
. 127
. 127
. 128
15 Dynamic management
15.1 Dynamically modifying the hierarchy .
15.1.1 Motivations . . . . . . . . . . .
15.1.2 “And thus it began to evolve” .
15.1.3 Example . . . . . . . . . . . . .
15.2 Changing offered services . . . . . . .
15.2.1 Presentation . . . . . . . . . .
15.2.2 Example . . . . . . . . . . . . .
15.2.3 Going further . . . . . . . . . .
.
.
.
.
.
.
.
.
.
.
.
.
.
.
.
.
.
.
.
.
.
.
.
.
.
.
.
.
.
.
.
.
.
.
.
.
.
.
.
.
.
.
.
.
.
.
.
.
.
.
.
.
.
.
.
.
.
.
.
.
.
.
.
.
.
.
.
.
.
.
.
.
.
.
.
.
.
.
.
.
.
.
.
.
.
.
.
.
.
.
.
.
.
.
.
.
.
.
.
.
.
.
.
.
.
.
.
.
.
.
.
.
.
.
.
.
.
.
.
.
.
.
.
.
.
.
.
.
.
.
.
.
.
.
.
.
.
.
.
.
.
.
.
.
.
.
.
.
.
.
.
.
.
.
.
.
.
.
.
.
.
.
.
.
.
.
.
.
.
.
.
.
.
.
.
.
.
.
.
.
.
.
135
. 135
. 136
. 136
. 138
. 138
. 138
.
.
.
.
.
.
.
.
.
.
.
.
.
.
.
.
16 Diet forwarders
16.1 Easy CORBA objects connections through ssh
16.2 The DietForwarder executable . . . . . . . . .
16.2.1 Command line options . . . . . . . . . .
16.3 Configuration examples . . . . . . . . . . . . .
16.3.1 Simple configuration . . . . . . . . . . .
16.3.2 Complex network topology . . . . . . .
c INRIA, ENS-Lyon, UCBL, CNRS, SysFera
.
.
.
.
.
.
.
.
.
.
.
.
.
.
.
.
.
.
.
.
.
.
.
.
.
.
.
.
.
.
.
.
.
.
.
.
.
.
.
.
.
.
.
.
.
.
.
.
.
.
.
.
.
.
.
.
.
.
.
.
.
.
.
.
.
.
.
.
.
.
.
.
.
.
.
.
.
.
.
.
.
.
.
.
.
.
.
.
.
.
.
.
.
.
.
.
.
.
.
.
.
.
129
129
129
129
130
130
130
131
133
Page 6
DIET User’s Manual
A Appendix
141
A.1 Configuration files . . . . . . . . . . . . . . . . . . . . . . . . . . . . . . . . . . . 141
c INRIA, ENS-Lyon, UCBL, CNRS, SysFera
Page 7
DIET User’s Manual
c INRIA, ENS-Lyon, UCBL, CNRS, SysFera
Page 8
DIET User’s Manual
Introduction
Resource management is one of the key issues for the development of efficient Grid environments.
Several approaches co-exist in today’s middleware platforms. The granularity of computation
(or communication) and dependencies between computations can have a great influence on the
software choices.
The first approach provides the user with a uniform view of resources. This is the case
of GLOBUS [12] which provides transparent MPI communications (with MPICH-G2) between
distant nodes but does not manage load balancing issues between these nodes. It’s the user’s
task to develop a code that will take into account the heterogeneity of the target architecture.
Grid extensions to classical batch processing provide an alternative approach with projects like
Condor-G [9] or Sun GridEngine [13]. Finally, peer-to-peer [20] or Global computing [11] can
be used for fine grain and loosely coupled applications.
A second approach provides a semi-transparent access to computing servers by submitting
jobs to servers offering specific computational services. This model is known as the Application Service Provider (ASP) model where providers offer, not necessarily for free, computing
resources (hardware and software) to clients in the same way as Internet providers offer network
resources to clients. The programming granularity of this model is rather coarse. One of the
advantages of this approach is that end users do not need to be experts in parallel programming to benefit from high performance parallel programs and computers. This model is closely
related to the classical Remote Procedure Call (RPC) paradigm. On a Grid platform, RPC
(or GridRPC [15, 17]) offers easy access to available resources from a Web browser, a Problem
Solving Environment (PSE), or a simple client program written in C, Fortran, or Java. It also
provides more transparency by hiding the selection and allocation of computing resources. We
favor this second approach.
In a Grid context, this approach requires the implementation of middleware to facilitate
client access to remote resources. In the ASP approach, a common way for clients to ask for
resources to solve their problem is to submit a request to the middleware. The middleware will
find the most appropriate server that will solve the problem on behalf of the client using a specific
software. Several environments, usually called Network Enabled Servers (NES), have developed
such a paradigm: NetSolve [1], Ninf [18], NEOS [10], OmniRPC [22], and more recently Diet
developed in the Graal project. A common feature of these environments is that they are built
on top of five components: clients, servers, databases, monitors and schedulers. Clients solve
computational requests on servers found by the NES. The NES schedules the requests on the
different servers using performance information obtained by monitors and stored in a database.
Diet stands for Distributed Interactive Engineering Toolbox. It is a toolbox for easily
developing Application Service Provider systems on Grid platforms, based on the Client/Agent/Server scheme. Agents are the schedulers of this toolbox. In Diet, user requests are served
via RPC.
c INRIA, ENS-Lyon, UCBL, CNRS, SysFera
Page 9
DIET User’s Manual
Diet follows the GridRPC API defined within the Open Grid Forum [14].
c INRIA, ENS-Lyon, UCBL, CNRS, SysFera
Page 10
DIET User’s Manual
Chapter 1
A Diet platform
Diet [8] is built upon Server Daemons. The process of scheduling the requests is distributed
amongst a hierarchy of Local Agents and Master Agents. The scheduler can use resource availability information collected from different tools like CoRI Easy, which is based on simple system
calls and some basic performance tests (see Chapter 9). Figure 1.1 shows the hierarchical organization of Diet.
Client$
MA$
Client$
MA$
Client$
MA$
LA$
LA$
SeD$
SeD$
MA$
SeD$
SeD$
SeD$
SeD$
MA : Master Agent
LA : Local Agent
SeD : ServerDeamon
Figure 1.1: A hierarchy of Diet agents
c INRIA, ENS-Lyon, UCBL, CNRS, SysFera
Page 11
DIET User’s Manual
1.1
Diet components
The different components of our software architecture are the following:
Client
A client is an application which uses Diet to solve problems. Many types of clients are
able to connect to Diet, from a web page, a PSE such as Matlab or Scilab, or from a
compiled program.
Master Agent (MA)
An MA receives computation requests from clients. These requests refer to some Diet
problems listed on a reference web page. Then the MA collects computation abilities from
the servers and chooses the best one. The reference of the chosen server is returned to
the client. A client can be connected to an MA by a specific name server or a web page
which stores the various MA locations.
Local Agent (LA)
An LA transmits requests and information between MAs and servers. The information
stored on an LA is the list of services available in the subtree rooted at the LA; for each
service, LAs store a list of children (agents or servers) that can be contacted to find
the service. Depending on the underlying network topology, a hierarchy of LAs may be
deployed between an MA and the servers. Of course, the function of an LA is to do a
partial scheduling on its subtree, which reduces the workload at the MA.
Server Daemon (SeD)
A SeD encapsulates a computational server. For instance it can be located on the entry
point of a parallel computer. The information stored on a SeD is a list of the data
available locally, i.e., on the server), the list of problems that can be solved on it, and
performance-related information such as the amount of available memory or the number
of resources available. When it registers, a SeD declares the problems it can solve to its
parent LA or MA. A SeD can give perfomance and hardware information by using the
CoRI module or performance predictions for some types of problems by using the CoRI
module. Both modules are described in Chapter 9.
1.2
Communications layer
NES environments can be implemented using a classic socket communication layer. Several
problems to this approach have been pointed out such as the lack of portability or limits on
the number of sockets that can be opened concurrently. Our aim is to implement and deploy
a distributed NES environment that works at a wider scale. Distributed object environments,
such as Java, DCOM or CORBA have proven to be a good base for building applications
that manage access to distributed services. They not only provide transparent communications
in heterogeneous networks, but they also offer a framework for the large scale deployment of
distributed applications. Being open and language independent, CORBA was chosen as the
communication layer in Diet.
As recent implementations of CORBA provide communication times close to that of sockets,
CORBA is well suited to support distributed applications in a large scale Grid environment.
New specialized services can be easily published and existing services can also be used. Diet
c INRIA, ENS-Lyon, UCBL, CNRS, SysFera
Page 12
DIET User’s Manual
is based upon OmniORB 4 [19] or later, a free CORBA implementation that provides good
communication performance.
1.3
Diet initialization
Figure 1.2 shows each step of the initialization of a simple Grid system. The architecture is
built in hierarchical order, each component connecting to its parent. The MA is the first entity
to be started (1). It waits for connections from LAs or requests from clients.
Cl
MA
MA
MA
MA
MA
LA
LA
LA
LA
LA
LA
SeD
SeD
SeD
1
Cl
MA
2
3
4
LA
SeD
SeD
SeD
LA
SeD
SeD
5
SeD
SeD
6
Figure 1.2: Initialization of a Diet system.
In step (2), an LA is launched and registers itself with the MA. At this step of system
initialization, two kinds of components can connect to the LA: a SeD (3), which manages some
computational resource, or another LA (4), to add a hierarchical level in this branch. When the
SeD registers to its parent LA, it submits a list of the services it offers. The agent then reports
the new service offering through its parent agent until the MA. If the service was previously
unavailable along that arm of the hierarchy the agents update their records. Finally, clients
can access the registered service by contacting the MA (5) to get a reference to the best server
available and then directly connect to it (6) to launch the computation.
The architecture of the hierarchy is described in configuration files (see Section 10.1.2) and
each component transmits the local configuration to its parent. Thus, the system administration
can also be hierarchical. For instance, an MA can manage a domain like a university, providing
prioritary access to users of this domain. Then each laboratory can run an LA, while each team
of the laboratory can run some other LAs to administrate its own servers. This hierarchical
administration of the system allows local changes in the configuration without interfering with
the whole platform.
1.4
Solving a problem
Assuming that the architecture described in Section 1.1 includes several servers able to solve the
same problem, the algorithm presented below lets an MA select a server for the computation
among those available. This decision is made in four steps.
• The MA propagates the client request through its subtrees down to the capable servers;
actually, the agents only forward the request on those subtrees offering the service.
c INRIA, ENS-Lyon, UCBL, CNRS, SysFera
Page 13
DIET User’s Manual
• Each server that can satisfy the request can send his performance and hardware information or an estimation of the computation time necessary to process the request to its
“parent” (an LA) (via performance prediction tools: see Chapter 9).
• Each LA that receives one or more positive responses from its children sorts the servers
and forwards the best responses to the MA through the hierarchy.
• Once the MA has collected all the responses from its direct children, it chooses a pool of
“better” servers and sends their references to the client.
1.5
1.5.1
Diet Extensions
Multi-MA
A standard Diet platform gives access to SeDs placed under the control of a MA as explained
at the beginning of this chapter. Sometime, it is useful to connect several MA together. This
happens when several organizations wish to share their resources to offer a larger set of service
types and more available servers. The Multi-MA extension allows this by creating a federation
which shares resources between several MA.
In multi-MA mode, the behavior of a Diet hierarchy does not change when a client requests
a service that is available under the queried MA. However, if a request sent to a MA does not
found a SeD that can resolve its problem, Diet will forward the request to other MAs of the
federation. To read more about multi-MA, see Chapter 12 and Chapter ??.
1.5.2
CoRI
Collector of Resource Information (CoRI) is a manager for collecting hardware and performance
information. When Diet is compiled with the appropriate option, it is possible to get this
information via different sub-modules like CoRI-Easy. (* if compiled and configured on the SeD
machine). See Chapter 9 for details on using CoRI.
c INRIA, ENS-Lyon, UCBL, CNRS, SysFera
Page 14
DIET User’s Manual
Chapter 2
Diet installation
2.1
2.1.1
Dependencies
General remarks on Diet platform dependencies
Diet is itself written in C/C++ and for limited parts in java. Diet is based on CORBA and
thus depends on the chosen CORBA implementation. Additionally, some of Diet extensions
make a strong use of libraries themselves written in C/C++ and java. Thus, we could expect
Diet to be effective on any platform offering decent version of such compilers.
Diet undergoes daily regression tests (see http://cdash.inria.fr/CDash/index.php?
project=DIET) on various hardwares, a couple of Un*x based operating systems (under different distributions), MacOSX and AIX, and mainly with GCC. But thanks to users reports
(punctual deployments and special tests conduced before every release), Diet is known to be
effective on a wide range of platforms.
Nevertheless, if you encounter installation difficulties don’t hesitate to post on Diet’s
users mailing list: [email protected] (for the archives refer to http://graal.
ens-lyon.fr/DIET/mail-lists.html). If you find a bug in Diet, please don’t hesitate to
submit a bug report on http://graal.ens-lyon.fr/bugzilla. If you have multiple bugs
to report, please make multiple submissions, rather than submitting multiple bugs in a single
report.
2.1.2
Hardware dependencies
Diet is fully tested on Linux/i386 and Linux/i686 platforms. Diet is known to be effective
on Linux/Sparc, Linux/i64, Linux/amd64, Linux/Alpha, Linux/PowerPC, AIX/PowerPC, MacOS/PowerPC and Windows XP(Cygwin)/i386 platforms. At some point in Diet history, Diet
used to be tested on the Solaris/Sparc platform...
2.1.3
Supported compilers
Diet is supported on GCC with versions ranging from 3.2.X to 4.3.4. Note that due to omniORB
4 (see 2.1.5) requirements towards thread-safe management of exception handling, compiling
Diet with GCC requires at least the version 2.96. Diet is also supported on XL compiler
(IBM) and Intel compiler.
c INRIA, ENS-Lyon, UCBL, CNRS, SysFera
Page 15
DIET User’s Manual
2.1.4
Operating system dependencies
Diet is fully tested on Linux [with varying distributions like Debian, Red Hat Enterprise Linux
(REL-ES-3), Fedora Core (5)], on AIX (5.3) on MacOSX (Darwin 8) and on Windows (Cygwin
1.5.25 and Cygwin 1.7.1).
2.1.5
Software dependencies
As explained in Section 1.2, CORBA is used for all communications inside the platform. The
implementations of CORBA currently supported in Diet is omniORB 4 which itself depends
on Python.
NB: We have noticed that some problems occur with Python 2.3: the C++ code generated
by idl could not be compiled. It has been patched in Diet, but some warnings may still appear.
omniORB 4 itself also depends on OpenSSL in case you wish to secure your Diet platform. If you want to deploy a secure Diet platform, SSL support is not yet implemented in
Diet, but an easy way to do so is to deploy Diet over a VPN.
In order to deploy CORBA services with omniORB, a configuration file and a log directory are required: see Section 10.1.1 for a complete description of the services. Their
paths can be given to omniORB either at runtime (through the well-known environment variables $OMNIORB CONFIG and $OMNINAMES LOGDIR), and/or at omniORB compile time (with the
--with-omniORB-config and --with-omniNames-logdir options.) Some examples provided
in the Diet sources depend on the BLAS and ScaLAPACK libraries. However the compilation
of those BLAS and ScaLAPACK dependent examples are optional.
2.2
Compiling the platform
Diet compilation process moved away from the traditional autotools way of things to a tool
named cmake (mainly to benefit from cmake’s built-in regression tests mechanism).
Before compiling Diet itself, first install the above mentioned (cf Section 2.1.5) dependencies. Then untar the Diet archive and change current directory to its root directory.
2.2.1
Obtaining and installing cmake per se
Diet requires using cmake at least version 2.4.3. For many popular distributions cmake is
incorporated by default or at least apt-get (or whatever your distro package installer might
be) is cmake aware. Still, in case you need to install an up-to-date version cmake’s official
site distributes many binary versions (alas packaged as tarballs) which are made available
at http://www.cmake.org/HTML/Download.html. Optionally, you can download the sources
and recompile them: this simple process (./bootstrap; make; make install) is described at
http://www.cmake.org/HTML/Install.html.
2.2.2
Configuring Diet’s compilation: cmake quick introduction
If you are already experienced with cmake then using it to compile Diet should provide no
surprise. Diet respects cmake’s best practices e.g., by clearly separating the source tree from the
c INRIA, ENS-Lyon, UCBL, CNRS, SysFera
Page 16
DIET User’s Manual
binary tree (or compile tree), by exposing the main configuration optional flag variables prefixed
with DIET_ (and by hiding away the technical variables) and by not postponing configuration
difficulties (in particular the handling of external dependencies like libraries) to compile stage.
cmake classically provides two ways for setting configuration parameters in order to generate
the makefiles in the form of two commands ccmake and cmake (the first one has an extra ”c”
character):
ccmake [options] <path-to-source>
in order to specify the parameters interactively through a GUI interface
cmake [options] <path-to-source> [-D<var>:<type>=<value>]
in order to define the parameters with the -D flag directly from the command line.
In the above syntax description of both commands, <path-to-source> specifies a path to the
top level of the source tree (i.e., the directory where the top level CMakeLists.txt file is to be
encountered). Also the current working directory will be used as the root of the build tree for
the project (out of source building is generally encouraged especially when working on a CVS
tree).
Here is a short list of cmake internal parameters that are worth mentioning:
• CMAKE_BUILD_TYPE controls the type of build mode among which Debug will produce
binaries and libraries with the debugging information
• CMAKE_VERBOSE_MAKEFILE is a Boolean parameter which when set to ON will generate
makefiles without the .SILENT directive. This is useful for watching the invoked commands and their arguments in case things go wrong.
• CMAKE_C[XX]_FLAGS* is a family of parameters used for the setting and the customization
of various C/C++ compiler options.
• CMAKE_INSTALL_PREFIX variable defines the location of the install directory (defaulted to
/usr/local on Un*x). This is cmake’s portable equivalent of the autotools configure’s
--prefix= option.
Eventually, here is a short list of ccmake interface tips:
• when lost, look at the bottom lines of the interface which always summarizes ccmake’s
most pertinent options (corresponding keyboard shortcuts) depending on your current
context
• hitting the ”h” key will direct you ccmake embedded tutorial and a list of keyboard
shortcuts (as mentioned in the bottom lines, hit ”e” to exit)
• up/down navigation among parameter items can be achieved with the up/down arrows
• when on a parameter item, the line in inverted colors (close above the bottom of the
screen) contains a short description of the selected parameter as well as the set of possible/recommended values
• toggling of boolean parameters is made with enter
• press enter to edit path variables
c INRIA, ENS-Lyon, UCBL, CNRS, SysFera
Page 17
DIET User’s Manual
• when editing a PATH typed parameter the TAB keyboard shortcut provides an emacs-like
(or bash-like) automatic path completion.
• toggling of advanced mode (press ”t”) reveals hidden parameters
2.2.3
A ccmake walk-through for the impatients
Assume that CVS_DIET_HOME represents a path to the top level directory of Diet sources.
This Diet sources directories tree can be obtained by Diet users by expanding the Diet
current source level distribution tarball. But for the Diet developers this directories tree simply
corresponds to the directory GRAAL/devel/diet/diet of a cvs checkout of the Diet sources
hierarchy. Additionally, assume we created a build tree directory and cd to it (in the example
below we chose CVS_DIET_HOME/Bin as build tree, but feel free to follow your conventions):
• cd CVS_DIET_HOME/Bin
• ccmake .. to enter the GUI
– press c (equivalent of bootstrap.sh of the autotools)
– toggle the desired options e.g., DIET_BUILD_EXAMPLES.
– specify the CMAKE_INSTALL_PREFIX parameter (if you wish to install in a directory
different from /usr/local)
– press c again, for checking required dependencies
– check all the parameters preceded with the * (star) character whose value was automatically retrieved by cmake.
– provide the required information i.e., fill in the proper values for all parameters
whose value is terminated by NOT-FOUND
– iterate the above process of parameter checking, toggle/specification and configuration until all configuration information is satisfied
– press g to generate the makefile
– press q to exit ccmake
• make in order to classically launch the compilation process
• make install when installation is required
2.2.4
Diet’s main configuration flags
Here are the main configuration flags:
• OMNIORB4_DIR is the path to the omniORB4 installation directory (only relevant when
omniORB4 was not installed in /usr/local).
Example: cmake .. -DOMNIORB4_DIR:PATH=$HOME/local/omniORB-4.1.5
• DIET_BUILD_EXAMPLES activates the compilation of a set of general client/server examples. Note that some specific examples (e.g., DIET_BUILD_BLAS_EXAMPLES) require some
additional flag to be activated too.
c INRIA, ENS-Lyon, UCBL, CNRS, SysFera
Page 18
DIET User’s Manual
• DIET_BUILD_LIBRARIES which is enabled by default, activates the compilation of the
Diet libraries. Disabling this option is only useful if you wish to restrict the compilation
to the construction of the documentation.
2.2.5
Diet’s extensions configuration flags
Diet has many extensions (some of them are still) experimental. These extensions most often
rely on external packages that need to be pre-installed. One should notice that some of those
extensions offer concurrent functionalities. This explains the usage of configuration flags in
order to obtain the compilation of the desired extensions.
• DIET_BUILD_BLAS_EXAMPLES option activates the compilation of the BLAS based Diet
examples, as a sub-module of examples. The BLAS 1 (Basic Linear Algebra Subprograms) are high quality “building block” routines for performing basic vector and matrix
operations. Level 1 BLAS do vector-vector operations, Level 2 BLAS do matrix-vector
operations, and Level 3 BLAS do matrix-matrix operations. Because the BLAS are efficient, portable, and widely available, they’re commonly used in the development of high
quality linear algebra software. Diet uses BLAS to build demonstration examples of client/server. Note that the option DIET_BUILD_BLAS_EXAMPLES can only be effective when
DIET_BUILD_EXAMPLES is enabled. DIET_BUILD_BLAS_EXAMPLES is disabled by default.
• DIET_USE_ALT_BATCH enables the transparent submission to batch servers. See Chapter 6
for more details.
• DIET_USE_WORKFLOW enables the support of workflow. For the support of workflows inside Diet, Xerces and Xqilla libraries are mandatory (see http://xerces.apache.org/
xerces-c/ and http://xqilla.sourceforge.net/HomePage). For more details about
the workflow support in Diet see chapter 13.
• DIET_WITH_MULTI_MA activates the so called MULTI Master Agent support which allows
the user to connect several MA for them to act as bounded. When this option is activated,
such a bounded MA is allowed to search for a SeD into the MA hierarchies it is connected
to.
• DIET_WITH_STATISTICS enables the generation of statistics logs. The logs can be obtained
for any element in the DIET hierarchy. To do so, you have to define the DIET STAT FILE NAME
environment variable. For instance, export DIET STAT FILE NAME=/tmp/client then
calling a client will generate the statistics for the client in the /tmp/client file.
2.2.6
Diet’s advanced configuration flags
Eventually, some configuration flags control the general result of the compilation or some
developers extensions:
• BUILD_TESTING is a conventional variable (which is not a cmake internal variable) which
specifies that the regression tests should also be compiled.
1
http://www.netlib.org/blas/
c INRIA, ENS-Lyon, UCBL, CNRS, SysFera
Page 19
DIET User’s Manual
• BUILD_SHARED_LIBS is a cmake internal variable which specifies whether the libraries
should be dynamics as opposed to static (on Mac system this option is automatically set
to ON, as static compilation of binaries seems to be forbidden on these systems)
• Maintainer By default cmake offers four different build modes that one toggles by positioning CMAKE_BUILD_TYPE built-in variable (to Debug, Release, RelWithDebInfo and
MinSizeRel). Maintainer is an additional mode which fulfills two basic needs of the
task of the maintainer of Diet. The first preventive task is to provide code free from any
compilation and link warnings. The second corresponds to the snafu stage which is to
debug the code. For reaching those goals the Maintainer build type sets the compilers
flags, respectively the linker flags, with all the possible warning flags activated, resp. with
the additional debug flags.
• Several options (not accessible through the ccmake GUI) can control the installation paths
for libraries, binaries, includes and modules. By default the value of these install paths are
respectively ${CMAKE_INSTALL_PREFIX}/lib${LIB_SUFFIX}, ${CMAKE_INSTALL_PREFIX}/bin,
${CMAKE_INSTALL_PREFIX}/include, ${CMAKE_INSTALL_PREFIX}/share/cmake/Modules.
They can independently be set up using the following variables LIB_INSTALL_DIR, BIN_INSTALL_DIR,
INSTALL_INSTALL_DIR and CMAKE_MOD_INSTALL_DIR. You can set those on the command
line when calling cmake or ccmake, for example cmake .. -DLIB_INSTALL_DIR=${HOME}/lib.
2.2.7
Compiling and installing
Summarizing the configuration choices
Once the configuration is properly made one can check the choices made by looking the little
summary proposed by cmake. This summary should look like ([...] denotes eluded portions):
~/DIET > ./cmake ..
[...]
- XXXXXXXXXXXXXXXXXXXXXXXXXXXXXXXXXXXXXXXXXXXXXXXXXXXXXXXXXXXXXXXXXXXXXXXXXX
-- XXXXXXXXXXXXXXXXXXXXXX DIET configuration summary XXXXXXXXXXXXXXXXXXXXXX
-- XXXXXXXXXXXXXXXXXXXXXXXXXXX 2010/03/31-07:47:15 XXXXXXXXXXXXXXXXXXXXXXXXXX
-- XXX System name Linux
-- XXX - Install prefix: /home/diet/local/diet
-- XXX - C compiler
: /usr/bin/gcc
-- XXX
* version
: 4.3.4
-- XXX
* options
: -Dinline="static __inline__" -Dconst="" -std=gnu99
-- XXX - CXX compiler : /usr/bin/c++
-- XXX
* version : 4.3.4
-- XXX
* options : -lpthread -g -D__linux__
-- XXX - OmniORB found: YES
-- XXX
* OmniORB version: 4.1.2
-- XXX
* OmniORB directory:
-- XXX
* OmniORB includes: /usr/include
-- XXX
* OmniORB libraries: [...]libomniDynamic4.so;[...]libomniORB4.so;[...]libomnithread.so
-- XXX - General options:
-- XXX
* Examples: ON
-- XXX
* BLAS Examples: ON
-- XXX - Options set:
-- XXX
* Batch: ON
c INRIA, ENS-Lyon, UCBL, CNRS, SysFera
Page 20
DIET User’s Manual
-- XXX
* Statistics: ON
-- XXXXXXXXXXXXXXXXXXXXXXXXXXXXXXXXXXXXXXXXXXXXXXXXXXXXXXXXXXXXXXXXXXXXXXXXXX
[...]
A more complete, yet technical, way of making sure is to check the content of the file named
CMakeCache.txt (generated by cmake in the directory from which cmake was invocated). When
exchanging with the developers list it is a recommendable practice to join the content of this
file which summarizes your options and also the automatic package/library detections made by
cmake.
Compiling stage
You are now done with the configuration stage (equivalent of both the bootstrap.sh and
./configure stage of the autotools). You are now back to your platform level development
tools, i.e., make when working on Unices. Hence you can now proceed with the compiling
process by launching make.
Testing
If you configured Diet with the BUILD_TESTING you can easily run the regression tests by
invoking the make test. This is equivalent to invoking ctest command (ctest is part of cmake
package). ctest --help provides a summary of the advanced options of ctest among which
we recommend the --verbose option.
Installation stage
After compiling (linking, and testing) you can optionally proceed with the installation stage
with the make install command.
2.3
Diet client/server examples
A set of various examples of Diet server/client are provided within the Diet archive, here are
some of the provided examples:
• Batch: A simple basic example on how to use the batch API is given here: no IN or
INOUT args, the client receives as a result the number of processors on which the service
has been executed. The service only writes to a file, with batch-independent mnemonics,
some information on the batch system.
• BLAS: the server offers the dgemm BLAS functionality. We plan to offer all BLAS (Basic
Linear Algebraic Subroutines) in the future. Since this function computes C = αAB+βC,
it can also compute a matrix-matrix product, a sum of square matrices, etc. All these
services are offered by the BLAS server. Two clients are designed to use these services:
one (dgemm client.c) is designed to use the dgemm function only, and the other one
(client.c) to use all BLAS functions (but currently only dgemm ) and sub-services, such
as MatPROD.
c INRIA, ENS-Lyon, UCBL, CNRS, SysFera
Page 21
DIET User’s Manual
• dmat manips: the server offers matrix manipulation routines: transposition (T), product
(MatPROD) and sum (MatSUM, SqMatSUM for square matrices, and SqMatSUM opt for square
matrices but re-using the memory space of the second operand for the result). Any subset
of these operations can be specified on the command line. The last two of them are given
for compatibility with a BLAS server as explained below.
• file transfer: the server computes the sizes of two input files and returns them. A
third output parameter may be returned; the server decides randomly whether to send
back the first file. This is to show how to manage a variable number of arguments: the
profile declares all arguments that may be filled, even if they might not be all filled at
each request/computation.
• ScaLAPACK: the server is designed to offer all ScaLAPACK (parallel version of the LAPACK library) functions but only manages the pdgemm function so far. The pdgemm
routine is the parallel version of the dgemm function, so that the server also offers all the
same sub-services. Two clients are designed to use these services: one (pdgemm client.c)
is designed to use the pdgemm function only, and the other one (client.c) to use all
ScaLAPACK functions and sub-services, such as MatPROD.
• workflow: The programs in this directory are examples that demonstrate how to use
the workflow feature of diet. The files representing the workflows that can be tested are
stored in xml sub-directory. For each workflow, you can find the required services in the
corresponding xml file (check the path attribute of each node element). For the scalar
manipulation example, you can use scalar server that gathers four different elementary
services.
2.3.1
Compiling the examples
cmake will set the examples to be compiled when setting the DIET_BUILD_EXAMPLES to ON
which can be achieved by toggling the corresponding entry of ccmake GUI’s or by adding
-DDIET_BUILD_EXAMPLES:BOOL=ON to the command line arguments of [c]cmake invocation.
Note that this option is disabled by default.
The compilation of the examples, respectively the installation, is executed on the above
described invocation of make, resp. make install stages. The binary of the examples are
placed in the <install dir>/bin/examples sub-directory of the installation directory. Likewise, the samples of configuration files located in src/examples/cfgs are processed by make
install to create ready-to-use configuration files in src/examples/cfgs and then copied into
<install dir>/etc/cfgs.
c INRIA, ENS-Lyon, UCBL, CNRS, SysFera
Page 22
DIET User’s Manual
Chapter 3
Diet data
It is important that Diet can manipulate data to optimize copies and memory allocation, to
estimate data transfer and computation time, etc. Therefore the data must be fully described
in terms of their data types and various attributes associated with these types.
3.1
Data types
Diet defines a precise set of data types to be used to describe the arguments of the services
(on the server side) and of the problems (on the client side).
The Diet data types are defined in the file <install dir>/include/DIET data.h. The
user will also find in this file various function prototypes to manipulate all Diet data types.
Please refer to this file for a complete and up-to-date API description.
To keep Diet type descriptions generic, two main sets are used: base and composite types.
3.1.1
Base types
Base types are defined in an enum type diet base type t and have the following semantics:
Type
DIET CHAR
DIET SHORT
DIET INT
DIET LONGINT
DIET FLOAT
DIET DOUBLE
DIET SCOMPLEX
DIET DCOMPLEX
Description
Character
Signed short integer
Signed integer
Long signed integer
Simple precision real
Double precision real
Simple precision complex
Double precision complex
Size in octets
1
2
4
8
4
8
8
16
NB: DIET SCOMPLEX and DIET DCOMPLEX are not implemented yet.
3.1.2
Composite types
Composite types are defined in an enum type diet type t:
c INRIA, ENS-Lyon, UCBL, CNRS, SysFera
Page 23
DIET User’s Manual
Type
DIET SCALAR
DIET VECTOR
DIET MATRIX
DIET STRING
DIET PARAMSTRING
DIET FILE
DIET CONTAINER
Possible base types
all base types
all base types
all base types
DIET CHAR
DIET CHAR
DIET CHAR
all base types
Each of these types requires specific parameters to completely describe the data (see Figure
3.1).
3.1.3
Persistence mode
Persistence mode is defined in an enum type diet persistence mode t
mode
DIET VOLATILE
DIET PERSISTENT RETURN
DIET PERSISTENT
DIET STICKY
DIET STICKY RETURN
Description
not stored
stored on server, movable and copy back to client
stored on server and movable
stored and non movable
stored, non movable and copy back to client
NB: DIET STICKY RETURN only works with Dagda.
3.2
Data description
Each parameter of a client problem is manipulated by Diet using the following structure:
typedef struct diet_arg_s diet_arg_t;
struct diet_arg_s{
diet_data_desc_t desc;
void
*value;
};
typedef diet_arg_t diet_data_t;
The second field is a pointer to the memory zone where the parameter data are stored. The
first one consists of a complete Diet data description, which is better described by a figure
than with C code, since it can be set and accessed through API functions. Figure 3.1 shows the
data classification used in Diet. Every “class” inherits from the root “class” data, and could
also be a parent of more detailed classes of data in future versions of Diet.
3.3
3.3.1
Data management
Data identifier
The data identifier is generated by the MA. The data identifier is a string field that contains the
MA name, the number of the session plus the number of the data in the problem (incremental)
plus the string “id”. This is the id field of the diet data desc t structure.
c INRIA, ENS-Lyon, UCBL, CNRS, SysFera
Page 24
DIET User’s Manual
argument
• base type
• type
• persistence
scalar
vector
• pointer to the value
matrix
• size
• number of rows
• pointer to the array
• number of columns
file
• path
• order row- or col-major
string/
paramstring
• length (without the '\0')
container
• pointer to the ID
• pointer to
the first character
• pointer to the array
Figure 3.1: Argument/Data structure description.
typedef struct {
char* id;
diet_persistence_mode_t
....
} diet_data_desc_t;
mode;
For example, id.MA1.1.1 will identify the first data in the first session submitted on the
Master Agent MA1.
NB: the field “id” of the identifier will be next replaced by a client identifier. This is not
implemented yet.
3.3.2
Data file
The name of the file is generated by a Master Agent. It is created during the diet initialize()
call. The name of the file is the aggregation of the string ID FILE plus the name of the MA
plus the number of the session.
A file is created only when there are some persistent data in the session.
For example, ID FILE.MA1.1 means the identifiers of the persistent data stored are in
the file corresponding to the first session in the Master Agent MA1.
The file is stored in the /tmp directory.
NB: for the moment, when a data item is erased from the platform, the file isn’t updated.
3.4
Manipulating Diet structures
The user will notice that the API to the Diet data structures consists of modifier and accessor
functions only: no allocation function is required, since diet profile alloc (see Section 3.6)
allocates all necessary memory for all argument descriptions. This avoids the temptation for
c INRIA, ENS-Lyon, UCBL, CNRS, SysFera
Page 25
DIET User’s Manual
the user to allocate the memory for these data structures twice (which would lead to Diet errors
while reading profile arguments). Please see the example in Section 3.7 for a typical example.
Moreover, the user should know that arguments of the set functions that are passed by
pointers are not copied, in order to save memory. This is true for the value arguments, but also
for the path in diet file set. Thus, the user keeps ownership of the memory zones pointed at
by these pointers, and he/she must be very careful not to alter it during a call to Diet.
3.4.1
Set functions
/**
* On the server side, these functions should not be used on arguments, but only
* on convertors (see section 5.5).
* If mode
is DIET_PERSISTENCE_MODE_COUNT,
* or if base_type
is DIET_BASE_TYPE_COUNT,
* or if order
is DIET_MATRIX_ORDER_COUNT,
* or if size, nb_rows, nb_cols or length is 0,
* or if path
is NULL,
* then the corresponding field is not modified.
*/
int
diet_scalar_set(diet_arg_t* arg,
diet_base_type_t
int
diet_vector_set(diet_arg_t* arg,
diet_base_type_t
void* value, diet_persistence_mode_t mode,
base_type);
void* value, diet_persistence_mode_t mode,
base_type, size_t size);
/* Matrices can be stored by rows or by columns */
typedef enum {
DIET_COL_MAJOR = 0,
DIET_ROW_MAJOR,
DIET_MATRIX_ORDER_COUNT
} diet_matrix_order_t;
int
diet_matrix_set(diet_arg_t* arg, void* value, diet_persistence_mode_t mode,
diet_base_type_t base_type,
size_t nb_rows, size_t nb_cols, diet_matrix_order_t order);
int
diet_string_set(diet_arg_t* arg, char* value, diet_persistence_mode_t mode);
/* The file size is computed and stocked in a field of arg
! Warning ! The path is not duplicated !!! */
int
diet_file_set(diet_arg_t* arg, cont char* path, diet_persistence_mode_t mode);
3.4.2
Access functions
/**
* A NULL pointer is not an error (except for arg): it is simply IGNORED.
c INRIA, ENS-Lyon, UCBL, CNRS, SysFera
Page 26
DIET User’s Manual
* For instance,
*
diet_scalar_get(arg, &value, NULL),
* will only set the value to the value field of the (*arg) structure.
*
* NB: these are macros that let the user not worry about casting (int **)
* or (double **) etc. into (void **).
*/
/**
* Type: int diet_scalar_get((diet_arg_t *), (void *),
*
(diet_persistence_mode_t *))
*/
#define diet_scalar_get(arg, value, mode) \
_scalar_get(arg, (void *)value, mode)
/**
* Type: int diet_vector_get((diet_arg_t *), (void **),
*
(diet_persistence_mode_t *), (size_t *))
*/
#define diet_vector_get(arg, value, mode, size) \
_vector_get(arg, (void **)value, mode, size)
/**
* Type: int diet_matrix_get((diet_arg_t *), (void **),
*
(diet_persistence_mode_t *),
*
(size_t *), (size_t *), (diet_matrix_order_t *))
*/
#define diet_matrix_get(arg, value, mode, nb_rows, nb_cols, order) \
_matrix_get(arg, (void **)value, mode, nb_rows, nb_cols, order)
/**
* Type: int diet_string_get((diet_arg_t *), (char **),
*
(diet_persistence_mode_t *))
*/
#define diet_string_get(arg, value, mode) \
_string_get(arg, (char **)value, mode)
/**
* Type: int diet_file_get((diet_arg_t *),
*
(diet_persistence_mode_t *), (size_t *), (char **))
*/
#define diet_file_get(arg, mode, size, path) \
_file_get(arg, mode, size, (char **)path)
3.5
Data Management functions
• The store id method is used to store the identifier of persistent data. It also accepts a
description of the data stored. This method has to be called after the diet call() so
that the identifier exists.
store_id(char* argID,char *msg);
• The diet use data method allows the client to use a data item that is already stored in
the platform.
c INRIA, ENS-Lyon, UCBL, CNRS, SysFera
Page 27
DIET User’s Manual
diet_use_data(diet_arg_t* arg,char* argID);
This function replaces the set functions (see Section 3.4.1).
NB: a mechanism for data identifier publication hasn’t been implemented yet. So, exchanges of identifiers between end-users that want to share data must be done explicitly.
• The diet free persistent data method allows the client to remove a persistent data
item from the platform.
diet_free_persistent_data(char *argID);
/*******************************************************************
*
Add handler argID and text message msg in the identifier file *
******************************************************************/
void
store_id(char* argID, char* msg);
/** sets only identifier : data is present inside the platform */
void
diet_use_data(diet_arg_t* arg, char* argID);
/******************************************************************
* Free persistent data identified by argID
*
*****************************************************************/
int
diet_free_persistent_data(char* argID);
3.5.1
Free functions
The amount of data pointed at by value fields should be freed through a Diet API function:
/****************************************************************************/
/* Free the amount of data pointed at by the value field of an argument.
*/
/* This should be used ONLY for VOLATILE data,
*/
/*
- on the server for IN arguments that will no longer be used
*/
/*
- on the client for OUT arguments, after the problem has been solved, */
/*
when they will no longer be used.
*/
/* NB: for files, this function removes the file and frees the path (since */
/*
it has been dynamically allocated by DIET in both cases)
*/
/****************************************************************************/
int
diet_free_data(diet_arg_t* arg);
c INRIA, ENS-Lyon, UCBL, CNRS, SysFera
Page 28
DIET User’s Manual
3.6
Problem description
For Diet to match the client problem with a service, servers and clients must “speak the same
language”, i.e., they must use the same problem description. A unified way to describe problems
is to use a name and define its profile with the type diet profile t:
typedef struct {
char*
pb_name;
int
last_in, last_inout, last_out;
diet_arg_t *parameters;
} diet_profile_t;
The field parameters consists of a diet arg t array of size last out + 1. Arguments can be:
IN: The data are sent to the server. The memory is allocated by the user.
INOUT: The data are allocated by the user as for the IN arguments, then sent to the server and
brought back into the same memory zone after the computation has completed, without
any copy. Thus freeing this memory on the client side while the computation is performed
on the server would result in a segmentation fault when the data are brought back onto
the client.
OUT: The data are created on the server and brought back into a newly allocated memory
zone on the client. This allocation is performed by Diet. After the call has returned,
the user can find the result in the zone pointed at by the value field. Of course, Diet
cannot guess how long the user will need these data, so the user must free the memory
him/herself with diet free data.
The fields last in, last inout and last out of the diet profile t structure respectively point
at the indexes in the parameters array of the last IN, INOUT and OUT arguments.
Functions to create and destroy such profiles are defined with the prototypes below:
diet_profile_t *diet_profile_alloc(char* pb_name, int last_in, int last_inout, int last_out);
int diet_profile_free(diet_profile_t *profile);
The values of last in, last inout and last out are respectively:
last in: −1 + number of input data.
last inout: last in + number of inout data.
last out: last inout + number of out data.
3.7
3.7.1
Examples
Example 1: without persistency
Let us consider the product of a scalar by a matrix: the matrix must be multiplied in-place,
and the computation time must be returned. This problem has one IN argument (the scalar
factor), one INOUT argument (the matrix) and one OUT argument (the computation time),
so its profile will be built as follows:
c INRIA, ENS-Lyon, UCBL, CNRS, SysFera
Page 29
DIET User’s Manual
profile
last_in = 0
last_inout = 1
last_out = 2
type=
DIET_SCALAR
base_type =
DIET_DOUBLE
value = &factor
0
type=
type=
DIET_SCALAR
DIET_MATRIX
base_type ==l
base_type
DIET_DOUBLE
DIET_DOUBLE
nb_r = 5
nb_c = 6
order = DIET_ROW_MAJOR
1
type=
DIET_SCALAR
base_type =
DIET_FLOAT
value = &time
2
Here are the lines of C code to generate such a profile:
double factor;
double *matrix;
float *time;
// Init matrix at least, factor and time too would be better ...
// ...
diet_profile_t profile = diet_profile_alloc(0, 1, 2); // last_in, last_inout, last_out
diet_scalar_set(diet_parameter(profile,0), &factor, 0, DIET_DOUBLE);
diet_matrix_set(diet_parameter(profile,1), matrix, 0, DIET_DOUBLE, 5, 6, DIET_ROW_MAJOR);
diet_scalar_set(diet_parameter(profile,2), NULL,
0, DIET_FLOAT);
NB1: If there is no IN argument, last in must be set to -1, if there is no INOUT argument,
last inout must be equal to last in, and if there is no OUT argument, last out must be
equal to last inout.
NB2: The value argument for set functions (3.4.1) is ignored for OUT arguments, since Diet
allocates the necessary memory space when the corresponding data are transferred from
the server, so set value to NULL.
3.7.2
Example 2: using persistency
Let us consider the following problem : C = A ∗ B, with A,B and C persistent matrices.
double *A, *B, *C;
// matrices initialization
...
diet_initialize();
strcpy(path,"MatPROD");
profile = diet_profile_alloc(path, 1, 1, 2);
diet_matrix_set(diet_parameter(profile,0),
A, DIET_PERSISTENT, DIET_DOUBLE, mA, nA, oA);
print_matrix(A, mA, nA, (oA == DIET_ROW_MAJOR));
diet_matrix_set(diet_parameter(profile,1),
B, DIET_PERSISTENT, DIET_DOUBLE, mB, nB, oB);
print_matrix(B, mB, nB, (oB == DIET_ROW_MAJOR));
c INRIA, ENS-Lyon, UCBL, CNRS, SysFera
Page 30
DIET User’s Manual
diet_matrix_set(diet_parameter(profile,2),
NULL, DIET_PERSISTENT_RETURN, DIET_DOUBLE, mA, nB, oC);
if (!diet_call(profile)) {
diet_matrix_get(diet_parameter(profile,2),&C, NULL, &mA, &nB, &oC);
store_id(profile->parameters[2].desc.id,"matrix C of doubles");
store_id(profile->parameters[1].desc.id,"matrix B of doubles");
store_id(profile->parameters[0].desc.id,"matrix A of doubles");
print_matrix(C, mA, nB, (oC == DIET_ROW_MAJOR));
}
diet_profile_free(profile);
// free matrices memory
...
diet_finalize();
Then, a client submits the problem : D = E + C with C already present in the platform.
We consider that the handle of C is “id.MA1.1.3”.
double *C, *D, *E;
// matrices initialization
...
diet_initialize();
strcpy(path,"MatSUM");
profile2 = diet_profile_alloc(path, 1, 1, 2);
printf("second pb\n\n");
diet_use_data(diet_parameter(profile2,0), "id.MA1.1.3");
diet_matrix_set(diet_parameter(profile2,1),
E, DIET_PERSISTENT, DIET_DOUBLE, mA, nB, oE);
print_matrix(E, mA, nB, (oE == DIET_ROW_MAJOR));
diet_matrix_set(diet_parameter(profile2,2),
NULL, DIET_PERSISTENT_RETURN, DIET_DOUBLE, mA, nB, oD);
if (!diet_call(profile2)) {
diet_matrix_get(diet_parameter(profile2,2), &D, NULL, &mA, &nB, &oD);
print_matrix(D, mA, nB, (oD == DIET_ROW_MAJOR));
store_id(profile2->parameters[2].desc.id,"matrix D of doubles");
store_id(profile2->parameters[1].desc.id,"matrix E of doubles");
}
diet_profile_free(profile2);
diet_free_persistent_data("id.MA1.1.3");
// free matrices memory
...
diet_finalize();
Note that when a single client creates persistent data with a first Diet call and uses that
data with a second Diet call, we will not know in advance the identifier of the data. However,
the identifier is stored in the structure of the first profile. For example, consider a matrix A
built with diet matrix set() method as follows:
c INRIA, ENS-Lyon, UCBL, CNRS, SysFera
Page 31
DIET User’s Manual
...
diet_profile_t *profile;
...
diet_matrix_set(diet_parameter(profile,0),
E, DIET_PERSISTENT, DIET_DOUBLE, mA, nA, oA);
...
After the first diet call, the identifier of A is stored in the profile
(in profile->parameters[0].desc.id). So, for the second call we will have the following
instruction in order to use A:
...
diet_profile_t *profile2;
...
diet_use_data(diet_parameter(profile2,0),profile->parameters[0].desc.id);
...
NB: when using this method, the first profile (here profile) must not be freed before using
or making a copy of the data identifier.
c INRIA, ENS-Lyon, UCBL, CNRS, SysFera
Page 32
DIET User’s Manual
Chapter 4
Building a client program
The most difficult part of building a client program is to understand how to describe the problem
interface. Once this step is done, it is fairly easy to build calls to Diet.
4.1
Structure of a client program
Since the client side of Diet is a library, a client program has to define a main function that
uses Diet through function calls. The complete client-side interface is described in the files
DIET data.h (see Chapter 3) and DIET client.h found in <install dir>/include. Please
refer to these two files for a complete and up-to-date API 1 description, and include at least the
latter at the beginning of your source code (DIET client.h includes DIET data.h):
#include <stdio.h>
#include <stdlib.h>
#include "DIET_client.h"
int main(int argc, char *argv[])
{
diet_initialize(configuration_file, argc, argv);
// Successive DIET calls ...
diet_finalize();
}
The client program must open its Diet session with a call to diet initialize, which
parses the configuration file to set all options and get a reference to the Diet Master Agent.
The session is closed with a call to diet finalize, which frees all resources associated with this
session on the client. Note that memory allocated for all INOUT and OUT arguments brought
back onto the client during the session is not freed during diet finalize; this allows the user
to continue to use the data, but also requires that the user explicitly free the memory. The user
must also free the memory he or she allocated for IN arguments.
1
Application programming interface
c INRIA, ENS-Lyon, UCBL, CNRS, SysFera
Page 33
DIET User’s Manual
4.2
Client API
The client API follows the GridRPC definition [23]: all diet functions are “duplicated” with
grpc functions. Both diet initialize/grpc initialize and diet finalize/grpc finalize
belong to the GridRPC API.
A problem is managed through a function handle, that associates a server to a problem
name. For compliance with GridRPC Diet accepts diet function handle init, but the server
specified in the call will be ignored; Diet is designed to automatically select the best server.
The structure allocation is performed through the function diet function handle default.
The function handle returned is associated to the problem description, its profile, in the call
to diet call.
4.3
Examples
Let us consider the same example as in Section 3.7, but for synchronous and asynchronous calls.
Here, the client configuration file is given as the first argument on the command line, and we
decide to hardcode the matrix, its factor, and the name of the problem.
4.3.1
Synchronous call
smprod for scalar by matrix product.
#include
#include
#include
#include
<stdio.h>
<stdlib.h>
<math.h>
"DIET_client.h"
int main(int argc, char **argv)
{
int i;
double factor = M_PI; /* Pi, why not ? */
double *matrix;
/* The matrix to multiply */
float *time
= NULL; /* To check that time is set by the server */
diet_profile_t
*profile;
/* Allocate the matrix: 60 lines, 100 columns */
matrix = malloc(60 * 100 * sizeof(double));
/* Fill in the matrix with dummy values (who cares ?) */
for (i = 0; i < (60 * 100); i++) {
matrix[i] = 1.2 * i;
}
/* Initialize a DIET session */
if (diet_initialize("./client.cfg", argc, argv)) {
printf("A problem occured during DIET initialization.\n"
"Make sure that a configuration file named client.cfg is present in this directory.\n");
return 1;
}
c INRIA, ENS-Lyon, UCBL, CNRS, SysFera
Page 34
DIET User’s Manual
/* Create the profile as explained in Chapter 3 */
profile = diet_profile_alloc("smprod",0, 1, 2); // last_in, last_inout, last_out
/* Set profile arguments */
diet_scalar_set(diet_parameter(profile,0), &factor, 0, DIET_DOUBLE);
diet_matrix_set(diet_parameter(profile,1), matrix, 0, DIET_DOUBLE, 60, 100, DIET_COL_MAJOR);
diet_scalar_set(diet_parameter(profile,2), NULL,
0, DIET_FLOAT);
if (!diet_call(profile)) { /* If the call has succeeded ... */
/* Get and print time */
diet_scalar_get(diet_parameter(profile,2), &time, NULL);
if (time == NULL) {
printf("Error: time not set !\n");
} else {
printf("time = %f\n", *time);
}
/* Check the first non-zero element of the matrix */
if (fabs(matrix[1] - ((1.2 * 1) * factor)) > 1e-15) {
printf("Error: matrix not correctly set !\n");
}
}
/* Free profile */
diet_profile_free(profile);
diet_finalize();
free(matrix);
free(time);
}
4.3.2
Asynchronous call
smprod for scalar by matrix product.
#include
#include
#include
#include
<stdio.h>
<stdlib.h>
<math.h>
"DIET_client.h"
int main(int argc, char **argv)
{
int i, j;
double factor = M_PI; /* Pi, why not ? */
size_t m, n; /* Matrix size */
double *matrix[5];
/* The matrix to multiply */
float *time
= NULL; /* To check that time is set by the server */
diet_profile_t
*profile[5];
diet_reqID_t rst[5] = {0,0,0,0,0};
m = 60;
n = 100;
c INRIA, ENS-Lyon, UCBL, CNRS, SysFera
Page 35
DIET User’s Manual
/* Initialize a DIET session */
if (diet_initialize("./client.cfg", argc, argv)) {
printf("A problem occured during DIET initialization.\n"
"Make sure that a configuration file named client.cfg is present in this directory.\n");
return 1;
}
/* Create the profile as explained in Chapter 3 */
for (i = 0; i < 5; i++){
/* Allocate the matrix: m lines, n columns */
matrix[i] = malloc(m * n * sizeof(double));
/* Fill in the matrix with dummy values (who cares ?) */
for (j = 0; j < (m * n); j++) {
matrix[i][j] = 1.2 * j;
}
profile[i] = diet_profile_alloc("smprod",0, 1, 2); // last_in, last_inout, last_out
/* Set profile arguments */
diet_scalar_set(diet_parameter(profile[i],0), &factor, 0, DIET_DOUBLE);
diet_matrix_set(diet_parameter(profile[i],1), matrix[i], 0, DIET_DOUBLE,
m, n, DIET_COL_MAJOR);
diet_scalar_set(diet_parameter(profile[i],2), NULL,
0, DIET_FLOAT);
}
/* Call DIET */
int rst_call = 0;
for (i = 0; i < 5; i++){
if ((rst_call = diet_call_async(profile[i], &rst[i])) != 0)
printf("Error in diet_call_async return -%d-\n", rst_call);
else {
printf("request ID value = -%d- \n", rst[i]);
if (rst[i] < 0) {
printf("error in request value ID\n");
return 1;
}
}
rst_call = 0;
}
/* Wait for DIET answers */
if ((rst_call = diet_wait_and((diet_reqID_t*)&rst, (unsigned int)5)) != 0)
printf("Error in diet_wait_and\n");
else {
printf("Result data for requestID");
for (i = 0; i < 5; i++) printf(" %d ", rst[i]);
for (i = 0; i < 5; i++){
/* Get and print time */
diet_scalar_get(diet_parameter(profile[i],2), &time, NULL);
if (time == NULL) {
printf("Error: time not set !\n");
} else {
c INRIA, ENS-Lyon, UCBL, CNRS, SysFera
Page 36
DIET User’s Manual
printf("time = %f\n", *time);
}
/* Check the first non-zero element of the matrix */
if (fabs(matrix[i][1] - ((1.2 * 1) * factor)) > 1e-15) {
printf("Error: matrix not correctly set !\n");
}
}
}
/* Free profiles */
for (i = 0; i < 5; i++){
diet_cancel(rst[i]);
diet_profile_free(profile[i]);
free(matrix[i]);
}
free(time);
diet_finalize();
return 0;
}
4.4
Compilation
After compiling the client program, the user must link it with the Diet libraries and the CORBA
libraries.
4.4.1
Compilation using cmake
The doc/ExternalExample directory also contains a CMakeFile.txt file which illustrates the
cmake way of compiling this simple client/server example:
PROJECT( DIETSIMPLEEXAMPLE )
cmake_minimum_required(VERSION 2.6)
# This example needs the FindDiet.cmake package detection script. We placed
# this script in the cmake sub-directory:
SET( CMAKE_MODULE_PATH ${DIETSIMPLEEXAMPLE_SOURCE_DIR}/cmake )
# Try to automaticaly detect a DIET installation...
FIND_PACKAGE( Diet )
# ...and on failure provide the user with some hints:
IF( NOT DIET_FOUND )
IF( DIET_DIR )
MESSAGE( "The provided DIET_DIR parameter seems NOT correct." )
ELSE( DIET_DIR )
MESSAGE("Could NOT find any DIET installation among the well known paths.")
MESSAGE("If your DIET installation is in a non canonical place, please provide DIET_DIR:")
MESSAGE(" - through the GUI when working with ccmake, ")
MESSAGE(" - as a command line argument when working with cmake e.g. ")
MESSAGE("
cmake .. -DDIET_DIR:PATH=/home/<your_login_name>/local/diet ")
c INRIA, ENS-Lyon, UCBL, CNRS, SysFera
Page 37
DIET User’s Manual
ENDIF( DIET_DIR )
ENDIF( NOT DIET_FOUND )
# On success use the information we just recovered:
INCLUDE_DIRECTORIES( ${DIET_INCLUDE_DIR} )
LINK_DIRECTORIES( ${DIET_LIBRARY_DIR} )
### Define a simple server...
ADD_EXECUTABLE( simple_server simple_server.c )
TARGET_LINK_LIBRARIES( simple_server ${DIET_SERVER_LIBRARIES} )
INSTALL( TARGETS simple_server DESTINATION bin )
### ... and it’s associated simple client.
ADD_EXECUTABLE( simple_client simple_client.c )
TARGET_LINK_LIBRARIES( simple_client ${DIET_CLIENT_LIBRARIES} )
INSTALL( TARGETS simple_client DESTINATION bin )
In order to test drive the cmake configuration of this example, and assuming the DIET HOME
points to a directory containing an installation of Diet, simply try:
export DIET_HOME=<path_to_a_DIET_instal_directory>
cd doc/ExternalExample
mkdir Bin
cd Bin
cmake -DDIET_DIR:PATH=$DIET_HOME -DCMAKE_INSTALL_PREFIX:PATH=/tmp/DIETSimple ..
make
make install
c INRIA, ENS-Lyon, UCBL, CNRS, SysFera
Page 38
DIET User’s Manual
Chapter 5
Building a server application
A Diet server program is the link between the Diet Server Deamon (SeD) and the libraries
that implement the service to offer.
5.1
Structure of the program
Much like the client side, the Diet SeD is a library. So the server developer needs to define
the main function. Within the main, the Diet server will be launched with a call to diet SeD
which will never return (except if some errors occur, or if a SIGINT or SIGTERM signal is
sent to the SeD). The complete server side interface is described in the files DIET data.h (see
Chapter 3) and DIET server.h found in <install dir>/include. Do not forget to include the
DIET server.h (DIET server.h includes DIET data.h) at the beginning of your server source
code.
#include <stdio.h>
#include <stdlib.h>
#include "DIET_server.h"
The second step is to define a function whose prototype is “Diet-normalized” and which
will be able to convert the function into the library function prototype. Let us consider a library
function with the following prototype:
int service(int arg1, char *arg2, double *arg3);
This function cannot be called directly by Diet, since such a prototype is hard to manipulate dynamically. The user must define a “solve” function whose prototype only consists of a
diet profile t. This function will be called by the Diet SeD through a pointer.
int solve_service(diet_profile_t *pb)
{
int
*arg1;
char
*arg2;
double *arg3;
diet_scalar_get(diet_parameter(pb,0), &arg1, NULL);
diet_string_get(diet_parameter(pb,1), &arg2, NULL);
c INRIA, ENS-Lyon, UCBL, CNRS, SysFera
Page 39
DIET User’s Manual
diet_scalar_get(diet_parameter(pb,2), &arg3, NULL);
return service(*arg1, arg2, arg3);
}
Several API functions help the user to write this “solve” function, particularly for getting
IN arguments as well as setting OUT arguments.
Getting IN, INOUT and OUT arguments
The diet * get functions defined in DIET data.h are still usable here. Do not forget that the
necessary memory space for OUT arguments is allocated by Diet. So the user should call the
diet * get functions to retrieve the pointer to the zone his/her program should write to.
Setting INOUT and OUT arguments
To set INOUT and OUT arguments, use the diet * desc set defined in DIET server.h, these
are helpful for writing “solve” functions only. Using these functions, the server developer must
keep in mind the fact that he cannot alter the memory space pointed to by value fields on the
server. Indeed, this would make Diet confused about how to manage the data1 .
/**
* If value
is NULL,
* or if order
is DIET_MATRIX_ORDER_COUNT,
* or if nb_rows or nb_cols is 0,
* or if path
is NULL,
* then the corresponding field is not modified.
*/
int
diet_scalar_desc_set(diet_data_t* data, void* value);
// No use of diet_vector_desc_set: size should not be altered by server
// You can alter nb_r and nb_c, but the total size must remain the same
int
diet_matrix_desc_set(diet_data_t* data,
size_t nb_r, size_t nb_c, diet_matrix_order_t order);
// No use of diet_string_desc_set: length should not be altered by server
int
diet_file_desc_set(diet_data_t* data, char* path);
1
And the server developer should not be confused by the fact that diet scalar desc set uses a
value, since scalar values are copied into the data descriptor.
c INRIA, ENS-Lyon, UCBL, CNRS, SysFera
Page 40
DIET User’s Manual
5.2
Server API
Defining services
First, declare the service(s) that will be offered2 . Each service is described by a profile description called diet profile desc t since the service does not specify the sizes of the data. The
diet profile desc t type is defined in DIET server.h, and is very similar to diet profile t.
The difference is that the prototype is described with the generic parts of diet data desc only,
whereas the client description uses full diet data.
file DIET_data.h:
struct diet_data_generic {
diet_data_type_t type;
diet_base_type_t base_type;
};
file DIET_server.h:
typedef struct diet_data_generic diet_arg_desc_t;
typedef struct {
char*
path;
int
last_in, last_inout, last_out;
diet_arg_desc_t* param_desc;
} diet_profile_desc_t;
diet_profile_desc_t* diet_profile_desc_alloc(const char* path,
int last_in, int last_inout, int last_out);
int diet_profile_desc_free(diet_profile_desc_t* desc);
diet_profile_desc_t *diet_profile_desc_alloc(int last_in, int last_inout, int last_out);
int diet_profile_desc_free(diet_profile_desc_t *desc);
Each profile can be allocated with diet profile desc alloc with the same semantics as for
diet profile alloc. Every argument of the profile will then be set with diet generic desc set
defined in DIET server.h.
Declaring services
Every service must be added in the service table before the server is launched. The complete
service table API is defined in DIET server.h:
typedef int (* diet_solve_t)(diet_profile_t *);
int diet_service_table_init(int max_size);
int diet_service_table_add(diet_profile_desc_t *profile,
diet_convertor_t
*cvt,
diet_solve_t
solve_func);
void diet_print_service_table();
The parameter diet solve t solve func is the type of the solve service function: a
function pointer used by Diet to launch the computation.
2
It is possible to declare several services in a single SeD.
c INRIA, ENS-Lyon, UCBL, CNRS, SysFera
Page 41
DIET User’s Manual
The parameter diet convertor t *cvt is to be used in combination with scheduling facilities (if available). It is there to allow profile conversion (for multiple services, or when differences
occur between the Diet and the scheduling facility profile). Profile conversion is complicated
and will be treated separately in Chapter 9.
5.3
Example
Let us consider the same example as in Chapter 4, where a function scal mat prod performs
the product of a matrix and a scalar and returns the time required for the computation:
int scal_mat_prod(double alpha, double *M, int nb_rows, int nb_cols, float *time);
Our program will first define the solve function that consists of the link between Diet and
this function. Then, the main function defines one service and adds it in the service table with
its associated solve function.
#include <stdio.h>
#include "DIET_server.h"
#include "scal_mat_prod.h"
int solve_smprod(diet_profile_t *pb)
{
double *alpha;
double *M;
float time;
size_t m, n;
int res;
/* Get arguments */
diet_scalar_get(diet_parameter(pb,0), &alpha, NULL);
diet_matrix_get(diet_parameter(pb,1), &M, NULL, &m, &n, NULL);
/* Launch computation */
res = scal_mat_prod(*alpha, M, m, n, &time);
/* Set OUT arguments */
diet_scalar_desc_set(diet_parameter(pb,2), &time);
/* Free IN data */
diet_free_data(diet_parameter(pb,0));
return res;
}
int main(int argc, char* argv[])
{
diet_profile_desc_t *profile;
/* Initialize table with maximum 1 service */
diet_service_table_init(1);
/* Define smprod profile */
profile = diet_profile_desc_alloc("smprod",0, 1, 2);
diet_generic_desc_set(diet_param_desc(profile,0), DIET_SCALAR, DIET_DOUBLE);
diet_generic_desc_set(diet_param_desc(profile,1), DIET_MATRIX, DIET_DOUBLE);
diet_generic_desc_set(diet_param_desc(profile,2), DIET_SCALAR, DIET_FLOAT);
c INRIA, ENS-Lyon, UCBL, CNRS, SysFera
Page 42
DIET User’s Manual
/* Add the service (the profile descriptor is deep copied) */
diet_service_table_add(profile, NULL, solve_smprod);
/* Free the profile descriptor, since it was deep copied. */
diet_profile_desc_free(profile);
/* Launch the SeD: no return call */
diet_SeD("./SeD.cfg", argc, argv);
return 0;
}
5.4
Compilation
After compiling her/his server program, the user must link it with the Diet and CORBA
libraries. This process is very similar to the one described for the client in section 4.4. Please
refer to this section for details.
c INRIA, ENS-Lyon, UCBL, CNRS, SysFera
Page 43
DIET User’s Manual
c INRIA, ENS-Lyon, UCBL, CNRS, SysFera
Page 44
DIET User’s Manual
Chapter 6
Batch and parallel submissions
6.1
Introduction
Most of resources in a grid are parallel, either clusters of workstations or parallel machines.
Computational grids are even considered as hierachical sets of parallel resources, as we can see
in ongoing project like the french research grid project, Grid’5000 [2] (for the moment, 9 sites
are involved), or like the Egee1 project (Enabling Grids for E-science in Europe), composed of
more than a hundred centers in 48 countries. Then, in order to provide transparent access to
resources, grid middleware must supply efficient mechanisms to provide parallel services.
Because parallel resources are managed differently on each site, it is neither the purpose of
Diet to deal with the deployment of parallel tasks inside the site, nor manage copies of data
which can possibly be on NFS. Diet implements mechanisms for a SeD programmer to easily
provide a service that can be portable on different sites; for clients to request services which can
be explicitly sequential, parallel or solved in the real transparent and efficient metacomputing
way: only the name of the service is given and Diet chooses the best resource where to solve
the problem.
6.2
Terminology
Servers provide services, e.g., instanciation of problems that a server can solve: for example,
two services can provide the resolution of the same problem, one being sequential and the other
parallel. A Diet task, also called a job, is created by the request of a client: it refers to the
resolution of a service on a given server.
A service can be sequential or parallel, in which case its resolution requires numerous processors of a parallel resource (a parallel machine or a cluster of workstations). If parallel, the task
can be modeled with the MPI standard, or composed of multiple sequential tasks (deployed for
example with ssh) resolving a single service: it is often the case with data parallelism problems.
Note that when dealing with batch reservation systems, we will likely speak about jobs
rather than about tasks.
1
http://public.eu-egee.org/
c INRIA, ENS-Lyon, UCBL, CNRS, SysFera
Page 45
DIET User’s Manual
6.3
Configuration for compilation
You must enable the batch flag in cmake arguments. Typically, if you build Diet from the
command line, you can use the following:
ccmake $diet_src_path
-DDIET_USE_ALT_BATCH:BOOL=ON
6.4
Parallel systems
Single parallel systems are surely the less deployed in actual computing grids. They are usually
composed of a frontal node where clients log in, and from which they can log on numerous
nodes and execute their parallel jobs, without any kind of reservation (time and space). Some
problems occur with such a use of parallel resources: multiple parallel tasks can share a single
processor, hence delaying the execution of all applications using it; during the deployment, the
application must at least check the connectivity of the resources; if performance is wanted, some
monitoring has to be performed by the application.
6.5
Batch system
Generally, a parallel resource is managed by a batch system, and jobs are submitted to a site
queue. The batch system is responsible for managing parallel jobs: it schedules each job, and
determines and allocates the resources needed for the execution of the job.
There are many batch system, among which Torque2 (a fork of PBS3 ), Loadleveler4 (developped by IBM), Oracle Grid Engine5 (formerly SunGrid Engine6 : SGE, developped by Sun),
OAR7 (developped at the IMAG lab). Each one implements its own language syntax (with
its own mnemonics), as well as its own scheduler. Jobs can generally access the identity of
the reserved nodes through a file during their execution, and are assured to exclusively possess
them.
6.6
Client extended API
Even if older client codes must be recompiled (because internal structures have evolved), they
do not necessarily need modifications.
Diet provides means to request exclusively sequential services, parallel services, or let Diet
choose the best implementation of a problem for efficiency purposes (according to the scheduling
metric and the performance function).
/∗ To e x p l i c i t l y c a l l a sequential service ∗/
2
http://old.clusterresources.com/products/torque/
http://www.clusterresources.com/pages/products/torque-resource-manager.php
4
http://www-03.ibm.com/servers/eserver/clusters/software/loadleveler.html
5
http://www.oracle.com/technetwork/oem/grid-engine-166852.html
6
http://www.sun.com/software/gridware/
7
http://oar.imag.fr
3
c INRIA, ENS-Lyon, UCBL, CNRS, SysFera
Page 46
DIET User’s Manual
diet error t
diet paralle l c all ( diet profile t ∗ profile ) ;
diet error t
diet sequential call async ( diet profile t∗ profile , diet reqID t∗ reqID ) ;
/∗ To e x p l i c i t l y c a l l a p a r a l l e l service in sync or async way ∗/
diet error t
diet sequential call ( diet profile t ∗ profile ) ;
diet error t
diet parallel call async ( diet profile t∗ profile , diet reqID t∗ reqID ) ;
/∗ To mark a p r o f i l e as p a r a l l e l or sequential . The default c a l l to
d i e t c a l l () or diet call async () w i l l perform a c a l l to the correct
previous c a l l ∗/
int
diet profile set parallel ( diet profile t ∗ profile ) ;
int
diet profile set sequential ( diet profile t ∗ profile ) ;
/∗ To l e t the user choose a given amount of resources ∗/
int
diet profile set nbprocs ( diet profile t ∗ profile , int nbprocs) ;
6.7
Batch server extended API and configuration file
There are too many diverse scenarii about the communication and execution of parallel applications: the code can be a MPI code or composed of different interacting programs possibly
launched via ssh on every nodes; input and output files can use NFS if this file system is present,
or they can be splitted and uploaded to each node participating to the calculus.
Then, we will see: what supplementary information has to be provided in the server configuration file; how to write a batch submission meta-script in a SeD; and how to record the
parallel/batch service.
6.8
Server API
/∗ Set the status of the SeD among SERIAL and BATCH ∗/
void
diet set server status ( diet server status t st ) ;
/∗ Set the nature of the service to be registered to the SeD ∗/
int
diet profile desc set sequential ( diet profile desc t ∗ profile ) ;
c INRIA, ENS-Lyon, UCBL, CNRS, SysFera
Page 47
DIET User’s Manual
int
diet profile desc set parallel ( diet profile desc t ∗ profile ) ;
/∗ A service MUST c a l l this command to perform the submission to the batch system ∗/
int
diet submit parallel ( diet profile t ∗ profile , const char ∗ command) ;
6.8.1
Registering the service
A server is mostly built like described in section 5. In order to let the SeD know that the service
defined within the profile is a parallel one, the SeD programmer must use the function:
void diet profile desc set parallel ( diet profile desc t∗ profile )
By default, a service is registered as sequential. Nevertheless, for code readability reasons,
we also give the pendant function to explicitly register a sequential service:
void diet profile desc set sequential ( diet profile desc t∗ profile )
6.8.2
Server configuration file
The programmer of a batch service available in a SeD do not have to worry about which
batch system to submit to, except for its name, because Diet provides all the mechanisms to
transparently submit the job to them.
Diet is currently able to submit batch scripts to OAR (version 1.6 and 2.0), PBS/Torque,
LoadLeveler, and SGE. The name of the batch scheduler managing the parallel resource where
the SeD is running has to be incorporated with the keyword batchName in the server configuration file. This is how the SeD knows the correct way of submitting a job.
Furthermore, if there is no default queue, the Diet deployer must also provide the queue
on which jobs have to be submitted, with the keyword batchQueue.
You also have to provide a directory where the SeD can read and write data on the parallel
resource. Please note that this directory is used by Diet to store the new built script that is
submitted to the batch scheduler. In consequence, because certain batch schedulers (like OAR)
need the script to be available on all resources, this directory might be on NFS (remember that
Diet cannot replicate the script on all resources before submission because of access rights).
Note that concerning OAR (v1.6), in order to use the CoRI batch features for 0AR 1.6 (see
Section 9.2.3), the Batch SeD deployer must also provide the keyword internQueue with the
corresponding name. For example, the server configuration file can contain the following lines:
batchName = oar
batchQueue = queue 9 13
pathToNFS = /home/ycaniou/tmp/nfs
pathToTmp = /tmp/YC/
internOARbatchQueueName = 913
6.8.3
Server API for writing services
The writing of a service corresponding to a parallel or batch job is very simple. The SeD
programmer builds a shell script that he would have normally used to execute the job, i.e., a
c INRIA, ENS-Lyon, UCBL, CNRS, SysFera
Page 48
DIET User’s Manual
script that must take care of data replication and executable invocation depending on the site.
In order for the service to be system independent, the SeD API provides some meta-variables
which can be used in the script.
• $DIET_NAME_FRONTALE: frontale name
• $DIET_USER_NBPROCS: number of processors
• $DIET_BATCH_NODESLIST: list of reserved nodes
• $DIET_BATCH_NBNODES: number of reserved nodes
• $DIET_BATCH_NODESFILE: name of the file containing the identity of the reserved nodes
• $DIET_BATCH_JOBID: batch job ID
• $DIET_BATCHNAME: name of the batch system
Once the script written in a string, it is given as an argument to the following function:
int
diet submit parallel ( diet profile t ∗ pb, char ∗ script )
6.8.4
Example of the client/server ’concatenation’ problem
There are fully commented client/server examples in <diet_src>/src/examples/Batch directory. The root directory contains a simple example, and TestAllBatch and Cori_cycle_stealing
are more practical, the latter being a code to explain the CoRI_batch API.
The root directory contains a simple basic example on how to use the batch API is given
here: no IN or INOUT args, the client receives as a result the number of processors on which the
service has been executed. The service only writes to a file, with batch-independent mnemonics,
some information on the batch system.
The <diet_src>/src/examples/Batch/file_transfer directory contains 3 servers, one
sequential, one parallel and one batch, and one synchronous and one asynchronous client. The
client is configurable to simply ask for only sequential, or explicitly parallel services, or to let
Diet choose the best (by default, two processors are used and the scheduling algorithm is
Round-Robin). We consequently give the MPI code which is called from the batch SeD, which
realizes the concatenation of two files sent by the client. Note that the user must change some
paths in the SeD codes, according to the site where he deploys Diet.
c INRIA, ENS-Lyon, UCBL, CNRS, SysFera
Page 49
DIET User’s Manual
c INRIA, ENS-Lyon, UCBL, CNRS, SysFera
Page 50
DIET User’s Manual
Chapter 7
Cloud submissions
7.1
Introduction
The user must understand the relationship between Diet Cloud and the Cloud system it is
using. A Cloud system is seen as a provider of on-demand resources and as such, the Diet
Cloud SeD is the front-end to the Cloud system from the Diet user’s point of view.
The Diet platform remains completely outside of the Cloud system and virtual resources
are instantiated based on how they are needed. These virtual resources contain the task that
solves the service required by the Diet client. It is the responsibility of the Diet service creator
to provide Virtual Machine images that contain the service implementation.
The Diet Cloud system is part of the Diet Barch system and it is recommended that the
user reads the corresponding chapter before the current.
7.2
Compatibility and requirements
The current version of Diet Cloud has been built on top of the Amazon EC2 SOAP interface,
version 2009-08-15 and is compatible with any cloud system that offers a front-end with this
interface.
We have used our own installation of Eucalyptus1 as well as AmazonEC22 for testing
and development. The installation process of the cloud system will not be detailed as it is
outside the scope of the current topic. For details on the installation and usage of the cloud
system please refer to your Cloud provider’s documentation. The rest of this chapter assumes
the existing installation and correct functioning of a Cloud system that the user can access.
To be able to reserve virtual resources on an Amazon EC2 compatible cloud system, the
Cloud user mush have knowledge of the following resources:
• The URL of the Cloud system
• Virtual machine images’ names: the user should know what virtual resources she
wants to instantiate. To be more precise, the user must know the names associated
to the virtual machine images, machine kernel images and machine ramdisk images that
she wants to use.
1
2
http://open.eucalyptus.com/
http://aws.amazon.com/fr/ec2/
c INRIA, ENS-Lyon, UCBL, CNRS, SysFera
Page 51
DIET User’s Manual
• Virtual machine instance type: if the user requires a specific type of virtual machine
that is specialized with larger quantities of virtual CPUs, memory space or disk space
offered. An Amazon EC2 compatible Cloud system offers 5 different types of virtual
machines that vary these three quantities. The exact values are not standard. Eucalyptus
provides the possibility of per-installation configuration of these types.
• The number of virtual resources to instantiate
• The X509 certificate that is associated to the Cloud installation: this is provided by the Cloud system after its installation and the user’s registration in the system.
• The user’s key: after registering in the Cloud system, each user receives a key that is
used for signing all the requests that she makes to the Cloud system.
• A keypair to use for the reservation: the user must create a keypair that is to be
used when performing reservations.
7.3
Configuration for compilation
In order to enable the compilation and installation of the Diet Cloud system, its corresponding
make flag must be enabled when configuring. This flag is named DIET_USE_CLOUD. This is a
part of the alternate batch system so it also needs to be installed (the DIET_USE_ALT_BATCH
flag). The Diet batch system is dependent on CORI so it also needs to be installed (the
DIET_USE_CORI flag).
The installation of the Cloud system is dependent on an installation of gSOAP3 that contains
the WSSE plugin. This is the Web Service Security plugin. It is the responsibility of the
Diet user to ensure a propper installation of gSOAP and its WSSE plugin. The will try to
automatically detect an installation of gSOAP with its components. If this fails, then the Diet
user will have to manually specify the installation path of the gSOAP package and its WSSE
plugin.
Please note that Diet Clour has been tested with gSOAP version 2.7.16.
Examples of the use of the Diet Cloud system will also be compiled if the DIET_BUILD_EXAMPLES
flag is triggered.
For more information on compiling and installing Diet please see the section dedicated
specifically to that purpose.
7.4
Server configuration file
At the time this documentation has been written, Eucalyptus and Amazon EC2 supported
5 different types of Virtual Machines to instantiate. These differ from one-another by CPU,
memory and disk characteristics. Eucalyptus allows the modification of these characteristics.
The 5 VM types and their associated default characteristics inside Eucalyptus are:
1. m1.small: 1 VCPU, 128 MB RAM, 2 GB Disk
2. c1.medium: 1 VCPU, 256 MB RAM, 5 GB Disk
3
http://www.cs.fsu.edu/∼engelen/soap.html
c INRIA, ENS-Lyon, UCBL, CNRS, SysFera
Page 52
DIET User’s Manual
3. m1.large: 2 VCPU, 512 MB RAM, 10 GB Disk
4. m1.xlarge: 2 VCPU, 1024 MB RAM, 20 GB Disk
5. c1.xlarge: 4 VCPU, 2048 MB RAM, 20 GB Disk
Configuring the server part is done by using the following options:
• batchName: the name of the batch system to be used. This is recognized internally by
the Diet Batch System and should always have the value eucalyptus.
• pathToNFS: path to a temporary directory
• cloudURL: the URL of the Cloud System’s management service
• emiName: the name of the Virtual Machine Image containing the service
• eriName: the name of the Ramdisk image to be used when instantiating the service
• ekiName: the name of the Kernel image to be used when instantiating the service
• vmType: the type of the Virtual Machine to be instantiated
• keyName: the name of the keypair created for use in the Cloud System
• vmMinCount: minimum number of VM instances that is acceptable for the current
service call to succede
• vmMaxCount: maximum number of VM instances for the current service call
• pathToCert: path to the X.509 certificate given by the Cloud System
• pathToPK: path to the private key that the current Cloud user has associated to the
Cloud System
An example of a valid configuration is the following:
batchName = eucalyptus
pathToNFS = /tmp
cloudURL = http://140.77.13.186:8773/ services/Eucalyptus
emiName = emi−82011336
eriName = eri−0ADF1561
ekiName = eki−CBC01482
vmType = m1. small
keyName = mykey
vmMinCount = 1
vmMaxCount = 1
pathToCert = /home/adi /.euca/euca2−admin−0b298100−cert .pem
pathToPK = /home/adi /.euca/euca2−admin−0b298100−pk.pem
c INRIA, ENS-Lyon, UCBL, CNRS, SysFera
Page 53
DIET User’s Manual
7.5
Registering the service
Diet’s Cloud module behaves like any other Batch System. A SeD programed this way is
actually a service residing at the front-end of a Cloud. It will be able to access directly all
the Virtual Machines that the Cloud has instantiated. Defining and registering the Cloudenabled Diet service is done in the same way as defining a batch service. Diet’s Batch System
module will internally invoke the Eucalyptus Batch System which will instantiate the Virtual
Resources corresponding to the current service.
7.6
Service API
Programming the SeD Cloud is done in the same way as programming normal Batch System.
The programmer builds a shell script that will execute his job. To facilitate access to the
instantiated Virtual Machines, the DIET_CLOUD_VMS meta-variable can be used inside the shell
script. This will automatically be replaced upon submission with a list of the IP addresses of
all the instantiated virtual resources.
7.7
Example of client/server
The Diet sources also contain working examples for the SeD Cloud. These can be found in:
<diet_src>/src/examples/cloud. The examples are built automatically if the DIET_BUILD_EXAMPLES
and DIET_HAVE_CLOUD make flags are selected. Note that the user must change the service configuration file to match his own Cloud installation.
c INRIA, ENS-Lyon, UCBL, CNRS, SysFera
Page 54
DIET User’s Manual
Chapter 8
Scheduling in Diet
8.1
Introduction
We introduce a plugin scheduling facility, designed to allow Diet service developers to define
application-specific performance measures and to implement corresponding scheduling strategies. This section describes the default scheduling policy in Diet and the interface to the plugin
scheduling facility.
8.2
Default Scheduling Strategy
The Diet scheduling subsystem is based on the notion that, for the sake of system efficacy
and scalability, the work of determining the appropriate schedule for a parallel workload should
be distributed across the computational platform. When a task in such a parallel workload
is submitted to the system for processing, each Server Daemon (SeD) provides a performance
estimate – a collection of data pertaining to the capabilities of a particular server in the context
of a particular client request – for that task. These estimates are passed to the server’s parent
agent; agents then sort these responses in a manner that optimizes certain performance criteria.
Effectively, candidate SeDs are identified through a distributed scheduling algorithm based on
pairwise comparisons between these performance estimations; upon receiving server responses
from its children, each agent performs a local scheduling operation called server response aggregation. The end result of the agent’s aggregation phase is a list of server responses (from servers
in the subtree rooted at said agent), sorted according to the aggregation method in effect. By
default, the aggregation phase implements the following ordered sequence of tests:
1. Least recently used: In the absence of application- and platform-specific performance
data, the Diet scheduler attempts to probabilistically achieve load balance by assigning
client requests based on the time they last finished to compute. Essentially each server
records a timestamp indicating the last time at which it was assigned a job for execution.
Each time a request is received, the SeD computes the time elapsed since its last execution,
and among the responses it receives, Diet agents select SeDs with a longer elapsed time.
2. Random: If the SeD is unable to store timestamps, the Diet scheduler will chose
randomly when comparing two otherwise equivalent SeD performance estimations.
c INRIA, ENS-Lyon, UCBL, CNRS, SysFera
Page 55
DIET User’s Manual
In principle, this scheduling policy prioritizes servers that are able to provide useful performance prediction information. In general, this approach works well when all servers in a given
Diet hierarchy are capable of making such estimations. However, in platforms composed of
SeDs with varying capabilities, load imbalances may occur: since Diet systematically prioritizes
server responses containing scheduling data, servers that do not respond with such performance
data will never be chosen.
We have designed a plugin scheduler facility to enable the application developer to tailor
the Diet scheduling to the targeted application. This functionality provides the application
developer the means to extend the notion of a performance estimation to include metrics that
are application-specific, and to instruct Diet how to treat those data in the aggregation phase.
We describe these interfaces in the following sections.
8.3
Plugin Scheduler Interface
Distributed applications are varied and often exhibit performance behavior specific to the domain from which they arise. Consequently, application-specific scheduling approaches are often
necessary to achieve high-performance execution. We propose an extensible framework to build
plugin schedulers, enabling application developers to specify performance estimation metrics
that are tailored to their individual needs.
8.3.1
Estimation Metric Vector
The type estVector t represents an estimation vector, logically a structure that can manage
a dynamic collection of performance estimation values. It contains values that represent the
performance profile provided by a SeD in response to a Diet service request. This collection
of values may include either standard performance measures that are available through Diet,
or developer-defined values that are meaningful solely in the context of the application being
developed.
8.3.2
Standard Estimation Tags
To access to the different fields of the estVector t, it is necessary to specify the tag that
correspond to a specific information type. Table 8.1 describes this correspondence. Some tags
represent a list of values, one has to use the diet est array * functions to have access to them.
In Table 8.1, the second column marks these multi-value tags.
The tag ALLINFOS is a special: his field is always empty, but it allows to fill the vector
with all known tags by the particular collector.
Standard Performance Metrics
To access to the existing default performance estimation routines (as described in Chapter 9), the
following functions are available to facilitate the construction of custom performance estimation
functions:
• The time elapsed since the last execution (to enable the “least recently used” scheduler)
is stored in an estimation metric vector by calling
c INRIA, ENS-Lyon, UCBL, CNRS, SysFera
Page 56
DIET User’s Manual
TCOMP
the predicted time to solve a problem
TIMESINCELASTSOLVE
time since last solve has been made (sec)
FREECPU
amount of free CPU power between 0 and 1
FREEMEM
amount of free memory (Mb)
NBCPU
number of available processors
CPUSPEED
x
frequency of CPUs (MHz)
TOTALMEM
total memory size (Mb)
AVGFREECPU
average amount of free CPU power in [0..1]
BOGOMIPS
x
CACHECPU
x
TOTALSIZEDISK
CPUs’ bogomips
cache size CPUs (Kb)
size of the partition (Mb)
FREESIZEDISK
amount of free place on partition (Mb)
DISKACCESREAD
average time to read on disk (Mb/sec)
DISKACCESWRITE
average time to write to disk (sec)
ALLINFOS
x
PARAL NB FREE RESOURCES IN DEFAULT QUEUE
[empty] fill all possible fields
number of idle resources
Table 8.1: Estimation tags
int diet estimate lastexec(estVector t ev,
const diet profile t* const profilePtr);
with an appropriate value for ev and the profilePtr corresponding to the current Diet
request.
• The number of waiting jobs when using the maximum concurrent jobs limit is stored in
an estimation metric vector by calling
int diet estimate waiting jobs(estVector t ev);
• CoRI allows to access in an easy way to basic performance prediction. See Chapter 9.2
to know more about the use of it.
In the future, we plan to expand the suite of default estimation metrics to include dynamic
internal Diet system state information (e.g., queue lengths).
Developer-defined Performance Metrics
Application developers may also define performance values to be included in a SeD response to
a client request. For example, a Diet SeD that provides a service to query particular databases
may need to include information about which databases are currently resident in its disk cache,
in order that an appropriate server be identified for each client request. To store such values,
the SeD developer should first choose a unique integer identifier, referred to as the tag to denote
each logical datum to be stored. Values are associated with tags using the following interface:
int diet est set(estVector t ev, int userTag, double value);
The ev parameter is the estimation vector where the value will be stored, the userTag parameter
denotes the chosen tag, and value indicates the value to be associated with the tag. Tagged data
are used to effect scheduling policies by defining custom server response aggregation methods,
described in Section 8.3.4.
c INRIA, ENS-Lyon, UCBL, CNRS, SysFera
Page 57
DIET User’s Manual
8.3.3
Estimation Function
The default behavior of a SeD when a service request arrives from its parent agent is to store
the following information in the request profile:
1. Elapsed time since last execution: To implement the default round-robin behavior in
absence of scheduling facilities, each SeD stores a timestamp of its last execution. When
a service request arrives, the difference between that timestamp and the current time is
added to the performance estimate.
This is accomplished by using the diet estimate lastexec functions described in Section 8.3.1.
To implement a plugin scheduler, we define an interface that admits customizable performance estimation routines:
typedef void (* diet perfmetric t)( diet profile t*,
estVector t);
diet perfmetric t
diet service use perfmetric(diet perfmetric t perfmetric fn);
Thus, the type diet perfmetric t is a function pointer that takes as arguments a performance
estimation (represented by the estVector t object) and a Diet service request profile. The
application developer can associate such a function, or performance estimation routine, with
Diet services via the diet service use perfmetric interface. This interface returns the previously registered performance estimation routine, if one was defined (and NULL otherwise). At
this point, a service added using the diet service table add function will be associated with
the declared performance estimation routine. Additionally, a performance estimation routine
so specified will be associated with all services added into the service table until another call to
the diet service use perfmetric interface is made. In the performance estimation routine,
the SeD developer should store in the provided estimation vector any performance data used
in the server response aggregation methods (described in the next section).
8.3.4
Aggregation Methods
At the time a Diet service is defined, an aggregation method – the logical mechanism by which
SeD responses are sorted – is associated with the service; the default behavior was described in
Section 8.2.
If application-specific data are supplied (i.e., the estimation function has been redefined),
an alternative method for aggregation is needed. Currently, a basic priority scheduler has been
implemented, enabling an application developer to specify a series of performance values that
are to be optimized in succession. A developer may implement a priority scheduler using the
following interface:
diet aggregator desc t*
diet profile desc aggregator(diet profile desc t* profile);
int diet aggregator set type(diet aggregator desc t* agg,
c INRIA, ENS-Lyon, UCBL, CNRS, SysFera
Page 58
DIET User’s Manual
diet aggregator type t atype);
int diet aggregator priority max(diet aggregator desc t* agg,
diet est tag t tag);
int diet aggregator priority min(diet aggregator desc t* agg,
diet est tag t tag);
int diet aggregator priority maxuser(diet aggregator desc t* agg,
int val);
int diet aggregator priority minuser(diet aggregator desc t* agg,
int val);
The diet profile desc aggregator and diet aggregator set type functions fetch and configure the aggregator corresponding to a Diet service profile, respectively. In particular, a
priority scheduler is declared by invoking the latter function with DIET AGG PRIORITY as the
agg parameter. Recall that from the point of view of an agent, the aggregation phase is essentially a sorting of the server responses from its children. A priority scheduler logically uses a
series of user-specified tags to perform the pairwise server comparisons needed to construct the
sorted list of server responses.
To define the tags and the order in which they should be compared, four functions are
introduced. These functions, of the form diet aggregator priority *, serve to identify the
estimation values to be optimized during the aggregation phase. The min and max forms
indicate that a standard performance metric (e.g., time elapsed since last execution, from the
diet estimate lastexec function) is to be either minimized or maximized, respectively. Similarly, the minuser and maxuser forms indicate the analogous operations on user-supplied
estimation values. Calls to these functions indicate the order of precedence of the tags.
Each time two server responses need to be compared, the values associated with the tags
specified in the priority aggregator are retrieved. In the specified order, pairs of corresponding
values are successively compared, passing to the next tag only if the values for the current tag
are identical. If one server response contains a value for the metric currently being compared,
and another does not, the response with a valid value will be selected. If at any point during
the treatment of tags both responses lack the necessary tag, the comparison is declared indeterminate. This process continues until one response is declared superior to the other, or all tags
in the priority aggregator are exhausted (and the responses are judged equivalent).
8.4
Example
An example is present in the Diet distribution to illustrate the usage of the plugin scheduler
functionality; this code is available in the directory
src/examples/plugin example/
A Diet server and client corresponding to a simulation of a database research application are
provided. If the construction of examples was enabled during Diet configuration, two binaries
c INRIA, ENS-Lyon, UCBL, CNRS, SysFera
Page 59
DIET User’s Manual
server and client will be built in this directory. Having deployed a Diet agent hierarchy, the
server may be instantiated:
$ server <SeD config> <DB> [ <DB> ...
]
where <DB> are string(s) that represent the existence of a particular database at the SeD’s site.
A client would pose a query against a set of databases:
$ client <client config> <DB> [ <DB> ...
]
The application uses the plugin scheduling facility to prioritize the existence of databases in
selecting a server, and thus, the expected result is that one of the SeDs with the fewest number
of database mismatches will be selected.
In the main function of the server.c file, the following block of code (a) specifies the use of
the priority aggregator for this service, (b) declares a performance estimation function to supply
the necessary data at request-time, and (c) defines the order of precedence of the performance
values (i.e., minimizing the number of database mismatches, and then maximizing the elapsed
execution time).
{
/* new section of the profile: aggregator */
diet_aggregator_desc_t *agg;
agg = diet_profile_desc_aggregator(profile);
/* for this service, use a priority scheduler */
diet_aggregator_set_type(agg, DIET_AGG_PRIORITY);
/* (a) */
/* install our custom performance function */
diet_service_use_perfmetric(performanceFn);
/* (b) */
/* define the precedence order */
diet_aggregator_priority_minuser(agg, 0);
/* (c) */
diet_aggregator_priority_max(agg, EST_TIMESINCELASTSOLVE); /* (c) */
}
The performance function performanceFn is defined as follows:
static void performanceFn(diet_profile_t* pb, estVector_t perfValues);
[...]
/*
** performanceFn: the performance function to use in the DIET
**
plugin scheduling facility
*/
static void
performanceFn(diet_profile_t* pb, estVector_t perfValues)
{
const char *target;
c INRIA, ENS-Lyon, UCBL, CNRS, SysFera
Page 60
DIET User’s Manual
int numMismatch;
/* string value must be fetched from description; value is NULL */
target = (diet_paramstring_get_desc(diet_parameter(pb, 0)))->param;
numMismatch = computeMismatches(target);
/*
** store the mismatch value in the user estimate space,
** using tag value 0
*/
diet_est_set(perfValues, 0, numMismatch);
/* also store the timestamp since last execution */
diet_estimate_lastexec(perfValues, pb);
}
The function computeMismatches (defined earlier in server.c) calculates the number of requested databases that are not present on the SeD making the evaluation. Together, these two
code segments serve to customize the generation of performance information and the treatment
of these data in the context of the simulated database search. Finally, it should be noted that
the existence of a plugin scheduler is completely transparent to the client, and thus client code
need not be changed.
8.5
Scheduler at agents level
In this section we introduce the way to define a scheduling policy in Diet. Some scheduling
strategies could not be developed using only the DietSeDs plugins. The schedulers at agents
level allow the developer to design every scheduler strategies, even the centralized ones. The
first two sections explain precisely how Diet performs the scheduling. The third section enters
in the Diet source code and can be ignored by most of the users. The fourth section presents
the tools provided to make an agent scheduler easily. The fifth section deals with the scheduler
module compilation and usage. The last section presents some scheduler examples.
8.5.1
Scheduling from the agents side.
In Diet, the scheduling works as follows (see Figure 8.1 for a representation of each step):
• A request is submitted to the Master Agent (step 1).
• The Master Agent forwards the request to the Local Agents and SeDs that it manages
(step 2).
• The SeDs which dispose of the asked service return a CORBA response structure which
contains an estimation metric vector (step 3).
• According to a default policy or a user-defined one, the responses from the SeDs are
aggregated. Then the responses sequence is sent to the parent agent which aggregates all
the results of its children (step 4).
c INRIA, ENS-Lyon, UCBL, CNRS, SysFera
Page 61
DIET User’s Manual
• When the aggregated responses reach the Master Agent, it returns the aggregated list of
all responses to the client (step 5).
• Finally, the client chooses the better server, according to the chosen aggregation method
(step 6).
2
1
request
3
MA
MA
request
response
LA
cpu
cpu
cpu
mem
time
mem
time
mem
time
SeD
cpu
cpu
cpu
mem
mem
mem
time
response 2
cpu
mem
6
time
time
time
cpu
cpu
cpu
cpu
cpu
MA
responses
mem
SeD
Sorted SeD list
LA
cpu
SeD
5
4
response 3
response 1
response 2
response 1
response
response
LA
LA
cpu3 > cpu1 > cpu2
LA
LA
request
time
response 3
cpu
mem
time
cpu
cpu
cpu
m
m
m
time
time
time
m
m
m
time
time
time
time
time
time
time
time
responses
responses
cpu
cpu
cpu
mem
mem
mem
mem
mem
cpu
cpu
cpu
m
m
m
time
time
time
Figure 8.1: Scheduling steps in Diet.
8.5.2
Aggregation methods overloading
To aggregate the responses of the SeDs, Diet uses an aggregation method which is called
by the agents. This method is chosen from the SeDs by defining the aggregator type (see
Section 8.3.2). By default, two aggregator types are proposed by Diet: DIET AGG DEFAULT
and DIET AGG PRIORITY. Another aggregator type is also available: DIET AGG USER.
Using this aggregator, the user can define her own aggregation method to be used by the
agents. Figure 8.2 presents the global schedulers classes organization in Diet. By choosing
the DIET AGG USER aggregator, the user commands the GlobalScheduler class to load an
external module containing a UserScheduler class overloading the aggregate method.
The user-defined aggregation method just needs to sort the responses from the SeDs. By
locating the aggregation method on the agent, we can use different scheduling strategies which
could not be implemented at the SeD level. These schedulers can also avoid some scheduling
problems while submitting asynchronous jobs (with “least recently used” scheduler for example).
8.5.3
The UserScheduler class
This section presents how the scheduling process is managed in Diet. Most of the developers
can go directly to the next section.
All the schedulers developed by users have to inherit from the UserScheduler class. This
class furnishes the methods to load its subclasses as a Scheduler class for Diet without error.
c INRIA, ENS-Lyon, UCBL, CNRS, SysFera
Page 62
DIET User’s Manual
GlobalScheduler
aggregate(corba_response_t* aggrResp,
size_t max_srv,
const size_t nb_responses,
const corba_response_t* responses)
...
DIET_AGG_PRIORITY
or
DIET_AGG_DEFAULT
DIET_AGG_USER
Scheduler
UserScheduler
aggregate(...)
...
DIET_AGG_DEFAULT
with
FAST/NWS estimations
aggregate(...)
...
DIET_AGG_DEFAULT
and
no FAST/NWS estimations
NWSScheduler
Load an external module
to instanciate the scheduler.
RRScheduler
aggregate(...)
...
aggregate(...)
...
NewScheduler
DIET_AGG_DEFAULT
and no FAST/NWS
and no timestamp
aggregate(...)
...
DIET_AGG_PRIORITY
with
user-defined metrics
FastScheduler
MaxScheduler
aggregate(...)
...
aggregate(...)
...
NewScheduler.cc
RandScheduler
aggregate(...)
...
NewScheduler.so
MinScheduler
aggregate(...)
...
NewScheduler.hh
Figure 8.2: Schedulers classes organization in Diet.
The only method a user has to overload is the aggregate method. Several useful functions and
macros are defined in the UserScheduler.hh file. The UserScheduler class is defined as follows:
class UserScheduler : public GlobalScheduler
{
typedef GlobalScheduler* constructor();
typedef void destructor(UserScheduler*);
public:
static const char* stName;
UserScheduler();
virtual
~UserScheduler();
/** These methods are used to load the user module and to obtain an
instance of the scheduler. */
static UserScheduler* getInstance(const char* moduleName);
static GlobalScheduler * instanciate(const char* moduleName);
void destroy(GlobalScheduler* scheduler);
static
GlobalScheduler* deserialize(const char* serializedScheduler,
const char* moduleName);
static
char* serialize(GlobalScheduler* GS);
c INRIA, ENS-Lyon, UCBL, CNRS, SysFera
Page 63
DIET User’s Manual
/** The method that has to be overloaded to define a new scheduler. */
virtual int
aggregate(corba_response_t* aggrResp,
size_t max_srv,
const size_t nb_responses,
const corba_response_t* responses);
private:
/** The UserScheduler class is a singleton class. Its constructor is
private. */
UserScheduler(const char* moduleName);
static UserScheduler* instance;
void* module;
/** These two methods are obtained from the loaded module. */
constructor* constructs;
destructor* destroys;
};
The aggregate method takes 4 arguments:
• corba response t* aggrResp: the result of the aggregation has to be set in this argument.
aggrResp is an array of corba server estimation t objects.
• size t max srv: this argument gives the maximum number of responses to return in
aggrResp. This value can be ignored without any risk and it is sometimes useful to
ignore it because this parameter is hard-coded in the Diet sources.
• const size t nb responses: this argument gives the number of responses in responses.
• const corba response t* responses: the responses are stored in this argument. It is an
array of corba response t which is a CORBA structure containing a CORBA sequence of
corba server estimation t.
The corba response t structure is defined as follows:
struct corba_response_t {
typedef _CORBA_ConstrType_Variable_Var<corba_response_t> _var_type;
CORBA::ULong reqID;
CORBA::Long myID;
SeqServerEstimation_t servers;
void operator>>= (cdrStream &) const;
void operator<<= (cdrStream &);
};
The var type field is an internal CORBA object. The scheduler developer does not have to
use it. The two operators operator>>= and operator>>= can be ignored too.
• CORBA::ULong reqID: this field contains the ID of the request.
• CORBA::Long myID: this field is for Diet internal usage. The developer should ignore
it.
c INRIA, ENS-Lyon, UCBL, CNRS, SysFera
Page 64
DIET User’s Manual
• SeqServerEstimation t servers: this field is a sequence of corba server estimation t. It
is used to store the SeDs references returned by the aggregate method. This is the field
that has to be sorted/filtered.
The corba server estimation t is defined as follows:
struct corba_server_estimation_t {
typedef _CORBA_ConstrType_Variable_Var<corba_server_estimation_t> _var_type;
corba_server_t loc;
corba_estimation_t estim;
void operator>>= (cdrStream &) const;
void operator<<= (cdrStream &);
};
• corba server t loc: this field is used to designate a particular SeD.
• corba estimation t estim: this field contains the estimation vector for the designated SeD.
The corba server t loc structure is defined as follows:
struct corba_server_t {
typedef _CORBA_ConstrType_Variable_Var<corba_server_t> _var_type;
_CORBA_ObjRef_Member< _objref_SeD, SeD_Helper> ior;
CORBA::String_member hostName;
CORBA::Long port;
void operator>>= (cdrStream &) const;
void operator<<= (cdrStream &);
};
The two interesting fields are:
• ior which is a CORBA reference to the SeD.
• hostName which is the hostname of the SeD.
The corba estimation t structure is defined as follows:
struct corba_estimation_t {
typedef _CORBA_ConstrType_Variable_Var<corba_estimation_t> _var_type;
SeqEstValue_t estValues;
void operator>>= (cdrStream &) const;
void operator<<= (cdrStream &);
};
SeqEstValue t estValues: This field is a CORBA sequence of estimation values. These estimation values are accessed through the specific functions:
diet est get internal and
diet est array get internal defined in scheduler/est internal.hh.
These functions prototypes are:
double diet_est_get_internal(estVectorConst_t ev, int tag, double errVal);
double diet_est_array_get_internal(estVectorConst_t ev, int tag,
int idx, double errVal);
c INRIA, ENS-Lyon, UCBL, CNRS, SysFera
Page 65
DIET User’s Manual
• ev : the estimation vector to evaluate.
• tag: the estimation tag.
• idx : the index of the value when available. For example, to obtain the frequency of the
second processor, we have to set idx to 1.
• errVal : the value returned by the function if an error occurred.
The tag argument may be assigned one of the following values:
- EST TIMESINCELASTSOLVE: The time elapsed since this SeD solved a request. This
value is used by the default Round-Robin scheduler when available.
- EST COMMPROXIMITY:
- EST TRANSFEREFFORT:
- EST FREECPU: The free CPU computation power.
- EST FREEMEM: The free memory on the node.
- EST NBCPU: The number of CPU installed on the node.
- EST CPUSPEED1 : The frequencies of the CPUs of the node.
- EST TOTALMEM: The total memory of the node.
- EST AVGFREEMEM: The average free memory on the node.
- EST AVGFREECPU: The average free CPU computation power on the node.
- EST BOGOMIPS1 : The computation power of the nodes CPUs given in bogomips.
- EST TOTALSIZEDISK: The total disk size on the node.
- EST FREESIZEDISK: The available disk space on the node.
- EST DISKACCESREAD: An evaluation of the disk read access performance.
- EST DISKACCESWRITE: An evaluation of the disk write access performance.
- EST USERDEFINED: The first user-defined value.
- EST USERDEFINED + n: The nth user-defined value.
To make the new scheduler class loadable by the GlobalScheduler class, the developer has
to define these two functions outside the class definition:
extern "C" GlobalScheduler* constructor() {
return new MyScheduler();
}
extern "C" void destructor(UserScheduler* scheduler) {
delete scheduler;
}
1
This value is accessed using the diet est array get internal function
c INRIA, ENS-Lyon, UCBL, CNRS, SysFera
Page 66
DIET User’s Manual
No C++ implementation of dynamic class loading are defined in the C++ standard. So, the
UserScheduler class has to use C functions to load an external module containing the new
scheduler class. A macro defined in UserScheduler.hh automates this declaration. You can
simply define your class as a scheduler class by calling SCHEDULER CLASS(MyScheduler),
where MyScheduler is the name of the class which inherits of the UserScheduler class.
8.5.4
Easy definition of a new scheduler class
The previous section presented how the scheduler class loader is working. Many things presented
before can be automated. The UserScheduler.hh file defines some useful functions and macros to
make a new scheduler class easily. In this section we will present how to create a new scheduler
class using these functions and macros.
The new class definition
Every scheduler class has to inherit from the UserScheduler class. The only redefinition needed
is the aggregate function. But, the init, serialize and deserialize functions have to be declared
conforming to the C++ standard (but not defined - the inherited functions are sufficient). The
following example shows a simple scheduler class implementation.
class MyScheduler : public UserScheduler {
public:
static const char* stName;
MyScheduler();
~MyScheduler();
void init();
static char* serialize(MyScheduler* GS);
static MyScheduler* deserialize(const char* serializedScheduler);
/* Overriden UserScheduler class aggregate method. */
int aggregate(corba_response_t* aggrResp, size_t max_srv,
const size_t nb_responses, const corba_response_t* responses);
};
const char* MyScheduler::stName="UserGS";
MyScheduler::~MyScheduler() {
}
MyScheduler::MyScheduler() {
this->name = this->stName;
this->nameLength = strlen(this->name);
}
int MyScheduler::aggregate(corba_response_t* aggrResp, size_t max_srv,
c INRIA, ENS-Lyon, UCBL, CNRS, SysFera
Page 67
DIET User’s Manual
const size_t nb_responses,
const corba_response_t* responses)
{
...
}
SCHEDULER\_CLASS(MyScheduler)
After defining the scheduler class, the developer just has to use the SCHEDULER CLASS
macro to define it as a scheduler class loadable from an agent.
In our example, the call to SCHEDULER CLASS(MyScheduler) – after the class declaration
– makes the class loadable by a Diet agent.
The aggregation method redefinition
The aggregate function has the following prototype:
int MyScheduler::aggregate(corba_response_t* aggrResp, size_t max_srv,
const size_t nb_responses,
const corba_response_t* responses)
{
...
}
The aggregate method takes 4 arguments:
• corba response t* aggrResp: the result of the aggregation has to be set in this argument.
aggrResp is an array of corba server estimation t objects.
• size t max srv: this argument gives the maximum number of responses to return in
aggrResp. This value can be ignored without any risk and it is sometimes useful to
ignore it because this parameter is hard-coded in the Diet sources.
• const size t nb responses: this argument gives the number of responses in responses.
• const corba response t* responses: the responses are stored in this argument. It is an
array of corba response t which is a CORBA structure containing a CORBA sequence of
corba server estimation t.
Two functions are defined to simplify the aggregation of the results:
typedef list<corba_server_estimation_t> ServerList;
ServerList CORBA_to_STL(const corba_response_t* responses, int nb_responses);
void STL_to_CORBA(ServerList &servers, corba_response_t* &aggrResp);
The first function converts the received CORBA sequence into a STL list. This function make
the first aggregation of the results by marshalling all the sequences into one.
The second function converts a STL list into a CORBA sequence that can be transfer ed by
Diet.
Then, an aggregate function should start by a call to the CORBA to STL function. The
obtained list can then be sorted/filtered using all the STL list facilities. And to finish, the result
list is computed by the STL to CORBA function.
Several macros are defined to simplify the sort of a STL list:
c INRIA, ENS-Lyon, UCBL, CNRS, SysFera
Page 68
DIET User’s Manual
SORTFUN(name, metric)
SORTFUN_NB(name, metric, nb)
REV_SORTFUN(name, metric)
REV_SORTFUN_NB(name, metric, nb)
These macros allow the developer to automatically define a sort function using a metric value.
For example, to define a sort function using the number of CPUs, the developer just has to
declare:
SORTFUN(compfun, NBCPU)
The SORTFUN NB macro is used for the multi-values metrics (for example the CPU cache for
each CPU). The nb value designates which value has to be used to sort the list. The REV *
functions are used to sort in ascending order.
To see all the metrics available for the SORTFUN macro, see Section 8.5.4.
When a sort function has been defined, the developer can use the SORT macro to sort the
STL list. For example with our compfun function:
SORT(serverList, compfun);
This call sorts the server STL list in decreasing order of the number of CPU.
An example of aggregate method definition
We will now present an example of an aggregate method using the functions and macro defined
in the UserScheduler.hh file.
SORTFUN(compCPU, NBCPU)
SORTFUN_NB(compCache, CACHECPU, 0)
REV_SORTFUN(compDiskRead, DISKACCESSREAD)
int MyScheduler::aggregate(corba_response_t* aggrResp, size_t max_srv,
const size_t nb_responses,
const corba_response_t* responses)
{
ServerList candidates = CORBA_to_STL(responses, nb_responses);
SORT(candidates, compCache);
SORT(candidates, compCPU);
SORT(candidates, compDiskRead);
STL_to_CORBA(candidates, aggrResp);
return 0;
}
This function returns a list sorted by increasing disk access for first criteria and by decreasing
CPU number and decreasing CPU cache.
c INRIA, ENS-Lyon, UCBL, CNRS, SysFera
Page 69
DIET User’s Manual
Access the metric values through macros
To simplify the access to some specific values defined inside the SeD, you can use these macros:
- TOTALTIME(SeD)
- COMMTIME(SeD)
- TCOMP(SeD)
- TIMESINCELASTSOLVE(SeD)
- COMMPROXIMITY(SeD)
- TRANSFEREFFORT(SeD)
- FREECPU(SeD)
- FREEMEM(SeD)
- NBCPU(SeD)
- CPUSPEED(SeD, idx)
- TOTALMEM(SeD)
- AVGFREEMEM(SeD)
- AVGFREECPU(SeD)
- BOGOMIPS(SeD, idx)
- CACHECPU(SeD, idx)
- TOTALSIZEDISK(SeD)
- FREESIZEDISK(SeD)
- DISKACCESSREAD(SeD)
- DISKACCESSWRITE(SeD)
- USERDEFINED(SeD, idx)
The macros taking two arguments need an index to choose which CPU measurement is needed.
Two extra macros are defined:
• HOSTNAME(server): The hostname of the SeD.
• SED REF(server): A CORBA reference to the SeD.
Here is an example of an aggregate function using these macros:
c INRIA, ENS-Lyon, UCBL, CNRS, SysFera
Page 70
DIET User’s Manual
SORTFUN(compBogo, BOGOMIPS)
int MyScheduler::aggregate(corba_response_t* aggrResp, size_t max_srv,
const size_t nb_responses,
const corba_response_t* responses)
{
ServerList candidates = CORBA_to_STL(responses, nb_responses);
ServerList chosen;
ServerList::iterator it;
for (it=candidates.begin(); it!=candidates.end(); ++it)
if (NBCPU(*it)>=2) chosen.push_back(*it);
SORT(chosen, compBogo);
STL_to_CORBA(chosen, aggrResp);
return 0;
}
This aggregation method first selects only the SeD which have more than 1 CPU and sorts
them according to their number of Bogomips.
8.5.5
Creation and usage of a scheduler module
How to compile a scheduler module
The first step is to compile Diet activating the ”USERSCHED” option. With this option,
you’ll find a subdirectory ”scheduler” in the include directory of the Diet installation. This
directory contains all the headers needed to develop the basis class of the scheduler module.
A scheduler module needs to be linked with some libraries to compile:
• omniORB4: The basis omniORB library.
• omnithread: The omniORB thread library.
• Diet libraries:
– CorbaCommon: The basis Diet Corba library.
– UtilsCommon & UtilsNodes: The Diet utilities libraries.
– IDLAgent & IDLCommon: The IDL Diet libraries.
– UtilsVector: The vector library internally used in Diet.
– IDLLA & IDLMA: The agents libraries.
When using g++ as compiler the option ”-shared” has to be used to compile the module under
Linux and ”-dynamiclib” under Mac OS X. The ”-fPIC” has to be used for both operating
systems.
c INRIA, ENS-Lyon, UCBL, CNRS, SysFera
Page 71
DIET User’s Manual
How to configure the agent and the SeD to use a scheduler module
On the agent side, the parameter schedulerModule has to be set to the path of the module
scheduler (in the agent configuration file). This option uses the same syntax than the other
agents and ORB options:
schedulerModule = <path to module>
On the SeD side, the developer has to choose DIET AGG USER as aggregator:
diet_aggregator_desc_t *agg;
diet_service_table_init(1);
profile = diet_profile_desc_alloc("serviceName", ...);
diet_generic_desc_set(diet_param_desc(profile, 0), ...);
...
agg = diet_profile_desc_aggregator(profile);
diet_aggregator_set_type(agg, DIET_AGG_USER);
diet_service_table_add(profile, ...);
...
Usually, the developer should define a performance metric function to communicate with the
agent scheduler. For example, if the scheduler uses the number of waiting jobs in the FIFO
queue, the performance metric could be:
void metric(diet_profile_t * profile, estVector_t values) {
diet_estimate_waiting_jobs(values);
}
This metric just fixes the number of waiting jobs in the FIFO queue of the SeD. Now, at the
agent side, the scheduler can use this value to aggregate, sort and filter the SeDs responses.
More details are given in the following section about how to use the SeDs plugin schedulers to
communicate with the agent scheduler module.
8.5.6
SeD plugin schedulers and agent schedulers interactions
Most of the time, a scheduler needs some information from the nodes, to choose where a job
should be executed. By using the plugin scheduler capacities of the SeDs, Diet allows to
communicate some useful information for the scheduling. The developer just has to define a
performance metric function and select DIET AGG USER as aggregator.
Information obtained from the SeD
Your plugin scheduler can access to the information obtained from CoRI by initializing the
estimation vector using the diet estimate cori function on the SeD. For more information about
CoRI, see Section 9.2. Then, on the agents scheduler side, these information are accessed using
one of the previously presented macro. You also can obtain the user-defined information by
using the USERDEFINED(SeD, nb) macro. These information have been defined on the SeDs
metric function using the diet est set(estVector t ev, int nb, double value).
For more information on how to get performance prediction values, please consult Chapter 9.
c INRIA, ENS-Lyon, UCBL, CNRS, SysFera
Page 72
DIET User’s Manual
8.5.7
A complete example of scheduler
This example source code is available on the src/examples/agent scheduler directory. The
scheduler performs a Round-Robin on the SeDs using their hostname to evaluate the number
of executions. For example, if the agent is connected to three SeDs, with two launched on the
same machine, the number of jobs executed on the machine with two SeDs will be at most one
more than the number of executed jobs on the other machine.
Hostname based Round-Robin plugin scheduler.
#include
#include
#include
#include
"GlobalSchedulers.hh"
"UserScheduler.hh"
"est_internal.hh"
<map>
std::map<std::string, unsigned int> hostCounter;
class HostnameRR : public UserScheduler {
public:
static const char* stName;
HostnameRR();
~HostnameRR();
void init();
static char* serialize(HostnameRR* GS);
static HostnameRR* deserialize(const char* serializedScheduler);
/* Overriden aggregate method to schedule jobs with the SRA policy. */
int aggregate(corba_response_t* aggrResp, size_t max_srv,
const size_t nb_responses, const corba_response_t* responses);
};
using namespace std;
const char* HostnameRR::stName="UserGS";
HostnameRR::~HostnameRR() {
}
HostnameRR::HostnameRR() {
this->name = this->stName;
this->nameLength = strlen(this->name);
}
int HostnameRR::aggregate(corba_response_t* aggrResp, size_t max_srv,
const size_t nb_responses,
c INRIA, ENS-Lyon, UCBL, CNRS, SysFera
Page 73
DIET User’s Manual
const corba_response_t* responses)
{
ServerList::iterator itSeD;
unsigned int nbUsage=0;
corba_server_estimation_t selected;
cout << "******************** HostnameRR ********************" << endl;
ServerList candidates = CORBA_to_STL(responses, nb_responses);
for (itSeD=candidates.begin(); itSeD!=candidates.end(); ++itSeD)
// We select the SeD by its host usage.
if (hostCounter[HOSTNAME(*itSeD)]<=nbUsage)
selected=*itSeD<;
aggrResp->servers.length(1);
aggrResp->servers[0]=selected;
return 0;
}
SCHEDULER_CLASS(HostnameRR)
8.6
Future Work
We have two primary efforts planned for extensions to the plugin scheduler.
• Additional information services: We plan to add functionalities to enable the application developer to access and use data concerning the internal state of the Diet server
(e.g., the current length of request queues). As other performance measurement and evaluation tools are developed both within and external to the Diet project (see Chapter 9),
some tools are already available to enable such information to be incorporated in the
context of the plugin scheduler.
• Enhanced aggregation methods: The plugin scheduler implemented in the current
release enables the Diet system to account for user-defined factors in the server selection
process. However, the priority aggregation method is fairly rudimentary and lacks the
power to express many imaginable comparison mechanisms. We plan to investigate methods to embed code into Diet agents (e.g., a simple expression interpreter) in a manner
that is secure and that preserves performance.
c INRIA, ENS-Lyon, UCBL, CNRS, SysFera
Page 74
DIET User’s Manual
Chapter 9
Performance prediction
9.1
Introduction
As we have seen in Chapter 8 the agent needs some information from the SeD to make an
optimal scheduling. This information is a performance prediction of the SeD. The agent will
ask the SeD to fill the data structure defined in Chapter 8 with the information it needs. The
SeD returns the information and the agent can make the scheduling.
Performance prediction can be based on hardware information, the load of the SeD (the CPU
load, the memory availability, etc.) or an advanced performance prediction can combine a set
of basic performance predictions. A performance prediction scheduler module named CoRI is
available.
CoRI is described in Section 9.2.
By default Diet is compiled with CoRI enabled. In table 9.1 you can see which information is
available with each compilation option.
-DDIET USE CORI:
BOOL=OFF
BOOL=ON
TCOMP
x
FREECPU
x
x
x
FREEMEM
x
x
x
NBCPU
x
x
x
x
x
CPUSPEED
TOTALMEM
x
x
AVGFREECPU
x
x
BOGOMIPS
x
x
CACHECPU
x
x
TOTALSIZEDISK
x
x
FREESIZEDISK
x
x
DISKACCESREAD
x
x
DISKACCESWRITE
x
x
x
x
ALLINFOS
-DDIET USE BATCH=ON
PARAL NB FREE RESOURCES IN DEFAULT QUEUE
x
x
Table 9.1: Dependencies of the available information on the compiling options
c INRIA, ENS-Lyon, UCBL, CNRS, SysFera
Page 75
DIET User’s Manual
Using convertors
The service profiles offered by Diet are sometimes not understandable by the service implementations. To solve this problem, a convertor processes each profile before it is passed to the
implementation. This is mainly used to hide the implementation specific profile of a service
from the user. It allows different servers to declare the same service with the same profile using
different implementations of the service. If no convertor is passed when declaring a new service,
a default convertor is assigned to it that does not change its profile nor its path.
To translate a profile, the convertor defines a new destination profile with a new path. It
then chooses for each argument of the new profile a predefined function to assign this argument
from the source profile. This allows the following operations:
Permutation of arguments. This is done implicitly by specifying which argument in the
source profile corresponds to which argument in the destination profile.
Copy of arguments. Arguments can be simply used by applying the DIET CVT IDENTITY
function. If the same source argument corresponds to two destination arguments it is
automatically copied.
Creation of new arguments. New arguments can either contain static values or the properties of existing arguments. To create a new static value, the index for the source argument
must be invalid (e.g.,-1) and the arg parameter must be set to the static argument. To extract a property of an existing argument, other functions than DIET CVT IDENTITY must
be applied. The result of this function will then be used as the value for the destination
argument. Corresponding to the Diet datatypes, the following functions exist:
• DIET CVT IDENTITY Copy the argument
• DIET CVT VECT SIZE Get the size of a vector
• DIET CVT MAT NB ROW Get the number of rows of a matrix
• DIET CVT MAT NB COL Get the number of columns of a matrix
• DIET CVT MAT ORDER Get the order of a matrix
• DIET CVT STR LEN Get the length of the string
• DIET CVT FILE SIZE Get the size of the file
Only the DIET CVT IDENTITY function can be applied to any argument; all other functions
only operate on one type of argument.
9.1.1
Example with convertors
A short example is available below:
/**
* Example 1
* Assume we declared a profile (INOUT MATRIX) with the path ’solve_T’.
* This profile will be called by the client. Our implementation expects
* a profile (IN INT, IN INT, INOUT MATRIX). This profile is known to
c INRIA, ENS-Lyon, UCBL, CNRS, SysFera
Page 76
DIET User’s Manual
* FAST with the path ’T_solve’.
* We will write a convertor that changes the name and extracts the
* matrix’s dimensions.
*/
// declare a new convertor with 2 IN, 1 INOUT and 0 OUT arguments
cvt = diet_convertor_alloc("T_solve", 0, 1, 1);
// apply the function DIET_CVT_MAT_NB_ROW to determine the
// 0th argument of the converted profile. The function’s
// argument is the 0th argument of the source profile. As it
// is an IN argument, the last parameter is not important.
diet_arg_cvt_set(&(cvt->arg_convs[0]), DIET_CVT_MAT_NB_ROW, 0, NULL, 0);
// apply the function DIET_CVT_MAT_NB_COL to determine the
// 1st argument of the converted profile. The function’s
// argument is the 0th argument of the source profile. As it
// is a IN argument, the last parameter is not important.
diet_arg_cvt_set(&(cvt->arg_convs[1]), DIET_CVT_MAT_NB_COL, 0, NULL, 0);
// apply the function DIET_CVT_IDENTITY to determine the
// 2nd argument of the converted profile. The function’s
// argument is the 0th argument of the source profile and
// it will be written back to the 0th argument of the source
// profile when the call has finished.
diet_arg-cvt_set(&(cvt->arg_convs[2]), DIET_CVT_IDENTITY, 0, NULL, 0);
// NOTE: The last line could also be written as:
//diet_arg_cvt_short_set(&(cvt->arg_convs[2]), 0, NULL);
// add the service using our convertor
diet_service_table_add(profile, cvt, solve_T);
// free our convertor
diet_convertor_free(cvt);
More examples on how to create and use convertors are given in the files
examples/dmat manips/server.c and examples/BLAS/server.c.
9.2
CoRI: Collectors of Ressource Information
CoRI manages the access to different tools for collecting information about the SeD.
Currently, various tools, called collectors, are implemented: CoRI Easy and CoRI batch.
The user can choose which collector will provide the information.
9.2.1
Functions and tags
The tags for information are of type integer and defined in the table 8.1. The second
type of tag diet est collect tag t is used to specify which collector will provide the
information: EST COLL EASY or EST COLL BATCH. Three different functions are provided
with CoRI.
c INRIA, ENS-Lyon, UCBL, CNRS, SysFera
Page 77
DIET User’s Manual
CoRI Manager
FAST
CoRI Easy
CoRI Batch
Figure 9.1: CoRI overview
The first function initializes a specific collector.
int
diet_estimate_cori_add_collector(diet_est_collect_tag_t collector_type,
void * data);
The second parameter is reserved for initializing collectors which need additional information on initialization. For example, the BATCH collector needs for its initialization
the profile of the service to be solved.
After the initialization, accessing to the information is done by specifying the collector
and the information type.
int
diet_estimate_cori(estVector_t ev,
int info_type,
diet_est_collect_tag_t collector_type,
void* data);
Cori-Easy doesn’t need more information, but BATCH need a profile of type “diet profile t”.
The last parameter is reserved for it.
The last function is used to test Cori-Easy. It prints all information Cori-Easy finds to
the standard output.
void
diet_estimate_coriEasy_print();
A result could be the following output:
start printing CoRI values..
cpu average load : 0.56
CPU 0 cache : 1024 Kb
number of processors : 1
CPU 0 Bogomips : 5554.17
diskspeed in reading : 9.66665 Mbyte/s
diskspeed in writing : 3.38776 Mbyte/s
total disk size : 7875.51 Mb
available disk size :373.727 Mb
total memory : 1011.86 Mb
available memory : 22.5195 Mb
end printing CoRI values
c INRIA, ENS-Lyon, UCBL, CNRS, SysFera
Page 78
DIET User’s Manual
9.2.2
CoRI-Easy
The CoRI-Easy collector makes some basic system calls to gather the information. CoRIEasy is available by default. The last column of the table 9.1 corresponds to the CoRIEasy’s functionality.
There is an example on how to use CoRI-Easy in the <diet_src>/src/examples/cori/
directory.
9.2.3
CoRI batch
With the help of the CoRI batch collector, a SeD programmer can use some information
obtained from the batch system. It is only available if Diet is compiled with the option
-DDIET USE BATCH set to ON. Currently, only simple information can be accessed but
functionalities will be improved along with the number of batch systems Diet is able to
address.
There is an example on how to use CoRI batch in the
<diet_src>/src/examples/Batch/Cori_cycle_stealing/ directory.
9.3
Future Work
There are two primary efforts for the CoRI manager:
• Improving CoRI-Easy: Some evaluation functions are very basic and should be
revised to increase their response time speed and the accuracy of the information.
There is a need for other information (i.e., information about the network). Every
operating systems provide other basic functions to get the information. CoRI-Easy
doesn’t know all functions. Use the diet estimate cori print() function to test
what CoRI-Easy can find on your SeD. Send us a mail if not all functions are
working properly.
• Improving CoRI batch: add new functionalities to access dynamic information
as well as some kind of performance predictions for more batch systems.
• New collectors: Integrating other external tools like Ganglia [21] or Nagios [16]
to the CoRI Manager can provide more useful and exact information.
c INRIA, ENS-Lyon, UCBL, CNRS, SysFera
Page 79
DIET User’s Manual
c INRIA, ENS-Lyon, UCBL, CNRS, SysFera
Page 80
DIET User’s Manual
Chapter 10
Deploying a Diet platform
Deployment is the process of launching a Diet platform including agents and servers.
For Diet, this process includes writing configuration files for each element and launching
the elements in the correct hierarchical order. There are three primary ways to deploy
Diet.
Launching by hand is a reasonable way to deploy Diet for small-scale testing and
verification. This chapter explains the necessary services, how to write Diet configuration
files, and in what order Diet elements should be launched. See Section 10.1 for details.
GoDiet is a Java-based tool for automatic Diet deployment that manages configuration file creation, staging of files, launch of elements, monitoring and reporting on
launch success, and process cleanup when the Diet deployment is no longer needed. See
Section 10.2 for details.
Writing your own scripts is a surprisingly popular approach. This approach often
looks easy initially, but can sometimes take much, much longer than you predict as there
are many complexities to manage. Learn GoDiet– it will save you time!
10.1
Deployment basics
10.1.1
Using CORBA
CORBA is used for all communications in Diet and for communications between Diet
and accessory services such as LogService, VizDIET, and GoDiet. This section gives
basic information on how to use Diet with CORBA. Please refer to the documentation
of your ORB if you need more details.
The naming service
Diet uses a standard CORBA naming service for translating an user-friendly stringbased name for an object into an Interoperable Object Reference (IOR) that is a globally
unique identifier incorporating the host and port where the object can be contacted. The
naming service in omniORB is called omniNames and it must be launched before any
c INRIA, ENS-Lyon, UCBL, CNRS, SysFera
Page 81
DIET User’s Manual
other Diet entities. Diet entities can then locate each other using only a string-based
name and the <host:port> of the name server.
To launch the omniORB name server, first check that the path of the omniORB
libraries is in your environment variable LD LIBRARY PATH, then specify the log directory,
through the environment variable OMNINAMES LOGDIR (or, with omniORB 4, at compile
time, through the --with-omniNames-logdir option of the omniORB configure script).
If there are no log files in this directory, omniNames needs to be intialized. It can be
launched as follows:
~ > omniNames -start
Tue Jun 28 15:56:50 2005:
Starting omniNames for the first time.
Wrote initial log file.
Read log file successfully.
Root context is IOR:010000002b00000049444c3a6f6d672e6f72672f436f734e616d696e672f4e61
6d696e67436f6e746578744578743a312e300000010000000000000060000000010102000d0000003134
302e37372e31332e34390000f90a0b0000004e616d655365727669636500020000000000000008000000
0100000000545441010000001c0000000100000001000100010000000100010509010100010000000901
0100
Checkpointing Phase 1: Prepare.
Checkpointing Phase 2: Commit.
Checkpointing completed.
This sets an omniORB name server which listens for client connections on the default
port 2809. If omniNames has already been launched once, ie there are already some log
files in the log directory, using the -start option causes an error. The port is actually
read from old log files:
~ > omniNames -start
Tue Jun 28 15:57:39 2005:
Error: log file ’/tmp/omninames-toto.log’ exists.
Can’t use -start option.
~ > omniNames
Tue Jun 28 15:58:08 2005:
Read log file successfully.
Root context is IOR:010000002b00000049444c3a6f6d672e6f72672f436f734e616d696e672f4e61
6d696e67436f6e746578744578743a312e300000010000000000000060000000010102000d0000003134
302e37372e31332e34390000f90a0b0000004e616d655365727669636500020000000000000008000000
0100000000545441010000001c0000000100000001000100010000000100010509010100010000000901
Checkpointing Phase 1: Prepare.
Checkpointing Phase 2: Commit.
Checkpointing completed.
c INRIA, ENS-Lyon, UCBL, CNRS, SysFera
Page 82
DIET User’s Manual
CORBA usage for Diet
Every Diet entity must connect to the CORBA name server: it is the way services discover each others. The reference to the omniORB name server is written in a CORBA
configuration file, whose path is given to omniORB through the environment variable
OMNIORB CONFIG (or, with omniORB 4, at compile time, through the configure script option: --with-omniORB-config). An example of such a configuration file is given in the directory src/examples/cfgs of the Diet source tree and installed in <install dir>/etc.
The lines concerning the name server in the omniORB configuration file are built as follows:
omniORB 4:
InitRef = NameService=corbaname::<name server hostname>:<name server port>
The name server port is the port given as an argument to the -start option of omniNames.
You also need to update your LD LIBRARY PATH to point to <install dir>/lib. So your
LD LIBRARY PATH environment variable should now be :
LD LIBRARY PATH=<omniORB home>/lib:<install dir>/lib.
NB1: In order to avoid name collision, every agent must be assigned a different name
in the name server. SeDs do not necessarily need a name, it is optional.
NB2: Each Diet hierarchy can use a different name server, or multiple hierarchies
can share one name server (assuming all agents are assigned unique names). In a multiMA environment, in order for multiple hierarchies to be able to cooperate it is necessary
that they all share the same name server.
10.1.2
Diet configuration file
A configuration file is needed to launch a Diet entity. Some fully commented examples
of such configuration files are given in the directory src/examples/cfgs of the Diet
source files and installed in <install dir>/etc 1 . Please note that:
• comments start with ’#’ and finish at the end of the current line,
• meaningful lines have the format: keyword = value, following the format of configuration files for omniORB 4,
• for options that accept 0 or 1, 0 means no and 1 means yes, and
• keywords are case sensitive.
1
if there isn’t <install dir>/etc directory, please configure Diet with --enable-examples and/or
run make install command in src/examples directory.
c INRIA, ENS-Lyon, UCBL, CNRS, SysFera
Page 83
DIET User’s Manual
Tracing API
traceLevel default = 1
This option controls debugging trace output. The following levels are defined:
level
level
level
level
level
=
=
<
<
=
0
1
5
10
10
level > 10
Do not print anything
Print only errors
Print errors and messages for the main steps (such as “Got a request”) - default
Print errors and messages for all steps
Print errors, all steps, and some important structures (such as the list of offered
services)
Print all Diet messages AND omniORB messages corresponding to an omniORB
traceLevel of (level - 10)
Client parameters
MAName default = none
This is a mandatory parameter that specifies the name of the Master Agent to connect
to. The MA must have registered with this same name to the CORBA name server.
Agent parameters
agentType default = none
As Diet offers only one executable for both types of agent, it is mandatory to specify
which kind of agent must be launched. Two values are available: DIET MASTER AGENT
and DIET LOCAL AGENT. They have aliases, respectively MA and LA.
name default = none
This is a mandatory parameter that specifies the name with which the agent will register
to the CORBA name server.
LA and SeD parameters
parentName default = none
This is a mandatory parameter for Local Agents and SeDs, but not for the MA. It
indicates the name of the parent (an LA or the MA) to register to.
Endpoint Options
dietPort default = none
This option specifies the listening port of an agent or SeD. If not specified, the ORB gets
a port from the system. This option is very useful when a machine is behind a firewall.
By default this option is disabled.
dietHostname default = none
The IP address or hostname at which the entitity can be contacted from other machines. If
not specified, let the ORB get the hostname from the system; by default, omniORB takes
c INRIA, ENS-Lyon, UCBL, CNRS, SysFera
Page 84
DIET User’s Manual
the first registered network interface, which is not always accessible from the exterior.
This option is very useful in a variety of complicated networking environments such as
when multiple interfaces exist or when there is no DNS.
LogService options
useLogService default = 0
This activates the connection to LogService. If this option is set to 1 then the LogCentral
must be started before any Diet entities. Agents and SeDs will connect to LogCentral to
deliver their monitoring information and they will refuse to start if they cannot establish
this connection. See Section 11.1 to learn more about LogService.
lsOutbuffersize default = 0
lsFlushinterval default = 10000
Diet’s LogService connection can buffer outgoing messages and send them asynchronously.
This can decrease the network load when several messages are sent at one time. It can
also be used to decouple the generation and the transfer of messages. The buffer is
specified by it’s size (lsOutbuffersize, number of messages) and the time it is regularly flushed (lsFlushinterval, nanoseconds). It is recommended not to change the
default parameters if you do not encounter problems. The buffer options will be ignored
if useLogService is set to 0.
Multi-MA options
To federate resources, each MA tries periodically to contact other MAs. These options
define how the MA connects to the others.
neighbours default = empty list {}
List of known MAs separated by commas. The MA will try to connect itself to the
MAs named in this list. Each MA is described by the name of its host followed by its
bind service port number (see bindServicePort). For example host1.domain.com:500,
host4.domain.com:500, host.domainB.net:2001 is a valid three MAs list. By default,
an empty list is set into neighbours.
maximumNeighbours default = 10
This is the maximum number of other MAs that can be connected to the current MA.
If another MA wants to connect and the current number of connected MAs is equal to
maximumNeighbours, the request is rejected.
minimumNeighbours default = 2
This is the minimum number of MAs that should be connected to the MA. If the current
number of connected MA is lower than minimumNeighbours, the MA tries to connect to
other MAs.
updateLinkPeriod default = 300
The MA checks if the connected MAs are alive every updateLinkPeriod seconds.
c INRIA, ENS-Lyon, UCBL, CNRS, SysFera
Page 85
DIET User’s Manual
bindServicePort default = none
The MAs need to use a specific port to be able to federate themselves. This port is only
used for initializing connections between MAs. If this parameter is not set, the MA will
not accept incoming connection.
You can find the full set of Diet configuration file options in the chapter A.
10.1.3
Example
As shown in Section 1.3, the hierarchy is built from top to bottom: children register to
their parent.
Here is an example of a complete platform deployment.
Launching the MA
For such a platform, the MA configuration file could be:
# file MA example.cfg, configuration file for an MA
agentType
= DIET MASTER AGENT
name
= MA example
#traceLevel
= 1
# default
#dietPort
= <port>
# not needed
#dietHostname
= <hostname|IP>
# not needed
#useLogService
= 0
# default
#lsOutbuffersize = 0
# default
#lsFlushinterval = 10000
# default
This configuration file is the only argument to the executable dietAgent, which is
installed in <install dir>/bin. Provided <install dir>/bin is in your PATH environment variable, run
~ > dietAgent MA_example.cfg
Master Agent MA_example started.
Launching an LA
For such a platform, an LA configuration file could be:
# file LA example.cfg, configuration file
agentType
= DIET LOCAL AGENT
name
= LA example
parentName
= MA example
#traceLevel
= 1
#
#dietPort
= <port>
#
#dietHostname
= <hostname|IP>
#
#useLogService
= 0
#
#lsOutbuffersize = 0
#
#lsFlushinterval = 10000
#
c INRIA, ENS-Lyon, UCBL, CNRS, SysFera
for an LA
default
not needed
not needed
default
default
default
Page 86
DIET User’s Manual
This configuration file is the only argument to the executable dietAgent, which is
installed in <install dir>/bin. This LA will register as a child of MA example. Run
~ > dietAgent LA_example.cfg
Local Agent LA_example started.
Launching a server
For such a platform, a SeD configuration file could be:
# file SeD example.cfg, configuration file for a SeD
parentName
= LA example
#traceLevel
= 1
# default
#dietPort
= <port>
# not needed
#dietHostname
= <hostname|IP> # not needed
#useLogService
= 0
# default
#lsOutbuffersize = 0
# default
#lsFlushinterval = 10000
# default
The SeD will register as a child of LA example. Run the executable that you linked
with the Diet SeD library, and do not forget that the first argument of the method call
diet SeD must be the path of the configuration file above.
Launching a client
Our client must connect to the MA example:
# file client.cfg, configuration file for a client
MAName
= MA example
#traceLevel = 1
# default
Run the executable that you linked with the Diet client library, and do not forget
that the first argument of the method call diet initialize must be the path of the
configuration file above.
10.2
GoDiet
GoDiet is a Java-based tool for automatic Diet deployment that manages configuration
file creation, staging of files, launch of elements, monitoring and reporting on launch
success, and process cleanup when the Diet deployment is no longer needed [5]. The
user of GoDiet describes the desired deployment in an XML file including all needed
external services (e.g., omniNames and LogService); the desired hierarchical organization
of agents and servers is expressed directly using the hierarchical organization of XML. The
user also defines all machines available for the deployment, disk scratch space available
at each site for storage of configuration files, and which machines share the same disk to
avoid unecessary copies. GoDiet is extremely useful for large deployments (e.g., more
than 5 elements) and for experiments where one needs to deploy and shut-down multiple
c INRIA, ENS-Lyon, UCBL, CNRS, SysFera
Page 87
DIET User’s Manual
deployments to test different configurations. Note that debugging deployment problems
when using GoDiet can be difficult, especially if you don’t fully understand the role of
each element you are launching. If you have trouble identifying the problem, read the
rest of this chapter in full and try launching key elements of your deployment by hand.
GoDiet is available for download on the web2 .
An example input XML file is shown in Figure 10.1; see [5] for a full explanation of
all entries in the XML. You can also have a look at the fully commented XML example
file provided in the GoDiet distribution under examples/commented.xml, each option is
explained. To launch GoDiet for the simple example XML file provided in the GoDiet
distribution under examples/example1.xml, run:
~ > java -jar GoDIET-x.x.x.jar example1.xml
XmlScanner constructor
Parsing xml file: example1.xml
GoDIET>
GoDiet reads the XML file and then enters an interactive console mode. In this
mode you have a number of options:
GoDIET> help
The following commands are available:
launch:
launch entire DIET platform
launch_check: launch entire DIET platform then check its status
relaunch:
kill the current platform and launch entire DIET platform once again
stop:
kill entire DIET platform using kill pid
status:
print run status of each DIET component
history:
print history of commands executed
help:
print this message
check:
check the platform status
stop_check:
stop the platform status then check its status before exit
exit:
exit GoDIET, do not change running platform.
We will now launch this example; note that this example is intentionally very simple
with all components running locally to provide initial familiarity with the GoDiet run
procedure. Deployment with GoDiet is especially useful when launching components
on multiple remote machines.
GoDIET> launch
* Launching DIET platform at Wed Jul 13 09:57:03 CEST 2005
Local scratch directory ready:
/home/hdail/tmp/scratch_godiet
2
http://graal.ens-lyon.fr/DIET/godiet.html
c INRIA, ENS-Lyon, UCBL, CNRS, SysFera
Page 88
DIET User’s Manual
** Launching element OmniNames on localHost
Writing config file omniORB4.cfg
Staging file omniORB4.cfg to localDisk
Executing element OmniNames on resource localHost
Waiting for 3 seconds after service launch
** Launching element MA_0 on localHost
Writing config file MA_0.cfg
Staging file MA_0.cfg to localDisk
Executing element MA_0 on resource localHost
Waiting for 2 seconds after launch without log service feedback
** Launching element LA_0 on localHost
Writing config file LA_0.cfg
Staging file LA_0.cfg to localDisk
Executing element LA_0 on resource localHost
Waiting for 2 seconds after launch without log service feedback
** Launching element SeD_0 on localHost
Writing config file SeD_0.cfg
Staging file SeD_0.cfg to localDisk
Executing element SeD_0 on resource localHost
Waiting for 2 seconds after launch without log service feedback
* DIET launch done at Wed Jul 13 09:57:14 CEST 2005 [time= 11.0 sec]
The status command will print out the run-time status of all launched components.
The LaunchState reports whether GoDiet observed any errors during the launch itself.
When the user requests the launch of LogService in the input XML file, GoDiet can
connect to the LogService after launching it to obtain the state of launched components;
when available, this state is reported in the LogState column.
GoDIET> status
Status
Element
OmniNames
MA_0
LA_0
SeD_0
LaunchState
running
running
running
running
LogState
none
none
none
none
Resource
localHost
localHost
localHost
localHost
PID
1232
1262
1296
1329
Finally, when you are done with your Diet deployment you should always run stop.
To clean-up each element, GoDiet runs a kill operation on the appropriate host using
the stored PID of that element.
GoDIET> stop
* Stopping DIET platform at Wed Jul 13 10:05:42 CEST 2005
c INRIA, ENS-Lyon, UCBL, CNRS, SysFera
Page 89
DIET User’s Manual
Trying
Trying
Trying
Trying
to
to
to
to
stop
stop
stop
stop
element
element
element
element
SeD_0
LA_0
MA_0
OmniNames
* DIET platform stopped at Wed Jul 13 10:05:43 CEST 2005[time= 0.0 sec]
* Exiting GoDIET. Bye.
One of the main problem when writing a GoDiet XML input file is to be compliant
with the dtd. A good tool to validate a GoDiet file before using GoDiet is xmllint.
This tool exist on most platforms and with the following command:
$ xmllint your_xml_file --dtdvalid path_to_GoDIET.dtd -noout
you will see the different lines where there is problem and a clear description of why your
XML file is not compliant.
c INRIA, ENS-Lyon, UCBL, CNRS, SysFera
Page 90
DIET User’s Manual
<?xml version=” 1 . 0 ” standalone=” no ” ?>
< !DOCTYPE d i e t c o n f i g u r a t i o n SYSTEM ” . . / GoDIET . dtd ”>
< d i e t c o n f i g u r a t i o n>
<g o D i e t debug=” 2 ” s a v e S t d O u t=” y e s ” s a v e S t d E r r=” y e s ” u s e U n i q u e D i r s=” no ” l o g=” no ” />
<r e s o u r c e s>
<s c r a t c h d i r=” /tmp/ GoDIET scratch ” />
<s t o r a g e l a b e l=” d i s k −1”>
<s c r a t c h d i r=” /tmp/ r u n s c r a t c h ” />
<s c p s e r v e r=” r e s 1 ” l o g i n=” doe ” />
</ s t o r a g e>
<s t o r a g e l a b e l=” d i s k −2”>
<s c r a t c h d i r=” /tmp/ r u n s c r a t c h ” />
<s c p s e r v e r=” r e s 2 ” l o g i n=” f o o ” />
</ s t o r a g e>
<s t o r a g e l a b e l=” d i s k −3”>
<s c r a t c h d i r=” /tmp/ r u n s c r a t c h ” />
<s c p s e r v e r=” r e s 3 ” l o g i n=” b a r ” />
</ s t o r a g e>
<compute l a b e l=” r e s 1 ” d i s k=” d i s k −1”>
<s s h s e r v e r=” r e s 1 ” l o g i n=” doe ” />
<env>
<v a r name=”PATH” v a l u e=” ” />
<v a r name=”LD LIBRARY PATH” v a l u e=” ” />
</ env>
</ compute>
<compute l a b e l=” r e s 2 ” d i s k=” d i s k −2”>
<s s h s e r v e r=” r e s 2 ” l o g i n=” f o o ” />
<env>
<v a r name=”PATH” v a l u e=” ” />
<v a r name=”LD LIBRARY PATH” v a l u e=” ” />
</ env>
</ compute>
< c l u s t e r l a b e l=” r e s 3 ” d i s k=” d i s k −3” l o g i n=” b a r ”>
<env>
<v a r name=”PATH” v a l u e=” ” />
<v a r name=”LD LIBRARY PATH” v a l u e=” ” />
</ env>
<node l a b e l=” r e s 3 h o s t 1 ”>
<s s h s e r v e r=” h o s t 1 . r e s 3 . f r ” />
<e n d p o i n t c o n t a c t=” 1 9 2 . 5 . 8 0 . 1 0 3 ” />
</ node>
<node l a b e l=” r e s 3 h o s t 2 ”>
<s s h s e r v e r=” h o s t 2 . r e s 3 . f r ” />
</ node>
</ c l u s t e r>
</ r e s o u r c e s>
< d i e t s e r v i c e s>
<omni names c o n t a c t=” r e s 1 I P ” p o r t=” 2121 ”>
<c o n f i g s e r v e r=” r e s 1 ” r e m o t e b i n a r y=” omniNames ” />
</ omni names>
</ d i e t s e r v i c e s>
< d i e t h i e r a r c h y>
<m a s t e r a g e n t l a b e l=”MA”>
<c o n f i g s e r v e r=” r e s 1 ” r e m o t e b i n a r y=” d i e t A g e n t ” />
< c f g o p t i o n s>
<o p t i o n name=” t r a c e L e v e l ” v a l u e=” 1 ” />
</ c f g o p t i o n s>
<SeD l a b e l=”SeD1”>
<c o n f i g s e r v e r=” r e s 2 ” r e m o t e b i n a r y=” s e r v e r d y n a d d r e m ” />
< c f g o p t i o n s>
<o p t i o n name=” t r a c e L e v e l ” v a l u e=” 1 ” />
</ c f g o p t i o n s>
</SeD>
<SeD l a b e l=”SeD2”>
<c o n f i g s e r v e r=” r e s 3 h o s t 1 ” r e m o t e b i n a r y=” s e r v e r d y n a d d r e m ” />
< c f g o p t i o n s>
<o p t i o n name=” t r a c e L e v e l ” v a l u e=” 30 ” />
</ c f g o p t i o n s>
<p a r a m e t e r s s t r i n g=”T” />
</SeD>
<SeD l a b e l=”SeD3”>
<c o n f i g s e r v e r=” r e s 3 h o s t 2 ” r e m o t e b i n a r y=” s e r v e r d y n a d d r e m ” />
< c f g o p t i o n s>
<o p t i o n name=” t r a c e L e v e l ” v a l u e=” 1 ” />
</ c f g o p t i o n s>
</SeD>
</ m a s t e r a g e n t>
</ d i e t h i e r a r c h y>
</ d i e t c o n f i g u r a t i o n>
.
Figure 10.1: Example XML input file for GoDiet.
c INRIA, ENS-Lyon, UCBL, CNRS, SysFera
Page 91
DIET User’s Manual
10.3
Shape of the hierarchy
A recurrent question people ask when first using Diet, is how should my hierarchy look
like? There is unfortunately no universal answer to this. The shape highly depends on
the performances you want Diet to attain. The performance metric that we often use to
characterize the performance of Diet is the throughput the clients get, i.e., the number
of serviced requests per time unit.
Several heuristics have been proposed to determine the shape of the hierarchy based
on the users’ requirements. We can distinguish two main studies. The first one focused on
deploying a single service in a Diet hierarchy [3, 4]. The shape of the best hierarchy on
a fully homogeneous platform is a Complete Spanning d-ary tree (CSD tree). The second
study focused on deploying several services alongside in a single hierarchy. Heuristics
based on linear programming and genetic algorithm have been proposed for different
kinds of platform [6, 7].
Even though the above mentioned studies can provide good, if not the best, deployments, they heavily rely on modelizations and benchmarks of Diet and the services.
This process can be quite long. Thus, we propose in this section a simple but somehow
efficient way of deploying a hopefully “good” hierarchy. (Note that if you do not care
about performances, a simple star graph should be enough, i.e., an MA and all your
SeDs directly connected to it.) Here are a few general remarks on Diet hierarchies:
• The more computations your service needs, the more powerful server you should
choose to put a SeD on.
• Scheduling performances of agents depends on the number of children they have,
as well as on the number of services each of the child knows. An agent will be more
efficient when all its children know one and the same service. Thus it is a good idea
to group all SeDs having the same characteristics under a common agent.
• The services declared by an agent to its parent is the union of all services present
in its underlying hierarchy.
• It is usually a good idea to group all Diet elements having the same services and
present on a given cluster under a common agent.
• There is usually no need for too many levels of agents.
• If you suspect that an agent does not schedule the requests fast enough, and that
it is overloaded, then add two (or more) agents under this agent, and divide the
previous children between these new agents.
c INRIA, ENS-Lyon, UCBL, CNRS, SysFera
Page 92
DIET User’s Manual
Chapter 11
Diet dashboard
This section discussed monitoring tools that can be used with Diet. We are currently
working on a tool called Diet Dashboard that will integrate a variety of external tools to
provide a single management and monitoring environment for Diet. Currently, however,
each of these tools is available separately. See Section 11.1 for a description of LogService,
Section 11.2 for a description of VizDIET, and Section 10.2 for a description of GoDiet.
11.1
LogService
The Diet platform can be monitored using a system called LogService. This monitoring
service offers the capability to be aware of information that you want to relay from the
platform. As shown in Figure 11.1, LogService is composed of three modules: LogComponent, LogCentral and LogTool.
LogCentral
find
service1
MA
solve
service1
LA
LA
SeD SeD
service1
LA
SeD SeDSeDSeD
SeDSeDSeD
service1
Figure 11.1: DIET and LogService.
c INRIA, ENS-Lyon, UCBL, CNRS, SysFera
Page 93
DIET User’s Manual
- A LogComponent is attached to a component and relays information and messages
to LogCentral. LogComponents are typically used within components one wants to
monitor.
- LogCentral collects messages received from LogComponents, then LogCentral stores
or sends these messages to LogTools.
- LogTools connect themselves to LogCentral and wait for messages. LogTools are
typically used within monitoring tools.
The main interest in LogService is that information is collected by a central point LogCentral that receives logEvents from LogComponents that are attached to Diet elements
(MA, LA and SeD). LogCentral offers the possibility to re-send this information to several
tools (LogTools) that are responsible for analysing these message and offering comprehensive information to the user.
LogService defines and implements several functionalities:
Filtering mechanisms As few messages as possible should be sent to minimize network traffic. With respect to the three-tier model, the communications between
applications (e.g., LogComponent) and the collector (e.g., LogCentral), as well as
between the collector and the monitoring tools (e.g., LogTools), should be minimized. When a LogTool registers with the LogCentral, it also registers a filter
defining which messages are required by the tool.
Message ordering Event ordering is another important feature of a monitoring system.
LogService handles this problem by the introduction of a global time line. At
generation each message receives a time-stamp. The problem that can occur is that
the system time can be different on each host. LogService measures this difference
internally and corrects the time-stamps of incoming messages accordingly. The time
difference is correcting by using a time difference measurement recorded during the
last ping that LogCentral has sent to the LogComponent (pings are sent periodically
to verify the “aliveness” of the LogComponent).
However, incoming messages are still unsorted. Thus, the messages are buffered for
a short period of time in order to deliver a sorted stream of messages to the tools.
Messages that arrive out of order within this time are sorted in the buffer and can
thus be properly delivered. Although this induces a delivery-delay for messages, this
mechanism guarantees the proper ordering of messages within a certain tolerance.
As tools should not rely on true real-time delivery of messages, this short delay is
acceptable.
The System State Problem A problem that arises in distributed environments is the
state of the application. This state may for example contain information on connected servers, their relationships, the active tasks and many other pieces of information that depend on the application. The system state can be constructed from
c INRIA, ENS-Lyon, UCBL, CNRS, SysFera
Page 94
DIET User’s Manual
all events that occurred in the application. Some tools rely on this state to work
properly.
The problem emerges if those specific tools do not receive all messages. This might
occur as tools can connect to the monitor after the application has been started.
In fact, this is quite probable as the lifetime of the distributed application can be
much longer than the lifetime of a tool.
As a consequence, the system state must be maintained and stored. In order to
maintain a system state in a general way, LogService does not store the system
state itself, but all messages which are required to construct it. Those messages are
identified by their tag and stored in a special list. This list is forwarded to each
tool that connects. For the tool this process is transparent, since it simply receives
a number of messages that represent the state of the application.
In order to further refine this concept, the list of important messages can also be
cleaned up by LogService. This is necessary as components may connect and disconnect at runtime. After a disconnection of a component the respective information
is no longer relevant for the system state. Therefore, all messages which originated
at this component can be removed from the list. They have become obsolete due
to the disconnection of the component and can be safely deleted in order to reduce
the length of the list of important messages to a minimum.
All Diet components implement the LogComponent interface. By using LogCentral,
the Diet architecture is able to relay information to LogCentral, and then it is possible to
connect to LogCentral by using a LogTool to collect, store and analyse this information.
LogService is available for download. See the web page http://graal.ens-lyon.fr/
DIET/logservice.html for more information.
11.2
VizDIET
VizDIET is the monitoring tool written for Diet to be able to vizualize and analyze
the status and activities of a running Diet deployment. As described in Section 11.1,
all Diet’s components integrate a LogComponent, and VizDIET implements the LogTool
interface in order to be able to collect all information sent by Diet’s components through
their LogComponent.
VizDIET provides a graphic representation of the Diet architecture being monitored.
There are two ways to use VizDIET.
Real-time monitoring: VizDIET is directly connected to the LogCentral using a Corba
connection and receives directly all information about the running Diet platform.
Post-mortem monitoring: VizDIET reads a log file containing all log messages received by LogCentral. This post-mortem analysis can also be replayed in real time
if the log file is time sorted. The log file is created during the real deployment by
a special tool provided with LogService that receives all messages from LogCentral
and writes them to a file.
c INRIA, ENS-Lyon, UCBL, CNRS, SysFera
Page 95
DIET User’s Manual
Figure 11.2: Snapshot of VizDIET.
As described in Section 1.4, there are two main steps in the treatment of a request in
Diet: one step to find and schedule a service, and one step to solve this service. So two
main activities are represented: schedule and compute information
Schedule information :
When an agent takes a scheduling decision for a task (i.e., finding and deciding
which SeD can execute a service), it is useful to know how the agent made its
decision. This information is represented by FindRequest in VizDIET.
Compute information :
When a SeD is computing a job we need to be aware of its state and know when
the computation begins and ends. This information is represented by SolveRequest.
In VizDIET, when a SeD is solving a service, the SeD changes color to red.
FindRequests are only attached to agents and SolveRequests are only attached to
SeDs. Finally the aggregation of one FindRequest and its SolveRequest is concatenated
in one request: DIETRequest. DIETResquest can be see as a job execution in a Diet
c INRIA, ENS-Lyon, UCBL, CNRS, SysFera
Page 96
DIET User’s Manual
Figure 11.3: Bar, taskflow and gantt graphs in vizDIET.
platform as seen by an end-user. A DIETRequest is also associated with a latency,
which is time between the end of a FindRequest and the beginning of a SolveRequest.
VizDIET offers the possiblity to visualize all of these requests from either the point of
view of the Diet platform, in which case you will see the DIETRequests, or in the point
of view of the Agents or SeDs, in which case you will see respectively the FindRequest
and the SolveRequest. The different kinds of requests are represented in different types
of graphics such as a Gantt chart, taskflow chart, or bar chart.
VizDIET also computes some other statistics for the platform such as average time
for scheduling, for solving, or latency. This information can be see for the whole service
in the platform or for one specific service. VizDIET has one other interesting feature:
the possibility to export all data collected by VizDIET into a file using a format that you
specify.
Finally, VizDIET is quite useful for understanding the behavior of the Diet hierarchy
c INRIA, ENS-Lyon, UCBL, CNRS, SysFera
Page 97
DIET User’s Manual
and quite simple to use. You have to keep in mind that VizDIET bases its information
upon log information that is forwarded by LogCentral from Diet components. Therefore,
the information displayed and computed in VizDIET is limited to the Diet hierarchy
(e.g., there is no information about clients).
Future development of VizDIET will depend on new developments in Diet. For
example, a new integration between Diet and JuxMem allows Diet to store data in
the JuxMem service. Correspondingly, the capability to log and visualize these transfers
has been added to VizDIET. VizDIET is available for download. See the web page
http://graal.ens-lyon.fr/DIET/vizdiet.html for more information.
c INRIA, ENS-Lyon, UCBL, CNRS, SysFera
Page 98
DIET User’s Manual
Chapter 12
Multi-MA extension
The hierarchical organization of Diet is efficient when the set of resources is shared
by few individuals. However, the aim of grid computing is to share resources between
several individuals. In that case, the Diet hierarchy become inefficient. The Multi-MA
extension has been implemented to resolve this issue. This chapter explains the different
scalability issues of grid computing and how to use the multi-MA extension to deal with
them.
12.1
Function of the Multi-MA extension
The use of a monolithic architecture become more and more difficult when the number
of users and the number of resources grow simultaneously. When a user tries to resolve a
problem, without the multi-MA extension, Diet looks for the better SeD that can solve
it. This search involves the fact that each SeD has to be queried to run a performance
prediction as described in Section 1.4.
The need to query every SeD that can resolve a problem is a serious scalability issue.
To avoid it, the multi-MA extension proposes to interconnect several MA together. So,
instead of having the whole set of SeD available under a hierarchy of a unique MA, there
are several MA and each MA manages a subset of SeDs. Those MA are interconnected
in a way that they can share the access to their SeDs.
Each MA works like the usual: when they received a query from a user, they looks
for the best SeD which can resolve their problem inside their hierarchy. If there is no
SeD available in its hierarchy, the queried MA forwards the query to another MA to find
a SeD that can be used by its client. This way, Diet is able to support more clients
and more servers because each client request is forwarded to a number of SeDs that is
independent of the total number of available SeDs.
12.2
Deployment example
The instructions about how to compile Diet with the multi-MA extension are available
in Section 2.2.5 and the configuration instructions are available in Section 10.1.2.
c INRIA, ENS-Lyon, UCBL, CNRS, SysFera
Page 99
DIET User’s Manual
The example described here is about four organizations which want to share there
resources. The first organization, named alpha, have ten SeDs which give access to the
service a. The second organization, named beta, have eight SeDs with the service a and
three with the service b. The third one, named gamma, have two SeDs with the service
c. The last one, named delta, have one SeD with the service a, but the server crash and
the SeD is unavailable.
Each organization has it’s own Diet hierarchy. All MAs (one for each organization)
are connected with the multi-MA extension as shown in Figure 12.2
gamma
c
delta
a
c
alpha
beta
LA1
a
a
a
LA2
a
a
a
a
a
LA1
a
a
a
b
a
LA2
a
a
a
a
b
b
a
Figure 12.1: Example of a multi-MA deployment
The following lines appear in the MA configuration file of alpha. They tell that the
multi-MA extension should listen for incoming connection at port 2001. They also tell
that the MA should create a link toward the MA of the organization gamma and toward
the MA of the organization beta. (The description of each configuration parameter are
available in Section 10.1.2.)
agentType = DIET_MASTER_AGENT
dietHostname = diet.alpha.com
bindServicePort = 2001
neighbours = diet.beta.com:2001,ma.gamma.com:6000
The following lines appear in the MA configuration file of beta:
agentType = DIET_MASTER_AGENT
dietHostname = diet.beta.com
bindServicePort = 2001
neighbours = diet.alpha.com:2001,ma.gamma.com:6000
The following lines appear in the MA configuration file of gamma. The neighbours
value is empty. This means that the gamma’s MA will not try to connect itself to other
c INRIA, ENS-Lyon, UCBL, CNRS, SysFera
Page 100
DIET User’s Manual
MA. However, the three others are configured to be connected to gamma. So, after all,
the gamma MA is connected to the other three.
agentType = DIET_MASTER_AGENT
dietHostname = ma.gamma.com
bindServicePort = 6000
neighbours =
Finally the following lines appear in the MA configuration file of delta:
agentType = DIET_MASTER_AGENT
dietHostname = ma.delta.com
bindServicePort = 2001
neighbours = ma.gamma.com:6000
12.3
Search examples
The following section explains how a diet call is managed when used on the previous
architecture.
If a client sends a diet call for the problem a to the alpha’s MA, the alpha’s MA
will return a reference of one of it’s SeD. However, if its scheduler (see Section 8) says
that no SeD is available, it will forward the request to beta and gamma. If beta has an
available SeD, it will be used to resolve the problem. If not, the request is forwarded to
delta.
Now, if a client performs a diet call for the problem c to the delta’s MA, the delta
MA does not have a SeD that can resolve this problem. So, it forwards the request to
gamma. If gamma has no available SeD, the request is forwarded to alpha and beta.
c INRIA, ENS-Lyon, UCBL, CNRS, SysFera
Page 101
DIET User’s Manual
c INRIA, ENS-Lyon, UCBL, CNRS, SysFera
Page 102
DIET User’s Manual
Chapter 13
Workflow management in Diet
13.1
Overview
Workflow applications consists of multiple components (tasks) related by precedence constraints that usually follow from the data flow between them. Data files generated by
one task are needed to start another task. Although this is the most common situation,
the precedence constraints may follow from other reasons as well, and may be arbitrarily
defined by the user.
This kind of application can be modeled as a DAG (Directed Acyclic Graph) where
each vertex is a task with given input data and service name, and each edge can either
be a data link between two tasks or a basic precedence constraint. The Diet workflow
engine can handle that kind of workflow by assigning each task to a SeD in the Diet
hierarchy using a Diet service call. This assignment is made dynamically when the
task is ready to be executed (i.e., all predecessors are done) depending on the service
performance properties and on available ressources on the grid.
A specific agent called the Master Agent DAG (MADAG ) provides DAG workflow
scheduling. This agent serves as the entry point to the Diet Hierarchy for a client that
wants to submit a workflow. The language supported by the MADAG is based on XML
and described in the section 13.4.1.
Because of large amounts of computations and data involved in some workflow applications, the number of tasks in a DAG can grow very fast. The need for a more abstract
way of representing a workflow that separates the data instances from the data flow has
led to the definition of a ”functional workflow language” called the Gwendia language.
A complex application can be defined using this language that provides data operators
and control structures (if/then/else, loops, etc.). To execute the application, we need to
provide both the workflow description (see 13.4.2) and a file describing the input data set.
The Diet workflow engine will instanciate the workflow as one or several tasks’ DAGs,
sent to the MADAG agent to be executed in the Diet platform.
c INRIA, ENS-Lyon, UCBL, CNRS, SysFera
Page 103
DIET User’s Manual
13.2
Quick start
Requirements and compilation The workflow supports in Diet needs the following:
• The Xerces library: the XML handling code is written with Xerces-C++ using the
provided DOM API.
• The XQilla library: the conditions in conditional or looping workflow structures are
written in XQuery language and parsed using the XQilla library.
• Enable the workflow support when compiling Diet. In order to build Diet with
workflow support using cmake, three configuration parameters need to be set:
– DIET USE WORKFLOW as follow: -DDIET USE WORKFLOW:BOOL=ON
– XERCES DIR: defines the path to Xerces installation directory. (e.g., -DXERCES DIR:PATH=/usr
– XQILLA DIR: defines the path to XQilla installation directory. (e.g., -DXQILLA DIR:PATH=/usr
N.B. 1: By activating the workflow module, the DAGDA module is also activated.
This is an example of generating command line:
cmake .. -DMAINTAINER_MODE:BOOL=ON -DOMNIORB4_DIR=/usr/local/omniORB \
-DDIET_USE_WORKFLOW:BOOL=ON \
-DXERCES_DIR=/usr/local/xerces
-DXQILLA_DIR=/usr/local/xqilla
Workflow support was tested in the following configurations:
– gcc version 4.0.2 and higher
– omniORB version 4.1.0 and higher
– Xerces 3.0.1
– XQilla 2.2.0
N.B. 2: Workflow support is not available on Windows/Cygwin platforms (Windows
XP and Cygwin <= 1.5.25) for Xerces 3.0.1 and XQilla 2.2.0.
Executing the examples The directory examples/workflow includes some examples of workflows. You can find a simple DAG workflow (see Figure 13.1) in the file
xml/scalar.xml and you can test it with the following command, where local client.cfg
is the Diet configuration file (example provided in the etc/client wf.cfg file).
./generic_client local_client.cfg -dag scalar.xml
You need to have a running Diet platform with the MADAG agent and the needed
services. You can launch a single SeD (scalar server) that includes all the needed
services. (read Chapter 5 for more details).
c INRIA, ENS-Lyon, UCBL, CNRS, SysFera
Page 104
DIET User’s Manual
x
succ
x+1
x+1
y
y
double
double
2y
2y
b
a
succ
a+b
Figure 13.1: DAG example
You can also find some examples of functional workflows written in the Gwendia
language (see file xml/func string.xml) and you can test it with the following command:
./generic_client local_client.cfg -wf func_string.xml data.xml
You need to have a running Diet platform with the needed services (the commands
to launch the services are included as comments within the workflow XML).
13.3
Software architecture
A new agent called the MADAG is used to manage workflows in the Diet architecture.
This agent receives requests from clients containing the description of a workflow in a
specific language (the MADAG XML workflow language for DAGs). The role of the
MADAG is to determine how to schedule the tasks contained in the workflow in order to
follow the precedence constraints between tasks, and how to map the tasks to appropriate
ressources in the Diet hierarchy.
The execution of the individual tasks is actually delegated by the MADAG to the
client that submitted the workflow. After submitting the workflow, the client is put in
a waiting mode and it will receive individual requests from the MADAG to execute each
task of the workflow. Therefore all the data transfers are done only from the client to
the SeDs and do not transit through the MADAG .
When all tasks are completed, the MADAG will send a release signal to the client
which will then retrieve the results if the execution was successful.
To use the MADAG , the client configuration file must include the parameter MADAGNAME
with the appropriate name.
c INRIA, ENS-Lyon, UCBL, CNRS, SysFera
Page 105
DIET User’s Manual
When the client uses a functional workflow (in Gwendia language) the Diet client
library provides the logic for instanciating the workflow, generating the DAGs and sending
them to the MADAG agent. Note that when several DAGs are generated they are usually
not independent as some data generated by one DAG may be used by another one.
13.4
Workflow description languages
13.4.1
MADAG language
A DAG is described with an XML representation which is close to Diet profile representation. In addition to profile description (problem path and arguments), this description
represents also the data dependencies between ports (source/sink), the node identifier
(unique) and the precedences between nodes. This last information can be removed since
it can be retrieved from the dependencies between ports, however it can be useful to
define a temporal dependency without port linking.
The general structure of this description is:
<dag>
<node id="..." path="...">
<arg name="..." type="........" value=".."/>
<in name="..." type="........" source="......."/>
<out name="...." type="........" sink="......"/>
<out name="...." type="........" sink="......"/>
</node>
....
The name argument represents the identifier of the port. To use it to define a source
or a sink value, it must be prefixed with the node id. For example if the source of the
input port in3 is the port out2 of the node n1, than the element must be described as
follow:
<in name="in3" type="DIET_INT" source="n1#out2"/>
The link between input and output ports must be described either by a source value
in the <in> element, or by a sink value in the <out> element. Specifying both does not
cause an error but duplicates the information.
The example shown in Figure 13.1 can be represented by this XML description:
<dag>
<node id="n1" path="succ">
<arg name="in1" type="DIET_INT" value="56"/>
<out name="out1" type="DIET_INT"/>
<out name="out2" type="DIET_INT"/>
</node>
c INRIA, ENS-Lyon, UCBL, CNRS, SysFera
Page 106
DIET User’s Manual
<node id="n2" path="double">
<in name="in2" type="DIET_INT" source="n1#out1"/>
<out name="out3" type="DIET_INT"/>
</node>
<node id="n3" path="double">
<in name="in3" type="DIET_INT" source="n1#out2"/>
<out name="out4" type="DIET_INT"/>
</node>
<node id="n4" path="sum">
<in name="in4" type="DIET_INT" source="n2#out3"/>
<in name="in5" type="DIET_INT" source="n3#out4"/>
<out name="out4" type="DIET_INT"/>
</node>
</dag>
13.4.2
Gwendia language
The Gwendia language is written in XML and validated by the workflow parser if the path
to the DTD is provided (using a !DOCTYPE XML entity in the workflow XML file). The
Gwendia DTD is included in the Diet distribution in the /usr/share/diet/FWorkflow.dtd
file.
Types Values flowing through the workflow are typed. Basic types are integer, short,
double, longint, float, string and file. Homogeneous arrays of values can be also
used as inputs/outputs and can have any depth: an array can contain arrays of values
(depth = 2). Arrays are ordered and can eventually contain NULL elements.
Processors A processor is a data production unit. A regular processor invokes a
service through a known interface. Defined processor types are webservice, diet and
beanshell. Special processors are workflow source (a processor with no inbound connectivity, delivering a list of externally defined data values), sink (a processor with no
outbound connectivity, receiving some workflow output) and constant (a processor delivering a single, constant value). To improve readability, the source, sink and constant
processors are grouped in an <interface> tag within the document. Other example
of processors are grouped in a <processors> tag. Web services define a <wsdl> tag
pointing to their WSDL description and the operation to invoke. Beanshells define a
<script> tag containing the java code to interpret. Diet services define a <diet> tag
describing the path to service to invoke. (When executing the workflow using the Diet
workflow engine, only processors containing a <diet> tag can be used). The <diet> tag
contains the path attribute that matches exactly the Diet service name, and optionnally contains the ’estimation’ attribute (with value keyword ’constant’) whenever the
computation time estimation for this service does not depend on input data (using this
option may reduce considerably the load on the Diet platform because the request for
c INRIA, ENS-Lyon, UCBL, CNRS, SysFera
Page 107
DIET User’s Manual
performance estimation is done only once by the MaDag instead of being done for each
task).
Processor ports Processor input and output ports are named and declared. A port
may be an input (<in> tag) or an output (<out> tag). For each input/output, the
following attributes can be defined:
• type (mandatory): contains the base type of data i.e., a basic type identifier that
describes the type of the data received/generated by the port. When data is scalar
this is the actual data type, when data is an array this is the type of the data leaves
of the array.
• depth (optional, default is 0): contains the depth of the array if applicable
• cardinality (optional, only for out ports with depth > 0): contains the number of
elements of the generated array. This value can be provided only if it is a constant
i.e., the number of elements does not vary for each instance of data. When the
data depth is greater than 1, the format for the cardinality attribute is a columnseparated list of integers (for example, ”2:3” for an array containing 2 arrays of 3
elements).
Iteration strategies Iteration strategies must be defined when the processor has two
or more input ports. By default the workflow parser will use a dot iteration strategy
for all inputs. These operators use the index of data items received or produced by
workflow processors to combine them. The index of a data item corresponds, for data
items produced by a source to the order number in the source data file, and for data items
produced by a standard processor to the index of input data items eventually combined
by the operators. There are 4 data manipulation operators:
• dot (groups 2 or more ports): data from the different ports are processed together
when their index match exactly (data with index 0 of one port is matched with
data with index 0 of the other ports). The output index is the same as the index
of the input data.
• cross (groups 2 ports): processes each data instance of the first port with each data
instance of the second port. This processor will increase by one the index depth of
the output (for example: if data inputs have indexes 0 and 1 then the outputs have
the index 0 1).
• flatcross (groups 2 ports): same as cross but with a different output indexation
scheme. This operator does not increase the depth of the output index but creates
new indexes (e.g., if data inputs have indexes 1 and 2 with a maximum index of 3
for the right input, then the output has the index 6 = 4 ∗ 1 + 2). Note that this
operator creates a synchronization constraint among all instances as the maximum
index of the right input must be known by the workflow engine before being able
to create new indexes.
c INRIA, ENS-Lyon, UCBL, CNRS, SysFera
Page 108
DIET User’s Manual
• match (groups 2 ports): processes each data instance of the first port with all the
data instances of the second port that have an index prefix that matches the first
port’s index (for example: if left data has index 1 1, it will be processed with all
right data which have an index beginning with 1 1). The output index is the second
port’s index.
Add figures explaining the different iteration strategies
Here is an example of a Gwendia workflow (to be continued with the links part below):
<workflow>
<interface>
<constant name="parameter" type="integer" value="50"/>
<source name="key" type="double" />
<sink name="results" type="file" />
</interface>
</processors>
<processor name="genParam">
<in name="paramKey" type="double"/>
<out name="paramFiles" type="file" depth="1"/>
<diet path="gen" estimation="constant"/>
</processor>
<processor name="docking">
<in name="param" type="integer" />
<in name="input" type="file" />
<out name="result" type="double" />
<iterationstrategy>
<cross>
<port name="param" />
<port name="input" />
</cross>
</iterationstrategy>
<diet path="dock" estimation="constant"/>
</processor>
<processor name="statisticaltest">
<in name="values" type="double" depth="1"/>
<out name="result" type="file"/>
<iterationstrategy>
<cross>
<port name="coefficient" />
<match>
<port name="values" />
<port name="weights" />
c INRIA, ENS-Lyon, UCBL, CNRS, SysFera
Page 109
DIET User’s Manual
</match>
</cross>
</iterationstrategy>
<diet path="weightedaverage" />
</processor>
</processors>
<links>
<!-- LINKS (see below) -->
</links>
</workflow>
Data links A data link is a connection between a processor output port and a processor
input port as exampled below:
<links>
<link
<link
<link
<link
<link
</links>
from="key" to="genParam:paramKey"/>
from="genParam:paramFiles" to="docking:input"/>
from="parameter" to="docking:param"/>
from="docking:result" to="statisticaltest:values" />
from="statisticaltest:result" to="results" />
When a processor A (port A.out) is connected to a processor B (port B.in) through a
data link, an instance of A (one task) may trigger a number of B instances that depends
on first, the data depth at both ends of the link and second, the iteration strategy chosen
for the B.in port within the B processor.
The data depths on both ends of the link determine the number of data items received
by the B.in port. Three cases are possible:
• 1 to 1 : when depth(A.out) = depth(B.in), a data item produced by A.out is sent
as-is to B.in
• 1 to N : when depth(A.out) < depth(B.in), a data item produced by A.out is an
array that will be split into its elements when sent to B. This will produce several
parallel instances (tasks) of the B processor. This is equivalent to a foreach structure
in usual programming languages, but is here transparent for the user as this is the
workflow engines that manages it.
• N to 1 : when depth(A.out) > depth(B.in), several data items produced by A.out
(by different tasks) will be grouped in an array before being sent to B.in. This is
the opposite behaviour from the previous point. Note that this structure creates
a synchronization barrier among the A tasks as they must all be completed before
the B tasks can be launched.
c INRIA, ENS-Lyon, UCBL, CNRS, SysFera
Page 110
DIET User’s Manual
Conditionals (if/then/else) Specific out ports tags (<outThen> and <outElse>) are
used in that kind of node. An outThen port will receive data assigned according to the
assignment list in the <then> tag only when the condition is evaluated to true. If the
condition is false, this port will not receive data but the <outElse> port will receive data
according to the assignment list in the <else> tag (assignment lists are semi-column
separated lists of assignments of an outThen or outElse port to an input port).
<condition name="IF_Example">
<in name="i" type="integer" />
<in name="j" type="integer" />
<outThen name="out1" type="integer" />
<outElse name="out2" type="integer" />
<!-- IF Condition must be written in XQuery language -->
<if>$i lt $j</if>
<then>out1=i;</then>
<else>out2=j;</else>
</condition>
Note that all the operators and functions defined in the XQuery standard (see http:
//www.w3.org/TR/xquery-operators/) can be used to make the boolean expression of
the <if> tag. These can process both numerical and string variables, and can also contain
XPath expressions to access elements of an array when the input port type is an array
(e.g., the expression “ contains($inlistitem[1]text(), ’a’) ” tests if the 1st element
of the array provided by the ’in’ port contains the letter ’a’).
While loops This structure uses specific port tags (<inLoop> and <outLoop>) in addition to standard port tags. They are used to connect this processor to other processors
that will be iterated as long as the while condition is true (condition is evaluated before
the first iteration). The standard <in> and <out> ports are used to connect this processor
to the rest of the workflow.
The loop initialization is done by mapping data from in ports to inLoop ports using
the ’init’ attribute. Each iteration produces data on outLoop ports according to the assignments of the <do> tag (semi-column separated list of assignments). The outputs of
the processors that are iterated can be connected to the inLoop ports when the results of
one iteration are used by the next one (but this is not mandatory). When the while condition is evaluated to false, the outLoop data items are handed over to the corresponding
out ports according to the ’final’ attribute of these. They are then sent to the connected
processors.
Finally for one instance of this while processor, N ≥ 0 iterations are done for processors connected to the outLoop ports and one data item is produced by the out port(s).
<loop name="WHILE_Example">
<!-- REQUIRED nb of IN ports EQUALS nb of OUT ports -->
<in name="v" type="double" />
<out name="out" type="double" />
c INRIA, ENS-Lyon, UCBL, CNRS, SysFera
Page 111
DIET User’s Manual
<inLoop name="v_l" type="double" init="v"/>
<outLoop name="l" type="double" final="out"/>
<!-- WHILE Condition must be written in XQuery language -->
<!-- it can contain ONLY LOOP IN ports -->
<while>$v lt 100</while>
<!-- DO maps the inLoop ports to the outLoop ports - straightforward -->
<do>l=v_l;</do>
</loop>
13.5
Client API
13.5.1
Structure of client program
The structure of a client program is very close to the structure of usual Diet client. The
general algorithm is as follow:
diet_initialize
create the workflow profile
call the method diet_wf_call
if success retrieve the results
free the workflow profile
diet_finalize
The following tables show a description of methods provided by the Diet workflow
API. The table 13.1 contains the main methods that are common to the DAG workflows
API and to the functional workflows API. The table 13.2 contains the methods that are
specific to the DAG API. The table 13.3 contains the methods that are specific to the
functional workflows API.
13.5.2
The simplest example
This example represents the basic client code to execute a DAG. Line 26 indicates that
the workflow output is a double value named n4#out4. The example shown in Figure 13.1
can be fully (execution and result retrieving) executed with this client.
c INRIA, ENS-Lyon, UCBL, CNRS, SysFera
Page 112
DIET User’s Manual
Workflow function
diet wf desc t*
diet wf profile alloc(const char*
wf file name, const char* wf name,
wf level t wf level);
void
diet wf profile free(diet wf desc t *
profile);
diet error t
diet wf call(diet wf desc t*
wf profile);
int
diet wf print results(diet wf desc t *
profile);
Description
allocate a workflow profile to be used for
a workflow submission.
wf file name : the file name containing
the workflow XML description. wf name
: the name of the workflow (used for
logs) wf level : specifier for workflow type
(DAG or FUNCTIONAL)
free the workflow profile.
execute the workflow associated to profile
wf profile.
print on standard output all the results of
the current executed workflow or dag.
Table 13.1: Diet workflow common API
Workflow function
int
diet wf scalar get(const char * id,
void** value);
int
diet wf string get(const char * id,
char** value);
int
diet wf file get(const char * id,
size t* size, char** path);
int
diet wf matrix get(id, (void**)value,
nb rows, nb cols, order);
Description
retrieves a workflow scalar result.
id : the output port identifier.
retrieves a workflow string result.
id : the output port identifier.
retrieves a workflow file result.
id : the output port identifier.
retrieves a workflow matrix result.
id : the output port identifier.
Table 13.2: Diet workflow DAG-specific API
c INRIA, ENS-Lyon, UCBL, CNRS, SysFera
Page 113
DIET User’s Manual
Workflow function
void
diet wf set data file(
diet wf desc t * profile,
const char * data file name);
void
diet wf set transcript file(
diet wf desc t * profile,
const char * transcript file name);
int
diet wf save data file(
diet wf desc t * profile,
const char * data file name);
int
diet wf save transcript file(
diet wf desc t * profile,
const char * transcript file name);
int
diet wf sink get(
diet wf desc t* wf profile,
const char * id, char** dataID;
Description
specifies the file containing the data description used to generate the workflow
specifies the file containing the tasks status and data (used to restart a dag or
workflow)
saves the input and output data description (’source’ and ’sink’ nodes) in XML
format. The file can be used as input data
file for another workflow execution.
saves the transcript of the current workflow (list of tasks with their status and
data). This file can be used as input transcript file for another workflow execution
(tasks already done with output data still
available on the platform will not be executed again)
gets a container (Dagda data) containing
all the data received by a ’sink’ node
Table 13.3: Diet workflow Functional-specific API
c INRIA, ENS-Lyon, UCBL, CNRS, SysFera
Page 114
DIET User’s Manual
#i n c l u d e
#i n c l u d e
#i n c l u d e
#i n c l u d e
#i n c l u d e
<s t r i n g . h>
<u n i s t d . h>
< s t d l i b . h>
<s t d i o . h>
<s y s / s t a t . h>
#i n c l u d e ” D I E T c l i e n t . h”
i n t main ( i n t argc , char ∗ argv [ ] )
{
diet wf desc t ∗ profile ;
char ∗ fileName ;
long ∗ l ;
i f ( a r g c != 3 ) {
f p r i n t f ( s t d e r r , ” Usage : %s < f i l e . c f g > < w f f i l e > \n ” , argv [ 0 ] ) ;
return 1;
}
i f ( d i e t i n i t i a l i z e ( argv [ 1 ] , argc , argv ) ) {
f p r i n t f ( s t d e r r , ”DIET i n i t i a l i z a t i o n f a i l e d ! \ n ” ) ;
return 1;
}
f i l e N a m e = argv [ 2 ] ;
p r o f i l e = d i e t w f p r o f i l e a l l o c ( fileName , ” t e s t ” ,DIET WF DAG ) ;
i f (! diet wf call ( profile )) {
p r i n t f ( ” g e t r e s u l t = %d ” , d i e t w f s c a l a r g e t ( ” n4#out4 ” , &l ) ) ;
p r i n t f (”% l d \n ” , ( l o n g ) ( ∗ l ) ) ;
}
diet wf free ( profile );
return 0;
}
13.6
Scheduling
The MADAG agent may receive many requests to execute workflows from one or several
clients, and the number of ressources to execute all tasks in parallel may not be sufficient
on the grid. In this case the choice of a particular workflow scheduler is critical to
determine the order of execution of all tasks that are ready to be executed.
Schedulers provide different online scheduling heuristics that apply different prioritization algorithms to choose the order of execution between tasks of the same DAG
(intra-DAG priority) and between tasks of different DAGs (inter-DAG priority). All
heuristics are based on the well-known HEFT heuristic that is extended to this case of
online multi-workflow scheduling.
c INRIA, ENS-Lyon, UCBL, CNRS, SysFera
Page 115
DIET User’s Manual
13.6.1
Available schedulers
The available MADAG workflow schedulers are:
• A basic scheduler (option -basic or default choice): this scheduler manages the
precedence constraints between the tasks. The priority between tasks within a dag
is set according (Heterogeneous Earliest Finish Time) HEFT [24] heuristic. When a
task is ready to be executed (i.e., the preceding tasks are completed) the ready task
with the higher HEFT rank is sent to the client for execution without specifying
a ressource. Then the client performs a standard Diet request that will use the
scheduler configured by the SeD.
• A Multi-HEFT scheduler (option -heft): this scheduler applies the HEFT heuristic
to all workflows submitted by different clients to the MADAG . This means that the
priorities assigned by the HEFT heuristic are used to order the tasks of all dags
processed by the MADAG and following this order the tasks are mapped to the first
available ressource.
• A Multi-AgingHEFT scheduler (option -aging heft): this scheduler is similar to
Multi-HEFT but it applies a correction factor to the priorities calculated by the
HEFT algorithm. This factor is based on the age of the dag ie the time since it was
submitted to the scheduler. Compared to Multi-HEFT this scheduler will increase
the priority of the tasks of a workflow that has been submitted earlier than other
dags.
• A FOFT (Fairness on Finish Time) scheduler (option -fairness): this scheduler uses
another heuristic to apply a correction factor to the priorities calculated by the
HEFT algorithm. This factor is based on the slowdown of the dag that is calculated
by comparing the earliest finish time of the tasks in the same environment without
any other concurrent workflow and the actual estimated finish time.
13.6.2
SeD requirements for workflow scheduling
The workflow schedulers (Basic, Multi-HEFT, Multi-AgingHEFT and FOFT) use information provided by the SeDs to be able to run the HEFT heuristic. So the SeD
programmer must provide the required data in the estimation vector by implementing a
plugin scheduler (see chapter 8).
The following fields in the estimation vector must be filled in:
1. The TCOMP field must contain the estimation of the computation time for the job (in
milliseconds). This can be done using the diet estimate comptime(estVector t
ev, double value) method within the performance evaluation function.
2. The EFT field must contain the estimation of the earliest finish time (in milliseconds
from the time of the current submit request) for the job. To compute this value,
the SeD programmer can use the API method
c INRIA, ENS-Lyon, UCBL, CNRS, SysFera
Page 116
DIET User’s Manual
diet estimate eft(...) to retrieve the estimated value of earliest finish time for
a new job.
c INRIA, ENS-Lyon, UCBL, CNRS, SysFera
Page 117
DIET User’s Manual
c INRIA, ENS-Lyon, UCBL, CNRS, SysFera
Page 118
DIET User’s Manual
Chapter 14
Dagda: Data Manager
Dagda (Data Arrangement for Grid and Distributed Applications) is a new data manager for Diet. Dagda offers to the Diet application developers a simple and efficient
way to manage the data. It was not designed to replace the JuxMem extension but
to be possibly coupled with it. In a future work, Dagda will be divided in two parts:
The Dagda data manager and the Dagda data interface. The data interface will make
interactions between Dagda, JuxMem, FTP etc. and other data transfer/management
protocols. In this chapter, we will present the current version of Dagda which is an
alternative data manager for Diet with several advanced data management features.
14.1
Overview
Dagda allows data explicit or implicit replications and advanced data management on the
grid. It was designed to be backward compatible with previously developed applications
for Diet which benefit transparently of the data replications. Moreover, Dagda limits
the data size loaded in memory to a user-fixed value and avoids CORBA errors when
transmitting too large data regarding to the ORB configuration.
Dagda offers a new way to manage the data on Diet. The API allows the application
developer to replicate, move, add or delete a data to be reused later or by another application. Each component of Diet can interact with Dagda and the data manipulation
can be done from a client application, a server or an agent through a plug-in scheduler.
A Dagda component is associated to each element in a Diet platform (client, Master
Agent, Local Agent, SeD). These components are connected following the Diet deployment topology. Figure 14.1 shows how the Dagda and Diet classical components are
connected. Contrary to a Diet architecture, each Dagda component has the same role.
It can store, transfer or move a data. The client’s Dagda component is isolated of the
architecture and communicates only with the chosen SeDs Dagda components when
necessary. When searching for a data, Dagda uses its hierarchical topology to contact
the data managers. Among the data managers having one replicate of the data, Dagda
chooses the “best” source to transfer it. To make this choice Dagda uses some statistics
collected from previous data transfers between the nodes. By not using dynamic inforc INRIA, ENS-Lyon, UCBL, CNRS, SysFera
Page 119
DIET User’s Manual
mation, it is unsure that Dagda really chose the “best” nodes for the transfers. In a
future version, we will introduce some facilities to estimate the time needed to transfer
a data and to improve the choice of a data stored on the grid. To do the data transfers,
Dagda uses the pull model: it is the destination node that ask for the data transfer.
DAGDA
component
Selected SeD(s) ²
Client
PowerBook G4
client request ¹
DAGDA
component
client input
data ⁴
job submission ³
MA
SeD output
data ⁶
DAGDA
component
DAGDA
component
SeD ⁵
DAGDA
component
LA
DAGDA
component
SeD
LA
persistent input
data from another
component ⁴
input data update ⁶
Figure 14.1: Dagda architecture in Diet.
Figure 14.1 presents how Dagda manages the data when a client submit a job. In
this example, the client wants to use some data stored on the grid and some personal
data. He wants to obtain some results and to store some others on the grid. Some of
these output data are already stored on the platform and they should be updated after
the job execution.
1. The client sends a request to the Master Agent.
2. The Master agent returns one or more SeD references.
3. The client sends its request to the chosen node. The parameters data are identified
by a unique ID and the problem profile contains a reference to the client’s data
manager.
4. Receiving the request the SeD asks the client to transfer the data of the user and
it asks to the Dagda architecture to obtain the persistent data already stored on
the platform.
c INRIA, ENS-Lyon, UCBL, CNRS, SysFera
Page 120
DIET User’s Manual
5. The SeD executes the job. After the execution, the SeD stores the output data
and it informs the client that the data are ready to be downloaded. It also asks the
architecture to update the modified output data.
6. The client upload its results and the data are updated on the nodes.
14.2
The Dagda configuration options
Dagda introduces new configuration options that can be defined for all the Dagda
components. None of these options are mandatory to use Dagda. Figure 14.2 presents
all the Dagda available options, their meaning and default values.
Client
Agent
SeD
The /tmp directory.
4
4
4
The omniORB giopMaxMsgSize size.
4
4
4
maxDiskSpace
The maximum disk space used by
Dagda to store the data. If set to 0,
Dagda will not take care of the disk
usage.
The available disk space on the
disk partition chosen by the
storageDirectory option.
4
4
4
maxMemSpace
The maximum memory space used by
Dagda to store the data. If set to 0,
Dagda will not take care of the memory usage.
No maximum memory usage is
set. Same effect than to choose
0.
4
4
4
cacheAlgorithm
The cache replacement algorithm used
when Dagda needs more space to store
a data. Possible values are: LRU,
LFU, FIFO
No cache replacement algorithm. Dagda never replace a
data by another one.
4
4
4
shareFiles
The Dagda component shares its file
data with all its children (when the
path is accessible by them, for example, if the storage directory is on a NFS
partition). Value can be 0 or 1.
No file sharing - 0
8
4
8
dataBackupFile
The path to the file that will be used
when Dagda save all its stored data/data path when asked by the user
(Checkpointing).
No checkpointing is possible.
8
4
4
restoreOnStart
Dagda will load the dataBackupFile
file at start and restore all the data
recorded at the last checkpointing
event. Possible values are 0 or 1.
No file loading on start - 0
8
4
4
Option
storageDirectory
maxMsgSize
Description
The directory on which Dagda will
store the data files
The maximum size of a CORBA message sent by Dagda.
Default value
Figure 14.2: Dagda configuration options
c INRIA, ENS-Lyon, UCBL, CNRS, SysFera
Page 121
DIET User’s Manual
14.3
Cache replacement algorithm
When a data is replicated on a site, it is possible that not enough disk/memory space is
available. In that case, Dagda allows to choose a strategy to delete a persistent data.
Only a simple persistent data can be deleted, the sticky ones are never deleted by the
chosen algorithm. Dagda offers three algorithms to manage the cache replacement:
• LRU: The least recently used persistent data of sufficient size is deleted.
• LFU: The least frequently used persistent data of sufficient size is deleted.
• FIFO: Among the persistent data of sufficient size, the oldest is deleted.
14.4
The Dagda API
By compiling Diet with the Dagda extension activated, the DIET Dagda.h file is installed on the Diet include directory. This file contains some data management functions
and macros.
14.4.1
Note on the memory management
On the SeD side, Dagda and the SeD share the same data pointers, that means that if
the pointer is a local variable reference, when Dagda will use the data, it will read an
unallocated variable. The users should allways allocate the data with a “malloc”/“calloc”
or “new” call on the SeD and agent sides. Because Dagda takes the control of the data
pointer, there is no risk of memory leak even if the service allocate a new pointer at each
call. The data lifetime is managed by Dagda and the data will be freed according to its
persistence mode.
h
14.4.2
On the SeD and agent sides, Dagda takes the control of the data
pointers. To free a data may cause major bugs which could be very
hard to find. The users could only free a Diet data on the client
side after the end of a transfer.
Synchronous data transfers
All of the following functions return at the end of the transfer or if an error occured.
They all return an integer value: 0 if the operation succeeds, another value if it fails.
Dagda put data macros/functions
The following functions put a data on the Dagda hierarchy to be used later. The last
parameter is always a pointer to a C-string which will be initialized with a pointer to
the ID string of the data. This string is allocated by Dagda and can be freed when
the user does not need it anymore. The first parameter is always a pointer to the data:
for a scalar value a pointer on the data, for a vector, matrix or string, a pointer on the
c INRIA, ENS-Lyon, UCBL, CNRS, SysFera
Page 122
DIET User’s Manual
first element of the data. The “value” argument for a file is a C-string containing the
path of this file. The persistence mode for a data managed by Dagda should allways
be DIET PERSISTENT or DIET STICKY. The VOLATILE and * RETURN modes do
not make sense in this data management context.
- dagda_put_scalar(void* value, diet_base_type_t base_type,
diet_persistence_mode_t mode, char** ID):
This macro adds to the platform the scalar data of type “base type” pointed by
“value” with the persistence mode “mode” (DIET PERSISTENT or DIET STICKY)
and initializes “*ID” with the ID of the data.
- dagda_put_vector(void* value, diet_base_type_t base_type,
diet_persistent_mode_t mode, size_t size, char** ID):
This macro adds to the platform the vector of “size” “base type” elements pointed
by “value” with the persistence mode “mode” and stores the data ID in “ID”.
- dagda_put_matrix(void* value, diet_base_type_t base_type,
diet_persistence_mode_t mode, size_t nb_rows,
size_t nb_cols, diet_matrix_order_t order, char** ID):
This macro adds to the platform the “base type” matrix of dimension “nb rows” ×
“nb cols” stored in “order” order. The data ID is stored on “ID”.
- dagda_put_string(char* value, diet_persistence_mode_t mode, char** ID):
This macro adds to the platform the string pointed by “value” with the persistence
mode “mode” and stores the data ID into “ID”.
- dagda_put_file(char* path, diet_persistence_mode_t mode, char**ID):
This macro adds the file of path “path” with the persistence mode “mode” to the
platform and stores the data ID into “ID”
Dagda get data macros/functions
The following API functions are defined to obtain a data from Dagda using its ID:
- dagda_get_scalar(char* ID, void** value,
diet_base_type_t* base_type):
The scalar value using the ID “ID” is obtained from Dagda and the “value” argument is initialized with a pointer to the data. The “base type” pointer content is
set to the data base type. This last parameter is optional and can be set to NULL
if the user does not want to get the “base type” value.
- dagda_get_vector(char* ID, void** value,
diet_base_type_t* base_type, size_t* size):
The vector using the ID “ID” is obtained from Dagda. The “value” argument is
initialized with a pointer to the first vector element. The “base type” content are
initialized with the base type and size of the vector. These two parameters can be
set to NULL if the user does not take care about it.
c INRIA, ENS-Lyon, UCBL, CNRS, SysFera
Page 123
DIET User’s Manual
- dagda_get_matrix(char* ID, void** value,
diet_base_type_t* base_type, size_t* nb_r,
size_t* nb_c, diet_matrix_order_t* order):
The matrix using the ID “ID” is obtained from Dagda. The “value” argument
is initialized with a pointer to the first matrix element. The “base type”, “nb r”,
“nb c” and “order” arguments contents are repectively set to the base type of the
matrix, the number of rows, the number of columns and the matrix order. All of
these parameters can be set to NULL if the user does not take care about it.
- dagda_get_string(char* ID, char** value):
The string of ID “ID” is obtained from Dagda and the value content is set to a
pointer on the first string character.
- dagda_get_file(char* ID, char** path):
The file of ID “ID” is obtained from Dagda and the “path” content is set to a
pointer on the first path string character.
14.4.3
Asynchronous data transfers
With Dagda, there are two ways to manage the asynchronous data transfers, depending
of the data usage:
• With end-of-transfer control: Dagda maintains a reference to the transfer thread.
It only releases this reference after a call to the corresponding waiting function.
The client developer should always use these functions, that’s why a data ID is
only returned by the “dagda wait *” and “dagda wait data ID” functions.
• Without end-of-transfer control: The data is loaded from/to the Dagda hierarchy
without the possibility to wait for the end of the transfer. These functions should
only be called from an agent plugin scheduler, a SeD plugin scheduler or a SeD if
the data transfer without usage of the data is one of the objectives of the called
service. The data adding functions without control should be used very carefully
because there is no way to be sure the data transfer is achieved or even started.
With asynchronous transfers, the user should take care of the data lifetime because
Dagda does not duplicate the data pointed by the passed pointer. For example, if the
program uses a local variable reference to add a data to the Dagda hierarchy and goes
out of the variable scope, a crash could occured because the data pointer could be freed
by the system before Dagda has finished to read it.
Dagda asynchronous put macros/functions
The arguments to these functions are the same than for the synchronous ones. See Section
14.4.2 for more details. All of these functions return a reference to the data transfer which
is an unsigned int. This value will be passed to the “dagda wait data ID” function.
c INRIA, ENS-Lyon, UCBL, CNRS, SysFera
Page 124
DIET User’s Manual
- dagda_put_scalar_async(void* value, diet_base_type_t base_type,
diet_persistence_mode_t mode)
- dagda_put_vector_async(void* value, diet_base_type_t base_type,
diet_persistence_mode_t mode, size_t size)
- dagda_put_matrix_async(void* value, diet_base_type_t base_type,
diet_persistence_mode_t mode, size_t nb_rows,
size_t nb_cols, diet_matrix_order_t order)
- dagda_put_string_async(char* value, diet_persistence_mode_t mode)
- dagda_put_file_async(char* path, diet_persistence_mode_t mode)
After a call to one of these functions, the user can obtain the data ID by calling the
“dagda wait data ID” function with a transfer reference.
- dagda_wait_data_ID(unsigned int transferRef, char** ID):
The “transferRef ” argument is the value returned by a “dagda put * async” function. The “ID” content will be initialized to a pointer on the data ID.
Dagda asynchronous get macros/functions
The only argument needed for one of these functions is the data ID. All of these functions
return a reference to the data transfer which is an unsigned int. This value will be passed
to the corresponding “dagda wait *” functions described later.
- dagda_get_scalar_async(char* ID)
- dagda_get_vector_async(char* ID)
- dagda_get_matrix_async(char* ID)
- dagda_get_string_async(char* ID)
- dagda_get_file_async(char* ID)
After asking for an asynchronous transfer, the user has to wait the end by calling the
corresponding “dagda wait *” function. The arguments of these functions are the same
than for the synchronous “dagda get *” functions. See Section 14.4.2 for more details.
- dagda_wait_scalar(unsigned int transferRef, void** value,
diet_base_type_t* base_type)
- dagda_wait_vector(unsigned int transferRef, void** value,
diet_base_type_t* base_type, size_t* size)
- dagda_wait_matrix(unsigned int transferRef, void** value,
diet_base_type_t* base_type, size_t* nb_r,
size_t* nb_c, diet_matrix_order_t* order)
c INRIA, ENS-Lyon, UCBL, CNRS, SysFera
Page 125
DIET User’s Manual
- dagda_wait_string(unsigned int transferRef, char** value)
- dagda_wait_file(unsigned int transferRef, char** path)
A plugin scheduler developer often wants to make an asynchronous data transfer to
the local Diet node. Problems can arise if you want to wait the completion of the
tranfer before returning. But with the previously defined functions, Dagda maintains a
reference to the transfer thread which will be released after a call to the waiting function.
To avoid Dagda to keep infinitely these references, the user should call the “dagda load *”
functions instead of the “dagda get * async” ones.
- dagda_load_scalar(char* ID)
- dagda_load_vector(char* ID)
- dagda_load_matrix(char* ID)
- dagda_load_string(char* ID)
- dagda_load_file(char* ID)
14.4.4
Data checkpointing with Dagda
Dagda allows the SeD administrator to choose a file where Dagda will store all the
data it’s managing. When a SeD has a configured and valid path name to a backup
file (“dataBackupFile” option in the configuration file), a client can ask to the agents or
SeDs Dagda components to save the data.
The dagda_save_platform() function, which can only be called from a client, records
all the data managed by the agents’ or SeDs’ Dagda components that allow it.
Then, the “restoreOnStart” configuration file option asks to the Dagda component to
restore the data stored on the “dataBackupFile” file when the component starts. This
mechanism allows to stop the Diet platform for a while and restart it conserving the
same data distribution.
14.4.5
Create data ID aliases
For many applications using large sets of data shared by several users, to use an automatically generated ID to retrieve a data is difficult or even impossible. Dagda allows
the user to define data aliases, using human readable and expressive strings to retrieve a
data ID. Two functions are defined to do it:
- dagda_data_alias(const char* id, const char* alias):
Tries to associate “alias” to “id”. If the alias is already defined, returns a non zero
value. A data can have several aliases but an alias is always associated to only one
data.
- dagda_id_from_alias(const char* alias, char** id):
This function tries to retrieve the data id associated to the alias.
c INRIA, ENS-Lyon, UCBL, CNRS, SysFera
Page 126
DIET User’s Manual
14.4.6
Data replication
After a data has been added to the Dagda hierarchy, the users can choose to replicate it
explicitely on one or several Diet nodes. With the current Dagda version, we allow to
choose the nodes where the data will be replicated by hostname or Dagda component
ID. In future developments, it will be possible to select the nodes differently. To maintain
backward compatibility, the replication function uses a C-string to define the replication
rule.
- dagda_replicate_data(const char* id, const char* rule)
The replication rule is defined as follows:
“<Pattern target>:<identification pattern>:<Capacity overflow behavior>”
• The pattern target can be “ID” or “host”.
• The identification pattern can contain some wildcards characters. (for example
“*.lyon.grid5000.fr” is a valid pattern.
• The capacity overflow behavior can be “replace” or “noreplace”. “replace” means
the cache replacement algorithm will be used if available on the target node (a data
could be deleted from the node to leave space to store the new one). “noreplace”
means that the data will be replicated on the node if and only if there is enough
storage capacity on it.
For example, “host:capricorne-*.lyon.*:replace” is a valid replication rule.
14.5
On the correct usage of Dagda
Some things to keep in mind when using Dagda as data manager for Diet:
• All the data managed by Dagda are entirely managed by Dagda: The user don’t
have to free them. Dagda avoids memory leaks, so the user does not have to worry
about the memory management for the data managed by Dagda.
• When using more than one Dagda component on a node, the user should define
a different storage directory for each component. For example, the Master Agent
and one SeD are launched on the same computer: the user can define the storage
directory of the Master Agent as “/tmp/MA” and the one for the SeD as “/tmp/SeD1”. Do not forget to create the directories before to use Dagda. This tip
avoids many bugs which are really hard to find.
• The Dagda API can be used to transfer the parameters of a service, but it should
not be used as this. If an application needs a data which is only on the client,
the user should transmit it through the profile. The Dagda API should be used
to share, replicate or retrieve an existing data. Using the API allows the user
c INRIA, ENS-Lyon, UCBL, CNRS, SysFera
Page 127
DIET User’s Manual
to optimize their applications, not to proceed to a diet call even if it works fine.
Indeed, the Dagda client component is not linked to the Diet hierarchy, so using
the API to add a data and then to use it as a profile parameter makes Dagda to
do additional and useless transfers.
• Dagda can be used without any configuration, but it is always a good idea to
define all the Dagda parameters in the configuration files.
For any comment or bug report on Dagda, please contact G. Le Mahec at the following e-mail address: [email protected].
14.6
Future works
The next version of Dagda will allow the users to develop their own cache replacement
algorithms and network capacity measurements methods. Dagda will be separated in
two parts: A data management interface and the Dagda data manager itself. Dagda
will implement the GridRPC data management API extension.
c INRIA, ENS-Lyon, UCBL, CNRS, SysFera
Page 128
DIET User’s Manual
Chapter 15
Dynamic management
15.1
Dynamically modifying the hierarchy
15.1.1
Motivations
So far we saw that Diet’s hierarchy was mainly static: once the shape of the hierarchy
chosen, and the hierarchy deployed, the only thing you can do is kill part of the hierarchy,
or add new subtrees to the existing hierarchy. But whenever an agent is killed, the
whole underlying hierarchy is lost. This has several drawbacks: some SeD will become
unavailable, and if you want to reuse the machines on which those SeD (or agents) are,
you need to kill the existing Diet element, and redeploy a new subtree. Another problem
due to this static asignement of the parent/children links is that if you have an agent that
is overloaded, you cannot move part of its children to an underloaded agent somewhere
else in the hierarchy without once again killing part of the hierarchy, and deploying once
again.
15.1.2
“And thus it began to evolve”
Hence, Diet also has a built-in mode in which you can dynamically modify its shape
using CORBA calls. In this mode, if a Diet element cannot reach its parent, when
initializing, it won’t exit, but will wait for an order to connect itself to a new parent.
Hence, you do not need to deploy Diet starting from the MA down to the SeD, you can
launch all the elements at once, and then, send the orders for each element to connect
to its correct parent (you do not even need to follow the shape of the tree, you can start
from the bottom to the tree up to the root, or use a random order, the service tables will
be correctly initialized.)
You now have access to the following CORBA methods:
• long bindParent(in string parentName): sends an order to a SeD or agent to
bind to a new parent having the name “parentName” if this parent can be contacted,
otherwise the element keeps its old parent. If the element already has a parent, it
unsubscribes itself from the parent, so that this latter is able to update its service
c INRIA, ENS-Lyon, UCBL, CNRS, SysFera
Page 129
DIET User’s Manual
table and list of children. A null value is returned if the change occurred, otherwise
a value different from 0 is returned if a problem occurred.
• long disconnect(): sends an order to disconnect an element from its parent. This
does not kill the element, but merely removes the link between the element and its
parent. Thus, the underlying hierarchy will be unreachable until the element is
connected to a new parent.
• long removeElement(): sends an order to a SeD to kill itself. The SeD first
unsubscribe from its parent before ending itself properly.
• long removeElement(in boolean recursive): same as above but for agents.
The parameter “recursive” if true also destroys the underlying hierarchy, otherwise only the agent is killed.
Now, what happens if during a request submission an element receives an order to
change its parent? Actually, nothing will change, as whenever a request is received a
reference to the parent from which the request originates is locally kept. So if the parent
changes before the request is sent back to the parent, as we keep a local reference on the
parent, the request will be sent back to the correct “parent”. Hence, for a short period
of time, an element can have multiple parents.
WARNING: currently no control is done on whether or not you are creating loops in the hierarchy when changing a parent.
15.1.3
Example
Two examples on how to call those CORBA methods are present in
src/examples/dynamic hierarchy:
• connect.cc sends orders to change the parent of an element.
Usage: ./connect <SED|LA> <element name> <parent name>.
• disconnect.cc sends orders to disconnect an element from its parent. It does not
kill the element, but only disconnects it from the Diet hierarchy (useful when your
platform is not heavily loaded and you want to use only part of the hierarchy)
Usage: ./disconnect <SED|LA> <element name>.
• remove.cc sends orders to remove an element.
Usage: ./remove <SED|AGENT> <element name> [recursive:
15.2
Changing offered services
15.2.1
Presentation
0|1]
A SeD does not necessarily need to declare all its services initially, i.e., as presented in
Chapter 5 before launching the SeD via diet_SeD(...). One could want to initially
c INRIA, ENS-Lyon, UCBL, CNRS, SysFera
Page 130
DIET User’s Manual
declare a given set of services, and then, depending on parameters, or external events,
one could want to modify this set of services. An example of such usage is to spawn
a service that is in charge of cleaning temporary files when they won’t be needed nor
by this SeD, nor by any other SeD or clients, and when this service is called, it cleans
whatever needs to be cleaned, and then this service is removed from the service table.
Adding a service has already been introduced in Chapter 5: using diet_service_table_add(...)
you can easily add a new service (be it before running the SeD or within a service). Well,
removing a service is as easy, you only need to call one of these methods:
int diet_service_table_remove(const diet_profile_t* const profile);
int diet_service_table_remove_desc(const diet_profile_desc_t* const profile);
So basically, when you want to remove the service that is called, you only need to pass
the diet_profile_t you receive in the solve function to diet_service_table_remove.
If you want to remove another service, you need to build its profile description (just as if
you wanted to create a new service), and pass it to diet_service_table_remove_desc.
15.2.2
Example
The following example (present in src/examples/dyn add rem) initially declares one
service. This service receives an integer n as parameter. It creates n services, and
removes the service that has just been called. Hence a service can only be called once,
but it spawns n new services.
#include <iostream>
#include <sstream>
#include <cstring>
#include "DIET_server.h"
#include "DIET_Dagda.h"
/* begin function prototypes*/
int service(diet_profile_t *pb);
int add_service(const char* service_name);
/* end function prototypes*/
static unsigned int NB = 1;
template <typename T>
std::string toString( T t ) {
std::ostringstream oss;
oss << t;
return oss.str();
}
/* Solve Function */
int
service(diet_profile_t* pb) {
int *nb;
c INRIA, ENS-Lyon, UCBL, CNRS, SysFera
Page 131
DIET User’s Manual
if (pb->pb_name)
std::cout << "## Executing " << pb->pb_name << std::endl;
else {
std::cout << "## ERROR: No name for the service" << std::endl;
return -1;
}
diet_scalar_get(diet_parameter(pb,0), &nb, NULL);
std::cout << "## Will create " << *nb << " services." << std::endl;
for (int i = 0; i < *nb; i++) {
add_service(std::string("dyn_add_rem_" + toString(NB++)).c_str());
}
std::cout << "## Services added" << std::endl;
diet_print_service_table();
/* Removing */
std::cout << "## Removing service " << pb->pb_name << std::endl;
#ifdef HAVE_ALT_BATCH
pb->parallel_flag = 1;
#endif
diet_service_table_remove(pb);
std::cout << "## Service removed" << std::endl;
/* Print service table */
diet_print_service_table();
return 0;
}
/* usage function */
int
usage(char* cmd) {
std::cerr << "Usage: " << cmd << " <SeD.cfg>" << std::endl;
return -1;
}
/* add_service function: declares SeD’s service */
int
add_service(const char* service_name) {
diet_profile_desc_t* profile = NULL;
unsigned int pos = 0;
/* Set profile parameters: */
profile = diet_profile_desc_alloc(strdup(service_name),0,0,0);
diet_generic_desc_set(diet_param_desc(profile,pos++),DIET_SCALAR, DIET_INT);
/* Add service to the service table */
if (diet_service_table_add(profile, NULL, service )) return 1;
/* Free the profile, since it was deep copied */
c INRIA, ENS-Lyon, UCBL, CNRS, SysFera
Page 132
DIET User’s Manual
diet_profile_desc_free(profile);
std::cout << "Service ’" << service_name << "’ added!" << std::endl;
return 0;
}
int checkUsage(int argc, char ** argv) {
if (argc != 2) {
usage(argv[0]);
exit(1);
}
return 0;
}
/* MAIN */
int
main( int argc, char* argv[]) {
int res;
std::string service_name = "dyn_add_rem_0";
checkUsage(argc, argv);
/* Add service */
diet_service_table_init(1);
add_service(service_name.c_str());
/* Print service table and launch daemon */
diet_print_service_table();
res = diet_SeD(argv[1],argc,argv);
return res;
}
15.2.3
Going further
Finally, another example is provided in src/examples/dynamicServiceMgr showing how
to dynamically load and unload libraries containing services. Hence, a client can send a
library to as server, and for as long as the library is compiled for the right architecture,
the server will be able to load it, and instanciate the service present in the library. The
service can further be called by other clients, and whenever it is not required anymore,
it can be easily removed.
c INRIA, ENS-Lyon, UCBL, CNRS, SysFera
Page 133
DIET User’s Manual
c INRIA, ENS-Lyon, UCBL, CNRS, SysFera
Page 134
DIET User’s Manual
Chapter 16
Diet forwarders
The Diet middleware uses CORBA as its communication layer. It is an easy and flexible
way for the different platform components to communicate. However, deploying Diet
on heterogeneous networks that are not reachable from each other except through ssh
connection is a complicated task needing complex configuration. Moreover, to ensure that
all objects can contact each others, we need to set-up and launch ssh tunnels between
each of them, reducing significantly the Diet scalability in that network configuration
context.
The Diet forwarders are the solution for such a situation, by reducing the number
of ssh tunnels to the minimum and making their launch totally transparent for the final
users. The Diet forwarders configuration is very simple even for very complex network
topologies.
The next section presents the global operation of Diet forwarders. Section 16.2
presents the DietForwarder executable, its command-line options and configuration file.
Then, section 16.3 gives two examples of forwarder configurations.
16.1
Easy CORBA objects connections through ssh
Each CORBA object in Diet is reachable through omniORB using a TCP port and
the hostname of the machine on which it is executed. By default these parameters
are fixed automatically by omniORB but it is also possible to choose them statically
using the Diet configuration file. When two objects are located on different networks
that are reachable only through ssh, it is easy to open an ssh tunnel to redirect the
communications between them on the good port and host. Then, correcting the objects
bindings into the omniNames servers is sufficient to ensure the communications between
the different objects. To allow two CORBA objects to communicate through an ssh
tunnel, users must:
• Start the process which declares the objects and register them into the omniNames
server(s).
• Open ssh tunnels that redirect the local objects ports to remote ports.
c INRIA, ENS-Lyon, UCBL, CNRS, SysFera
Page 135
DIET User’s Manual
• Modify the objects bindings in the omniNames server(s) to make them point to the
forwarded ports.
When using few objects that do not need much interaction, these steps can easily
be done “manually”. But Diet uses several different objects for each element and is
designed to manage thousands of nodes. Moreover, creating an ssh tunnel between all
the nodes of a Grid cannot even be considered.
The Diet forwarders deal with this problem by creating proxy objects that forward
the communications to a peer forwarder through a unique ssh tunnel. Then, only one
ssh tunnel is created to connect two different networks. This system also allows users
to define complex communications routing. Figure 16.1 shows how the Diet forwarders
work to route communications through ssh tunnels. Moreover most of the configuration
of the forwarders automatically can be set by Diet itself.
Figure 16.1: Forwarders routing Diet communication through ssh tunnels
16.2
The DietForwarder executable
Since Diet 2.5, when installing Diet, an executable called DIETForwarder is installed
on the bin directory. It allows to launch a forwarder object following the configuration
passed on the command line.
16.2.1
Command line options
The Diet forwarder executable takes several options to be launched:
• --name: to define the name of the forwarder.
• --peer-name: the name of its peer on the other network.
c INRIA, ENS-Lyon, UCBL, CNRS, SysFera
Page 136
DIET User’s Manual
• --ssh-host: the ssh host for the tunnel creation.
• --ssh-port: the port to use to establish the ssh connection (by default: 22).
• --ssh-login: the login to use to establish the ssh connection (by default: current
user login).
• --ssh-key: the private key to use to establish the ssh connection (by default:
$HOME/.ssh/id_rsa).
• --remote-port: the port to listen on the ssh host (by default: the remote forwarder
tries to dermine an available port automatically, note that if the connection fails
when you do not use this option, then you have to specify the remote port).
• --remote-host: the host to which the connection is made by the tunnel (corresponds to host in the ssh options -L and -R).
• --nb-retry: the number of times the local forwarder tries to bind itself to the
distant forwarder (default is 3).
• --peer-ior: if you already know the IOR of the distant forwarder, then you can
pass it to your local forwarder. By default, the local forwarder retrieves the IOR of
its peer.
• --tunnel-wait: the time is seconds that the forwarder will wait while opening the
ssh tunnel.
The remote port can be chosen randomly among the available TCP ports on the remote host. Sometimes, depending on the configuration of sshd, you will need to set
--remote-host to localhost or 127.0.0.1 (or the address of the local loopback if it
is not 127.0.0.1) for the tunnel to work correctly (in fact, most problems come from a
badly configured tunnel).
In order, to activate a Diet forwarder, users must:
• Launch omniNames on the remote and local hosts.
• Launch the first peer on the remote host, only defining its name and its network
configuration.
• Launch the second peer, passing it it the first peer name, the ssh connection informations, the remote port to use and its network configuration.
Rem: The forwarders must be launched before the Diet hierarchy.
c INRIA, ENS-Lyon, UCBL, CNRS, SysFera
Page 137
DIET User’s Manual
16.3
Configuration examples
The first example presents the configurations of Diet forwarders to connect a SeD located
on a network only reachable through ssh to a Diet hierarchy located on another network.
The second example presents the configurations of Diet forwarders to connect three
networks: the first one can only reach the second one through ssh and the third one
can also only reach the second one through ssh. We want to connect Diet elements
distributed over the three networks.
16.3.1
Simple configuration
• The two different domains are net1 and net2. The forwarders will be launched on
the hosts fwd.net1 and fwd.net2.
• There is no possibility to access fwd.net1 from fwd.net2 but users can access
fwd.net2 from fwd.net1 using an ssh connection.
• The forwarder on fwd.net1 is named Fwd1, the forwarder on fwd.net2 is named
Fwd2.
• One SeD is launched on fwd.net2, the rest of the Diet hierarchy is launched on the
net1 domain.
Command line to launch Fwd1 :
fwd.net1$ dietForwarder
name Fwd1 −−peer-name Fwd2 \
−−ssh-host fwd.net2 −−ssh-login dietUser \
−−ssh-key id rsa net2 −−remote-port 50000
−−
Command line to launch Fwd2 :
fwd.net2$ dietForwarder
name Fwd2
−−
Note that Fwd2 has to be launched before Fwd1. When the two forwarders are
launched, the user can deploy his Diet hierarchy. All the communications through Diet
forwarders are transparent.
16.3.2
Complex network topology
To connect the three domains, we need 4 forwarders (2 pairs): one on net1, two on net2
and one on net3.
• The three domains are: net1, net2 and net3.
• The machines located on net1 and net3 are only reachable from fwd.net2 through
ssh.
c INRIA, ENS-Lyon, UCBL, CNRS, SysFera
Page 138
DIET User’s Manual
• The four forwarders are named Fwd1, Fwd2-1, Fwd2-3 and Fwd3.
• The Diet hierarchy is distributed on the three networks.
Command line to launch Fwd1 :
fwd.net1$ dietForwarder
name Fwd1
−−
Command line to launch Fwd2-1 :
fwd.net2$ dietForwarder
name Fwd2-1 −−peer-name Fwd1 \
−−ssh-host fwd.net1 −−ssh-login dietUser \
−−ssh-key id rsa net1 −−remote-port 50000
−−
Command line to launch Fwd2-3 :
fwd.net2$ dietForwarder
name Fwd2-3 −−peer-name Fwd3 \
ssh-host fwd.net3 −−ssh-login dietUser \
−−ssh-key id rsa net3 −−remote-port 50000
−−
−−
Command line to launch Fwd3 :
fwd.net3$ dietForwarder
name Fwd3
−−
Using this configuration, a communication from a host on net1 to a host on net3 is
first routed from Fwd1 to Fwd2-1 and then from Fwd2-3 to Fwd3. Note that Fwd1 has
to be launched before Fwd2-1, and Fwd3 has to be launched before Fwd2-3.
c INRIA, ENS-Lyon, UCBL, CNRS, SysFera
Page 139
DIET User’s Manual
c INRIA, ENS-Lyon, UCBL, CNRS, SysFera
Page 140
DIET User’s Manual
Appendix A
Appendix
A.1
Configuration files
agentType
• Component: Agent (MA and LA)
• Mode: All
• Type: Agent type
• Description: Master Agent or Local Agent? As there is only one executable
for both agent types, it is COMPULSORY to specify the type of this agent:
DIET MASTER AGENT (or MA) or DIET LOCAL AGENT (or LA).
batchName
• Component: SeD
• Mode: Batch
• Type: String
• Description: The reservation batch system’s name.
batchQueue
• Component: SeD
• Mode: Batch
• Type: String
• Description: The name of the queue where the job will be submitted.
bindServicePort
• Component: MA
• Mode: All
• Type: Integer
c INRIA, ENS-Lyon, UCBL, CNRS, SysFera
Page 141
DIET User’s Manual
• Description: port used by the Master Agent to share its IOR.
cacheAlgorithm
• Component: All
• Mode: Dagda
• Type: String
• Description: The cache replacement algorithm used when Dagda needs more
space to store a data. Possible values are: LRU, LFU, FIFO. By default, no
cache replacement algorithm. Dagda never replace a data by another one.
clientMaxNbSeD
• Component: Client
• Mode: All
• Type: Integer
• Description: The maximum number of SeD the client should receive.
dataBackupFile
• Component: Agent and SeD
• Mode: Dagda
• Type: String
• Description: The path to the file that will be used when Dagda save all its
stored data/data path when asked by the user (Checkpointing). By default,
no checkpointing is possible.
dietHostName
• Component: All
• Mode: All
• Type: String
• Description: the listening interface of the agent. If not specified, let the ORB
get the hostname from the system (the first one if several one are available).
dietPort
• Component: All
• Mode: All
• Type: Integer
• Description: the listening port of the agent. If not specified, let the ORB get
a port from the system (if the default 2809 was busy).
c INRIA, ENS-Lyon, UCBL, CNRS, SysFera
Page 142
DIET User’s Manual
forceRebind
• Component: Client
• Mode: All
• Type: Boolean
• Description: force clients rebinding into CORBA Naming Service (default :
true).
initRequestID
• Component: MA
• Mode: All
• Type: Integer
• Description: When a request is sent to the Master Agent, a request ID is
associated and by default it begins at 1. If this parameter is provided, it will
begins at initRequestID.
internOARbatchQueueName
• Component: SeD
• Mode: Batch
• Type: String
• Description: only useful when using CORI batch features with OAR 1.6
locationID
• Component: SeD
• Mode: Dagda
• Type: String
• Description: This parameter is used for alternative transfer cost prediction.
lsOutbuffersize
• Component: Agent and SeD
• Mode: All
• Type: Integer
• Description: the size of the buffer for outgoing messages.
lsFlushinterval
• Component: Agent and SeD
• Mode: All
c INRIA, ENS-Lyon, UCBL, CNRS, SysFera
Page 143
DIET User’s Manual
• Type: Integer
• Description: the flush interval for the outgoing message buffer.
MADAGNAME
• Component: Client
• Mode: Workflow
• Type: String
• Description: the name of the MADAG agent to wich the client will connect.
MAName
• Component: Client
• Mode: All
• Type: String
• Description: Master Agent name. The ORB configuration files of the clients
and the children of this MA (LAs and SeDs) must point at the same CORBA
Naming Service as the one pointed at by the ORB configuration file of this
agent.
maxConcJobs
• Component: SeD
• Mode: All
• Type: Integer
• Description: If useConcJobLimit == true, how many jobs can run at once?
This shoudl be used in conjunction with maxConcJobs.
maxDiskSpace
• Component: All
• Mode: Dagda
• Type: Integer
• Description: The maximum disk space used by Dagda to store the data. If set
to 0, Dagda will not take care of the disk usage. By default this value is equal
to the available disk space on the disk partition chosen by the storageDirectory
option.
maximumNeighbours
• Component: MA
• Mode: Integer
c INRIA, ENS-Lyon, UCBL, CNRS, SysFera
Page 144
DIET User’s Manual
• Type: Multi MA
• Description: maximum number of connected neighbours. The agent does not
accept a greater number of connection to build the federation than maximumNeighbours.
maxMemSpace
• Component: All
• Mode: Dagda
• Type: Integer
• Description: The maximum memory space used by Dagda to store the data.
If set to 0, Dagda will not take care of the memory usage. By default no
maximum memory usage is set. Same effect than to choose 0.
maxMsgSize
• Component: All
• Mode: Dagda
• Type: Integer
• Description: The maximum size of a CORBA message sent by Dagda. By
default this value is equal to the omniORB giopMaxMsgSize size.
minimumNeighbours
• Component: MA
• Mode: Multi MA
• Type: Integer
• Description: Minimum number of connected neighbours. If the agent has
less that this number of connected neighbours, is going to find some new
connections.
moduleConfigFile
• Component: Agent
• Mode: User scheduling
• Type: String
• Description: Optional configuration file for the module.
name
• Component: Agent and SeD
• Mode: All
c INRIA, ENS-Lyon, UCBL, CNRS, SysFera
Page 145
DIET User’s Manual
• Type: String
• Description: The name of the element. This parameter is not mandatory for
a SeD as it can generate a name during launch time.
neighbours
• Component: MA
• Mode: Multi MA
• Type: String
• Description: A list of Master Agent that must be contacted to build a federation. The format is a list of host:port.
parentName
• Component: LA and SeD
• Mode: All
• Type: String
• Description: the name of the agent to which the element will register. This
agent must have registered at the same CORBA Naming Service that is pointed
to by your ORB configuration.
pathToNFS
• Component: SeD
• Mode: Batch
• Type: String
• Description: Path to an NFS directory where you have read/write rights.
pathToTmp
• Component: SeD
• Mode: Batch
• Type: String
• Description: Path to a temporary directory where you have read/write rights.
restoreOnStart
• Component: Agent and SeD
• Mode: Dagda
• Type: Boolean
• Description: Dagda will load the dataBackupFile file at start and restore all
the data recorded at the last checkpointing event. Possible values are 0 or 1.
By default, no file loading on start - 0.
c INRIA, ENS-Lyon, UCBL, CNRS, SysFera
Page 146
DIET User’s Manual
schedulerModule
• Component: Agent
• Mode: User scheduling
• Type: String
• Description: The path to the scheduler library file containing the implementation of the plugin scheduler class.
shareFiles
• Component: Agent
• Mode: Dagda
• Type: Boolean
• Description: The Dagda component shares its file data with all its children
(when the path is accessible by them, for example, if the storage directory is
on a NFS partition). Value can be 0 or 1. By default no file sharing - 0.
storageDirectory
• Component: All
• Mode: Dagda or Batch
• Type: String
• Description: The directory on which Dagda will store the data files. By
default /tmp is used.
traceLevel
• Component: All
• Mode: All
• Type: Integer
• Description: traceLevel for the Diet agent:
–
–
–
–
–
–
0 Diet do not print anything,
1 Diet prints only warnings and errors on the standard error output,
2 [default] Diet prints information on the main steps of a call,
5 Diet prints information on all internal steps too,
10 Diet prints all the communication structures too,
> 10 (traceLevel - 10) is given to the ORB to print CORBA messages too.
updateLinkPeriod
• Component: MA
c INRIA, ENS-Lyon, UCBL, CNRS, SysFera
Page 147
DIET User’s Manual
• Mode: Multi MA
• Type: Integer
• Description: The agent check at a regular time basis that all it’s neighbours
are still alive and try to connect to a new one if the number of connections is
less than minimumNeighbours. updateLinkPeriod indicate the period in second
between two checks.
useConcJobLimit
• Component: SeD
• Mode: All
• Type: Boolean
• Description: should SeD restrict the number of concurrent solves? This should
be used in conjunction with maxConcJobs.
useLogService
• Component: Agent and SeD
• Mode: All
• Type: Boolean
• Description: 1 to use the LogService for monitoring.
USE SPECIFIC SCHEDULING
• Component: Client
• Mode: Custom Client Scheduling (CCS)
• Type: String
• Description: This option specifies the scheduler the client will use whenever it
submits a request:
– BURST REQUEST: round robin on the available SeD
– BURST LIMIT: only allow a certain number of request per SeD in parallel
the limit can be set with ”void setAllowedReqPerSeD(unsigned ix)”
c INRIA, ENS-Lyon, UCBL, CNRS, SysFera
Page 148
DIET User’s Manual
Bibliography
[1] D. Arnold, S. Agrawal, S. Blackford, J. Dongarra, M. Miller, K. Sagi, Z. Shi, and
S. Vadhiyar. Users’ Guide to NetSolve V1.4. Computer Science Dept. Technical
Report CS-01-467, University of Tennessee, Knoxville, TN, July 2001. http://www.
cs.utk.edu/netsolve/.
[2] F. Cappello, F. Desprez, M. Dayde, E. Jeannot, Y. Jegou, S. Lanteri, N. Melab,
R. Namyst, P. Primet, O. Richard, E. Caron, J. Leduc, and G. Mornet. Grid’5000:
A large scale, reconfigurable, controlable and monitorable grid platform. In Proceedings of the 6th IEEE/ACM International Workshop on Grid Computing, Grid’2005,
Seattle, Washington, USA, November 2005.
[3] Eddy Caron, Pushpinder Kaur Chouhan, and Frédéric Desprez. Automatic middleware deployment planning on heterogeneous platfoms. In The 17th Heterogeneous
Computing Workshop (HCW’08), Miami, Florida, April 2008. In conjunction with
IPDPS 2008.
[4] Eddy Caron, Pushpinder Kaur Chouhan, and Arnaud Legrand. Automatic deployment for hierarchical network enabled server. In The 13th Heterogeneous Computing
Workshop (HCW 2004), page 109b (10 pages), Santa Fe. New Mexico, April 2004.
[5] Eddy Caron and Holly Dail. Godiet: a tool for managing distributed hierarchies
of diet agents and servers. Research report 2005-06, Laboratoire de l’Informatique
du Paralllisme (LIP), February 2005. Also available as INRIA Research Report
RR-5520.
[6] Eddy Caron, Benjamin Depardon, and Frédéric Desprez. Modelization for the Deployment of a Hierarchical Middleware on a Heterogeneous Platform. Research Report RR-7309, INRIA, 06 2010. Also available as LIP Research Report RRLIP201019.
[7] Eddy Caron, Benjamin Depardon, and Frédéric Desprez. Modelization for the Deployment of a Hierarchical Middleware on a Homogeneous Platform. Research Report
RR-7201, INRIA, 02 2010. Also available as LIP Research Report RRLIP2010-10.
[8] Eddy Caron and Frédéric Desprez. DIET: A scalable toolbox to build network
enabled servers on the grid. International Journal of High Performance Computing
Applications, 20(3):335–352, 2006.
c INRIA, ENS-Lyon, UCBL, CNRS, SysFera
Page 149
DIET User’s Manual
[9] Condor-G. http://www.cs.wisc.edu/condor/condorg/.
[10] M.C. Ferris, M.P. Mesnier, and J.J. Mori. NEOS and Condor: Solving Optimization
Problems Over the Internet. ACM Transaction on Mathematical Sofware, 26(1):1–
18, 2000. http://www-unix.mcs.anl.gov/metaneos/publications/index.html.
[11] C. Germain, G. Fedak, V. Néri, and F. Cappello. Global computing systems. Lecture
Notes in Computer Science, 2179:218–227, 2001.
[12] Globus. http://www.globus.org/.
[13] Sun GridEngine. http://wwws.sun.com/software/gridware/.
[14] GridRPC Working
gridrpc-wg/.
Group.
https://forge.gridforum.org/projects/
[15] S. Matsuoka, H. Nakada, M. Sato, and S. Sekiguchi. Design Issues of Network
Enabled Server Systems for the Grid. http://www.eece.unm.edu/∼dbader/grid/
WhitePapers/satoshi.pdf, 2000. Grid Forum, Advanced Programming Models
Working Group whitepaper.
[16] Nagios. http://www.nagios.org.
[17] H. Nakada, S. Matsuoka, K. Seymour, J. Dongarra, C. Lee, and H. Casanova.
GridRPC: A Remote Procedure Call API for Grid Computing. In Grid 2002, Workshop on Grid Computing, number 2536 in Lecture Notes in Computer Science, pages
274–278, Baltimore, MD, USA, November 2002.
[18] H. Nakada, M. Sato, and S. Sekiguchi. Design and Implementations of Ninf: towards a Global Computing Infrastructure. Future Generation Computing Systems,
Metacomputing Issue, 15(5-6):649–658, 1999. http://ninf.apgrid.org/papers/
papers.shtml.
[19] OMNIORB. http://www.uk.research.att.com/omniORB/.
[20] Andy Oram, editor. Peer-to-Peer: Harnessing the Benefits of a Disruptive Technology. O’Reilly, 2001.
[21] Federico D. Sacerdoti, Mason J. Katz, Matthew L. Massie, and David E Culler.
Wide area cluster monitoring with ganglia, 2003.
[22] M. Sato, M. Hirano, Y. Tanaka, and S. Sekiguchi. OmniRPC: A Grid RPC Facility
for Cluster and Global Computing in OpenMP. Lecture Notes in Computer Science,
2104:130–136, 2001.
[23] Keith Seymour, Hidemoto Nakada, Satoshi Matsuoka, Jack Dongarra, Craig Lee,
and Henri Casanova. Overview of GridRPC: A Remote Procedure Call API for
Grid Computing. In Manish Parashar, editor, Grid Computing - GRID 2002, Third
International Workshop, Baltimore, MD, USA, November 18, 2002, Proceedings,
volume 2536 of LNCS, pages 274–278. Springer, 2002.
c INRIA, ENS-Lyon, UCBL, CNRS, SysFera
Page 150
DIET User’s Manual
[24] Haluk Topcuouglu, Salim Hariri, and Min you Wu. Performance-effective and lowcomplexity task scheduling for heterogeneous computing. IEEE Trans. Parallel Distrib. Syst., 13(3):260–274, 2002.
c INRIA, ENS-Lyon, UCBL, CNRS, SysFera
Page 151


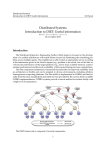
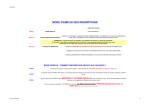
![[U4.52.02] Macro-commande MACRO_MODE_MECA](http://vs1.manualzilla.com/store/data/006360976_1-a4248eaaadfb88c0685de49fb5990c7b-150x150.png)