1
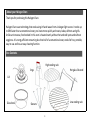
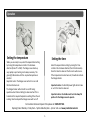
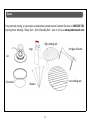
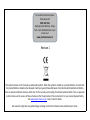
12 Litre Halogen Oven
User manual
Model number G2SH03001
Please read these instructions carefully and keep them for future reference
For Customer Services & Spare Parts please call 0845 209 7461
Opening times: Monday - Friday 9am – 5pm & Saturday 9am – 1pm or visit us at www.productcareuk.com
CONTENT:
Page
Safety Instructions…………………………...................... 2
About your Halogen Oven………………….………………. 3
Box contents………................................................... 3
Before use & Preparation........................................4
Operation……….....................................................… 5
Pre-heating………..................................................... 6
Cooking Food….……………………………………………………7
Guidelines…………………..……………………………..…….. 8-9
Cooking guideline table………………………….…….…… 10
Recipes…………………………………………..………………. 11-12
Cleaning & Care………………………………….……………… 13
Spares……………………………………………………………….. 14
Connection to the mains supply………………………… 15
Guarantee…………………………………………………………. 16
SAFETY INSTRUCTIONS:
Important safety instructions:When using this appliance, basic safety precautions should always
be followed.
Read and Retain instructions: All operating instructions, safety for
the user and others should be read before operation and retained
for future reference.
Heed all warnings: should be adhered to.
Unplug from mains power socket when not in use.
Warning: To reduce the risk of an electrical shock or damage to
the product, do not immerse the plug, cables or lid in water or
other liquids.
Warning: children should not use this appliance. Close supervision is
necessary when any appliances are used near children.
Warning: this appliance is not intended for use by persons
(including children) with reduced physical, sensory or mental
capabilities, or lack of experience and knowledge, unless they have
been given supervision or instruction concerning use of the
appliance by a person responsible for their safety. Children should
be supervised to make sure that they do not play with the appliance.
DO NOT allow the power cord to hang over the edge of surfaces.
Do not operate any appliance with a damaged cord or plug, or after
the appliance malfunctions or is dropped or damaged in any
manner. The supply cord cannot be replaced. If the cord is
damaged the appliance should be scrapped.
WARNING! - Only use on a safe, stable, heat-proof work surface
WARNING! - DO NOT touch the hot surfaces.
Surfaces remain hot even after the Halogen Oven is switched off.
DO NOT place the Halogen Oven on or near a hot gas or electric
hob or in a heated oven.
Do not use appliance for purpose other than intended usage.
EXTREME caution must be used when handling or disposing of
hot oils or other liquids.
Do not attempt to open the product. Unauthorised handling
of the device may result in an electrical shock or damage to the
device and will void your warranty.
Place cables in a safe manor to avoid Slips, trips and falls.
Do not operate this appliance with an external timer.
Do not remove or lift the oven while power cord is connected
to the wall outlet.
If you are not using the product you should, Turn the time and
temp dials to off position and disconnect the power cord.
If you require to remove the lid you should lift the top using the
carrying handle, then place the top resting the stainless steel
edge rim first on a suitable heat resistant flat surface.
Warning: halogen element is very bright, never look directly into
the element.
Never operate the main unit of the product other than on the bowl.
2
About your Halogen Oven
Thank you for purchasing this Halogen Oven.
Halogen Oven uses technology that cooks using infrared waves from a halogen light source. It cooks up
to 60% faster than a conventional oven, pre-heats more quickly and roasts, bakes, defrosts and grills.
Unlike a microwave, food cooked in this oven is heated evenly without hot and cold spots and without
sogginess. It’s energy efficient consuming less than half of a conventional oven, cooks fat free, portable,
easy to use and has an easy cleaning function.
Box Contents
High cooking rack
Tongs
Hot glass lid stand
Lid
Glass bowl
Low cooking rack
Skewers
3
Before use
Check the halogen oven after unpacking for any visual damage or missing parts such as:
● Misaligned or damaged casing.
● Damage to the plug or cable.
● If any parts are missing i.e. tongs or cooking racks or there is any damage please call customer services.
Thoroughly wash the glass bowl, plastic base, cooking racks and tongs in hot soapy water and allow to dry completely.
Important - do not immerse the glass lid in water or place in a dishwasher.
Once unplugged from the mains power socket, the surface of the glass lid can be carefully wiped clean using a damp cloth or sponge.
Preparation
First check that:•
•
•
•
•
•
The Halogen oven is on stable heat proof surface.
You have a suitable amount of surface space cleared to place the glass lid when removed from the halogen oven.
You have placed the required cooking rack and food inside the glass bowl .
The halogen oven is plugged into the earthed mains power socket.
Power cord is not touching anything potentially hot.
You have oven gloves ready to remove the cooked food.
What cookware items can be used in your halogen oven?
Anything that can be used in a conventional oven for example:- oven safe pans, bowls, plates, tin foil etc. as long as the fan is not
blocked and the lid can be closed fully.
For Customer Services & Spare Parts please call 0845 209 7461
Opening times: Monday - Friday 9am – 5pm & Saturday 9am – 1pm or visit us at www.productcareuk.com
4
Operation
Setting the temperature
Setting the time
When you are ready to use, select the required heat setting
by turning the temperature control in the clockwise
direction (from off to 250C). The halogen oven heats up
very quickly so pre-heating is not always necessary. The
green light illuminates until the required temperature is
reached.
Important notice: The halogen oven will not turn on until
the timer has been set.
Select the required timer setting by turning the Time
control in the clockwise direction (from 0 to 60 minutes).
Once the timer has been set the fan motor will come on.
If the temperature has also been set, this will also activate
the halogen heater.
Important notice:- the Red LED power light will not come
on until the timer has been set.
The halogen heater will turn itself on and off during
operation when the heat setting has been reached. This is
to maintain the required temperature setting. When the set
cooking time has elapsed the halogen oven will turn off.
Important notice:- the handle must be in the down/On
position for the halogen oven to operate.
For Customer Services & Spare Parts please call 0845 209 7461
Opening times: Monday - Friday 9am – 5pm & Saturday 9am – 1pm or visit us at www.productcareuk.com
5
Pre-heating
If pre-heating is required (although the halogen oven heats quickly), adjust the temperature control and set the time control to 5
minutes . Once the temperature has been reached the halogen element will turn off and on, this is the indication the oven has reached
the required temperature. Food can now be placed in the glass bowl and the correct cooking time can be set.
Caution: take care the halogen oven will be hot.
Important note: the time control must not be turned anticlockwise, this may damage the timer. Take care to set the correct time
required.
Warning: do not touch the surface of the halogen oven – it will get extremely got when in use and will remain hot for some time after.
Always remove the glass lid with the handle supplied, as this will de-activate the safety switch and turn off the oven.
Oven gloves are recommended when removing glass lid.
Defrost setting
The Defrost setting ,also shown as clean on the temperature setting.
This setting is a low temperature setting that should be used to defrost foods.
Important note: always ensure food is adequately defrosted before cooking
For Customer Services & Spare Parts please call 0845 209 7461
Opening times: Monday - Friday 9am – 5pm & Saturday 9am – 1pm or visit us at www.productcareuk.com
6
Cooking Food
Cooking: Cooking time depends on the size, weight, type etc. of the food to be cooked. For example most meat comes with
recommended cooking times, but since halogen ovens cooks faster than conventional ovens, you may need to allow less time to cook
the food.
To ensure the food is cooked properly, use a cooking thermometer or pierce the food with a fork or skewer to check for signs of it being
uncooked. When cooking vegetables check for tenderness.
Remember: distribute food evenly in the convection oven to ensure an even flow of air all around the food.
Avoid stacking food in an attempt to cook more food, if air cannot circulate around the food you will only fully cook the top. Always
leave spaces for the air to travel .
Guidance: For some guidance we have provided a few recipes and cooking times on the next few pages.
Always check your food has cooked full before eating.
Hints & Tips: timings may vary according to the weight of the food and individual taste.
When you become familiar with the oven you be able to determine the best cooking times and temperatures to suit your personal
preference.
Use the tongs to remove the cooking racks
7
Guidelines
Vegetables
Biscuits & Pastries
Wash, peel and prepare the vegetables as normal, then wrap the
vegetables into a piece of foil and place on the low rack in the oven – if you
are cooking more then 1 type of vegetables ensure that there are 1cm gap
between parcels. Preheat the oven to 220°C and cook for around 10 – 15
minutes.
Put a baking tray with the mixture onto the high rack, preheat the oven to
between 220°C - 230°C and cook for approximately 12 -15 minutes.
Pies
For already cooked fresh pies preheat the oven to 200°C and using the low
rack, cook them for between 8 – 12 minutes.
Hint – The low and high rack can be used simultaneously to cook a variety
of vegetables, ensure that you put the slower cooking vegetables on the
higher rack and the faster cooking vegetables on the lower rack.
For frozen pies preheat the oven to 200°C and using the low rack, cook
them for between 20 – 25 minutes.
Eggs
Hint – If cooking smaller types of food, (small vegetables), or if steaming
fish it may be necessary to wrap them in foil and place them on top of the
high rack.
Preheat the oven to 200°C and put between 1 and 6 eggs on the high rack
for between 4 – 6 minutes. When the eggs are cooked to your preference
remove them with tongs.
Frozen Food
Larger foods like meat joints or poultry cannot be cooked from frozen and
must be thoroughly thawed before cooking. Some foods can be cooked
from frozen and may actually cook better, simply follow the
manufacturer’s guidelines. However cooking times in the Halogen Oven
are often faster, therefore check and adjust accordingly.
For Customer Services & Spare Parts please call 0845 209 7461
Opening times: Monday - Friday 9am – 5pm & Saturday 9am – 1pm or visit us at www.productcareuk.com
8
Guidelines
Fish
Toasting
Fish can be cooked in a couple of ways in the Halogen oven, these
are: grilling and baking. To steam, preheat the oven to 200°C 250°C for 6 minute, then place the fish in a piece of foil, season as
required, place on the high rack and cook for 13-15 minutes
(depending on the weight of the fish). For grilling set the oven to
around 230°C and place the fish on the high rack. To bake, place
the fish on the rack, set the temperature between 180°C - 200°C
and cook for around 15 – 20 minutes.
Your Halogen Oven will enable you to toast a wide variety of foods
including bread, crumpets, pizza and bagels. The hot air in the
oven will usually toast both sides of the food at once, to enable
this ensure you use the high rack and set the temperature
between 220°C - 230°C according to personal taste.
Roasting Meat
Grilling / Barbecuing
Chicken – Set the oven to between 180°C - 200°C and cook for
around 70 minutes on the low rack. Enjoy the food is fully cooked,
before eating
When barbecuing or grilling ensure all items are placed on the
high rack and the temperature is set between 220°C - 240°C. It is
important to select the thickness of the food when selecting the
cooking times: for example, a 4cm thick steak will take longer to
cook than a 2cm thick steak. Also, consider that frozen foods such
as burgers, sausages, etc. are likely to require a longer cooking
time. To ensure an even colour you may wish to turn your food
during the grilling process.
Pork - Set the oven to 200°C, place on the low rack for around 30 –
40 minutes or until crackling has formed. Reduce the temperature
to between 180°C - 200°C, turn the pork and cook for a further 15
– 20 minutes.
Lamb/Beef - Set the oven to between 180°C - 200°C and cook for
around 30 minutes. Turn the meat and cook for a further 15 – 20
minutes.
Hint - Place a piece of kitchen foil at the bottom of the oven so it
gathers excess fat and enables the bowl to be cleaned more easily.
Hint – Increase the cooking time and reduce the temperature by
approximately 10% when cooking marinated meats.
For Customer Services & Spare Parts please call 0845 209 7461
Opening times: Monday - Friday 9am – 5pm & Saturday 9am – 1pm or visit us at www.productcareuk.com
9
Cooking time guidelines (check food is fully cooked before consuming)
Halogen Oven cooking times
Food
Time(minutes)
Temperature(oC)
Rack used
Roast chicken (1.6Kg)
Chicken breast (350g)
Roast Beef (1Kg)
Steak
Cod steak (150g)
Sausage/bacon
70
20
75
8-10
24
10
200
190
180
250
200
120
Low
Low
Low
High
High
Low
Onion (whole, small)
Potatoes (roast, small, cut in two)
Potato (baked, medium size)
Parsnips (strips -2cm diameter)
Peppers (halved)
Yorkshire pudding
Oven chips (frozen)
60
36
75
36
34
12
15-18
200
200
200
200
200
200
200
Low
Low
low
High
Low
Low
Low
Poached
Soft-boiled
Hard-boiled
Omelette
5-6
4-5
8-10
10-12
175
200
200
175
Low
Low
Low
Low
Meat
Other
Eggs
10
Recipes
Roast Chicken
Ingredients:
1.2 to 1.7kgs chicken
Method:
Preheat the Halogen oven to 180°C for 6 minutes before cooking.
Wash the chicken and dry excess moisture with a towel or cloth,
then place it on the low rack.
When preheated place the low rack and chicken into the oven,
replace the lid and cook for 70 minutes. Ensure the food is cooked
through before consuming.
Grilled Sirloin Steak
Ingredients:
1 sirloin steak (3/4 – 1 inch thick)
salt & pepper
Method:
Preheat the Halogen oven to 250°C for 6 minutes before cooking.
Season the Steak with Salt and Pepper on both sides, then place
onto the high rack
Put the high rack and steak into the oven and cook for your
required finish of rare, medium rare, medium or well done.
Try: Carrots, Onion and Potatoes
Pizza
Ingredients:
One (fresh or frozen) pizza, no larger than 11 inches
Method:
Preheat the Halogen oven to 250°C for 6 minutes before cooking.
Place the pizza on the low rack and put into the oven for 3-5
minutes for fresh and 5-7 minutes for frozen.
For Customer Services & Spare Parts please call 0845 209 7461
Opening times: Monday - Friday 9am – 5pm & Saturday 9am – 1pm or visit us at www.productcareuk.com
11
Recipes
Raisin & Honey Flapjacks
Cookie
Ingredients:
125g margarine
125g Demerara sugar
3 tablespoons clear honey
50g raisins
1 teaspoon round mixed spice
200g rolled oats
Ingredients:
100g brown sugar
100g butter
170g self raising flour
1 tablespoon golden syrup
Tube of smarties
Method:
Line a 25-30cm square baking tin with non stick baking parchment.
Put the margarine, sugar and honey in a small saucepan and heat
gently until dissolved. Stir in the raisin, mixed spice and rolled
oats.
Press the mixture into the prepared tin and level with the back of
the metal spoon.
Cover the tin with foil and cook the biscuits on the lower rack of
the halogen oven at 180oC for 20minutes. Mark out pieces while
the flapjack is still warm. Allow to cool, then serve.
Method:
Cream together the sugar and butter.
Add the golden syrup and mix well then add the flour and mix to a
paste.
Add the smarties and mix well again.
With a spoon, put a ball of paste about the size of a walnut onto a
baking tray that will fit into your halogen oven. Keep adding balls
of paste this way but try to keep at least 2cm around each ball, as
they will expand.
You may need to do the cooking in 2 batches. Cook on 200oC for
8-10 minutes or until the cookies are golden brown.
Serves 10
Serves 12
For Customer Services & Spare Parts please call 0845 209 7461
Opening times: Monday - Friday 9am – 5pm & Saturday 9am – 1pm or visit us at www.productcareuk.com
12
Cleaning & Care
Before cleaning ensure the halogen oven is turned off, unplugged from the mains supply and has fully cooled down.
Remove any food and drain away any fat from the glass bowl.
All parts, EXCEPT the glass lid with plastic parts are dishwasher safe.
Do not use abrasives or harsh cleaners, however, stubborn stains can be removed using a nylon scouring pad or brush.
Wash the cooking racks and cooking bowl in warm soapy water, rinse and dry thoroughly before use. Ensure extra care is taken when
handling the glass bowl, especially when wet.
The lid cooker assembly must be wiped down with a soft, damp, lint free cloth.
Easy Cleaning
The halogen oven has a special self cleaning setting. Add warm water to the glass bowl ensuring there is no more than a few
centimetres in depth and add a small amount of mild detergent.
Turn the appliance on to clean (also shown as defrost) on the temperature dial and set the timer for 5 minutes. The action of the
water in the glass cooking bowl will help clean away some of the cooking stains.
Hints & tips: you should clean the upper unit and lid/cooker assembly with a soft, damp lint free cloth moistened with a mild
detergent solution only. Never immerse the lid/cooker assembly in water or any other liquids.
For Customer Services & Spare Parts please call 0845 209 7461
Opening times: Monday - Friday 9am – 5pm & Saturday 9am – 1pm or visit us at www.productcareuk.com
13
Spares
If any parts are missing, or you require a replacement, please contact Customer Services on 0845 209 7461
Opening times: Monday - Friday 9am – 5pm & Saturday 9am – 1pm or visit us at www.productcareuk.com
High cooking rack
Tongs
Hot glass lid stand
Lid
Glass bowl
Low cooking rack
Skewers
14
Connection to the mains supply
WARNING- THIS APPLIANCE MUST BE EARTHED
This appliance is designed to operate from a mains supply of AC230V ~ 50HZ.
Check that the voltage marked on the product corresponds with your supply voltage.
This product is fitted with a 13A plug complying with BS1363 and is fitted with an appropriate fuse
complying with BS1362. Always replace the fuse with one of the same rating. If the plug is unsuitable for
your mains socket or needs to be replaced, please note the following:
Important: The wires in the mains lead must be connected as per the following diagram -
Always ensure that the plug cord grip is fastened correctly.
If your appliance is supplied with a non-rewireable plug, you will find that it incorporates a fuse, the value
of which is indicated either on the base of the plug or on the fuse carrier. Always replace the fuse with
one of the same rating. If you need to remove the plug, cut it from the mains lead and dispose of it. Never
attempt to re-use this plug or insert it into a socket outlet, as there is a very great risk of an electric shock.
15
Guarantee:
This product is guaranteed for 12 months from the date of the original purchase. If any
defect arises due to faulty materials or workmanship the faulty product must be
returned to the place of purchase.
Refund or replacement is at the discretion of the store.
The following conditions apply:
•
The product must be returned to the retailer with the original proof of purchase.
•
The product must be installed and used in accordance with the instructions
contained in this instruction guide and any other instructions for use which has been
supplied.
•
It must be used for domestic purposes only and for its intended use.
• This guarantee does not cover wear and tear, damage, misuse or consumable parts.
This does not affect your statutory rights.
For Customer Services & Spare Parts please call 0845 209 7461
Opening times: Monday - Friday 9am – 5pm & Saturday 9am – 1pm or visit us at www.productcareuk.com
16
For Customer Services & Spare
Parts please call
0845 209 7461
Opening times: Monday - Friday
9am – 5pm & Saturday 9am –1pm
or visit us at
www.productcareuk.com
Revision 1
This symbol is known as the 'Crossed-out wheelie bin Symbol'. When this symbol is marked on a product/batteries, it means that
the product/batteries should not be disposed of with your general household waste. Only discard electrical/electronic/battery
items in separate collection schemes, which cater for the recovery and recycling of materials contained within. Your co-operation
is vital to make sure the success of these schemes and for the protection of the environment. For your nearest disposal facility,
visit www.recycle-more.co.uk or ask in store for details.
We reserve the right due to possible changes to design to alter the instruction manual without prior notice.