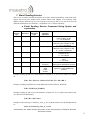
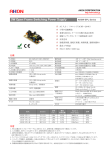
1
Maestro Heritage Software Tools USER MANUAL Rev. 1.4 www.maestro-wireless.com Email: [email protected] Tel: 852 2869 0688 Fax: 852 2525 4701 Address: Room 3603-3609, 36/F, 118 Connaught Road West, Sheung Wan, Hong Kong REVISION HISTORY Rev. 1.0 1.1 Date 1 Mar2008 22Sep2008 1.2 18MAY2009 1.3 3DEC2009 1.4 8Nov2010 Details First release Update for software 091d Update for software 092 Update for software 092f Update for software 092i Originated by Wallace Lee ver. Wallace Lee ver. Wallace Lee ver. Wallace Lee ver. Walace Lee This manual is written without any warranty. Maestro Wireless Solutions Ltd. reserves the right to modify or improve the product and its accessories which can also be withdrawn without prior notice. Besides, our company stresses the fact that the performance of the product as well as accessories depends not only on the proper conditions of use, but also on the environment around the places of use. Maestro Wireless Solutions Ltd. assumes no liability for damage incurred directly or indirectly from errors, omissions or discrepancies between the modem and the manual. Confidential, the whole present document is the sole property of Maestro Wireless Solutions Limited. 2 TABLE OF CONTENTS CHAPTER 1: INTRODUCTION ................................................ 7 CHAPTER 2: HERITAGE PLUGIN SETUP AND COMMANDS ...... 8 1. 2. 3. Selecting Plug-in ....................................................................... 8 AT commands for digital I/Os on Plug-in Boards............................ 9 a. b. c. AT+IOBR command ................................................................. 9 AT+IOBW command ................................................................ 9 AT+IOBOR command ............................................................. 10 a. b. c. d. e. f. AT+NMEA command .............................................................. 11 AT+CGPSSTART command...................................................... 11 AT+CGPSSTOP command ....................................................... 12 AT+CGPSSTANDBY command ................................................. 13 AT+AGPS command .............................................................. 13 AT+GPSPOS command ........................................................... 14 a. AT+ETHRST command ........................................................... 15 a. b. c. d. e. f. AT+CNTREAD command ......................................................... 16 AT+CNTRESET command ....................................................... 16 AT+AICFG command ............................................................. 17 AT+AISW command .............................................................. 18 AT+AISR command ............................................................... 19 AT+AIR command ................................................................. 19 AT commands for CGPS Plug-in Board ........................................11 4. AT commands for Ethernet Plug-in Board ....................................15 5. AT commands for Pulse Counter Plug-in Board .............................16 CHAPTER 3: GPRS AND TCP/UDP PARAMETERS SETUP ........21 1. 2. 3. GPRS Network Parameters ........................................................21 a. b. AT+IPGPRS command ............................................................ 21 AT+IPCONNECT command ...................................................... 22 a. b. c. AT+IPTCP command .............................................................. 22 AT+IPUDP command ............................................................. 24 AT+IPBUFF command ............................................................ 25 a. AT+IPOPT command .............................................................. 26 TCP/UDP Parameters Setup .......................................................22 Extra TCP/UDP Parameters Setup ...............................................26 CHAPTER 4: AUTOMATIC AND SELF-RECOVERY TCP/UDP CONNECTION.......................................................................28 1. 2. 3. Flow diagram of Auto TCP/UDP connection function ......................29 AT commands for Auto TCP/UDP connection ................................30 a. b. AT+AUTOTCP command ......................................................... 30 AT+AUTOUDP command......................................................... 31 a. AT+AUFCM command ............................................................ 32 AT commands for tuning Auto TCP/UDP connection ......................32 CHAPTER 5: AT COMMAND DRIVEN TCP/UDP CONNECTION 33 1. AT commands for Auto TCP/UDP connection ................................33 a. b. c. AT+DLEMODE command ........................................................ 33 AT+AOTCP command ............................................................. 34 AT+OUDP command .............................................................. 34 CHAPTER 6: PING SERVICE..................................................36 1. AT command for setting up and execute ping ..............................36 a. AT+IPPING command ............................................................ 36 CHAPTER 7: DYNAMIC DNS ..................................................38 Confidential, the whole present document is the sole property of Maestro Wireless Solutions Limited. 3 1. 2. Description of the Operation ......................................................38 AT command for configuring Dynamic DNS..................................39 a. b. c. AT+IPDDNSSERV command.................................................... 39 AT+IPDDNSACCT command.................................................... 39 AT+IPDDNSUPD command ..................................................... 40 CHAPTER 8: TCP TERMINAL .................................................42 1. 2. Description of the Operation ......................................................42 AT command for TCP Terminal ...................................................42 a. AT+TCPTERM command ......................................................... 42 CHAPTER 9: EMAIL SENDING (SMTP) SERVICE ....................44 1. 2. Description of the Operation ......................................................44 AT command for email sending ..................................................44 a. b. c. d. e. AT+IPSMTP command ............................................................ 44 AT+EMADDR command .......................................................... 45 AT+EMSUBJ command ........................................................... 46 AT+EMBODY command .......................................................... 47 AT+EMSEND command .......................................................... 48 CHAPTER 10: REMOTE AT COMMAND BY SMS ......................50 1. 2. Description of the operation ......................................................50 AT command for configuring AT command by SMS .......................51 3. Limitation and caution to be taken when using remote AT command 51 a. AT+SMSAT command ............................................................. 51 CHAPTER 11: CALL SCREENING ...........................................52 1. AT commands for configuring call screening ................................52 a. b. c. d. AT+CSRN command .............................................................. 52 AT+CSNW command ............................................................. 52 AT+CSNR command .............................................................. 53 AT+CSND command .............................................................. 54 CHAPTER 12: MODEM STATUS CHECK AND MONITORING ....54 1. AT command for Modem Status Check and Monitoring ..................55 a. b. AT+TMODE command ............................................................ 55 Operation of Modem Status Check and Monitoring ..................... 55 CHAPTER 13: AUTOMATIC PIN ENTRY .................................56 1. AT command for Automatic PIN Entry .........................................57 a. AT+AUTOPIN command ......................................................... 57 CHAPTER 14: REMOTE PROGRAM UPDATE ...........................59 1. AT command for remote firmware update ...................................59 a. b. c. d. AT+IPFTP command .............................................................. 59 AT+FTPDOTA command ......................................................... 60 AT+ADDINSTALL command .................................................... 61 Notes and cautions to be taken ............................................... 62 CHAPTER 15: COMMAND STRING - INTRODUCTION ............63 1. Command String and “Service” Concept .....................................63 CHAPTER 16: COMMAND STRING – WRITING AND USING ...64 1. 2. 3. Structure of Command String ....................................................64 a. b. c. Service type ......................................................................... 64 Service Id ............................................................................ 64 Operation type and Operation argument .................................. 64 Concatenating Command String .................................................64 Entering and executing Command String ....................................65 Confidential, the whole present document is the sole property of Maestro Wireless Solutions Limited. 4 a. b. AT+CSTR command ............................................................... 65 AT+CSTRSET command ......................................................... 65 CHAPTER 17: COMMAND STRING – SERVICES .....................67 1. 2. 3. 4. 5. 6. 7. 8. 9. 10. Alarm Service ..........................................................................67 a. b. Alarm Service Command String Syntax and explanation............. 67 Reading Alarm Service status ................................................. 67 a. b. Counter Service Command String Syntax and explanation .......... 68 Reading Counter Service status ............................................... 68 a. b. Countdown Timer Service Command String Syntax and explanation 68 Reading Countdown Timer status ............................................ 69 a. b. c. d. Input port Service Command String Syntax and explanation ....... 69 Input Port operation mechanism (single I/P triggering) .............. 70 Input Port operation mechanism (multiple I/P triggering) ........... 71 Reading I/P Port status .......................................................... 71 a. b. Output Port Service Command String Syntax and explanation ..... 72 Reading O/P Port status ......................................................... 72 a. b. SMS Service Command String Syntax and explanation ............... 72 Using “variable” options within SMS content ............................. 73 a. b. c. Email Sending Service Command String Syntax and explanation . 74 Using “variable” options within additional email content ............. 75 Reading Email Sending Service status ...................................... 75 Counter Service .......................................................................68 Countdown Timer Service .........................................................68 Input Port Service ....................................................................69 Output Port Service ..................................................................72 SMS Service ............................................................................72 Email Sending Service ..............................................................74 Device Power Control Service ....................................................76 a. Device Power Control Service Command String Syntax and explanation ..................................................................................... 76 b. Reading Device Power Control status ....................................... 77 Analogue Input Service.............................................................77 a. b. c. Analogue Input Service Command String Syntax and explanation 77 Analogue Input operation mechanism ...................................... 78 Reading Analogue Input Service status .................................... 78 a. b. c. Pulse Counter Service Command String Syntax and explanation . 79 Pulse Counter operation mechanism ........................................ 79 Reading Pulse Counter Service status ...................................... 79 Pulse Counter Service ...............................................................79 CHAPTER 18: COMMAND STRING – READING STATUS OF SERVICES ............................................................................80 1. Command for reading current information of Services ..................80 a. b. c. d. e. f. g. h. i. j. Confidential, AT+CSTRSTAT command ........................................................ 80 Reading Alarm Service ........................................................... 80 Reading Counter Service ........................................................ 81 Reading Countdown Timer Service .......................................... 81 Reading Input Pin Service ...................................................... 81 Reading Output Pin Service .................................................... 81 Reading Device Power Control Service ..................................... 81 Reading Email Sending Service ............................................... 81 Reading Analogue Input Service .............................................. 82 Reading Pulse Counter Service ................................................ 82 the whole present document is the sole property of Maestro Wireless Solutions Limited. 5 CHAPTER 19: KNOWN ISSUES .............................................83 1. 2. 3. 4. AT +WIND command ................................................................83 Saving of parameters to non-volatile memory..............................83 Mutually exclusive TCP/UDP functions .........................................83 Sending Heritage Software commands over SMS .........................83 CHAPTER 20: QUESTIONS AND ANSWERS ...........................84 1. 2. 3. 4. AutoTCP/UDP ..........................................................................84 AT command driven TCP/UDP connection ....................................84 Remote AT command by SMS ....................................................84 Command String Feature ..........................................................84 CHAPTER 21: EXAMPLES OF HERITAGE SOFTWARE SETUP AND OPERATION .........................................................................85 1. 2. 3. 4. 5. 6. 7. 8. 9. 10. 11. To setup a Automatic TCP connection .........................................85 To make a AT command driven TCP connection ............................85 To setup periodic ping...............................................................86 To setup TCP Terminal and Dynamic DNS automatic update...........86 Perform Remote program update by sending Command over SMS ..87 Command String programming example 1 ..................................87 Command String programming example 2 ..................................87 Command String programming example 3 ..................................88 Command String programming example 4 ..................................88 Command String programming example 5 ..................................88 Command String programming example 6 ..................................89 CHAPTER 22: COMMAND STRING QUICK REFERENCE ..........90 Confidential, the whole present document is the sole property of Maestro Wireless Solutions Limited. 6 CHAPTER 1: INTRODUCTION Heritage Software Tools is a set of software solutions for Maestro Heritage modem. New functions added to increase application range of various industrial and automated applications: AT commands specific for individual plug-in boards Automatic and self-recovery TCP/UDP socket connection AT command driven TCP/UDP socket connection Ping Service Dynamic DNS (* note) Email sending (SMTP) Remote AT command through SMS and TCP Terminal (* note) Call screening (reject call made by unauthorized phone number) Modem status check and monitoring Remote program updating “Command String” programming scripts Remote program updating Users can configure and use the above features by following this document. Note: Special GPRS service from network recommended. See Chapter 7 and 8 for details Confidential, the whole present document is the sole property of Maestro Wireless Solutions Limited. 7 CHAPTER 2: HERITAGE PLUGIN SETUP AND COMMANDS Maestro Heriage allows different harware plug-in boards to be conneted to the expansion slot to enhance functionality. In software side there are commands to configure and control different plug-in boards. 1. Selecting Plug-in AT+HPLUGIN command Description: This command is used to setup Heritage with individual hardware plug-in board. Command Syntax: AT+HPLUGIN=<type> Response Syntax: +HPLUGIN: <type> Command AT+ HPLUGIN=? AT+ HPLUGIN=2 AT+ HPLUGIN=? Possible responses: +HPLUGIN: 1 OK Note: show current settings OK Note: use plug-in #2 (CGPS) +HPLUGIN: (1-4) OK Note: possible values Defined Values: <type> Plug-in type 1 I/O plug-in board (HER010, default value) 2 CGPS plug-in board (HER020) 3 reserved 4 Ethernet plug-in board (HER040) 5 Pulse counter plug-in board (HER070) Note: After changing the <type> value the modem will reset immediately. Modem will not detect and check if +HPLUGIN value match with actual plug-in , user should make sure entering is correct. Confidential, the whole present document is the sole property of Maestro Wireless Solutions Limited. 8 2. AT commands for digital I/Os on Plug-in Boards NOTE: An optional plug-in board (I/O , CGPS, Ethernet or Pulse counter) is needed to plug to Heritage for using this Service. Contact Maestro Wireless for information. For details please read the user guide of plugins. Plug-in I/O (HER010) C-GPS (HER020) Ethernet (HER040) Pulse Counter (HER070) No. of input supported 6 6 2 0 No. of output supported 6 4 2 4 a. AT+IOBR command This command is to read the value of one or all Input Pins on the plug-in board. Command Syntax: AT+IOBR [(=<pin>)] Response syntax: +IOBR: <val>,<val>,<val>,<val>,<val><val> +IOBR: <pin>,<val> Command AT+IOBR AT+IOBR=1 AT+IOBR=? Possible responses: +IOBR: 000000 OK Note : read all input pins values +IOBR: 1,0 OK Note : read the value of input pin #1 +IOBR[: (1-6)] OK Note: possible values Defined Values: <pin> ID of the Input Pin to be read. Valid value is from 1 to 6 for I/O plug-in and 1 to for CGPS plug-in, 2 for Ethernet plug-in. If omitted all Input Pins will be read <val> Current value (status) of the Input Pin: 0 input signal not detected 1 input signal detected Note: 1. Number of displayed or possible Input Pin value depends on plug-in type chose. 2. If no <pin> argument is entered , then all Input Pins values will be read and the result is displayed as a series „0‟ or „1‟, representing the value for input #1 to #6 from left to right. 3. Always read Plug-in Board user manual before wiring to avoid permanent damage to the board b. AT+IOBW command This command is to set (write) the value of one or all Output Pins on the plug-in.. Command Syntax: AT+IOBW= <val><val>…. AT+IOBW= <pin>,<val> Response syntax: OK Confidential, the whole present document is the sole property of Maestro Wireless Solutions Limited. 9 Command Possible responses: AT+IOBW=111111 OK Note : set all six output pins to value “1” AT+IOBW=000001 OK Note : set Output pins #1 to 5 to “1”, #6 to „0‟ AT+IOBW=6,0 OK Note: set Output pin #6 to „0‟ (others not changed) Defined Values: <pin> ID of the Output Pin to be set. Valid value depends on number of Input Pins of plug-in used.. <val> Value (output) value of the pin to be set: 0 Output Pin is opened 1 Output Pin is closed (shorted) Note: 1. Number of displayed or possible output pin value depends on plug-in type chose. 2. You can only set one of all or all Output Pins in one command. 3. To set all Output Pins at one time, enter command with a set of digits (only 0 or 1 is allowed, total number of digits is same as number of Output Pins available) to set the state of each Output Pin respectively. 4. Always read Plug-in Board user manual before wiring to avoid permanent damage to the board. c. AT+IOBOR command This command is to read the last value of one or all Output Pins on the plug-in board. Command Syntax: AT+IOBOR [(=<pin>)] Response syntax: +IOBOR: <val><val><val><val><val><val> +IOBOR: <pin>,<val> Command AT+IOBOR AT+IOBOR=1 AT+IOBOR=? Possible responses: +IOBOR: 000000 OK Note : read all output pins values +IOBOR: 1,0 OK Note : read the value of output pin #1 +IOBOR[: (1-6)] OK Note: possible values) Defined Values: <pin> ID of the Output Pin to be read. Valid value is from 1 to maximum number of Output Pin available on the plug-in. If omitted all Output Pins will be read <val> Current value (status) of the Output Pin: 0 Output Pin is set to 0 (open) 1 Output Pin is set to 1 (closed) Confidential, the whole present document is the sole property of Maestro Wireless Solutions Limited. 10 Note: 1. Number of displayed or possible Output Pin value depends on plug-in type chose. 2. If no <pin> argument is entered , then all Output Pins values will be read and the result is displayed as a series „0‟ or „1‟, representing the value of Output from #1 to #last from left to right. 3. Always read Plug-in Board user manual before wiring to avoid permanent damage to the board 3. AT commands for CGPS Plug-in Board NOTE: An optional C-GPS plug-in board is needed to plug to Heritage for using this Service. Contact Maestro Wireless for information. For details please read the C-GPS Plug-in Board user guide. a. AT+NMEA command This command is set if NMEA frames should not be sent out to com port or not. Command Syntax: AT+NMEA =<val> Response syntax: +NMEA: 1 Command AT+NMEA=1 AT+NMEA? AT+NMEA=? Possible responses: OK Note : enable NMEA frames to be sent +INMEA: 1 OK Note : read current value +NMEA: (0-2) OK Note: possible values Defined Values : <val> 0 no NMEA frames will be sent out 1 NMEA frames will be sent out to the com port 2 Reserved Note: 1. You can only set the +NMEA value BEFORE starting the CGPS Plug-in otherwise you will get error message. See section of +CGPS command for starting CGPS. 2. The command will not check if CGPS Plug-in is present or not. NMEA frames will come out a while after CGPS is started. If no CGPS Plug-in present no NMEA frame will be come out. b. AT+CGPSSTART command This command is to start running CGPS Plug-in Board. Command Syntax: AT+CGPSSTART=<type> Response syntax: OK Confidential, the whole present document is the sole property of Maestro Wireless Solutions Limited. 11 Command AT+CGPSSTART Possible responses: OK Note : start running CGPS Plug-in (default is HOT start) AT+CGPSSTART=”COLD” OK Note : start running CGPS Plug-in (COLD start) AT+CGPSSTART=? +CGPSSTART: (HOT,WARM,COLD,FACTCOLD,SIMCOLD),(AGPSON,AGPSOF F) OK Note :possible values AT+CGPSSTART? +CGPSSTART: HOT, AGPSON OK Note :read current value Defined Values : <type> "HOT" start with all previous run data (previous run should end with AT+CGPRSSTANDBY command). This will expect the fastest fixing. "WARM" start with previous run data, except position sigma is high (prev. run should end with AT+CGPSSTOP command) "COLD" start with NO previous run data, except drift estimate "FACTCOLD" start with Factory Defaults instead of previous run data (almanac data, no drift estimate) "SIMCOLD" start with no change to previous run data area - needed for Simulator runs Note: 1. The argument will be saved automatically. and CGPS will be restarted automatically after power-off/on cycle. To prevent CGPS start running on next power up please use AT+CGPSSTOP command c. AT+CGPSSTOP command This command is to stop running CGPS Plug-in Board. Command Syntax: AT+CGPSSTOP Response syntax: OK Command AT+CGPSSTOP AT+CGPSSTOP? Possible responses: OK Note : stop running CGPS Plug-in +CGPSSTOP: STATE IS OFF OK Note : check current CGPS state Note: 1. This command will stop CGPS clock and next CGPS start need to be "WARM" or "COLD" type. If want to re-start CGPS with "HOT" option please use AT+CGPSSTANDBY command Confidential, the whole present document is the sole property of Maestro Wireless Solutions Limited. 12 d. AT+CGPSSTANDBY command This command is to set CGPS Plug-in Board in standby mode. This consumes slightly more power, but allows for faster restarts when the CGPS plug-in is restarted with the CGPSSTART command. Note: when doing a "HOT" start (see +CGPSSTART command), the previous session should be stopped with this command Command Syntax: AT+CGPSSTANDBY Response syntax: OK Command AT+CGPSSTANDBY AT+CGPSSTANDBY? Possible responses: OK Note : set CGPS Plug-in in standby mode +CGPSSTANDBY: IN STANDBY MODE OK Note : check current CGPS standby state Note: 1. This command will NOT stop CGPS clock and next CGPS start can "HOT" type (faster to fix). If want to stop CGPS to save more power please use AT+CGPSSTOP command e. AT+AGPS command This command is to enable or disable using AGPS feature for faster GPS fix. When enabled Heritage will use GPRS service to download Satellite data thru Internet (about 3Kbyte each time) to shorten GPS fix time. Make sure the +IPGPRS setting Is properly set before using AGPS feature. Command Syntax: AT+AGPS=<val> Response syntax: OK Command AT+AGPS=1 AT+AGPS=1 AT+AGPS? Possible responses: OK Note : enable AGPS feature OK Note : disable AGPS feature +AGPS: 1 OK Note : check current APS standby state Defined Values : <val> 0 1 AGPS is disabled AGPS is enabled Note: 1. The +AGPS setting should be made before starting running CGPS by +CGPSSTART command. Confidential, the whole present document is the sole property of Maestro Wireless Solutions Limited. 13 2. 3. 4. 5. Make sure the GPRS service is available and the +IPGPRS setting is properly set. The program will self-control the AGPS functionality. Once AGP is needed it will try downloading new satellite data (about 3Kbytes) thru GPRS. The need of downloading is determined by internal program and may be taken time to time. AGPS operation is silent : e.g. if GPRS is not available it will not should any message User can use AT+AGPSSTATUS command to check current AGPS status. f. AT+GPSPOS command This command allows getting the last position information received. Command Syntax: AT+GPSPOS Response syntax: +GPSPOS:<fix>, <time>, <date>, <latitude>, <longitude>,<altitude>, <hdop>, <speed>, <course>, <nbsat> Command AT+GPSOPS Possible responses: +GPSPOS: 1,225454,192294,4916.45N,12311.12W,111.1,0.9,25.5,180.0,06 OK Note : see defined values +GPSPOS: -1,,,,,,,,,0 OK Note : see defined values AT+GPSPOS Defined Values : <fix> 0 Invalid Fix 1 2D fix 2 3D fix -1 It is not possible to define a position <time> hhmmss Example: <date> ddmmyy Example: time of fix, ranges of values: hh (hour) 00 to 23, mm (minute) 00 to 59, ss (second) 00 to 59 225454 means 22:54:54 UTC date of fix, ranges of values: dd (day) 01 to 31, mm (month) 01 to 12, yy (year) 2000 to 2099 191194 means November 19th of 1994 <latitude> ddmm.mmmm(N/S) ranges of values: dd (degree) 00 to 90, mm.mmmm (minute) 00,0000 to 59.9999, (N/S) North or South Example: latitude of the fix- 4916.45N means 49 degree 16.45 min North <longitude> dddmm.mmmm(E/W) Example: ranges of values: dd (degree) 00 to 180, mm.mmmm (minute) 00,0000 to 59.9999, (E/W) East or West longitude of the fix – 12.311.12W means 123 degree 11.12 min West Confidential, the whole present document is the sole property of Maestro Wireless Solutions Limited. 14 <altitude> mmmm.m altitude of fix in meter <hdop> mmm.mm: horizontal dilution of position in meter <speed> ssss.s Speed over ground, in kilometers per hour <course> dddmm.mmmm course in degree, minute, ranges of values: ddd (degree) 000 to 360 mm.mmmm (minute) 00.0000 to 59.9999 <nbsat> nn number of satellites in view 4. AT commands for Ethernet Plug-in Board NOTE: An optional Ethernet plug-in board is needed to plug to Heritage for using this Service. Contact Maestro Wireless for information. For details please read the Ethernet Plug-in Board user guide. a. AT+ETHRST command This command is to configure the periodic reset function of Heritage and Ethernet Plug-in board. If set the Heritage will perform a soft reset periodically with period set with this command. Command Syntax: AT+ETHRST =<min> Response syntax: +ETHRST: 1 Command AT+ETHRST=0 Possible responses: OK Note : disable periodic reset function AT+ETHRST=360 OK Note : enable periodic reset function with period of 360 minutes AT+ETHRST? +ETHRST: 360 OK Note : read current value AT+ETHRST=? +ETHRST: (0-1500) OK Note: possible values Defined Values : <min> Period of reset in minutes. If set to 0 the periodic reset is disabled. Default value is 1440 (24 hours). Note: 1. This reset function and AT+ETHRST command is function only when Ethernet Plug-in is selected (+HPLUGIN=4). 2. Once enabled this reset is unconditional. Make sure the device connected to the Ethernet Plug-in is able to handle the disconnection of Ethernet connection and can reconnect automatically. Confidential, the whole present document is the sole property of Maestro Wireless Solutions Limited. 15 5. AT commands for Pulse Counter Plug-in Board NOTE: An optional Pulse Counter plug-in board is needed to plug to Heritage for using this Service. Contact Maestro Wireless for information. For details please read the Plug-in Board user guide. a. AT+CNTREAD command This command is to read the value of one or all Pulse Counters on the plug-in board. Command Syntax: AT+CNTREAD [(=<cnt>)] Response syntax: + CNTREAD: <val>,< val>,<val>,<val>,<state>,<state>,<state>,<state> + CNTREAD: <pin>,<val>,<state> Command AT+CNTREAD AT+CNTREAD=1 AT+CNTREAD=1 AT+CNTREAD=? Possible responses: +CNTREAD: 1,2,3,4,1,1,1,1 OK Note : read all Pulse Counters values and states +CNTREAD: 1,10,0 OK Note : read current value and state of Pulse Counter #1 +CNTREAD: -1 OK Note : error on reading Pulse Counter +CNTREAD: [(1-4)[,(1-10)]] OK Note: possible values Defined Values : <cnt> ID of the Pulse counter. Valid range is 1 to 4. <val> Pulse counter current value. Valid range is 0 to 65535. if it is -1 means there is problem reading counter value <state> 0 Pulse Counter is disconnected 1 Pulse Counter is disconnected Note: 1. Occasionally the initial counter value of counters may not be zero, Please use AT+CNTRESET command to reset counters just after connection. b. AT+CNTRESET command This command is to read the value of one or all Pulse Counters on the plug-in board. Command Syntax: AT+CNTRESET[=<cnt> Response syntax: OK + CME ERROR: 3 Confidential, the whole present document is the sole property of Maestro Wireless Solutions Limited. 16 Command AT+CNTRESET AT+CNTRESET=1 AT+CNTRESET=1 Possible responses: OK Note : reset all four Pulse Counters 0 OK Note : reset Pulse Counter #1 to 0 +CME ERROR: 3 Note: Error resetting Pulse Counter Defined Values : <cnt> ID of the Pulse counter to be reset. Valid range is 1 to 4. c. AT+AICFG command Note: normally you NEED NOT use this command to change the setting of Analogue Inputs. Consult Maestro Wireless for details. This command is to configure the Analogue Inputs of the plug-in board. Command Syntax: AT+AICFG=<ACTION>,<AI>,<FSD>,<DR>,<SHUNT> (when <ACTION>=0) AT+AICFG=<ACTION>,<AI>[,<AI>] (when <ACTION>=1) Response syntax: OK +AICFG: <AI>,<FSD>,<DR>,<SHUNT> Command AT+AICFG=0,1,4,0,1 AT+AICFG=0,,,,1 AT+AICFG=1,1 AT+AICFG=1,1,4 Possible responses: OK Note : AI #1 use FSD: 6.144V1,DR: 128SPS,500ohm ON OK Note : AI #1 500ohm OFF, others no change +AICFG: 1,0,4,0 OK Note : read AI#1 settings +AICFG: 1,0,4,0 +AICFG: 2,0,4,0 +AICFG: 3,0,4,0 +AICFG: 4,0,4,0 OK Note : read AI#1 to AI#4 settings Defined Values : <AI> ID of the Analogue Input that configuration to be set or read. Valid range is 1 to 4, (or 255 to configure all 4 Analogue Inputs) <FSD> Full scale deflection setting 0 6.144V (default value) 1 4.096V 2 2.048V 3 1.024V 4 0.512V 5 0.256V Confidential, the whole present document is the sole property of Maestro Wireless Solutions Limited. 17 <DR> Sapmple data rate 0 8SPS 1 16SPS 2 32SPS 3 64SPS 4 128SPS (default value) 5 250SPS 6 475SPS 7 800SPS <SHUNT> 500ohm resistor setting. For details please read HER070 manual 0 500 ohm resistor enabled (same as AT+AISW=<AI>,1) 1 500 ohm resistor disabled (same as AT+AISW=<AI>,0) Note: 1. Changing the value of <shunt> will change the reading value of Analogue Input. See AT+AIR command for details. d. AT+AISW command This command is to enable/disable the 500 ohm internal resistor of the Analogue Inputs of the plug-in board. Command Syntax: AT+AISW= <val><val><val><val>…. AT+AISW= <AI>,<val> Response syntax: OK Command AT+AISW=1111 AT+AISW=0001 AT+AISW=1,0 Possible responses: OK Note : set all AI‟s 500 ohm resistor to OFF OK Note : set the 4th AI‟s 500 ohm resistor to OFF. Others to ON OK Note: set the 1st AI‟s 500 ohm resistor to ON (others not changed) Defined Values: <AI> ID of the Analogue Input resistor to be set. Valid value is 1 to 4. <val> Analogue Input resistor state: 0 500 ohm resistor enabled (default value) 1 500 ohm resistor disabled Confidential, the whole present document is the sole property of Maestro Wireless Solutions Limited. 18 Note: 1. You can only set one of all or all resistor states in one command. 2. To set all resistor states at one time, enter command with 4 of digits (only 0 or 1 is allowed, to set the state of each resistor respectively. 3. Always read Plug-in Board user manual before setting to avoid permanent damage to the board. 4. Changing the value of <val> will change the reading value of Analogue Input. See AT+AIR command for details. e. AT+AISR command This command is to read the value of one or all resistor states on the plug-in board. Command Syntax: AT+AISR [(=<AI>)] Response syntax: +AISR: <val>,<val>,<val>,<val> +AISR: <AI>,<val> Command AT+AISR AT+AISR=1 AT+AISR=? Possible responses: +AISR: 1111 OK Note : read all resistor states +AISR: 1,0 OK Note : read the state of AI#1 resistor state +AISR[: (1-4)] OK Note: possible values Defined Values: <AI> ID of Analogue Input resistor to be read. Valid value is from 1 to 4. If omitted all resistors' state will be read <val> Current value (status) of the resistor 0 500 ohm resistor enabled (default value) 1 500 ohm resistor disabled Note: 1. If no <AI> argument is entered , then all resistor states will be read and the result is displayed as a series „0‟ or „1‟, representing the value for resistor #1 to #4 from left to right. f. AT+AIR command This command is to read the value of one or all Analogue Inputs on the plug-in board. Command Syntax: AT+AIR [(=<AI>)] Response syntax: +AIR: <val>,<val>,<val>,<val> +AIR: <AI>,<val> Confidential, the whole present document is the sole property of Maestro Wireless Solutions Limited. 19 Command AT+AIR AT+AIR AT+AIR=1 AT+AIR=1 AT+AIR=? Possible responses: +AIR: 0.0009375 0 1.108125 0 OK Note : read all Analogue Input values +AIR: ERROR ERROR ERROR ERROR OK Note : error on reading Analogue Input values +AISR: 1,1.032845 OK Note : read value of AI#1 +AISR: 1,1.032845 OK Note : error on reading Analogue Input value +AISR[: (1-4)] OK Note: possible values Defined Values: <AI> ID of Analogue Input value to be read. Valid value is from 1 to 4. If omitted all AI values will be read <val> Value of the Analouge Input. When 500 ohm resistor is disabled, the unit of value is V When 500 ohm resistor is disabled, the unit of value is mA Note: 1. Carefully read the Plug-in manual before connecting Analogue Inputs otherwise the device may be damaged. 2. If no <AI> argument is entered , then AI values will be read and the result is displayed for AI #1 to #4 from left to right. 3. If you get ERROR or +CME ERROR: 3 even with correct command and argument it could be the Plug-in is not functioning or connection problem. Contact Maestro Wireless or distributor. Confidential, the whole present document is the sole property of Maestro Wireless Solutions Limited. 20 CHAPTER 3: GPRS AND TCP/UDP PARAMETERS SETUP The Automatic and AT command driven TCP/UDP connection, PING service, DDNS support (described in Chapter 4,5,6,7 and 8) requires GPRS connection and TCP / UDP parameters setup. This chapter will describe those required setups. 1. GPRS Network Parameters User need to enter the following parameters for GPRS connection: Access point name (APN) User name Password They are to be entered by using AT+IPGPRS command. Contact your network operator for these parameters. a. AT+IPGPRS command Description: This command is used to setup GPRS network parameters for the TCP/UDP connection feature. Command Syntax AT+IPGPRS=<Cid>,<APN>,<UN>,<PW> Response Syntax +IPGPRS: <Cid>,<APN>,<UN>,<PW> Command AT+ IPGPRS? AT+ IPGPRS=1, AT+ IPGPRS =1,”INTERNET” AT+ IPGPRS=? Possible responses: +IPGPRS: 1,"INTERNET","" ,”” OK Note: show current settings OK Note: set Cid value to 1 OK Note: set the PDP value to 1 and APN to “INTERNET” +IPGPRS: (1-4),(100),(50),(50) OK Note: possible values Defined Values : <Cid> PDP context identifier Note: to use with TCP/UDP connection feature this value must be set to 1. <APN> Access point name of the GPRS network. Max 100 characters. <UN> User name to access the GPRS service. Max 50 characters. <PW> Password used to access the GPRS service. Max 50 characters. Confidential, the whole present document is the sole property of Maestro Wireless Solutions Limited. 21 b. AT+IPCONNECT command This command is to make the modem to activate or deactivate GPRS connection. Once IPCONNECT is success you can perform TCP/UDP connection as described on other chapters. Please read note below on using this command. Command Syntax AT+IPCONNECT = <Bearer>,<Connect> Response Syntax +IPCONNECT: <Bearer>,<Connect> Command AT+ IPCONNECT=? AT+ IPCONNECT? AT+IPCONNECT=1,1 AT+IPCONNECT=1,1 AT+ IPCONNECT =1,0 Possible responses: +IPCONNECT: (0-1) , (0-1) OK Note: display possible values +IPCONNECT: 1,0 OK Note: display current status OK OK OK Note: Activate GPRS connection success +CME ERROR: 3 Note: Activate GPRS connection fail OK Note: Deactivate GPRS connection success Defined Values: <Bearer> 0: using GSM Bearer ( Note: do NOT use this ) 1: using GPRS Bearer. <Connect> 0: to stop connection 1: to start connection. Note: Before you connect to GPRS by this command make sure you have finished the following first: 1. Entered APN settings by AT+IPGPRS command Chapter 3.1.a) 2. It is suggested after modem power up wait about 20 seconds before making GPRS connection. 2. TCP/UDP Parameters Setup For using automatic or AT command driven TCP/UDP connection (described in Chapter 5 and 6), you need to first enter the target TCP/UDP peer parameters. There are: AT+IPTCP AT+IPUDP AT+IPBUFF a. AT+IPTCP command This command specifies the TCP socket parameters and mode that to be used by automatic or AT command driven TCP connection (described in Chapter 4 and 5). Confidential, the whole present document is the sole property of Maestro Wireless Solutions Limited. 22 Command Syntax AT+IPTCP=<port>,<mode>,<server>,<TCPTxDelay> Response Syntax + IPTCP: <port>,<mode>,<server>,<TCPTxDelay> Command AT+ IPTCP? Possible responses: +IPTCP: 0,"S","",0 OK Note : show current settings AT+ IPTCP =23 OK Note: set the TCP port to 23 AT+ IPTCP OK =23,”C”,202.144.111.222”,0 Note: to set the modem to connect TCP socket Client (caller) mode to target :address 202.144.111.222 and port 23 AT+ IPTCP OK =23,”S”,255.255.255.255”,0 to set the modem to wait for TCP socket connection request (Server (listening) mode) any calling IP address allowed, port 23 AT+ IPTCP =? +IPTCP: (0-65535),("C","S"),(120),(0-1) OK Note : possible argument Defined Values: <port> The port number has to be used for the TCP socket connection. Default value is 0. Valid range is 0 to 65535. <mode> Mode of TCP operation. Default value is “S”. “S” Server (Listening) mode. This configures Maestro Heritage to open a listening TCP connection on the specified <port> . The TCP connection will be active upon getting socket connection request from the allowed remote TCP peer (see <address>) “C” Client (caller) mode. This configures Maestro Heritage to request opening a TCP connection to the server with the specified <address> and <port> . Note: This parameter is used by Auto TCP connection (see Chapter 4) only. <address> The address of the TCP server (or host). Default value is empty. Legal values could be 32-bit in dotted-decimal notation (i.e. xxx.xxx.xxx.xxx) or alphanumeric ASCII test string up to 120 characters (only if DNS is available on the GPRS network) Note: In “Server” (Listening) mode the modem will only accept TCP connection request for the caller with address specified in the <address> field. Yet if it is set to “255.255.255.255” the modem will accept request from ANY address. <TCPTxDelay> This parameter determines if there is time delay introduced before sending a TCP frame that has not been entirely filled with user data. If it is set to 0 initiates the sending of a TCP frame as soon as possible after the reception of a single character value from the host. If it is set to 1 initiate a delay will be introduced before the sending of a TCP frame The default value is 0. Confidential, the whole present document is the sole property of Maestro Wireless Solutions Limited. 23 b. AT+IPUDP command This command specifies the UDP socket parameters and mode that to be used by automatic or AT command driven UDP connection (described in Chapter 4 and 5). Command Syntax AT+IPUDP=<port>,<mode>,<server>,<UDPTxDelay> Response Syntax + IPUDP: <port>,<mode>,<server>,<UDPTxDelay> Command AT+ IPUDP? Possible responses: +IPUDP: 0,"S","",0 OK Note : show current settings AT+ IPUDP =23 OK Note: set the UDP port to 23 AT+ IPUDP OK =23,”C”,202.144.111.222”,0 Note: to set the modem to connect UDP socket Client (caller) mode to target :address 202.144.111.222 and port 23 AT+ IPUDP OK =23,”S”,255.255.255.255”,0 to set the modem to wait for UDP socket connection request (Server (listening) mode) any calling IP address allowed, port 23 AT+ IPUDP=? +IPUDP: (0-65535),("C","S"),(120),(0-1) OK Note : possible argument Defined Values: <port> The port number has to be used for the UDP socket connection. Default value is 0. Valid range is 0 to 65535. <mode> Mode of UDP operation. Default value is “S”. “S” Server (Listening) mode. This configures Maestro Heritage to open a listening UDP connection on the specified <port> . The UDP connection will be active upon getting socket connection request from the allowed remote UDP peer (see <address>) “C” Client (caller) mode. This configures Maestro Heritage to request opening a UDP connection to the server with the specified <address> and <port>. Note: This parameter is used by Auto UDP connection (see Chapter 3) only. <address> The address of the UDP server (or host). Default value is empty. Legal values could be 32-bit in dotted-decimal notation (i.e. xxx.xxx.xxx.xxx) or alphanumeric ASCII test string up to 120 characters (only if DNS is available on the GPRS network) Note: In “Server” (Listening) mode the modem will only accept UDP connection request for the caller with address specified in the <address> field. Yet if it is set to “255.255.255.255” the modem will accept request from ANY address. Confidential, the whole present document is the sole property of Maestro Wireless Solutions Limited. 24 <UDPTxDelay> This parameter determines if there is time delay introduced before sending a UDP frame that has not been entirely filled with user data. If it is set to 0 initiates the sending of a UDP frame as soon as possible after the reception of a single character value from the host. If it is set to 1 initiate a delay will be introduced before the sending of a UDP frame The default value is 0. c. AT+IPBUFF command This command specifies the number of bytes of payload data from remote peer buffered inside the modem when automatic or AT command driven TCP / UDP connection is made. If the quantity of buffered data reaches this value, the whole buffered data will be sent out to the serial port. If the data from remote is large enough at one time, only multiple of this value data will be sent out to the serial port remainder will be kept inside buffer. Example: AT+IPBUFF=5 1234567890 ABCDEFGH FGH 18 bytes of data sent from TCP or UDP socket to modem 15 bytes (multiple of 5) data sent out to serial port, remaining data buffered inside 1234567890 ABCDE the modem Command Syntax AT+IPBUFF = <buff> Response Syntax +IPBUFF: <buff> Command AT+ IPBUFF=? AT+ IPBUFF? AT+IPBUFF = 5 Possible responses: +IPBUFF: 0-100 OK Note: display possible values +IP BUFF: 0 OK Note: display current status OK Note: Set IPBUFF value to 5 Confidential, the whole present document is the sole property of Maestro Wireless Solutions Limited. 25 Defined Values: <buff> The number of bytes of data to be buffered. Default value is 0 (i.e. no buffering). Valid range is 0 to 100. Note: If the TCP or UDP socket connection is broken, buffered data will be lost. 3. Extra TCP/UDP Parameters Setup User can set additional parameters of TCP/UDP connection, including “keep alive” packet, maximum packet size and TTL. a. AT+IPOPT command This command specifies the extra TCP/UDP socket parameters. Command Syntax AT+IPOPT=<CMDType>,<parameter>[,action>] Response Syntax + IPOPT: <CMDType>,<parameter>[,<action>] Command AT+ IPOPT? AT+ IPOPT =1,1 AT+IPOPT=2,512 AT+ IPOPT=3,128 AT+IPOPT=4,60,1 AT+ IPOPT=? Possible responses: +IPOPT: 1, 0 +IPOPT: 2, 536 +IPOPT: 3, 64 +IPOPT: 4,0,0 OK Note: display current settings OK Note: enable the keep alive packet feature OK Note: set the size of maximum packet that to be sent to 512 bytes OK Note: set TTL to 128 OK Note: Enable Ping action every 60 seconds, if ping fail then disconnect GPRS +IPOPT: (1-4),(0-65535)[,(0-2)] OK Note : possible argument Defined Values: <CMDType> 1 setup “keep alive” packet feature: When <parameter> is 0, the feature is disabled When <parameter> is 1 and a TCP socket connected, every 7200 seconds (2 hours) an empty “keep alive” packet will be sent out from the modem to avoid socket being closed because of idle timeout. 2 Specifies the maximum size of the outgoing packet to <parameter>. The size can be set from 1 to 65535(0xFFFF) default value is 65535. Confidential, the whole present document is the sole property of Maestro Wireless Solutions Limited. 26 3 Specifies the TTL value of the socket connection to <parameter>. The value can be set from 1 to 255. Default value is 128. 4 Specify weather to use ping function to check Internet connectivity: <parameter> is the period in second of calling ping function after GPRS connected (+IPCONNECT) <action> to specify the action will be taken if a set of ping action fail: 0 do nothing (default) 1 disconnect GPRS (+IPCONNECT=1,0) 2 reset Maestro Heritage Confidential, the whole present document is the sole property of Maestro Wireless Solutions Limited. 27 CHAPTER 4: AUTOMATIC AND SELF-RECOVERY TCP/UDP CONNECTION The Auto TCP/UDP connection feature is defined for accessing serial devices over the Internet. Heritage can be configured that after power up it will connect to a remote TCP/UDP socket (client mode) or to wait for the TCP/UDP socket connection request from remote peer (server mode). If the socket connection is unsuccessful or disconnected it will repeat the connection request and back to waiting stage. This make remote peer can access serial device connected to Maestro Heritage. Direct serial connection RS-232 cable TCP Socket connection via the Internet /GPRS network Broad band GPRS RS-232 cable Fixed IP: 123.456.789.0 00 Program monitoring Port 23 Auto TCP connection set to connect 123.456.789.0 port 23 Confidential, the whole present document is the sole property of Maestro Wireless Solutions Limited. 28 1. Flow diagram of Auto TCP/UDP connection function Modem Power on/ restart No Is AutoTCP/UDP enabled ? Stop Yes Wait for 20 secs No Re-attach GPRS No GPRS attach OK ? Yes Re-activate GPRS No GPRS activation OK ? Yes TCP/UDP connection request from allowed peer? No No Client mode ? Yes No OK to open pre-defined TCP/UDP socket ? Dealy 2 seconds Yes No Open TCP/UDP socket, connect to serial port Open TCP/UDP socket, connect to serial port TCP/UDP disconnected or closed ? TCP/UDP disconnected or closed ? Yes Yes GPRS attach fail ? No Yes GPRS activation fail ? No No Yes GPRS attach fail ? Yes No GPRS activation fail ? Yes No Confidential, the whole present document is the sole property of Maestro Wireless Solutions Limited. 29 2. AT commands for Auto TCP/UDP connection a. AT+AUTOTCP command This command controls the Heritage to start TCP socket connection automatically Before using AT+AUTOTCP TCP and GPRS settings MUST be setup properly using AT+IPTCP and AT+IPGPRS command respectively. Command Syntax AT+AUTOTCP=<mode> Response syntax: +AUTOTCP: <mode> Command AT+AUTOTCP=0 AT+AUTOTCP=1 AT+ AUTOTCP? AT+AUTOTCP=? Possible responses: OK Note : disable AutoTCP OK Enable AutoTCP +AUTOTCP : 1 OK Note display current status +AUTOTCP : (0-1) Note : possible argument Defined Values: <mode> 1 enable auto TCP 0 disable auto TCP Note: Before enabling Auto TCP, it MUST be properly set the GPRS settings by AT+IPGPRS command and TCP settings by AT+IPTCP command (see Chapter 3) ONLY GPRS PDP context # 1 will be used. So please setup +IPGPRS settings with <cid>=1 Once AutoTCP is enabled, it will start the TCP socket connection automatically after 20 seconds. Once the TCP connection is established successfully, the serial port will go to data mode, all data entered to the serial port will be sent to remote TCP peer. No more AT commands will be accepted then. In TCP connected data mode, the DSR and DCD signals of the serial port will go to high. If the TCP connection is broken the modem will try to reconnect automatically. During re-connection period serial port will go back to command mode, and DSR/DCD signal back to low. The setting will be saved, and after power off, the AUTOTCP will be restarted with the 20 seconds delay after power up. To stop auto TCP connection, you need to enter the command AT+AUTOTCP=0 by either 1: within 20 seconds after power up, or 2: during reconnection (serial port back to command mode), or 3: by SMS (see Chapter, SMS AT commands) Auto TCP connection is exclusive to other TCP/UDP feature. See Chapter 12 (Q&A) Confidential, the whole present document is the sole property of Maestro Wireless Solutions Limited. 30 b. AT+AUTOUDP command This command controls the Heritage to start UDPacket connection automatically. Before using AT+AUTOUDP TCP and GPRS settings MUST be setup properly using AT+IPUDP and AT+IPGPRS command respectively. Command Syntax AT+AUTOUDP=<mode> Response syntax: +AUTOUDP: <mode> Command AT+AUTOUDP=0 AT+AUTOUDP=1 AT+ AUTOUDP? AT+AUTOUDP=? Possible responses: OK Note : disable AutoUDP OK Note: Enable AutoUDP +AUTOUDP : 1 OK Note: display current status +AUTOUDP : (0-1) Note : possible argument Defined Values: <mode> 1 enable auto UDP 0 disable auto UDP Note: Before enabling Auto UDP, it MUST be properly set the GPRS settings by AT+IPGPRS command and UDP settings by AT+IPUDP command ONLY GPRS PDP context # 1 will be used. So please setup +IPGPRS settings with <cid>=1 Once AutoUDP is enabled, it will start the UDP socket connection automatically after 20 seconds. Once the UDP connection is established successfully, the serial port will go to data mode, all data entered to the serial port will be sent to remote UDP peer. No more AT commands will be accepted then. In UDP connected data mode, the DSR and DCD signals of the serial port will go to high. If the UDP connection is broken the modem will try to reconnect automatically. During re-connection period serial port will go back to command mode, and DSR/DCD signal back to low. The setting will be saved, and after power off, the AUTOUDP will be restarted with the 20 seconds delay after power up. To stop auto UDP connection, you need to enter the command AT+AUTOUDP=0 by 1: within 20 seconds after power up, or 2: during reconnection (serial port back to command mode) or 3: by SMS (see Chapter , SMS AT command). Auto TCP connection is exclusive to other TCP/UDP feature. See Chapter 18 (Q&A) Due to the nature of UDP socket connection, AT+AUTOUDP=0 may not be able to disconnection. in this case you may send command AT+IPCONNECT=1,0 to disconnect GPRS connection. Confidential, the whole present document is the sole property of Maestro Wireless Solutions Limited. 31 3. AT commands for tuning Auto TCP/UDP connection a. AT+AUFCM command This command controls the buffering time of TDP/UDP data sent to remote peer. Data coming towards UART will be buffered for a “delay” period before being sent out. Command Syntax AT+AUFCM=<delay> Response syntax: +AUFCM: <delay> Command AT+AUFCM=1 AT+ AUFCM? AT+AUFCM=? Possible responses: OK Note : set the +AUFCM value to 1 +AUFCM : 2 OK Note: display current status +AUFCM : (1-255) Note : possible argument Defined Values: <delay> Default value: 0 Possible value: 1 to 255 Delay units between sending buffered data to TCP/UDP peer. The actual delay time is calculated by the value of <delay> times 18.5 ms. So if <delay> is equal to 2 that means data will be sent to remote peer every 39ms (or immediately if internal buffer is full) Increasing this value can make the data packet size bigger especially when data flow is slow, thus reducing overhead. Note: If the value is set too high the maximum data transfer speed may be decreased. Confidential, the whole present document is the sole property of Maestro Wireless Solutions Limited. 32 CHAPTER 5: AT COMMAND DRIVEN TCP/UDP CONNECTION This feature let user to make a TCP or UDP connection upon the AT+OTCP or AT+OUDP command. This socket connection feature does support DLE/ETX character coding. See 5.1.a The AT+OTCP and AT+OUDP operation is similar to AT#OTCP and AT#OUDP function provided original IP Connectivity. See IP connectivity document. Make sure you have made the GPRS connection by AT+IPCONNECT command before making socket connection (see Chapter 17, setup examples). 1. AT commands for Auto TCP/UDP connection a. AT+DLEMODE command When performing the AT command driven TCP or UDP socket connection, the attached host has the choice to code or not the ETX character. When DLEMODE is set to 0, no specific process is needed on ETX characters. It means that it is not possible for a host to request an end of connection or to receive a clear indication of end of connection from the TCP/IP stack. When DLEMODE is set to 1, the ETX character means a request or an indication of end of connection. As a consequence, ETX characters that belong to the payload data must be sent by the host on the serial port preceded by a DLE character. Similarly ETX characters received by the TCP/IP stack from the Internet are sent to the host through the serial port preceded by a DLE character “ETX” is character hex 03, “DLE” character is hex 10 (Dec 16) Default value is 0. Command Syntax AT+DLEMODE=<mode> Response syntax: +DLEMODE: <mode> Command AT+ DLEMODE =0 AT+ DLEMODE =1 AT+ DLEMODE? AT+ DLEMODE =? Possible responses: OK Note : disable DLEMODE OK Note: Enable DLEMODE +DLEMODE : 1 OK Note: display current status +DELMODE : (0-1) Note : possible argument Defined Values: <mode> 1 enable DLEMODE 0 disable DLEMODE Note: DLEMODE is not available for Automatic TCP/UDP connection. Confidential, the whole present document is the sole property of Maestro Wireless Solutions Limited. 33 b. AT+AOTCP command This command is sent by the attached host to open a TCP connection to the TCP server specified by the AT+IPCTP command. If socket connection is made successfully it will response CONNECT 115200 and the serial port will go to data mode, all data entered to the serial port will be sent to remote TCP/UDP peer. If socket connection is unsuccessful or socket is disconnected afterwards the modem will send out NO CARRIER message and back to command mode. Command Syntax: AT+OTCP Response syntax: CONNECT 115200 Command AT+ OTCP AT+ OTCP AT+ OTCP Possible responses: CONNECT 115200 Note : TCP connection made successfully +CME ERROR 3 Note: fail, either IPCONNECT is not ready or socket service is used already NO CARRIER Note: possibly remote server no response Note: AT+OTCP connection is exclusive to other TCP feature. See Chapter (Q&A) If TCP connection is unsuccessful or broken after connection the GPRS connection will also be disconnected. (+IPCONNECT: 1,0). So please enter AT+IPCONNECT=1,1 to reconnect GPRS before entering AT+OTCP. c. AT+OUDP command This command sent by the attached host to open a UDP connection to the UDP server specified by the AT+IPUDP command. If socket connection is made successfully it will response CONNECT 115200 and the serial port will go to data mode, all data entered to the serial port will be sent to remote UDP peer. If socket connection is unsuccessful or socket is disconnected afterwards the modem will send out NO CARRIER message and back to command mode. Command Syntax: AT+OUDP Response syntax: CONNECT 115200 Command AT+ OUDP AT+ OUDP AT+ OUDP Possible responses: CONNECT 115200 Note : UDP connection made successfully +CME ERROR 3 Note: fail, either IPCONNECT is not ready or socket service is used already NO CARRIER Note: possibly remote server no response Confidential, the whole present document is the sole property of Maestro Wireless Solutions Limited. 34 Note: AT+OUDP connection is exclusive to other TCP/UDP feature. See Chapter 18 (Q&A) If UDP connection is unsuccessful or broken after connection the GPRS connection will also be disconnected. (+IPCONNECT: 1,0). So please enter AT+IPCONNECT=1,1 to reconnect GPRS before entering AT+OUDP. Due to the nature of UDP socket connection, sending ETX characters (when DLEMODE is 1) may not be able to make disconnection. Confidential, the whole present document is the sole property of Maestro Wireless Solutions Limited. 35 CHAPTER 6: PING SERVICE This feature is to make a ping (ICMP Echo Request) to a specified IP address and get back the echo result. Ping service can also be called by IPCONNECT as a tool to check Internet connection. See AT+IPOPT command in Chapter 3 for details. 1. AT command for setting up and execute ping a. AT+IPPING command Command Syntax: AT+SMSAT=<mode>(,<key>) AT+IPPING= <mode>,<address>, <nb>, <delay>, <timeout> Response syntax: +IPPING : ,<address>, time=<echo time> Command Possible responses: AT+IPPING=2, ”210.103.11.18” OK ,3,1,15 Note : configure ping target (210.103.11.18), 3 ping trials total, 1 second between each trial, timeout limit 15 AT + IPPING +IPPING : “210.103.11.18”, time=562ms +IPPING : “210.103.11.18”, time=662ms +IPPING : “210.103.11.18”, time=762ms OK Note: Execute ping action (no argument) AT+IPPING=? AT+IPPING? +IPPING: (0-2),(15),(1-10),(1-10),(1-60) OK Note : Possible arguments +IPPING: ”210.103.11.18”, 3, 1, 15 OK Note: Display current status Defined Values: <mode> 0,1 reserved 2 configure ping address and parameters below <address > IP address of the target to be pinged. Must be in form of dot-decimal notation (xxx.xxx.xxx.xxx). <nb> Numbers of ping trials for each ping action. E.g. if the value is 3 will ping the target for 3 times. Default value is 3. Valid range is 1 to 10. (When used with IPCONNECT check the ping is assumed fail if all ping trails fail.) <delay> Time in second between each ping trial. Default value is 3. Valid range is 1 to 10. Confidential, the whole present document is the sole property of Maestro Wireless Solutions Limited. 36 Note : - Ping target must be in dot-decimal notation format, URL format is not supported. Before making command driven ping action (AT+IPPING w/o argument) make sure GPRS is connected (+IPCONNECT: 1,1) and ping target and parameters are set properly. Confidential, the whole present document is the sole property of Maestro Wireless Solutions Limited. 37 CHAPTER 7: DYNAMIC DNS To use this feature, we strongly suggest getting special GPRS service from your network operator: a. Network will assign a true public IP address to Heritage upon GPRS activations, and b. that GPRS connection allows incoming access from public Internet to Heritage This feature lets Heritage to login to certain Dynamic DNS service providers, to update the hostname with Heritage current IP address. So user can access Heritage with pre-registered hostname. User can use this function together with “TCP Terminal” (see Chapter 8 ) and can use Telnet to access Heritage and send AT command over Internet. Maestro Wireless Solution Ltd does not have affinity with any Dynamic DNS service providers. Maestro Wireless Solution Ltd does not guarantee any service provided by DDNS service providers and not liable to any loss or damage caused by such service. 1. Description of the Operation Dynamic DNS service mymodem.ddns.com Dynamic IP: 200.123.111.21 mymodem.ddns.com <-> 200.123.111.21 1. User need to create an account on DDNS service providers and register a hostname. Following providers are tested working correctly: www.dyndns.com www.no-ip.com 2. Use AT+IPDDNSSERV command to enter DDNS update server URL and port no. Use AT+IPDDNSACCT to enter own account login, password and hostname. 3. When IPCONNECT is ready, use AT+IPDDNSUPD command to update the above hostname with modem‟s current IP address. 4. User can also use AT+IPDDNSUPD command to configure automatic DDNS update upon each time of IPCONNECT established Confidential, the whole present document is the sole property of Maestro Wireless Solutions Limited. 38 2. AT command for configuring Dynamic DNS a. AT+IPDDNSSERV command Command Syntax: AT+IPDDNSSERV= <serv_url>,<serv_port> Response syntax: +IPDDNSSERV: <serv_url>,<serv_port> OK Command Possible responses: AT+IPDDNSSERV=”members.dy OK ndns.org”,80 Note : enter DDNS service provider‟s update server information AT+IPDDNSSERV? +IPDDNSSERV: ”members.dyndns.org”,80 OK Note display current status AT+IPDDNSSERV=? +IPDDNSSERV: (64),(0-65535) OK Note : Possible arguements Defined Values: <serv_url> URL of the update server. For example it is “members.dyndns.org” for www.dyndns.com. Check with your DDNS service provider for correct name. <serv_port > Port number of the update server. For example it is 80 or 8080 for www.dyndns.com. Check with your DDNS service provider for correct port number.. List of parameters of verified DDNS service providers Provider www.dynnds.com www.no-ip.com <serv_url> members.dyndns.org dynupdate.no-ip.com <serv_port> 80 80 b. AT+IPDDNSACCT command Command Syntax: AT+IPDDNSACCT=<hostname>,<login>,<psswd> Response syntax: OK Command AT+IPDDNSACCT=”12345678.dy ndns.org”, ”maestro”, ”maestro” AT+IPDDNSACCT? AT+IPDDNSACCT=? Possible responses: OK Note : enter DDNS account and host name info +IPDDNSACCT: ”12345678.dyndns.org”, ”maestr o”, ”maestro” OK Note display current status +IPDDNSACCT: (64),(32),(32) OK Note : Possible arguements Confidential, the whole present document is the sole property of Maestro Wireless Solutions Limited. 39 Defined Values: <hostname> Hostname to be associated with M100‟s IP address. Should register the hostname in your account and verified it on your DDNS service provider. Maximum length is 64 characters. <login > Login name of the DDNS service account. Maximum length is 32 characters. <psswd > Login password of the DDNS service account. Maximum length is 32 characters. c. AT+IPDDNSUPD command Command Syntax: AT+IPDDNSUPD AT+IPDDNSUPD= <auto_upd> Response syntax: OK +IPDDNSUPD: <result>, <ret_code> Command AT+IPDDNSUPD=1 AT+IPDDNSUPD=0 AT+IPDDNSUPD AT+IPDDNSUPD AT+IPDDNSUPD? AT+IPDDNSUPD=? Possible responses: OK Note : enable automatic DDNS update OK Note : disable automatic DDNS update +IPDDNSUPD: 1, “good 203.111.111.111” OK Note : perform DDNS update, successful +IPDDNSUPD: 3, “badauth” OK Note : perform DDNS update,unsuccessful +IPDDNSUPD: 3, “badauth” OK Note : display current setting: automatic DDNS update disabled result of last DDNS update since power up + IPDDNSUPD: (0-1) OK Note : Possible arguements Defined Values: < auto_upd > 0 disable automatic DDNS update 1 enable automatic DDNS update (see notes for details) <result > result of DDNS update process. it is related to the return code of DDNS update server. if <result> is 1 or 2 the update is assumed successful . < ret_code > return code of DDNS update server. Confidential, the whole present document is the sole property of Maestro Wireless Solutions Limited. 40 Following table list the relationship between <result> and <ret_code>. Result Ret_code 1 good 2 3 4 no_chg badauth donator 5 6 7 8 9 10 11 notfqdgn Nohost numhost abuse badagent dnserr 911 Visit Website of DDNS service providers for the explanation of return code. Note : If the DDNS update process fails because of failure to get server response the <result> maybe a negative value, contact Heritage to get details. Before making command driven ping action (AT+IPPING w/o argument) make sure GPRS is connected (+IPCONNECT: 1,1) and ping target and parameters are set properly. If automatic DDNS update enabled, Heritage will detect GPRS connection and start DDNS update once connection is established. If update is fail it will retry for 3 times maximum. User can enter AT+IPDDNSUPD? to check the result of last update result. Confidential, the whole present document is the sole property of Maestro Wireless Solutions Limited. 41 CHAPTER 8: TCP TERMINAL To use this feature, we strongly suggest getting special GPRS service from your network operator : a. Network will assign a true public IP address to Heritage upon GPRS activations, and b. that GPRS connection allows incoming access from public Internet to Heritage This feature lets Heritage 100 can be connected through TCP channel, and AT commands can be sent over this channel. User can use Telnet type terminal service to “login” to M100 and control it by sending AT commands through the telnet. 1. Description of the Operation Telnet Terminal 1. 2. 3. 4. Uses AT+TCPTERM command to configure password port for the TCP terminal, and enable TCP terminal function. After about 20 seconds Heritage will connect to the Internet automatically. And then it will check the TCP port. User from outside Internet can use Telnet application to connect the port of Heritage TCP terminal. User need to know the IP address of the Heritage. Or with the aid of Dynamic DNS (Chapter) user can use the hostname associated the Heritage for connections. Once connected user need to enter password. If password is correct user can send AT command to the Heritage on Telnet program. 2. AT command for TCP Terminal a. AT+TCPTERM command Command Syntax: AT+TCPTERM =<mode>[,<psswd>,<port>,<timeout>] Response syntax: +TCPTERM =<stat>,<psswd>,<port>,<timeout> OK Confidential, the whole present document is the sole property of Maestro Wireless Solutions Limited. 42 Command Possible responses: AT+TCPTERM=2, ”123456”,23,3 OK 0 Note : configure TCP Terminal, password: 123456, port: 23, timeout:30(secs) AT +TCPTERM=1 OK Note : enable TCP terminal AT+TCPTERM=0 OK Note : disable TCP terminal AT+TCPTERM? +TCPTERM: 1,”123456”,23,30 Note : display current status AT+TCPTERM=? +TCPTERM: (0-1),(16),(1-65535),(1-65535) OK Note : possible argument Defined Values: <mode> 0 disable TCP Terminal. 1 enable TCP Terminal. 2 configure TCP Terminal parameters. <psswd> Login password for TCP Terminal. When user opens the Heritage TCP Terminal port it will prompt “password”. User need to enter the password set with this parameter. User has 3 times of chance to enter correct password. If password is correct user can enter AT command otherwise TCP connection will be closed. It can be consisting 1 to 16 alphanumeric characters. Default is “000000” (6 zeros). <port> Port number of TCP Terminal. Please do not set to the same value of port number in +IPTCP and +IPUDP command. Default is 23. Valid value is 1 to 65535. <timeout > Maximum time in second TCP terminal will wait for an entry after TCP terminal opened. If no data received in this period the connection will be closed. Default is 30. Valid value is 1 to 65535. Note : If TCP terminal is enabled the Heritage will connect to GPRS (+IPCONNECT=1,1) about 15 seconds after power up. Only one TCP terminal connection can be made at a time. Any further connection requested will be refused. Not all AT commands could be executed. If un-allowed command is entered “command not allowed” message will be returned. Command echo feature is always enabled (except entering password). Unsolicited codes like “RING”, “+CMTI”, etc will not be displayed on TCP terminal. Never send „interactive‟ AT command by SMS, e.g. AT+CMGS=…. This feature cannot return the prompt to the sender for second input. Always think twice before you send AT command. For example if you send AT+CPOF it will turn off the modem, and you need to go to access the modem to reset it. Confidential, the whole present document is the sole property of Maestro Wireless Solutions Limited. 43 CHAPTER 9: EMAIL SENDING (SMTP) SERVICE To use this feature, make sure there is a SMTP server which can serve you. The network service provider may have her own dedicated SMTP server. For using other SMTP server, please check if the service connection is possible or not. This feature Heritage to send an email via a SMTP server. This feature can save parameters like of SMTP sever name, address of sender and recipient, email subject and email body (content). Then with AT command this function will construct and email using the above stored Information. The above information will also be used by Command String email sending service (Chapter 16.7). 1. Description of the Operation 1. Enter the following information by AT commands (see following sections) - SMTP server Information (address, port, login Info) - Email addresses of sender; recipient (s) - Email subject - Email body (content) Valid “minimal” emails contain sender address and one recipient address with no subject and no content (empty email). 2. Make IP connection (see Chapter 3.1.b). 3. Use AT+EMSEND command to send out email. 4. An email can contain - maximum up to 1024(pre-stored)+128(command line additional) characters, - three (sets of) recipient: "To","cc" and "bcc". Each set have 64 characters of email address(es) - .Subject (title) up to 128 characters, from a choice 10 pre-store subject record. 2. AT command for email sending a. AT+IPSMTP command This command is to set SMTP server parameters Command Syntax: AT+IPSMTP= <port>,<auth >,<server>,<id>,<pwd> Response syntax: +IPSMTP= <port>,<auth >,<server>,<id>,<pwd> OK Command Possible responses: AT+IPSMTP=25,1,”smtp.networ OK k.com”,”login”,”pssd” Note : setup SMTP parameter (using authentication with no encryption) AT+IPSMTP=25,0,”smtp.networ OK k.com” Note : setup SMTP parameter (no authentication) AT+IPSMTP? +IPSMTP: 25,0,”smtp.network.com” OK Note : display current setting Confidential, the whole present document is the sole property of Maestro Wireless Solutions Limited. 44 AT+IPSMTP=? +IPSMTP: (0-65535),(0-2),(120),(64),(64) OK Note : Possible arguements Defined Values: <port> Port number of the SMTP server. Default value is 25. <auth> Authentication type used for authentication: 0 no authentification required (default) 1 authentification with no encryption 2 authentication used with encrypted username/password in MIME64 during AUTH LOGIN phase <server> IP address of SMTP server (in xxx.xxx.xxx.xxx format) or an alpha numeric string format (e.g. smtp.server.com) Maximum 120 characters Note: if alpha numeric string format is used, make sure the GPRS network has proper DNS service available. <id> login name of the user. Maximum 64 characters. <pwd> Password for the user. Maximum 64 characters. b. AT+EMADDR command This command is to save, read and delete email addresses of sender, recipient, cc recipient and bcc recipient. Command Syntax: AT+EMADDR= <oper>,<id>,<address> Response syntax: +EMADDR : <oper><id>,<addr> OK Command AT+ EMADDR=0,0,”[email protected]” AT+ EMADDR=0,1,”[email protected]” AT+ EMADDR=1,1 AT+ EMADDR=2,1 AT+ EMADDR=? Possible responses: OK Note: store email address id 0 (sender address) OK Note: store email address id1 +EMADDR: 1, "[email protected]" Note: read stored address id 1 OK Note: erase email address id1 +EMADDR: (0-2),(0-50), (64) Note: possible argument Defined Values: <oper> Type of operation: 0 store email address to flash 1 read email address from flash 2 erase email address from flash Confidential, the whole present document is the sole property of Maestro Wireless Solutions Limited. 45 <id> Identification number (id) of the email address. Valid value is 0 to 50 0 id of the sender address (mandatory) 1-50 id of recipient email address <addr> Email address to be stored Note: The program will NOT check if the address is in valid format or not. Email address stored with <id>=0 can only be used as of the sender address, not recipent.. For each <id> you can save more than one email address, separated by comma, e.g. AT+EMADDR=0,1,"[email protected] , [email protected] , [email protected]" But each address list limited to 64 characters. c. AT+EMSUBJ command This command is to save, read and delete email subject (title). Command Syntax: AT+EMSUBJ= <oper>,<id>,<subj> Response syntax: +EMSUBJ : <oper><id>,<subj> OK Command AT+ EMSUBJ=0,1,”This is subj #1” AT+ EMSUBJ=1,1 AT+ EMSUBJ=2,1 AT+ EMSUBJ=? Possible responses: OK Note: store email subject #1 +EMSUBJ: 1, "This is subj #1" Note: read stored email subject with <id>=1 OK Note: erase email subject with <id>=1 +EMSUBJ: (0-2),(1-10), (128) Note: possible argument Defined Values: <oper> Type of operation: 0 store email subject to flash 1 read email subject from flash 2 erase email subject from flash <id> Identification number (id) of the email subject. Valid value is 1 to 10 <subj> Email subject to be stored. Maximum 128 characters for each subject. Note: It is recommend using only alpha-numeric characters (ASCII value 32 to 127) for email subject content. Confidential, the whole present document is the sole property of Maestro Wireless Solutions Limited. 46 d. AT+EMBODY command This command is to save, read and delete pre-stored email body (content). Up to 3 email bodies with 1024 characters max can be stored. The <id> field is the id number of the email body to be stored. To save email body, first enter AT+EMBODY=0,<id> then <ENTER> and wait for "> " prompt. Then simply type email body content, <ctrl-Z> (ASCII 26) to finish. This command can be aborted using the <ESC> (ASCII 27) character when entering text. Command Syntax: AT+EMBODY= <oper>,<id>,<BODY> text is entered <ctrl-z / ESC> Response syntax: +EMBODY : <oper><id>,<BODY> Email body entered OK Command AT+ EMBODY=0,1 Possible responses: > This is email body #1<ctrl-Z> Note: enter email body with <id>=1 +EMBODY: 1,21 OK Note: successful stored 21 characters as email body with <id>=1 AT+ EMBODY=0,1 > This is email <ESC> Note: press <ESC> to abort email body entry AT+ EMBODY=1,1 AT+ EMBODY=2,1 AT+ EMBODY=? OK Note: abort to store email body with <id>=1 +EMBODY: 1 This is email body #1 OK Note: read stored email body with <id>=1 OK Note: erase email body with <id>=1 +EMBODY: (0-2),(1-3) Note: possible argument Defined Values: <oper> Type of operation: 0 store email body to flash 1 read email body from flash 2 erase email body from flash <id> Identification number (id) of the email body. Valid value is 1 to 3 Confidential, the whole present document is the sole property of Maestro Wireless Solutions Limited. 47 Note: As a standard smtp type email, the body should contain alpha-numeric characters only. Each email body can contain up to 1024 characters. If data entered is more than 1024 it will stop getting and saved to On save email body to a same <id> old body will be over written. e. AT+EMSEND command This command is send an email with pre-saved email subject(using AT+EMSUBJ command); pre-saved email body (content) (using AT+EMBODY command), plus and additional email body to pre-saved email address(es) (using AT+EMADDR command). Maximum three (group of) reipent(s) can be sent for a single email: standard recipient, carbon copy (cc) recipient, blind carbon copy (cc) recipient. GPRS connection (+IPCONNECT=1,1) must to be made and smtp parameters have to be entered properly before sending email otherwise will return +CME ERROR: 3 . When finishing a result code will be returned. Result code "0" means email transferred success, otherwise there is error. See following for more explanation. Command Syntax: AT+EMSEND= <to_id>,<cc_id>,<bcc_id>,<subj_id>,<body_id>,<add_body> Response syntax: +EMSEND : <result> OK +CME EORR 3 Command AT+ EMSEND=1 AT+ EMSEND=0,0,2 AT+ EMSEND =1,2,3,1,1,”extra” AT+ EMSEND=1,2,3,1,1,”extra” AT+ EMSEND=1,2,3,1,1,”extra” Possible responses: +EMSEND: 0 OK Note: minimum email (no subject and body)successfully sent email to email address stored <id>=1 +EMSEND: 0 OK Note: minimum email (no subject and body)successfully sent email to email address stored <id>=1 as “bcc” recipient + EMSEND: 0 OK Note: email with subject stored with <id>=1; body stored with <id>=1 and additional body “extra” is sent to: Address with <id>=1 as recipient, Address with <id>=2 as cc recipient, Address with <id>=3 as bcc recipient +CME ERROR:3 Note: email sending fail (possible reason : IP not connected) +EMSEND: 550 OK email sending fail (smtp reply code: No such user here) Confidential, the whole present document is the sole property of Maestro Wireless Solutions Limited. 48 Defined Values: <to_id> Identification number (id) of the email address(es) that as a normal email recipient. Valid value is 0 to 50.('0' or missing parameter means no recipient for this email) <cc_id> Identification number (id) of the email address(es) that as a "carbon copy" (cc) email recipient. Valid value is 0 to 50. ('0' or missing parameter means no cc recipient for this email) <cc_id> Identification number (id) of the email address(es) that as a "blind carbon copy" (cc) email recipient. Valid value is 0 to 50. ('0' or missing parameter means no recipient for this email) . <subj_id> Identification number (id) of the email subject. Valid value is 0 to 10. ('0'or missing parameter means no subject for this email). <body_id> Identification number (id) of the email body (content). Valid value is 0 to 3. '0'or missing parameter means no saved body will be used for this email. < add_body > Additional email body (content) to be sent. Maximum 128 characters can be sent. Identification < add_body > will be added just after body indicated by <body_id>(if available). <id> Identification number (id) of the email body. Valid value is 1 to 3 <result> Result code of the email sending process: Result code 0 -1 -2 -3 -4 -5 -99 4xx – 5xx explanation Email sending successful Reserved Reserved Smtp setup fail Cannot resolve smtp server/ server not found Connect smtp server timeout Other error SMTP protocol reply code Comments / countermeasure Contact Maestro Wireless Contact Maestro Wireless Check +IPSMTP parameters Check +IPSMTP parameters Retry later Contact Maestro Wireless Check SMTP document (RFC 821) for explanation Note: As a standard SMTP type email, the body should contain alpha-numeric characters only. A "minimum" email contains at least sender's email address and one recipient address. Subject and body can be left empty. On save email body to a same <id> old body will be over written. When one email is being sent you cannot send another email. To put a queue of emails please use Command String "EM" (email sending) service. Confidential, the whole present document is the sole property of Maestro Wireless Solutions Limited. 49 CHAPTER 10: REMOTE AT COMMAND BY SMS This feature is to control the modem to interpret AT command from incoming SMS, executing it, and return the result to sender by SMS. The user can enable the modem to receive AT command by incoming SMS. See following about AT+SMSAT command. 1. Description of the operation Step 1: send AT command to modem by SMS 000000AT+CSQ Step 2: modem execute and return response by SMS +CSQ: 17,0 5. 6. 7. 8. 9. 10. 11. 12. OK When enabled, the modem will treat the incoming SMS as a source of AT command only if all of the following conditions (a, b and c) are fulfilled: a. The content of SMS sent to the modem is using standard 7-bit GSM data decoding scheme, b. The first 6 characters of the SMS content matches the <key> parameter set by AT+SMSAT command, (default key is “000000”) c. The 7th and 8th characters of the SMS content is “AT” (in capital letters) If SMSAT is enabled, the modem will read each incoming SMS, if the conditions mentioned in 1 are matched the message will be executed, even it is an invalid AT command When using SMSAT feature, only +CNMI:x,1,x,x,x setting could be used (i.e. incoming message will be stored in SIM card). The maximum length of the AT command is limited by length of SMS, i.e. 160-6 = 154 characters When the SMS AT command is executed, all intermediate and final responses will be buffered recorded, then return to the sender‟s phone number in one single SMS. If response(s) of the AT command is (are) more than 160 characters, only the first 160 characters will be returned. In case the modem cannot get terminal response within 26 seconds, the modem will then abort the command, and return intermediate responses (if present). If the SMSAT feature is enabled, all incoming SMS, either with valid AT command or not, will be erased. This is to prevent SIM card memory from fully filled; such the modem will not receive new SMS. Confidential, the whole present document is the sole property of Maestro Wireless Solutions Limited. 50 2. AT command for configuring AT command by SMS a. AT+SMSAT command Command Syntax: AT+SMSAT=<mode>(,<key>) Response syntax: +SMSAT: <mode>,<key> Command AT+SMSAT=0 AT+ SMSAT =1 AT+ SMSAT? AT+SMSAT=2,123456 AT+ SMSAT =? Possible responses: OK Note : disable remote AT command by SMS OK Enable remote AT command by SMS +SMSAT : 1,000000 OK Note display current status OK Note: set the <key> value +SMSAT : (0-2),(6) OK Note : possible argument Defined Values: <mode> 0 disable remote AT command by SMS 1 enable remote AT command by SMS 2 change the value of the <key> <key> A 6-digit numeric character key from 000000 to 999999. Only incoming SMS with the first 6 characters matching with this key will be treated as a valid source of remote AT command. 3. Limitation and caution to be taken when using remote AT command This feature will not „judge‟ the result of executing the command, so care has to be taken not to enter improper command that make the modem becoming out of control: 1. Never send „interactive‟ AT command by SMS, e.g. AT+CMGS=…. This feature cannot return the prompt to the sender for second input 2. Always wait for the return SMS with AT responses before you send another SMS AT command. 3. It could be in some case (e.g. network failure) the modem cannot return response SMS. The modem will try sending response SMS for three times max. If still not successful it will abort. 4. Always think twice before you send AT command by SMS. For example if you send AT+CPOF it will turn off the modem, and you need to go to access the modem to reset it. Confidential, the whole present document is the sole property of Maestro Wireless Solutions Limited. 51 5. Some AT commands can be sent over SMS. See Chapter 17. CHAPTER 11: CALL SCREENING This feature enables Heritage to reject incoming call if the phone number does not match one of the entries of authorized phone number list. Unauthorized incoming call will be hanged up within one ring. Up to 10 authorized phone numbers can be stored. Each number can be as long as characters Waiting call can also be rejected. 1. AT commands for configuring call screening a. AT+CSRN command This command is to enable or disable call screening feature. Command Syntax: AT+CSRN=<mode> Response syntax: +CSRN: <mode> Command AT+CSRN=0 AT+CSRN=1 AT+CSRN? AT+CSRN=? Possible responses: OK Note : disable call screening OK Enable call screening +CSRN : 1 Note display current status +CSRN: (0-1) Note : possible argument Defined Values: <mode> 0 disable call screening 1 enable call screening Note: To use call screening make sure Caller ID service is enabled otherwise all incoming call will be rejected. To apply call screening to waiting call please first enable Call waiting indication by command AT=CCWA=1,1 Rejected incoming will not be diverted to voice mail. b. AT+CSNW command This command is to enter authorized phone number. Command Syntax: AT+CSNW=<id>,<num> Response syntax: OK Confidential, the whole present document is the sole property of Maestro Wireless Solutions Limited. 52 Command AT+CSNW=1,”12345678” AT+CSNW=11,”12345678” AT+CSNW=3,”1qaaa” AT+CSNW=? Possible responses: OK Note : enter authorized number to location 1 +CME ERROR: 3 Note : location out of range +CME ERROR: 3 Note : non-numeric characters not allowed +CSRN: (1-10),(20) Note : possible argument Defined Values: <id> Location of the authorized phone number to be stored. Valid range is from 1 to 10 <num> Authorized phone number. First digit can be “+”, others must be numeric digits. Maximum length is 20 Note: Enter phone number exactly same as the incoming one, especially if entering International phone number. Use AT+CLIP command to check incoming call number first. Enter empty phone number in the <num> field will erase the record of that location. c. AT+CSNR command This command is to read authorized phone number entered. Command Syntax: AT+CSNR=<id1>(,<id2>) Response syntax: +CSNR: <id>,<num>…. Command AT+CSNR=1 AT+CSNR=1,8 AT+CSNR=? Possible responses: +CSNR: 1, “12345678” OK Note : display authorized number in location 1 +CSNR: 1, “12345678” +CSNR: 3, “123456” +CSNR: 6, “12345678” +CSNR: 8, “12345678” OK Note : display authorized number in from location 1 to 8 +CSNR=(1-10),(1-10) OK Note: possible argument Defined Values: <id1> Beginning location of the authorized phone number to be read. Valid range is from 1 to 10. <id2> Ending location of the authorized phone number to be read. Valid range is from 1 to 10. Confidential, the whole present document is the sole property of Maestro Wireless Solutions Limited. 53 d. AT+CSND command This command is to erase authorized phone number entered. Command Syntax: AT+CSND=<id1>(,<id2>) Response syntax: +CSNR: <id>,<num>…. Command AT+CSND=1 AT+CSNR=1,8 AT+CSND=? Possible responses: OK Note : erase authorized number in location 1 OK Note : erase authorized number in from location 1 to 8 +CSND=(1-10),(1-10) OK Note: possible argument Defined Values: <id1> Beginning location of the authorized phone number to be erased. Valid range is from 1 to 10. <id2> Ending location of the authorized phone number to be erased. Valid range is from 1 to 10.AT+CSRN command. CHAPTER 12: MODEM STATUS CHECK AND Confidential, the whole present document is the sole property of Maestro Wireless Solutions Limited. 54 MONITORING The Modem Status Check and Monitoring feature makes the modem can check the status of the modem in either “one shot” or periodic (per minute) mode. Modem will also report check result by SMS if result is beyond preset limit, and reset automatically if losing network connection. Following items will be checked: network registration (periodic mode only, triggering reset) rom test signal strength (can trigger reporting) IP address of modem (only when GPRS connection activated). 1. AT command for Modem Status Check and Monitoring a. AT+TMODE command This command is to perform and setup modem status check and monitoring feature Command Syntax: AT+TMODE (=<mode>(,<para>)) Response syntax: +TMODE: <test1>,<test2>…. Command AT+TMODE AT+TMODE=? AT+TMODE? AT+TMODE=0 AT+TMODE=1 AT+TMODE=2,”1234567” AT+TMODE=3,10 AT+TMODE=4,3450 Possible responses: +TMODE: 1, 15, “10.111.222.33”, 3814 OK Note : execute status check (“one shot” mode) +TMODE: (0-4), (15) Note : possible argument +TMODE: 1, 1234567, 10, 3500 OK Note: display current setting OK Note: disable periodic mode check OK Note: enable periodic mode check OK Note: set telephone number for periodic mode reporting OK Note: set network signal trigger level for remote reporting OK Note: set input voltage trigger level for remote reporting Defined Values : <mode> 0 disable periodic mode check 1 enable periodic mode check 2 to set the number in <para> field as telephone number for periodic mode check reporting. See section 7.1.2 for details 3 to set the number in <para> field as network signal trigger level for periodic mode check reporting. See section 1b for details b. Operation of Modem Status Check and Monitoring Confidential, the whole present document is the sole property of Maestro Wireless Solutions Limited. 55 “One Shot” mode: When user enters AT+TMODE command the modem will perform a single check and will send back the result like this: +TMODE: 1, 15, “10.111.222.33”, 3814 OK Meaning of parameters: Check item rom data checksum network signal strength modem IP address Input voltage Result field # 1 2 3 4 Result 0 fail 1 pass Range from 1-32 (or 99) In xxx.xxx.xxx.xxx format Voltage to the modem’s internal module (times 1000) Remark same as AT+CSQ Only shown when GPRS session is activated See * below * Note. This is not for end customer use. “Periodic” mode: When user enters AT+TMODE=1 command the modem will perform periodic check every one minute: Firstly it will check if the modem is registered to the network; if the modem is not registered to the network it will increase a counter by one. If the counter reach 5 (i.e. not registered for consecutive 5 minutes) the modem will reset If the modem is registered to the network the counter will be reset to 0 and perform check same as “one shot” mode If the result of the network signal strength is lower than the setting of AT+TMODE=3,x the test result will be sent over SMS to the telephone number set by AT+TMODE=2,xxxxxxx (max number of digit is 20) If the result of the input voltage is lower than the setting of AT+TMODE=4,x the test result will be sent over SMS to the telephone number set by AT+TMODE=2,xxxxxxx If 3 consecutive checks fail (i.e. 3 SMS sent) then the periodic mode check will be disabled automatically. Network signal trigger level range is from 1-31. CHAPTER 13: AUTOMATIC PIN ENTRY The Automatic Pin entry feature lets user to save a PIN code into Heritage. When Heritage detects a PIN (PIN1) enabled SIM on starting it will use this saved PIN code to unlock the Confidential, the whole present document is the sole property of Maestro Wireless Solutions Limited. 56 SIM. To prevent further PIN blocking user can set minimum PIN Remaining Attempt Number as a prerequisite for the automatic PIN entry operation. Following items will be checked: 1. AT command for Automatic PIN Entry a. AT+AUTOPIN command This command is to configure and enable/disable Automatic PIN Entry feature Command Syntax: AT+AUTOPIN=<mode> [,<pin>,<remain>,<unso>)) Response syntax: OK Command AT+AUTOPIN=1 AT+AUTOPIN=0 AT+AUTOPIN? AT+AUTOPIN=? AT+AUTOPIN=2,”8888”,3,0 AT+AUTOPIN=1 AT+AUTOPIN=2,,2,1 AT+CFUN=1 +AUTOPINE: 1 Possible responses: OK Note : enable Automatic PIN Entry OK Note : disable Automatic PIN Entry +AUTOPIN: 1, “1234”, 3, 0 OK Note: display current setting +AUTOPIN: (0-2),(4),(1-3),(0-1) Note: possible arguments OK Note: set saved PIN as “8888”, PIN Remaining Attempt Number as 3, disable unsolicited message OK OK Note: enable Automatic PIN Entry and unsolicited message and set PIN Remaining Attempt Number to 2 OK Note: after reset PIN Remaining Attempt Number is 1, Automatic PIN Entry aborted and display unsolicted message Defined Values : <mode> 0 disable Automatic PIN Entry (default value) 1 enable Automatic PIN Entry 2 configure parameters <pin> Four digit PIN code for Automatic PIN Entry, default value is "0000" <remain> Minimum value of PIN Remaining Attempt Number. If PIN Remaining Attempt Number is less than the value of <remain>, Automatic PIN Entry will not operate. Valid value is 1 to 3. Default value is 3. <unso> 0 no unsolicited message (default) 1 unsolicited message +AUTOPINE: <pin_remain> will be displayed if <remain> is Confidential, the whole present document is the sole property of Maestro Wireless Solutions Limited. 57 larger than PIN Remaining Attempt Number. Note: Be VERY careful on using this feature as normally a SIM card have 3 times of PIN entry attempts. Further Incorrect attempt will lead to the card become SIM blocked and need PUK to unblock the cad. This feature is only for SIM card that is PIN1 enabled. It will not work for PIN2 or PUK locked SIM card. The Automatic PIN Entry operation will be performed only after power up or restart. Enabling AUTOPIN after power up will not make it operate immediately. The AT+AUTOPIN command cannot be entered remotely (SMS, TCP Terminal). I can only be entered via local physical port. The AT+AUTOPIN command is not password protected. Be cautious of saved PIN entry read by other people. Confidential, the whole present document is the sole property of Maestro Wireless Solutions Limited. 58 CHAPTER 14: REMOTE PROGRAM UPDATE By using this feature, user can download the new version of Maestro Heritage program from a FTP server and upgrade the program. By combining Remote AT command by SMS feature user can control the Maestro to complete the program downloading and updating process remotely. GPRS Download file from FTP server AT commands to start download and update AT+IPFTP=21,”A’,”I”,”123.456.789”,”id”,”pwd” AT+FTPDOTA=”new_prog.dwl”,1 FTP server To perform the whole program update process, several AT commands (steps) have to be sent: 1. AT+IPGPRS to set network parameters (APN) 2. AT+IPFTP to set FTP server parameters (name, user id, password) 3. AT+FTPDOTA to set filename and FTP path and start downloading (*) 4. AT+ADINSTALL to install the downloaded new program (*) (*) Note: by adding one extra parameter after step 3 complete, step 4 will be executed automatically. See following sections for details 1. AT command for remote firmware update a. AT+IPFTP command This command is to set FTP server parameters Command Syntax: AT+IPFTP =<port>,<type>,<mode>,<server>,<id>,<pwd> Response syntax: OK Command AT+IPFTP= 21,”I”,”A”,”201.123.222.222”, ”userid”,”pssd” AT+IPFTP=? AT+IPFTP? Possible responses: OK Note : setup FTP parameter +IPFTP: (0-65535), (“A”,”I”,”E”),(“P”,”A”),(120),(64),(64) Note : possible argument +IPFTP: 21,”I”,”A”,”201.222.222.222”,”userid”,”pssd” OK Note: display current setting Defined Values : <port> Port number of the FTP server. Default value is 21 <type> Translation of carriage return, valid values are: I image (no translation, default), A ASCII Confidential, the whole present document is the sole property of Maestro Wireless Solutions Limited. 59 E EBCDIC <mode> Passive or Active mode valid values are: P passive (default), A active <server> IP address of FTP server (in xxx.xxx.xxx.xxx format) or an alpha numeric string format (e.g. ftp.server.com) Maximum 120 characters Note: if alpha numeric string format is used, make sure the GPRS network has proper DNS service available. <id> login name of the user. Maximum 64 characters. <pwd> Password for the user. Maximum 64 characters. b. AT+FTPDOTA command This command is to inform the modem the filename and FTP path. The modem will login to the FTP server; download the update file, and optionally execute the update process. Command Syntax: AT+FTPDOTA =<filename>[,<path>],[,<update>] Response syntax: +FTPDOTA : 0, <filename>, <filesize> +FTPDOTA : <result> +ADINSTALL : <adinstall result> Command AT+FTPDOTA=”update.dwl” Possible responses: +FTPDOTA: 0, update.dwl, 17000 OK Note : download “update.dwl” file from FTP root directory, file size is 17000 bytes AT+FTPDOTA=”update1.dwl,”sub” +FTPDOTA: 0, update.dwl, 17001 OK Note : download “update1.dwl” file from FTP “sub” directory, file size is 17001 bytes AT+FTPDOTA=”update1.dwl,”sub”,1 +ADINSTALL: 2 M100_VAF_094d_OAT316_32 Nov 11 200718:01:42 Note : download “update1.dwl” file from FTP “sub” directory, and perform program update successfully AT+FTPDOTA? +FTPDOTA: update.dwl, 17001 OK Note : check downloaded file ready for update AT+FTPDOTA? +FTPDOTA: OK Note : no downloaded file AT+FTPDOTA=”update1.dwl” +FTPDOTA: -3 OK Note : error on downloading file (FTP open fail) AT+FTPDOTA=? +FTPDOTA: (128)[,(128)] Note : possible argument Confidential, the whole present document is the sole property of Maestro Wireless Solutions Limited. 60 Defined Values: <filename> File name of the file to be downloaded. Maximum 128 characters. <path> Path (directory) name where the file is placed. Maximum 128 characters. If <path> is omitted, program will try to download from FTP‟s root (entry) directory. Maximum 128 characters. <update> If a third parameter „1‟ is entered, the program will execute the AT+ADINSTALL command if the download process is successful. This is useful for sending update commands over SMS, so that one SMS is saved in this case. See next section for the details of AT+ADINSTALL command. <result> Result code of the downloading process: Result code 0 -1 -2 -3 explanation Download successful SIM card problem Internal memory problem FTP connection fail -4 -5 -6 -7 -8 4xx – 5xx Reserved Download file size not same as FTP reported Not enough space for downloading File format incorrect Error writing flash FTP protocol return code Comments / countermeasure Check SIM card and PIN Try reset modem Check network signal, check FTP status, check FTP address Retry downloading Contact Maestro Wireless Check file for downloading Contact Maestro Wireless Check FTP document (RFC 959) for explanation c. AT+ADDINSTALL command This command is perform the program update process. File downloaded by AT+FTPDOTA command will replace the existing Heritage program. Modem will restart and then restart result and version will be displayed. Command Syntax: AT+ADINSTALL Response syntax: +ADINSTALL: <result>, <ver> Command AT+ADINSTALL Possible responses: +ADINSTALL: 2 HERITAGE_090b_OAT422a_32 Feb 26 200811:42:36 Note : update successful, show existing program version AT+ADINSTALL +ADINSTALL: 3 HERITAGE_090a_OAT422a_32 Jan 26 200811:42:36 Note : update unsuccessful, show existing program version AT+ADINSTALL +CEE ERROR: 3 Note : update unsuccessful, no update file available Confidential, the whole present document is the sole property of Maestro Wireless Solutions Limited. 61 Defined Values: <result> 2 update process successful 3 update process unsuccessful (original program will be loaded) Note: for other result code please contact Maestro Wireless Solutions <ver> Version number of existing running Software Tools. d. Notes and cautions to be taken 1. This feature is ONLY for updating new program for Heritage. Do not use it for downloading other things. Always contact Maestro Wireless or distributor for correct update file and information. 2. If you want to perform update for modem at remote site by AT command over SMS, make sure the feature is enabled by command AT+SMSAT=1 is entered. 3. Make sure you have setup GPRS settings by AT+IPGPRS command. When entering AT+FTPDOTA command the program will make GPRS connection automatically if not connected before. 4. It is recommended to stop other Software Tools such as AutoTCP/UDP connection during program downloading and updating. 5. Depending on the file size and network condition the download time could be a few minutes up to 3o minutes. Be patient to wait for response after entering AT+FTPDOTA command. 6. Do not use “~” character on file path because it cannot be transferred correctly over SMS. 7. No resume function on FTP downloading. The whole file has to be downloaded at one time otherwise the downloaded data will be discarded. Confidential, the whole present document is the sole property of Maestro Wireless Solutions Limited. 62 CHAPTER 15: COMMAND STRING - INTRODUCTION “Command String” is a set of programmable scripts for Maestro Heritage mode. User can input sets of Command Strings to control various kinds of “Service”. Unlike AT command, Command strings can be stored inside heritage and can be executed upon output of certain services. 1. Command String and “Service” Concept Timer Command String Input port Alarm Counter “Trigger capable” Services Command String Command String Command String Stored in flash Output port SMS Email sending Power Ctrl Non “Trigger capable” Services “Command String” and “Service” operation mechanism 1. Use AT command to enter preset Command Strings 2. Command strings can be executed upon power up or directly by AT commands 3. Executed Command Strings will drive some Services to be done (e.g. sending SMS or setting output pins) 4. Executed Command Strings can also configure and control some Services that have “trigger” capability. 5. These Services, when a certain pre-defined condition is matched (e.g. timer reach zero) can “trigger” a stored Command String. 6. Execute stored Command String to control Services again Confidential, the whole present document is the sole property of Maestro Wireless Solutions Limited. 63 CHAPTER 16: COMMAND STRING – WRITING AND USING 1. Structure of Command String A single Command String is a text string composed with four fields, for example: TM 1 ST 100 Operation argument Service type Service id Operation type Each field is separated by a space (ascii value 32) a. Service type This field has two capital characters indicates the type of Service to be chosen: Field entry AL CT Service alarm See Chapter 17.1 TM Countdo Counter wn timer 17.2 17.3 IP (*) input ports 17.4 OP (*) output ports 17.5 SM SMS 17.6 EM Email 17.7 PS AI(*) PS(*) Power Analogue Pulse control input counter 17.8 17.9 17.10 (*) Services need optional I/O plug-in board See further chapters for the explanation of each service. b. Service Id Each type of Service there has more than one unit; e.g. there are 5 counters available so the id range is 1 to 5 c. Operation type and Operation argument For each type of Service there are few kinds of operations; e.g. “TM 1 ST 100” means to set the value or countdown timer #1 to 100 seconds. See further chapters for the explanation of each service. 2. Concatenating Command String You can concatenate Command Strings update 128 bytes long totally (including space). They will be executed sequentially. However, if one Command String is incorrect or invalid execution will be stopped and successive Command Stings will not be executed. For example: TM 1 ST 100 TM 1 TR 99 TM 1 SW 1 First String “TM 1 ST 100” will be executed Second String “TM 1 TR 99” will not be executed because “99” is out of range Confidential, the whole present document is the sole property of Maestro Wireless Solutions Limited. 64 Third String “TM 1 SW 1” is correct but will not be executed because execution is stopped on 2nd String 3. Entering and executing Command String You can use the following AT commands to store and execute Command String a. AT+CSTR command Description: This command is used to execute a Command String directly. Command Syntax: AT+CSTR= <string> Response Syntax: OK +CME ERROR : 3 Command AT+ CSTR=”TM 1 ST 3” AT+ CSTR=”TM 1 ST 3 TM 30 ST 4” Possible responses: OK Note: entire Command String executed successfully +CME ERROR: 3 Note: one Command String cannot be executed Defined Values: <string> Command String Note: When there is error in between concatenated Command String +CME ERROR: 3 will be returned. See 2.2. b. AT+CSTRSET command Description: This command is used to store, read and delete Command String. It can also used to execute stored Command String. Command Syntax: AT+CSTRSET= <oper>,<id>[,<string>] Response Syntax: OK +CME ERROR: 3 Command AT+ CSTRSET=0,1,”TM 1 ST 3” Possible responses: OK Note: store Command String with String id = 1 AT+ CSTRSET=0,99,”TM 1 ST 3” +CME ERROR: 3 Note: id out of range AT+CSTRSET=1,1 +CSTRSET : 1, “TM1 ST 3” Note: read stored Command String id 1 AT+CSTRSET=3,1 OK Note: execute stored Command String id 1 Confidential, the whole present document is the sole property of Maestro Wireless Solutions Limited. 65 AT+CSTRSET=2,1 AT+CSTRSET=3,1 OK Note: erase Command String id 1 from flash memory +CME ERROR: 3 Note: id 1 is empty Defined Values: <oper> Define type of operation: 0 store Command String to flash 1 read Command String from flash 2 erase Command String from flash 3 execute Command String stored in flash <id> Identification number (id) of the Command String. Valid value is 1 to 50, and 80; i.e. up to 51 Command Strings can be stored. Command String with id = 80 will be executed when modem power up <string> Command String Note: Each Command String is limited to 128 bytes. The program will NOT check if the input Command String is valid or not. Confidential, the whole present document is the sole property of Maestro Wireless Solutions Limited. 66 CHAPTER 17: COMMAND STRING – SERVICES “Service” is a kind function or tool that can be made use by Command String. There are two kinds of Services: Trigger capable When a certain pre-defined condition is matched (e.g. timer reach zero) “trigger” a stored Command String. These Services include: Alarm, Counter, Input Port, and Countdown Timer Non-Trigger capable Can only perform job when called by Command String. These Services include: Output Port, SMS 1. Alarm Service Alarm is used to execute a Command String when the real-time clock of the Heritage meets the set time of the Alarm. To use Alarm it is required to set the real-time clock of the modem properly, see AT+CCLK in AT command manual. There are total of 5 Alarms can be used a. Alarm Service Command String Syntax and explanation 1st field 2nd field 3rd field 4th field Service type Service id Operation type Operation argument AL (1 to 5) ST 09/10/10,12:00:00 ST TR 0 (1 to 50) 0 Explanation Set alarm date/time yy/mm/dd,hh:mm:ss format Cancel preset Set Command String to be run, 0 to cancel setting Example: Set alarm #1 to execute Command String #20 at 01OCT2008, 01:00:00 AL 1 TR 1 AL 1 ST 08/10/01,01:00:00 Example: Cancel #1 Alarm setting AL 1 ST 0 Example: Cancel #1 Alarm executing Command String AL 1 TR 0 Note: The Alarm date time input MUST to fulfill the following requirements: 1. In yy/mm/dd,hh:mm:ss format, program will also check if input date/time is valid or not 2. At least 4 minutes later than current modem‟s real-time clock time (check by AT+CCLK command) Do not concatenate after ST operation; set time operation should be at the last part of Command String After alarm time, the ST setting of that Alarm will be lost This service will make use of Heritage internal alarm command (AT+CALA) so please avoid using AT+CALA command by yourself when Alarm Service is used. If the modem is restarted, date time setting of each Alarm will be checked against real-time clock time. If time is passed the setting will be cancelled. Alarm Service is “one-shot” type. There is no periodic alarm like “daily” or “weekly” b. Reading Alarm Service status See Chapter 18 for details. Confidential, the whole present document is the sole property of Maestro Wireless Solutions Limited. 67 2. Counter Service Counter is used to execute a Command String when the Counter value equals a preset value. There are total of 5 Counters. a. Counter Service explanation Command String Syntax and 1st field 2nd field 3rd field 4th field Service type Service id Operation type Operation argument Explanation CT (1 to 5) DE 1 TO 255 IN 1 TO 255 RS ST 0 -32768 to 32767 TR (1 to 50) 0 Decrement the value of Counter with argument value Increment the value of Counter with argument value Reset the Counter value to zero Set the “trigger” value If Counter value equal this value, will execute Command String Set Command String to be run, 0 to cancel setting Example: Set Counter #1 to execute Command String #10 if Counter value equal 100 CT 1 ST 100 CT 1 TR 10 Example: Increase Counter #1 value by 20 CT 1 IN 20 Example: Reset Counter #1 value to 0 CT 1 RS 0 Note: Initial Counter and trigger values are zero. The Counter is recorded by a signed 16 bit register, if the Counter value is 32767 and you increase it by 1, the value will change to -32768 There is no limit on no. of times of triggering. E.g. If you first set trigger value to 2 and reset Counter to 0, then you increment counter by 2, then decrement by 2 and increment by 2 again. Then the associated Command String will be executed twice b. Reading Counter Service status See Chapter 18 for details. 3. Countdown Timer Service Countdown Timer is used execute a Command String when the Timer value reach zero. Counting period is 1 second. There are total of 10 Countdown Timers. a. Countdown Timer Service Command String Syntax and explanation 1st field 2nd field 3rd field 4th field Service type Service id Operation type Operation argument Explanation TM (1 to 10) ST 1 TO 2147483647 0 TO 1 (1 to 50) 0 Initial value of Countdown Timer (in seconds) Start (1) or Stop (0) Timer Set Command String to be run, 0 to cancel setting SW TR Confidential, the whole present document is the sole property of Maestro Wireless Solutions Limited. 68 Example: Set Countdown Timer #1 to execute Command String #10 and start 600 seconds countdown TM 1 ST 600 TM 1 SW 1 TM 1 TR 10 Example: Stop Countdown Timer #1 TM 1 SW 0 Example: Cancel Countdown Timer #1 to trigger Command String TM 1 TR 0 Note: When the Countdown Timer expires (reach 0) it will stop automatically (SW 0). If two or more Timers expire at the same timer, Timer with smaller id has higher priority, i.e. Command String related to that Timer will be executed first. These are not precision Timers, if the Modem is busy (e.g. with network communication). The execution time may be delayed b. Reading Countdown Timer status See Chapter 18 for details. 4. Input Port Service NOTE: An optional I/O plug-in board is needed to plug to Heritage for using this Service. Contact Maestro Wireless for information. Input Port Service can use the signal of I/O board‟s input ports to control the execution of Command String. You can control the change of single or multiple Input Port signals as a condition to trigger Command String execution. a. Input port Service Command String Syntax and explanation 1st field 2nd field 3rd field 4th field Service type Service id Operation type Operation argument IP 1 to 6, 101 to 106 DR MS 0 to 1 if IP# is 1 to 6 1 TO 63 if IP# is 101 to 106 1 TO 63 TH 1 to 255 TR (1 to 50) 0 Explanation Direction of I/P signal change to trigger Binary sum value of multiple I/P to trigger “Mask” value to select multiple I/Ps for triggering Duration of the I/P state to trigger, unit in 0.1s Set Command String to be run, 0 to cancel setting Example: Configure Input Port #1 with detection “high to low” and threshold value 0.1s, and trigger Command String #5 if signal condition match: IP 1 DR 1 IP 1 TH 1 IP 1 TR 5 Confidential, the whole present document is the sole property of Maestro Wireless Solutions Limited. 69 Example: Configure Input Port #4 is high and Port#6 is low and threshold value 0.1s, and trigger Command String #5 if signal condition match: IP 101 MS40 DR8 IP 101 TH 1 IP 1 TR 5 Example: cancel Input Port#1 to trigger Command String IP 1 TR 0 b. Input Port operation mechanism (single I/P triggering) DC voltage to Input Port: 5 – 32V: logic 1 (high) 0V : logic 0 (low) I/O board plug-in The Input Port will give out a high or low signal depending on the input voltage to the port The Command String can check the change of Input port Signal (operation “DR”): IP 1 DR 0 detect a low-to-high input voltage change IP 1 DR 1 detect a high-to-low input voltage change To prevent transient noise signal, a threshold value can be set (operation “TH”). This is the time period required for the detected state to trigger Command String execution. Unit is in 1 millisecond. Valid value from 1 to 50 (0.1 sec to 5 sec) E.g. TH 10 Threshold value is 1 sec. E.g. When set as low-to-high triggering and threshold 1 second: IP 1 DR 0 IP 1 TH 10 IP 1 TR 5 When period of high signal reach the Threshold value, the command string will be executed Start counting time when a low to high signal change is detected Input port voltage Time = T When T=1second the Command String #5 will be executed E.g. when set as high-to-low triggering and threshold 1 sec IP 1 DR 1 IP 1 TH 10 IP 1 TR 5 Input port voltage Time = T Start counting time when a high to low signal change is detected When period of low signal reach Threshold value, the command string will be executed When T=1second the Command String #5 will be executed Confidential, the whole present document is the sole property of Maestro Wireless Solutions Limited. 70 c. Input Port operation mechanism (multiple I/P triggering) For multiple I/P triggering each I/P port will be assigned with a numerical value: I/P# value (decimal) value (binary) 1 1 1 2 2 10 3 4 100 4 8 1000 5 16 10000 6 32 100000 To select I/P Ports use the "MS" operation with value equal to the sum of values according to the above table, for example: IP 101 MS 40 I/P Port #4 and 6 signal is selected for Id 101 (8+32) IP 102 MS 3 I/P Port #1 and #2 signals is selected for Id 102 (1+2) And operation “DR” is now used to determine the state(s) (not direction) of I/P Ports to trigger. If the I/P is “low” (0) state the value is 0, otherwise the valuing method is same as “MS” operation, for example: IP 101 DR 32 both I/P Port #4 and #6 with high '1' signal will trigger (0+32) IP 102 DR 2 both I/P Port #1 Is low (0) and #2 is high '1' signal will trigger. (0+2) "TH" operation is same as single I/P triggering Note: Due to product limitation the modem cannot detect switching action with period less than 100ms. If the input signal change is less than 100ms this feature will not be able to detect accurately. Always uses Id#101 to 106 for multiple I/P triggering application. If two or more I/P Ports change at the same timer, I/P Port smaller id have higher priority, i.e. Command String related to that I/P Port will be executed first. It is possible that a single I/P Port can be included into two or more multiple I/P Port groups. In case of multiple I/P triggering it will NOT check the direction of signal change of each included I/P; just check the combined state value against DR value. ion). The execution time may be delayed d. Reading I/P Port status See Chapter 18 for details. Confidential, the whole present document is the sole property of Maestro Wireless Solutions Limited. 71 5. Output Port Service NOTE: An optional I/O plug-in board is needed to plug to Heritage for using this Service. Contact Maestro Wireless for info. Output Port Service can control the state of I/O board‟s output ports by Command String. a. Output Port Service Command String Syntax and explanation 1st field 2nd field 3rd field 4th field Service type Service id Operation type Operation argument Explanation OP (1 to 6) SW 0 TO 1 Set the state of Output Port Example: Set the Output Port #1 with logic state “ON” (1) OP 1 SW 1 Input Port operation mechanism: Output Port: Short: logic 1 Open: logic 0 I/O board plug-in OP 1 SW 1 Output Port #1 will short OP 1 SW 0 Output Port #1 will open Note: Read I/O board plug-in documentation for the connecting and specifications of Output Ports. When power up or reset, ALL Output Ports are set to logic 0 (open). Previous output state will NOT be kept. b. Reading O/P Port status See Chapter 18 for details. 6. SMS Service This service is used to send out a SMS to phone number recorded in the first 10 phonebook records in SIM card. a. SMS Service Command String Syntax and explanation 1st field 2nd field 3rd field 4th field Service type Service id Operation type Operation argument SM (1 to 10) SN (SMS content) %CTn %IP %TMn Explanation Send out the SMS to phone number inside SIM card “%” to indicate “variable” options in SMS content Confidential, the whole present document is the sole property of Maestro Wireless Solutions Limited. 72 Example: Send a message “ALERT” to phone number store in SIM phonebook #1: SM 1 SN ALERT Example: Send a message “Counter#2_value_is_20" to phone number store in SIM phonebook #1: SM 1 SN Counter#2_value_is_%CT2 b. Using “variable” options within SMS content In the SMS content field you can use “%” and Service type to insert the current value of Service into the SMS content: Variable Description %CTn Current value of counter Id#n %TMn Current value of Timer Id#n %IP Current I/P Ports‟ summing value Range of „n‟ 1 to 5 1 to 10 (See Chap 13.4.c for calculation) %OP Current O/P Ports‟ summing value (calculation same as I/P Ports) (See Chap 13.4.c for calculation) Invalid Service name or Id will be ignored. Note: 1. Due to modem/SIM initialization it is recommended to send SMS 30 seconds after power up. 2. Only send SMS with “normal” characters. If SMS content has character with ASCII value outside the range between 11 and 127, the SMS may not be sent properly. 3. In case of sending SMS failure (e.g. network problem) the program will delay 0.5 second and try to resend the SMS. If the second time retry (i.e. 3 times total) fails this SMS delivery will be aborted. 4. The maximum length of the SMS content is limited by the maximum length of Command String (128 bytes). The more of Command Strings, the less of SMS length. Confidential, the whole present document is the sole property of Maestro Wireless Solutions Limited. 73 7. Email Sending Service This service is used to send out an Email to one or more email saved address, with saved email subject and saved plus variable email content. Please read Chapter 9 for entering email address, subject and body. Up to 10 set of groups (service type EM, id 1 to 10) can be set with different combinations of "elements" : recipient(to,cc,bcc), subject and body. a. Email Sending Service Command String Syntax and explanation 1st field 2nd field 3rd field 4th field Service type Service id Operation type Operation argument EM (1 to 10) TO (0-50) CC (0-50) BC (0-50) SU (0-10) BD (0-3) SN (additional content) %CTn %IP %OP %TMn Explanation Id of recipient email address (see Chapter 9.2b) 0 : no receipient Id of “cc” recipient email address (see Chapter 9.2b) 0 : no cc receipient Id of “bcc”recipent email address (see Chapter 9.2b) 0 : no bcc receipient Id of email subject (see Chapter 9.2c) 0 : no subject Id of email body (see Chapter 9.2c) 0 : no body Send out the email with above setting plus additional content “%” to indicate “variable” options in SMS additional content Example: Setting up EM set #1 with elements: recipient #1, cc #3, bcc #4, subject #1, content #2: EM 1 TO 1 EM 1 CC 3 EM 1 BC 4 EM 1 SU 1 EM 1 BD 1 Example: Sending email EM set#1 with additional content "HELLO_WORLD": EM 1 SN HELLO_WORLD Example: Setting up EM set #2 with elements: recipient bcc #3, no subject and content only "0", and send out immediately: EM 2 BC 3 EM 2 SN 0 Example: Send a message “Counter#2_value_is_20" to phone number store in SIM phonebook #1: SM 1 SN Counter#2_value_is_%CT2 Confidential, the whole present document is the sole property of Maestro Wireless Solutions Limited. 74 b. Using “variable” options within additional email content In the Email additional content field you can use “%” and Service type to insert the current value of Service into the additional content: Variable Description %CTn Current value of counter Id#n %TMn Current value of Timer Id#n %IP Current I/P Ports‟ summing value Range of „n‟ 1 to 5 1 to 10 (See Chap 13.4.c for calculation) %OP Current O/P Ports‟ summing value (calculation same as I/P Ports) (See Chap 13.4.c for calculation) Invalid Service name or Id will be ignored. Note: 1. To use Email Sending Service make sure all parameters has been setup properly first: APN (+IPGPRS) SMTP server (+IPSMTP) Sender and recipient address (+EMADDR) Subject (+EMSUBJ) Body (+EMBODY) It is strongly suggested you have tested the email sending function by using AT+EMSEND command to send test emails first before using EM Command Sting. 2. If Operation argument of TO,CC,BC,SU and BD is set to 0(default), the associated Email set will not contain that element 3. A minimum email contains one recipient (either TO, CC or BC) and one character of additional email content. 4. Unlike AT+EMSEND command, sending email use EM service will automatically making GPRS connection (+IPCONNECT=1,1) 5. In case email sending is unsuccessful due to any reason, the same email will be resent for max 2 more times. If all retries are fail that Email will be aborted 6. When using EM service maximum 10 emails can be put on sending queue, further Email sending requests will be aborted. Buffered email queue is volatile and will be lost If modem Is power off or reset. Also when there is EM service in queue AT+EMSEND command will not be allowed. 7. The maximum length of the SMS content is limited by the maximum length of Command String (128 bytes). The more of Command Strings, the less of SMS length. c. Reading Email Sending Service status See Chapter 18 for details. Confidential, the whole present document is the sole property of Maestro Wireless Solutions Limited. 75 8. Device Power Control Service By using Device Power Control Service user can control on/off state of certain component of the Heritage, in order to save power consumption. A single Service id field can be set to control four parts of the Heritage. a. Device Power Control Service Command String Syntax and explanation 1st field 2nd field 3rd field 4th field Service type Service id Operation type Operation argument Explanation PW (0 to 15) (don’t care) (don’t care) Service Id to decide componets’ on/off state Example: Enable low clock mode and disable LEDs : PW 3 0 0 Example: Enable low clock mode; disable LEDs,UART and deregister from Network PW 15 0 0 The value of Service Id is the sum of the values each of which is related to a particular Device Power Control operation: value 1 2 4 8 Function Turn off LEDs Enable power down mode (W32K mode) Deregister from network ("Flight mode") Turn off UART Remark except network status LED Same as AT+W32K=1 command Same as AT+COPS=2 command Com port will not get any data The larger the id value of PW, the more power saving of the Heritage. For example user can set e.g. the Heritage to register to network only once per day, sending out SMS, then de-register. Note: BE VERY CAREFUL to use with id #8 (Turn off UART). This will make Heritage Com port switched off and cannot accept AT command. NEVER program the Heritage to enable this once power up. Although "Operation type" and "Operation argument" fields are ignored, "dummy" entries are needed for consistent Command String Syntax. Use may write "PW" Command String like this ("0" as dummy entry) : PW 15 0 0 Refer to AT command manual for the details of power down (W32K) mode. It is recommended to use "PW" service some time after power on. So user can have time to change setting. Each time when "PW" Command String is executed. Refer to AT command manual for the details of power down (W32K) mode. Refer to AT command manual for the details of power down (W32K) mode. Confidential, the whole present document is the sole property of Maestro Wireless Solutions Limited. 76 This Device Power Control setting is not saved by itself, so each time when power on the status should be 0 (without any "PW" Command String executed) b. Reading Device Power Control status See Chapter 18 for details. 9. Analogue Input Service NOTE: An optional Pulse Counter plug-in board is needed to plug to Heritage for using this Service. Contact Maestro Wireless for information. Analogue Input Service can use the signal of Analogue Input to control the execution of Command String. a. Analogue Input Service Command String Syntax and explanation 1st field 2nd field 3rd field 4th field Service type Service id Operation type Operation argument AI 1 to 4, TP 1 to 3 TH 1 to 255 HL -6000 to 6000 LL -6000 to 6000 TR (1 to 50) 0 Explanation Trigger Type of AI value change to trigger Duration of the AI state to trigger, unit in 1s High Limit of AI to trigger (units mA or mV) Low Limit of AI to trigger (unit: mA or mV) Set Command String to be run, 0 to cancel setting Example: Configure AI#1 trigger condition that value is either higher than the high limit (3000)or lower than low limit (1000)and threshold value 1s, and trigger Command String #5 if signal condition match: AI 1 TP 3 AI 1 TH 1 AI 1 HL 3000 AI 1 LL 1000 AI 1 TR 5 Example: Configure AI#3 trigger condition that value is higher than the high limit (1000) threshold value 2s, and trigger Command String #1 if signal condition match: AI 3 TP 1 AI 3 TH 2 AI 3 HL 1000 AI 3 TR 2 Example: cancel AI#1 to trigger Command String AI 1 TR 0 Confidential, the whole present document is the sole property of Maestro Wireless Solutions Limited. 77 b. Analogue Input operation mechanism Voltage to AI : -6 to 6V The Analogue Input Service will keep checking the AI once every one second. Depending on Trigger Type (TP) set, the service will trigger executing Command String if condition fulfilled: Trigger Type TP 1 2 3 AI value change from lower than to higher than HL value Trigger Trigger AI value AI value change from higher than to lower than LL value Trigger Trigger T=TH Trigger to execute Command String if TP=1 or TP=3 Time = T HL Start to count threshold time when crossing H/L Limit LL T=TH Trigger to execute Command String if TP=2 or TP=3 Time = T Note: Please read Pulse Counter Plug-in board manual carefully before setup. The Service cannot detect AI value change period less than 1s. If the AI value change is less than 1 second this feature will not be able to detect accurately c. Reading Analogue Input Service status See Chapter 18 for details. Confidential, the whole present document is the sole property of Maestro Wireless Solutions Limited. 78 10. Pulse Counter Service NOTE: An optional Pulse Counter plug-in board is needed to plug to Heritage for using this Service. Contact Maestro Wireless for information. Pulse Counter Service can use the value of Pulse counter to control the execution of Command String. a. Pulse Counter Service Command String Syntax and explanation 1st field 2nd field 3rd field 4th field Service type Service id Operation type Operation argument PC 1 to 4, ST 0 to 65535 RS 1 (Don’t care) TR (1 to 50) 0 Explanation Pulse Counter value to trigger Reset Pulse Counter value to zero Set Command String to be run, 0 to cancel setting Example: Configure PC#1 trigger condition that value is equal or higher than 100 and trigger Command String #5 PC 1 ST 100 PC 1 TR 5 Example: Reset PC#3 value to 0: PC 1 RS 0 Example: cancel PC#1 to trigger Command String PC 1 TR 0 b. Pulse Counter operation mechanism The Pulse Counter Service will keep checking the Pulse Counters once every one second. If the Pulse Counter value is equal or larger than the ST value the service will trigger executing Command String. Note: Please read Pulse Counter Plug-in board manual carefully before setup. The Pulse Counter value is incremental only. The Trigger will appear once if the counter value “crosses" the ST value. So it is suggested in the triggered Command String to include Command to reset Pulse Counter. After power loss Pulse Counter value will be reset to zero. c. Reading Pulse Counter Service status See Chapter 18 for details. Confidential, the whole present document is the sole property of Maestro Wireless Solutions Limited. 79 CHAPTER 18: COMMAND STRING – READING STATUS OF SERVICES 1. Command for reading current information of Services You can use AT command to read the info of trigger capable Services. a. AT+CSTRSTAT command Description: This command is to read current parameter or status of a particular service. Command Syntax: AT+CSTRSTAT=”<type> <id>” Response Syntax: OK +CME ERROR: 3 Command AT+ CSTSTAT=”AL 1” AT+ CSTRSTAT=”TM 10” AT+CSTRSTAT=”IP 9” Possible responses: AL 1 : ST 01/01/01,12:00:00 TR 2 OK Note: read current setting of Alarm #1 TM 10: CV 66 SW 1 TR 20 OK Note: read current info of countdown timer #10 +CME ERROR: 3 Note: id out of range Defined Values: <type> Define type of Service: AL alarm CT counter IP Input Port CT Countdown timer PW Device Power Control <id> Service id b. Reading Alarm Service Enter AT+CSTRSTAT = “AL 1” will get Alarm #1 info: AL 1 a : ST 01/01/01,12:00:00 b TR 3 c a. Service id b. datetime set (space if not set) c. Command String id to be executed if trigger (0 if not to trigger) Confidential, the whole present document is the sole property of Maestro Wireless Solutions Limited. 80 c. Reading Counter Service Enter AT+CSTRSTAT = “CT 1” will get Counter #1 info: CT 1 : ST 300 a CV 20 TR c d b 3 a. Service id b. trigger value of the counter c. current value of the counter d. Command String id to be executed if trigger (0 if not to trigger) d. Reading Countdown Timer Service Enter AT+CSTRSTAT = “TM 1” will get Countdown Timer #1 info: TM 1 : CW 90 a b SW 0 TR 3 c d a. Service id b. current value of the timer c. timer is running (1) or stop (0) d. Command String id to be executed if trigger (0 if not to trigger) e. Reading Input Pin Service Reading Enter AT+CSTRSTAT = “IP 1” will get Input Port #1 info: IP 1 a : MS 1 b DR 0 c TH 5 d a. Service id b. Mask value (valid for multiple I/P trigger) c. direction of detection d. threshold value of the detection e. Command String id to be executed if trigger (0 if not to trigger) TR 3 e f. Reading Output Pin Service Enter AT+CSTRSTAT = “OP 1” will get Device Power Control info: OP 1 a : SW 0 b a. Service id b. State (0 : low, 1 : high) g. Reading Device Power Control Service Enter AT+CSTRSTAT = “PW 1” will get Device Power Control info: PW a a. Current Service id (mode) 0 h. Reading Email Sending Service Reading Enter AT+CSTRSTAT = “EM 1” will get Email set #1 info: EM 1 : a TO 1 b CC 0 BC 5 c d SU 3 e BD 1 f a. Service id b. id of TO recipient c. id of CC recipient d. id of BC recipient e. id of email subject f. id of email body Confidential, the whole present document is the sole property of Maestro Wireless Solutions Limited. 81 i. Reading Analogue Input Service Reading Enter AT+CSTRSTAT = “AI 1” will get AI #1 info: AI 1: a TP 1 b HL 100 c LL 10 d TH 5 e TR 1 f CV 30 g a. Service id b. Trigger Type (1-3) c. High Limit (mV or mA) d. Low Limit (mV or mA) e. Threshold value (second) f. Command String id to be executed if trigger (0 if not to trigger) g. current value (mV or mA) j. Reading Pulse Counter Service Reading Enter AT+CSTRSTAT = “PC 1” will get Email set #1 info: PC 1 : a ST 1 b CV 0 c TR 5 d a. Service id b. trigger value of the pulse counter c. current value of the pulse counter d. Command String id to be executed if trigger (0 if not to trigger) Confidential, the whole present document is the sole property of Maestro Wireless Solutions Limited. 82 CHAPTER 19: KNOWN ISSUES The Heritage Softtools will affect certain other AT commands operation. Please note. 1. AT +WIND command AT+WIND command will be disabled 2. Saving of parameters to non-volatile memory You cannot save the settings of the following AT commands by concatenating the &W command: AT+CREG AT+CGREG AT+CGEREP To save the above settings please enter AT&W separately. 3. Mutually exclusive TCP/UDP functions Following functions are exclusive to each other, i.e. if either is enabled others could not be then: AT+AUTOTCP=1 AT+AUTOUDP=1 AT+OTCP 4. Sending Heritage Software commands over SMS You can use the remote AT command by SMS feature to send Heritage Software AT commands mentioned in this document except the followings: AT+OTCP AT+OUDP AT+IPCONNECT AT+EMBODY AT+ETHRST AT+AUTOPIN Confidential, the whole present document is the sole property of Maestro Wireless Solutions Limited. 83 CHAPTER 20: QUESTIONS AND ANSWERS 1. AutoTCP/UDP Q. A. Can I specify <server> by URL (e.g. xxxx.com) rather than IP address? Yes, but only if your GPRS network have proper DNS service. You cannot specify your own DNS server Q. A. If I enabled AutoTCP or AutoUDP, how can I stop it? you need to enter the command AT+AUTOTCP=0 or AUTOUDP=0 by either 1: within 20 seconds after power up, or 2: during reconnection (serial port back to command mode), or 3: by SMS (see Chapter 6) 2. AT command driven TCP/UDP connection Q. A. Why I see three “OK” coming after entering AT+IPCONNECT=1,1 command? The Software Tools program is issuing internal AT command for GPRS setup, so extra “OK” responses will be seen. Q. After the TCP/UDP connection is stopped I wan to enter AT+OTCP or AT+OUDP to reconnect but I get message “+CME ERROR: 3”. Why? After TCP/UDP socket connection the GPRS connection session will also be disconnected. So please enter AT+IPCONNECT=1,1 to reconnect GPRS first. A. 3. Remote AT command by SMS Q. A. Can I send any AT command by SMS to control other features described in this document? Yes. Please refer to Chapter 19. 4. Command String Feature Q. A. Are the status of Services settings and status will be saved when power is cut? All Services status will be saved into non-volatile memory, so e.g. like Countdown timer will resume counting when power recover. But all Output Ports will be set to logic 0 when power up. Q. A. Can I check the status out Output Ports? Yes. You can use AT+CSTRSTAT command to check Q. A. What should be noted with the execution priority of concatenated Command String? During executing concatenated Command String, if the 1st part of the CS leading to another no. of the CS to be triggered, then the triggered CS will be executed first, e.g. “CT 1 IN 1 CT 1 DE 1” If the first CS (counter #1 increment by 1) will let the Counter#1 to trigger CS #2, then CS #2 will be executed BEFORE executing “CT 1 DE 1” Confidential, the whole present document is the sole property of Maestro Wireless Solutions Limited. 84 CHAPTER 21: EXAMPLES OF HERITAGE SOFTWARE SETUP AND OPERATION 1. To setup a Automatic TCP connection To setup Auto connect to TCP server with IP 61.167.60.1 port 23 (client mode) Commands to be entered AT+IPGPRS=1,”INTERNET” (APN is INTERNET) AT+IPCTP = 23,”C”,”61.167.60.1”,1 (target TCP is 61.167.60.1, port 23, client mode, TxDelay is enabled) AT+AUTOTCP=1 (open TCP socket connection) (TCP connection will start after 20 secs) Modem response OK OK OK To setup Auto connect to remote TCP client request with any IP address, port 23(server mode) Commands to be entered AT+IPGPRS=1,”INTERNET” (APN is INTERNET) AT+IPCTP = 23,”S”,”255.255.255.255”, 1 (to accept TCP connection from any IP address, port 23, client mode, TxDelay is enabled ) AT+AUTOTCP=1 (open TCP socket connection) (Modem will start to monitor TCP port 23 after 20 secs) Modem response OK OK OK 2. To make a AT command driven TCP connection IP Connectivity (AT# feature) user can follow the following steps to make OTCP connection To connect to TCP server with IP 61.167.60.1 port 23 Commands to be entered AT+IPGPRS=1,”INTERNET” (APN is INTERNET) AT+IPCTP = 23,”C”,”61.167.60.1”,1 (target TCP is 61.167.60.1, port 23, TxDelay is enabled ) AT+DLEMODE=1 AT+CGATT=1 AT+IPCONNECT=1,1 (GPRS connection) AT+OTCP (open TCP socket connection) Modem response OK OK OK OK OK OK OK CONNECT 115200 Confidential, the whole present document is the sole property of Maestro Wireless Solutions Limited. 85 3. To setup periodic ping To setup to pin an IP address every 30 minutes, disconnect GPRS if fail Commands to be entered Modem response AT+IPGPRS=1,”INTERNET” (APN is INTERNET) AT+IPPING = 2,”61.167.60.1”, 3,2,15 (ping is 61.167.60.1,no. of trial is 3, delay between pin is 2 secs, timeout is 15 secs) AT+IPOPT=4,1800,1 (enable Ping every 1800secs, if ping fail then disconnect GPRS ) OK OK OK 4. To setup TCP Terminal and Dynamic DNS automatic update Open TCP Terminal with port 1024, and enable DDNS update with hostname “mymodem.dyndns.org” Commands to be entered Modem response AT+IPGPRS=1,”INTERNET” (APN is INTERNET) AT+IPDDNSSERV=”members.dyndns.org”,80 (set DDNS server settings) AT+IPDDNSACCT=”mymodem.dyndns.org”,”mylogin”,”mypsswd” (set DDNS account settings) AT+IPDDNSUPD=1 (enable automatic DDNS update) AT+TCPTERM=2,”mypsswd”,1024,30 (set TCP Terminal password to “mypsswd”,port 1024 and timeout 30 secs ) AT+TCPTERM=1 (enable TCP Terminal) OK OK OK OK OK OK Confidential, the whole present document is the sole property of Maestro Wireless Solutions Limited. 86 5. Perform Remote program update by sending Command over SMS To download update file from ftp.maestro.com, directory “update”, filename “MSP.dwl”, login id : USER, password : PASSWORD (Remember to enter AT+SMSAT=1 to enable AT command over SMS first, default key = “000000”) SMS Flow and response (min three SMS to be sent): 000000AT+IPGPRS=1,”sgprs” OK 000000AT+IPFTP=21,”I”,”A”,”202.100. 222.222”,”USER”,”PASSWORD” OK 000000AT+FTPDOTA=”MSP.dwl”,”upda te”,1 +ADINSTALL: 2 ,””A M 100_VAF_094d_OAT316_32 NOV 11 18:01:42 6. Command String programming example 1 Output port power-up status settings To set Output Port #1, #3 and #6 to logic 1 (short) 1 minute after power up: Command String to be entered AT+CSTRSET=0,80,”TM 1 ST 60 TM 1 TR 1 TM 1 SW 1” AT+CSTRSET=0,1,”OP 1 SW 1 OP 3 SW 1 OP 6 SW 1” Explanation Set timer #1 60 seconds countdown on power up and set to trigger Command String #1 Command String #1 switch Output Port 1,3 and 6 to logic 1 7. Command String programming example 2 Input Port signal counting and triggering To set if Input Port #1 has a low-to-high signal for three times within 30 seconds, set Output Port #5 to high Services used: IP #1, CT #1, TM #2, OP #5 (“CS” = Command String) Command String to be entered AT+CSTRSET=0,6,”OP 5 SW 1 CT 1 RS 0” AT+CSTRSET=0,5,”CT 1 RS 0 TM 2 ST 30 TM 2 SW 0” AT+CSTRSET=0,4,”CT 1 IN 1 TM 2 SW 1” AT+CSTR=”IP 1 DR 1 IP 1 TH 1 IP 1 TR 4 CT 1 ST 3 CT 1 TR 6 TM 2 ST 30 TM 2 TR 5” Explanation CS6 : OP #5 set to 1, Counter#1 reset 0 CS5: Counter#1 reset 0, set Timer #2 to 30 sec and stops it. CS4: increment Counter #1 by 1, switch Timer#2 on Set Input#1 low-to-high, 100mS threshold, trigger CS4, Set Counter #1 trigger value to 3, trigger CS#6 Set Timer#2 to 30 secs, trigger CS5 Confidential, the whole present document is the sole property of Maestro Wireless Solutions Limited. 87 8. Command String programming example 3 Input Port signal SMS triggering To set if Input Port #1 has a low-to-high signal and last for 0.5 seconds, send a SMS to phone book number 1 to tell Input Pins status Services used: IP #1 (“CS” = Command String) Command String to be entered AT+CSTRSET=0,2,”SM 1 SN PIN_1_HIGH_IP_STATUS:_%IP” AT+CSTR=”IP 1 DR 0 IP 1 TH 5 IP 1 TR 2” Explanation CS2 : send SMS to phone #1 with content “PIN_1….” Input#1 low-to-high, 50mS threshold, trigger CS2, 9. Command String programming example 4 Input Port signal counting and triggering To set if Input Port #1 has a low-to-high signal and last for 0.5 seconds, send an email with config set with EM#1 Services used: EM #1, IP #2 (“CS” = Command String) AT Cmd/Cmd String to be entered AT+IPGPRS=1,”INTERNET” AT+IPSMTP=25,0,”smtp.netowk.com” AT+EMADDR=0,0,”[email protected]” AT+EMADDR=0,1,[email protected] , [email protected]” AT+EMADDR=0,2,”[email protected] , [email protected]” AT+EMADDR=0,3,”[email protected] , [email protected]” AT+EMSUBJ=0,1,”Email subj #1” AT+CSTR=”EM 1 TO 1 EM 1 CC 2 EM 1 BC 3 EM 1 SU 1” AT+CSTRSET=0,3,”EM 1 SN PIN_1_HIGH_IP_STATUS:_%IP” AT+CSTR=”IP 2 DR 0 IP 2 TH 5 IP 2 TR 3” Setup Setup Setup Setup Explanation GPRS SMTP server sender address recipient address Setup cc recipient address Setup bcc recipient address Setup email subject Set EM#1 using TO#1, CC#2, BCC #3, Subj #1 CS3: send out email with setting using EM#1with add‟l content “PIN_1…” Set Input#2 low-to-high, 50mS threshold, trigger CS3 10. Command String programming example 5 Analogue Input signal counting and triggering To set if AI #1 value exceed 1V and last for 2 seconds, send an email with config set with EM#1 Services used: SM #1, AI #1 (“CS” = Command String) AT Cmd/Cmd String to be entered AT+CSTRSET=0,2,”SM 1 SN AI_1_over_1000mV AT+CSTR=”AI 1 TP 1 AI 1 HL 1000 AI 1 TH 2 AI 1 TR 2” Explanation CS2 : send SMS to phone #1 with content “AI_1_over_1000mV” Set AI#1 exceed HL trigger, HL=1000mV, 50mS threshold, trigger CS2 Confidential, the whole present document is the sole property of Maestro Wireless Solutions Limited. 88 11. Command String programming example 6 Pulse Counter signal counting and triggering To set if PC #1 value exceed 100 then set Output Port #1 to high Services used: OP #1 (“CS” = Command String) AT Cmd/Cmd String to be entered Explanation AT+CSTRSET=0,2,”OP 1 SW 1” switch Output Port 1 to logic 1 AT+CSTR=”PC 1 RS 0 PC 1 ST 100 PC 1 TR 2” Reset PC#1 value to 0, Set PC#1 exceed 100, trigger CS2 Confidential, the whole present document is the sole property of Maestro Wireless Solutions Limited. 89 CHAPTER 22: COMMAND STRING QUICK REFERENCE Service Id 1 to 5 Operation Type ST TR Service Id 1 to 5 Operation Type DE IN RS ST TR Service Id 1 to 10 Operation Type ST SW TR Service Id 1 to 6 101-106 Operation Type DR MS TH TR Service Id 1 to 6 Operation Type SW Service Id 1 to 10 Operation Type SN Service Id 1 to 10 Operation Type TO CC BCC ALARM “AL” Argument and Explanation yy/mm/dd,hh:mm:ss(Date time, 0 to cancel) 0 to 50 (CS to trigger, 0 to cancel) COUNTER “CT” Argument and Explanation 1 to 255 (Decrement) 1 to 255 (Increment) 0 (Reset) -32768 to 32768 (value to trigger 0 to 50 (CS to trigger, 0 to cancel) COUNTDOWN TIMER “TM” Argument and Explanation 1 to 2147483647 (Timer initial value) 0 to 1 (stop or start timer) 1 to 50 (CS to trigger, 0 to cancel) INPUT PORT “IP” Argument and Explanation 0 to 1 1-63 (trigger direction or I/P sum, multiple I/P) 1 to 63 (Mask value for multiple I/P, Id 101-106 only) 1 to 255 (Duration state to trigger unit in 0.1s) 1 to 50 (CS to trigger, 0 to cancel) OUTPUT PORT “OP” Argument and Explanation 0 to 1 (state of Output port) SMS “SM” Argument and Explanation (SMS CONTENT) (variable : %CTn counter value %IP input port value %OP output value %TMn countdown timer value) EMAIL “EM” Argument and Explanation 0-50 (recipient id, 0 to cancel) 0-50 (cc recipient id, 0 to cancel) 0-50 (bcc recipient id, 0 to cancel) Confidential, the whole present document is the sole property of Maestro Wireless Solutions Limited. 90 SU BD SN Service Id 0 to 15 0-10 (subject id, 0 to cancel) 0-3 (body/content id, 0 to cancel) (additional email content) (variable : %CTn counter value %IP input port value %OP output value %TMn countdown timer value) DEVICE POWER CONTROL “PW” Operation Type Argument and Explanation 1 (dummy) 1(dummy) Service Id 1 to 4 Operation Type TP TH HL LL TR ANALOGUE INPUT “AI” Argument and Explanation 1 to 3 (Trigger type: higher than HL, lower than LL, or both) 1 to 255 (threshold tp trigger unit in second) -6000 to 6000 (High Limit unit mV or mA) -6000 to 6000 (Low Limit unit mV or mA) 0 to 50 (CS to trigger, 0 to cancel) Service Id 1 to 4 Operation Type ST RS TR PULSE COUNTER “PC” Argument and Explanation 1 to 65535 (Trigger value) Don’t care (reset counter) 0 to 50 (CS to trigger, 0 to cancel) Confidential, the whole present document is the sole property of Maestro Wireless Solutions Limited. 91