1
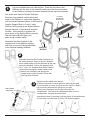
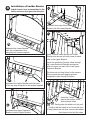
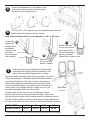
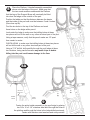
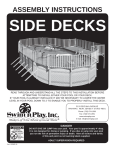
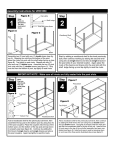
A-FRAME
LADDER
420490-13
INSTALLATION
INSTRUCTIONS
Division of Swim’n Play, Inc.
313 Regina Avenue
Rahway, NJ 07065-4891
732-574-1500
www.swimnplay.com
GENERAL
Before you start, check to see that you have the correct number of parts. Use the packing list on the
last page. Carefully read through and understand all the assembly steps before starting assembly.
NOTE: Lyfgard as a manufacturer reserves the right to revise, change, or modify construction of it’s
products.
DANGER
DO NOT DIVE OR JUMP into your pool. Your pool is approximately 4’ deep. It is
not designed for diving or jumping. If you dive or jump into your pool you run the
risk of permanent injury or death. Alert all visitors and family of this and point out all
warning labels supplied.
ADULT SUPERVISION REQUIRED
1
Lay one Handrail down on a flat surface. Press the two tabs of the
Platform into the slots in the Handrail making sure that the top surface
of the Platform is facing in the same direction as the top of the Handrail.
Also make sure that the Outside Staircase
Receiver (long channel running along one
edge of the Platform) is on the side opposite
from the Inside Staircase Stems of the Handrail.
OUTSIDE
STAIRCASE
RECEIVERS
Install a Support Block to “lock in” each
Platform tab by pressing the Support Blocks
through the slots of the Handrail and onto
the tabs. Note carefully to position the
down arrow of the Support Block correctly.
Tap the Support Blocks firmly into
place using a rubber mallet.
Assemble the other Handrail to the
opposite side of the platform making
sure that you mount it facing identically
to the Handrail already attached.
INSIDE
STAIRCASE
STEM
PLATFORM
TAB
SUPPORT
BLOCKS
2
Assemble the Inside Pool Ladder Staircase into
the Inside Staircase Stems of the two Handrails.
Use a rubber mallet to tap the Staircase all the way
up into the Handrail. Secure the assembly with
the ¼” x 20 x 2¼” Stainless Steel Bolts, passing
the bolts first through the inside section of the
Handrail, the Staircase, and through the
outside section of the Handrail. Fasten with
the Cap Nuts Provided.
3
Leave these
holes free
Weight must be added to the bottom
of the pool staircase. A coarse gravel or sand may be used.
If you use sand, you must you must seal the sand in a plastic
bag to prevent the sand from going into your pool.
Simply insert the bags of sand or gravel into the four
compartments. Then place the compartment door over the
compartments, lining up the screw holes.
Assemble the door by inserting it into the groove in the ladder body
and securing using the three (3) #10 x 5/8” screws supplied.
A
2
B
C
4
Installation of Ladder Barrier
Ladder barrier is to be assembled to the
ladder staircase that goes into the pool.
D
Assemble the Lower Extension
Bracket onto the Lower Bracket.
E
A
Assemble the Lower Bracket
onto the compartment door
using the two screws supplied.
Insert 3 barrier tubes through the Lower
Bracket and secure with one screw on each
tube to the Upper Bracket.
Insert the remaining 3 barrier tubes through
the Lower Extension Bracket and secure
with one screw on each tube to the Upper
Extension Bracket.
The tubes do not have holes for the screws.
These screws are self tapping and are
designed to drive through the tubes.
B
F
Assemble the Upper Bracket onto the back
of the top step using two of the screws supplied.
Insert the 3 vinyl
caps at the bottom of the
three external tubes.
C
Gently place the ladder into the pool.
Confirm that the tubes do not touch the liner.
If they tubes touch the liner, remove the ladder
from the pool and cut the tubes.
Assemble the Upper Extension
Bracket onto the Upper Bracket.
3
5
Close the compartment on the bottom of the
outside staircase as shown, similar to step 3
but without putting weight into it.
A
6
B
C
For Pools 52” or 54” deep and you are assembling the universal
ladder attach the extension feet as follows:
Note: these extension feet are not required for a 48” or 50” pool.
A
Locate and
position the
ladder bottom
and ladder
extension feet
SLOT
as shown.
(Two extension
feet required).
TAB
7
C
Rotate extension
foot up into position.
Insert screw #10 x 1”
into hole and fasten
securely to ladder.
Repeat this for each corner.
B
SCREW
HOLE
Insert tab
into slot at rear
bottom of ladder.
Holding the inside pool ladder staircase assembly
under the water, slightly twist the assembly to the
side to allow any and all trapped air to escape.
Place the ladder assembly back onto the top ledge of the pool.
Check the levelness of the ladder when the inside staircase
is touching the bottom of the pool. It may be necessary to
adjust the levelness by either sliding the staircase section
out of the handrail slightly, or by removing the staircase and
cutting some of the straight section to allow you to put the
Adjust here
staircase assembly further into the handrail.
in or out
In either case, drill the two holes in the staircase section
and secure with the two bolts as described earlier. Make sure
that he bolt goes through both the handrail and the staircase section.
Use the following chart to determine how long your base legs should
be. Use a hack saw and then cut them to the required length if needed.
POOL DEPTH
BRACE LENGTH
48”
50”
52”
54” *
48 3/4”
50 3/4”
52 3/4”
52 3/4”
* You must use additional patio blocks under the brace pad for proper support.
4
8
Place the Platform / Handrail assembly assembled
above onto the ledge of the pool. Make sure that
the two round receivers underneath the Platform
that the legs of the Support Brace will eventually be fitted
into clear the ledge on the outside of the pool.
Position the ladder so that the distance between the barrier
and the inside of the pool wall must be between 3 and 4 inches.
(See close-up 8A).
Find the two holes in the top of the Platform and mark
these holes on the ledge with a pencil.
Look under the ledge to make sure that drilling holes at these
two places will not hit the wall or any other structural part of the pool.
Using a tape measure, verify that the pencil marks are 19” apart
from center to center.
CHECK AGAIN to make sure that drilling holes at these two places
will not hit the wall or any other structural part of the pool.
Using a 7/16” drill bit, drill carefully through the pool ledge at these
two locations, being careful because any metal chips or debris
falling into the pool could cause damage to the liner.
8A
Minimum 3”
Maximum 4”
Outside
of Pool
Inside
of Pool
9
Fasten the entire ladder assembly to the pool ledge by placing
two 3/8 x 16 x 2 1/4” stainless steel bolts through the holes in
the platform and through the holes in the ledge drilled previously.
Fasten with stainless steel washers and nuts provided.
5
11
10
Install the outside staircase section
to the ladder by holding the staircase
horizontally to the platform. Align the slot in
the staircase with the hook in the platform
and lower the staircase down.
Your ladder is now ready for use.
Insert the two (2) Brace Legs
into the Brace Pad and Platform.
Using the holes in the Brace Pad
and Platform as a template drill a
1/8” pilot hole through the Brace Legs.
Secure the Brace Legs using four
(4) #10 x 5/8” Pan head Screws
provided.
Note: Support the bottom of the Brace
Pad using patio blocks (not supplied).
LG AF DLX PACKING LIST
ITEM DESCRIPTION
CAUTIONS
PART #
QTY.
IN POOL STAIRCASE
361274
1
OUTSIDE STAIRCASE
361275
1
PLATFORM
361238
1
COMPARTMENT DOOR
361276
2
• Locate the ladder on a solid base.
EXTENSION FEET
361243
4
• Only one person on the ladder at a time.
SUPPORT BLOCK
361239
4
• Always face the ladder when using.
BRACE LEGS
700137
2
21” HANDRAIL
361242
2
• The ladder must be installed as per manufacturers
instructions.
1/4 - 20 X2 1/4” S.S. BOLT
460178
2
1/4 - 20 S.S. CAP NUT
460179
2
• DANGER! NO DIVING - NO JUMPING
Permanent injury or death may result.
3/8 - 16X2 1/4” S.S. BOLT
460180
2
• Remove outside staircase section when not in use
to prohibit unauthorized entry into the pool.
• Warning labels have been supplied already attached
to your ladder. Should you need additional labels for
any reason, either contact your local pool dealer or
the manufacturer, and order the label with the part
number.
• DANGER! Do not swim behind, through,
or around the ladder! This may cause entrapment
resulting in permanent injury or death.
Division of Swim’n Play, Inc.
313 Regina Avenue, Rahway, NJ 07065-4891
www.swimnplay.com
6
3/8 - 16 S.S. HEX NUTS
460182
2
3/8 S.S. WASHER
460181
4
#10 X 5/8” S.S. PAN HEAD SCREW
460191
10
“DO NOT SWIM THROUGH” LABEL
(APPLIED TO HANDRAIL)
490158
2
“DO NOT DIVE” LABELS
(APPLIED TO HANDRAIL)
490157
2
“REMOVE WHEN NOT IN USE” LABEL
(APPLIED TO OUTSIDE STAIRCASE)
490159
1
LARGE “DO NOT DIVE” LABEL
(APPLIED TO PLATFORM)
490156
1
INSTRUCTIONS
420490
1
5 YEAR LIMITED WARRANTY
420516
1
#10 X 1” ROUND HEAD S.S. SCREW
460169
4
LOWER BRACKET
361262
1
UPPER BRACKET
361261
1
LOWER EXTENSION BRACKET
361264
1
UPPER EXTENSION BRACKET
361263
1
BARRIER TUBES
604079
6
SCREWS
460221
14
VINYL CAPS
603079
3
BRACE PAD
361240
1