1
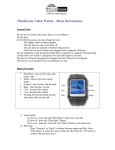
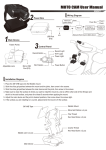
ThinkGeek Video Watch – Basic Instructions
(Rev 1)
General Notes
Do not use in extreme cold, heat, dusty or wet conditions.
Do not drop.
In the following cases you must charge the unit:
• The display indicates a low battery
• The unit does not stay on or shuts off
• The unit does not respond to buttons being pressed
• If the unit can not be found when plugged into a computer USB port
Do not unplug the watch during download or upload to a computer because this will
result in a program error and could result in lost data.
The device will begin charging once plugged into the USB port of a computer.
This device is not waterproof, do not submerge in water.
•
•
•
•
•
•
Play/Pause: turn on/off,
enter, play, pause, stop
Menu: return to previous
menu or previous screen
Forward : next section
Back : last selection
Vol+ : increase the volume
(must press and hold)
Vol-: decrease the volume
(must press and hold)
1) Turn On/Off
(1) Turn on : press “Play/Pause” button once (the time display will appear) and press
“Play/Pause” button again and main menu screen will appear
(2) Turn off : press and hold the “Play/Pause” button for about 4 seconds
2) Browsing
Press “Forward” or “Back” button to choose between menus and files. Press
“Play/Pause” button to select the menu or play the file. Press the “Menu” button to
return to the previous menu or screen.
3) Deleting
Use the “Forward” and “Back” buttons to select the file that you wish to delete. When
the file is highlighted, press and hold the “Back” button for 5 seconds and then release.
The Delete screen will appear and you will use the “Back” or “Forward” button to select
No or Yes. Then press the “Play/Pause” button to confirm your choice.
4) Volume Adjustment
(1) press and hold “Vol+” to increase volume
(2) press and hold “Vol-” to decrease volume
5) Display Clock
While the watch is off, press the “Play/Pause” button and the clock will display. The
clock display will stay on for about 5 seconds to save battery life.
Navigating Watch Functions
After turning on the watch you will see the first function menu screen (which is Music).
Press “Forward” or “Back” to scroll through the other function menu screens, press
“Play/Pause” to enter a function’s menu. Press or press and hold the “Menu” button to
return to a previous screen or menu.
1) Music Menu
Press “Play/Pause” button to display music player screen. The current track title will
be shown along with the track number, volume level, encoding rate. Press
“Play/Pause” button to begin playing the current track. Press the “Forward” button to
skip to the next track or the “Back” button to skip to the previous track. Press and
hold the “Vol+” or “Vol-“ button to change the volume level.
While a track is playing press the “Menu” button to view other music playback
options. Scroll through these options using the “Back” or “Forward” buttons and
press “Play/Pause” to select the various options. Press “Menu” button to return to the
previous screen. Press and hold the “Menu” button to return to the main function
menu screen.
While a track is playing the watch display will return automatically to the clock
display screen. Press the “Play/Pause” button to return back to the music player
screen.
2) Video Menu
Press “Play/Pause” button to display the listing of video files. Use the “Forward” and
“Back” buttons to navigate to the desired video file. Press “Play/Pause” to play the
file. Press and hold the “Vol+” or “Vol-“ buttons to change the volume level. Press
the “Back” or “Forward” buttons to view the previous or next video. Press “Menu” to
stop the video and return to the listing of video files.
3) Photo Menu
Press “Play/Pause” button to display the listing of photos. Use the “Forward” and
“Back” buttons to navigate to the desired photo file. Press “Play/Pause” to view the
file. Press the “Back” or “Forward” buttons to view the previous or next photo. Press
“Menu” to stop viewing the photos and return to the listing of photos.
4) Voice Menu
Press “Play/Pause” button to display the voice recording playback screen. If you
have made any voice recording files, press the “Play/Pause” button to play the files
and press the “Forward” or “Back” button to skip to the next or previous recording.
To make a new voice recording, press the “Menu” button while on the voice
recording playback screen. You will see a list of various options, with “Record” at
the top. The “Record” option should already be selected. Press the “Play/Pause”
button to begin voice recording, using the built-in microphone. You will see a blue
screen with a timer counting each second. To end voice recording (or pause it), press
the “Play/Pause” button again. To resume recording, press the “Play/Pause” button
again. If you are finished, press “Menu” button to save the recording. You will then
return to the voice recording playback screen, where you can listen to your new or
previous voice recordings.
Press and hold the “Menu” button to return to the main function menu screen.
5) E-Book Menu
Press “Play/Pause” button to view the first text file in the listing of E-books. Press
the “Forward” and “Back” buttons to scroll to and read the next or previous page. If
you wish to select a different E-Book to read, press the “Menu” button to see the full
listing of E-Books. Use the “Forward” and “Back” buttons to navigate to the desired
E-Book file. Press “Play/Pause” to read the file.
6) File Menu
Press “Play/Pause” button to view the main file listing screen. Press the “Forward”
and “Back” buttons to navigate through the various files and folders. This will show
you all files and folders on the watch.
To delete a file use the “Forward” and “Back” buttons to select the file that you wish
to delete. When the file is highlighted, press and hold the “Back” button for 5
seconds and then release. The Delete screen will appear and you will use the “Back”
or “Forward” button to select No or Yes. Then press the “Play/Pause” button to
confirm your choice.
7) Setting Menu
Press “Play/Pause” button to view the main setting screen, which will list various
options. Press the “Forward” and “Back” buttons to scroll through the various
options. Press the “Play/Pause” button to enter that option and make additional
adjustments.
For example, to adjust the time, select the “Time” option then press “Play/Pause” and
then select the “Adjust” option and press “Play/Pause” button again. Use the
“Forward” and “Back” buttons to select the field you want to change. Press the
“Play/Pause” button to change the field to a red color. When the field is red use the
“Forward” and “Back” buttons to adjust it. Press the “Play/Pause” button again when
finished adjusting. Press the “Menu” button to return to previous screen(s).