1
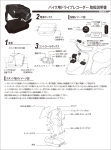
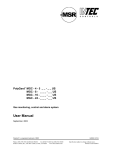
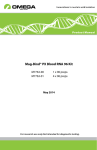
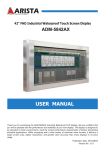
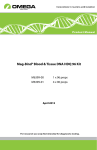
MOTO CAM User Manual
2
Wiring Diagram
Power Box
Power+
Motorcycle
Ignition Switch
Motorcycle
1
USB Port
(P.8)
Main Device
3
Fasten Points
Micro USB
Port (P.9)
Headlight or
Indicator Switch
RELAY
Motorcycle Power Ground or Battery Ground
GC1
3
Control Panel
Record Button
Adjustable Lens
Battery
Power Box
Wi-Fi Button
Record Light
Wi-Fi Light
Power Light
1
2
Power Button
Installation Diagram
1.
2.
3.
4.
Place the 3M VHB tape onto the Metallic mount.
Stick the silica gel patches between the mount and the joints, then screw in the screws.
Stick the silica gel patches between the main device and the joints, then screw in the screws.
Make sure to clean the surface of where you want to install the mount to, and rip off the other side of the 3M tape and
stick it to the said surface, and press for at least 5 seconds when applying the mount.
5. Adjust the main device and the joint to desired positions, then screw down the screws tight.
6. If the surface you are installing to is curved, please bend the mount to fit the surface.
3M VHB Tape
Metallic Mount
Silica Gel Patches x 4 pcs
Fine Thread
Hex Head Screw x 2 pcs
Coarse Thread
Metallic Joint x 2 pcs
Main Device
Hex Head Screw x 2 pcs
Power+
PowerHeadlight or
Indicator
GC1
MOTO CAM User Manual
Operating Instructions
Establishing Wi-Fi Connection
1. Button Descriptions
i Power button: Press once to turn power on/off, Hold down 5
seconds for forced shutdown
ii Wi-Fi button: Press once to turn Wi-Fi on/off, Hold down 10
seconds for restoring to factory settings
iii Record button: Press once to lock the current video file
(only works while recording), Hold down for 3 seconds to
start/end recording.
2. When the ignition switch is turned to [ACC], the device is
booted up, and will enter recording mode in about 5 seconds.
3. When the ignition switch is turned to [OFF], the current
recording file is automatically saved and the device will
proceed to shut down.
4. Wi-Fi is off by default, start-up time requires 15 seconds.
5. When Wi-Fi is enabled, the APP can be used to connect to the
device to download, view, edit the files and give access to
camera settings.
6. “The Foxeye Wi-Fi APP supports both the iOS and the Android
systems.
1. Mobile APP Installation
i iPhone: Search for “Action Cam HD” on the Apple’s App store.
ii Android 5: Search for “Action Cam HD” on Google play.
iii Android 4: Download “Action Cam HD” Android 4 app as
http://www.foxeye-cam.com/doc/809FhP.apk
2. Wait for the device to boot up and enter recording mode.
3. Press the Wi-Fi button on the control panel, the recording will be
interrupted shortly, and when the Wi-Fi indicator light is lit, the
recording will resume.
4. Find "GC1_xxxxxx" in the Wi-Fi listings on your mobile device,
enter the default password "00000000", and select to connect.
5. Boot up the Foxeye Wi-Fi App, and proceed to use the app.
The microphone operation instrucion is as followed:
1. The microphone is defaulted as on every time the device is
booted up.
2. During recording mode
A. Stop recording, short press the power button once, the power
light will blink twice, start recording, the sound will be muted.
B. Stop recording, short press the power button once, the power
light will blink once, start recording, the sound will be unmuted.
3. During Wi-Fi mode
A. Short press the power button once, the power light will blink
twice, the sound will be muted.
B. Short press the power button once, the power light will blink
once, the sound will be unmuted.
Formating Internal Memory
1. After the devices has booted, please turn off Wi-Fi and the
recording function.
2. Press and hold both the Wi-Fi and recording button for about
10 seconds, the blue and red light will start to cross blinking to
indicate the formatting process has started.
3. All lights will extinguish to indicate the formatting has been
successful.
4. Formatting will wipe out all files in the memory including the
locked files, please back up all the files you wish to keep
before commencing to format.
System Reset
Press power button 20 seconds to reset the system if control panel
LED lights are unstable (recording red light can’t turn on or off /
power green light can’t turn on…etc)
Light Indicators
Restore to Factory Settings
1. Red light:
Recording when lit, Stops recording when extinguished.
2. Blue light:
Wi-Fi on when lit, Wi-Fi off when extinguished.
3. Green light:
Device on when lit, off when extinguished.
1. Make sure the device is not recording and the Wi-Fi is off.
2. Hold down the WI-FI button on the control panel for 10
seconds, the device will automatically reboot and is restored to
factory settings.
Precautions
1.
2.
3.
4.
5.
6.
The time stamp function is disabled when Wi-Fi is on.
This device has loop recording and file lock down functions, locked files cannot be overwritten unless using connection via an external device such as a mobile phone.
This device has IPX6 waterproof ratings, but is not designed to submerge underwater.
Do not disassemble the device; all warranty will be invalid if the device has been disassembled.
If installed on the negative terminal of the vehicle, be sure that the said terminal is connected to the battery’s negative terminal.
The red wire is positive electricity, it must be connect to a positive electricity controlled by the ignition switch, which means when the ignition switch is turned to “ACC”,
the white light on the control panel will also be lit, and will enter recording mode.
7. After all the wires are fixed in position, be sure the steering of the handlebars will not implicate the wires.
8. The USB port of the power box can supply a 5V/2A power output to provide charging for phones or tablets, please be aware that when the rubber cap is off, the device
cannot sustain any water, and please leave the cap on when not using the USB port. When installing the power box, place face the opening of the USB port downwards
and be careful of any water that may get in.
9. You can use Micro USB to connect the device to a computer and use as an external storage device, but please be aware that when the rubber cap is off, the device
cannot sustain any water, and please leave the cap on when not using the USB port.
30500198300C