1
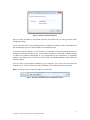
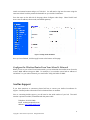
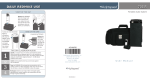
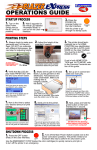
®
®
Acellus Lab Cart
User’s Manual
Version 4B
Acellus Corporation
www.acellus.com
1
Copyright © 2010 Acellus Corporation. All Rights Reserved.
Table of Contents
Using Acellus ..................................................................................................................................................... 3
Acellus Lab Cart and Server .................................................................................................................... 3
Acellus Laptops............................................................................................................................................ 3
Acellus Updates ........................................................................................................................................... 4
Accessing the Acellus Server .................................................................................................................. 4
Accessing Acellus from the Local Network................................................................................... 4
Accessing Acellus over the Internet ................................................................................................ 4
Wireless Router Configuration ................................................................................................................... 5
Obtaining the Security Key...................................................................................................................... 5
Logging into the Lab Wireless Router................................................................................................. 5
Determine the Current Address of the Wireless Router .............................................................. 7
Assigning a Static IP Address ................................................................................................................. 7
Configure the Wireless Router From Your School’s Network .................................................... 8
Acellus Support ................................................................................................................................................ 8
2
Copyright © 2010 Acellus Corporation. All Rights Reserved.
Using Acellus
The Acellus Lab is already pre-configured for most school environments. A typical Acellus Lab
installation will require no pre-installation setup.
Acellus Lab Cart and Server
The Acellus Lab Cart should be positioned inside the classroom where students will be using the
Acellus Computer Learning System. The cart’s power cable should be plugged in, and the Acellus
Server in the cart should be powered on. If you would like to use Acellus on computers outside
your lab, you will also need to plug in the Network Uplink cable.
For typical daily usage, this is all that is necessary to set up the Acellus Lab Cart in the classroom.
Power Up Instructions:
• Plug in the power cable on the Acellus Cart.
• Press the power button on the front of the Acellus Server.
(The Acellus Server takes about a minute to boot.)
Shutdown instructions:
• Briefly press the Acellus Server’s power button.
(Do not hold the power button down.)
• Wait until the server’s power button light turns off.
• The Acellus Cart may now be unplugged.
Warning: Shut down the Acellus Server before disconnecting the power cable. Failure to do so
may cause data loss or server failure.
Acellus Laptops
A locked Acellus Laptop is pre-configured to use the Acellus Cart’s wireless router and is locked
down so only Acellus may be run. No setup is required to use an Acellus Laptop with the cart’s
Acellus Server.
Note: The laptop’s battery life is approximately 11 hours, which is long enough for a normal school
day. However, the laptops need to be charged every night, or they will not last through a second
day of rigorous use. Storing the laptops in the powered-on Acellus Cart will recharge them.
For long-term storage of the Acellus Laptops, such as during the summer, it is best to store them
in an un-powered Lab Cart, with their batteries at half charge.
3
Copyright © 2010 Acellus Corporation. All Rights Reserved.
Acellus Updates
In order for your Acellus Server to update, plug the Network Uplink cable on the left side of the
Acellus Lab Cart into your network. If your network uses DHCP, an IP address will be
automatically assigned to the router inside the Acellus cart.
Note: If your school network requires static IP addresses, please see the Assigning a Static IP
Address section for more information.
The requirements for receiving nightly updates are:
•
•
•
The Acellus server must be on during the night.
The Network Uplink cable must be plugged in to allow the Acellus server to access the
Internet.
Ports 22, 80, and 443 must be open on your school’s firewall, outgoing only.
Important: The Acellus server must be connected to the Internet each night using the uplink
cable provided. During the update, all student data is also backed up in case of system failure.
Accessing the Acellus Server
On a locked-down Acellus Laptop, the Acellus Server in your lab will come up by default. If you
have connected wirelessly to the Acellus Lab on your own computer, the Acellus Server is
accessible using the address 172.30.30.1.
Accessing Acellus from the Local Network
The Acellus server in your lab can be used from the regular school network if the Network Uplink
cable is plugged in. To access the server from a computer not attached to the lab’s wireless, use
the external IP address of the wireless router.
The external IP address of the wireless router may be obtained through its web interface. See the
Determine the Current Address of the Wireless Router section for more information.
Accessing Acellus over the Internet
Acellus servers are Internet-ready, so they may safely face the Internet. However, be sure to set
good teacher passwords if you are planning to use Acellus over the Internet, as weak passwords
will make your system more vulnerable to attacks from the outside.
To access Acellus over the Internet, you must either forward ports from your internet router to the
Acellus lab’s wireless router, or assign the wireless router a public WAN IP address. See the
Assigning a Static IP Address section for instructions.
4
Copyright © 2010 Acellus Corporation. All Rights Reserved.
The ports that must be forwarded from your Internet router are 22 and 80.
When you have forwarded the correct ports, your students and teachers may access your Acellus
server using the external IP address of your Internet router.
Wireless Router Configuration
Obtaining the Security Key
The security key for the wireless router’s administration can be obtained from your Acellus
Coordinator. See the Acellus Support section for contact information.
Logging into the Lab Wireless Router
The Acellus Lab Wireless Router will have a public name of the Acellus Lab’s Serial Number. An
Acellus Lab with a serial number of “AC0001” will have a wireless router named “AC0001”.
Figure 1. Wireless Router Connection
5
Copyright © 2010 Acellus Corporation. All Rights Reserved.
Figure 2. Entering a Network Security Key
Once you have connected to the wireless network in the Acellus Lab, you can log into the router
configuration page.
If your computer is set to automatically obtain an IP address, the wireless router in the Acellus Lab
will automatically give you a DHCP address on its internal network.
If you have a static IP address on your computer, you will need to temporarily change it while you
administer the Acellus wireless router. You can either change your computer’s network settings
to obtain an IP address automatically, or you can manually set your computer to a compatible
address. Any address from 172.30.30.3 to 172.30.30.99 is an available address on the Acellus Lab
network scheme.
Once you have an appropriate IP address on your computer, you can log into the Acellus Lab
wireless router. To do so, enter the router’s IP address into the address line of your browser.
Note: The wireless router’s internal IP address is 172.30.30.2.
Figure 3. Browsing to the Wireless Router Configuration Interface
6
Copyright © 2010 Acellus Corporation. All Rights Reserved.
Figure 4. Log into the Configuration Interface
Determine the Current Address of the Wireless Router
The DHCP address of the wireless router can easily be read from the Status page. The WAN
section of the settings page shows the IP address that is visible from your school’s network.
Figure 5. Finding the Current IP Address of the Wireless Router
Assigning a Static IP Address
In some cases, it is necessary to assign a Static IP Address to the router. To do so, plug the cart’s
Network Uplink cable into your network and wirelessly connect to the router.
Note: The Acellus Laptops cannot be used to configure this router.
The network security key must be obtained from your Acellus Coordinator.
7
Copyright © 2010 Acellus Corporation. All Rights Reserved.
Launch an internet browser and go to 172.30.30.2. You will need to log into the router using the
username “admin” and the password obtained from your Acellus Coordinator.
From the menu on the left side of the page, select Configure under Setup. Select Fixed IP and
enter a new IP address, subnet mask, and default gateway.
Figure 6. Setting a Static IP Address
Once you have finished, click the Apply button at the bottom of the page.
Configure the Wireless Router From Your School’s Network
When you are on your school’s local area network, you can administer the Acellus Server from the
router’s WAN address using port 8080. For example, if your wireless router had an address of
192.168.0.17 on your school network, you would enter “http://192.168.0.17:8080”.
Acellus Support
If you have questions or comments, please feel free to contact your Acellus Coordinator for
support. General product information can be obtained from our website.
Prior to contacting Acellus support, you will need to the serial number of your lab. The serial
number is printed on a label, located beneath the power cable.
Telephone: 816-229-3800
Email: [email protected]
Website: http://www.acellus.com/
8
Copyright © 2010 Acellus Corporation. All Rights Reserved.