1
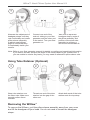
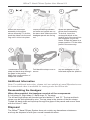
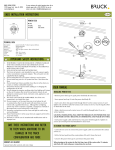
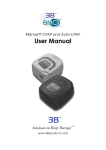
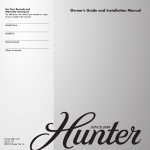
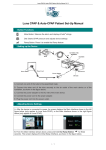
Exhibit 71
71
Exhibit
3B Willow™ Nasal Pillows System
User Manual
Table of Contents
Willow™ Nasal Pillows System . . . . . . . . . . . . . . . . . . . . . . . . . . . . 1
Intended Use . . . . . . . . . . . . . . . . . . . . . . . . . . . . . . . . . . . . . . . . . . 1
Medical Information . . . . . . . . . . . . . . . . . . . . . . . . . . . . . . . . . . . . . 1
Parts of the Willow™ . . . . . . . . . . . . . . . . . . . . . . . . . . . . . . . . . . . . 2
Nasal Pillows Sizes. . . . . . . . . . . . . . . . . . . . . . . . . . . . . . . . . . . . . . 3
Fitting the Willow™. . . . . . . . . . . . . . . . . . . . . . . . . . . . . . . . . . . . . . 3
Using Tube Retainer (Optional). . . . . . . . . . . . . . . . . . . . . . . . . . . . . 4
Removing the Willow™ . . . . . . . . . . . . . . . . . . . . . . . . . . . . . . . . . . 4
Disassembling for Cleaning . . . . . . . . . . . . . . . . . . . . . . . . . . . . . . . 5
Cleaning the Willow™ in the Home . . . . . . . . . . . . . . . . . . . . . . . . . 5
Reassembling the Willow™. . . . . . . . . . . . . . . . . . . . . . . . . . . . . . . . 6
Additional Information . . . . . . . . . . . . . . . . . . . . . . . . . . . . . . . . . . . . 7
Disposal . . . . . . . . . . . . . . . . . . . . . . . . . . . . . . . . . . . . . . . . . . . . . . 7
Technical Specifications . . . . . . . . . . . . . . . . . . . . . . . . . . . . . . . . . . 8
Symbols . . . . . . . . . . . . . . . . . . . . . . . . . . . . . . . . . . . . . . . . . . . . . . 8
Limited Warranty . . . . . . . . . . . . . . . . . . . . . . . . . . . . . . . . . . . . . . . 1
Willow™ Nasal Pillows System User Manual V4
Willow™ Nasal Pillows System
Thank you for choosing WillowTM Nasal Pillows System.
The Willow™ nasal pillows system is light, flexible and quiet. It is designed to
minimize contact with your face and to maximize comfort during therapy. This
user guide provides you with the information you need for the correct use of your
system.
Intended Use
The WillowTM is intended for adult patients (>30Kg) prescribed continuous
positive airway pressure or Bi-level therapy, and it is intended for single patient
reuse in the home environment.
CAUTION: Federal law restricts the sale of this device to sale by or on the order
of a physician.
Medical Information
Note: The WillowTM does not contain latex, PVC, or DEHP materials. If you have
ANY reaction to any part of the system, discontinue use and consult your sleep
therapist.
WARNING and CAUTION
• This system should be used only with flow generators (CPAP or Bi-level) recommended
by your physician or respiratory therapist. It should not be used unless the flow generator
is turned on and operating properly. The vent holes should never be blocked.
• Explanation of the Warning: Flow generators are intended to be used with special
interfaces with connectors which have vent holes (vent holes are located on the elbow)
or separate exhalation devices to allow continuous flow of air out of the interface. When
the flow generator is turned on and functioning properly, new air from the flow generator
will flush the exhaled air out through the attached exhalation port. However, when the
flow generator is not operating (eg, power failure), not enough fresh air will be provided
through the system, and exhaled air may be re-breathed. In this situation, remove the
WillowTM immediately.
• The exhaust vent flow is lower at lower system pressure (see section “Technical
Specifications” for Pressure-Flow Curve details). If the system pressure during expiration
is too low, there may not be enough exhaust vent flow to completely flush the air delivery
hose of exhaled air before the start of the next inspiration.
• Discontinue using the WillowTM if you frequently experience nasal irritation, and consult
your physician.
• If oxygen is used with the flow generator, the oxygen flow must be turned off when the
flow generator is not operating. Explanation of the Warning: When the flow generator is
not in operation, and the oxygen flow is left on, oxygen delivered into the ventilator tubing
may accumulate within the flow generator enclosure. Oxygen accumulated in the flow
generator enclosure will create a risk of fire. This warning applies to most types of flow
generators.
• Please refrain from smoking while oxygen is in use.
Note: At a fixed flow rate of supplemental oxygen flow, the inhaled oxygen concentration
will vary, depending on the pressure settings, patient breathing pattern, interface selection
and the leak rate.
1
Willow™ Nasal Pillows System User Manual V4
Parts of the Willow™
Headgear Assembly
Tube Retainer
Tube Retainer
Back Strap
Frame
Nasal Pillows
Elbow
Clip
Pillow Sleeve
Panels
Short Tube
Swivel
Figure 1 Construction of the WillowTM
2
Willow™ Nasal Pillows System User Manual V4
Nasal Pillows Sizes
You can choose the appropriate nasal pillows from ”S”,”M” and ”L” sizes, depending on
individual dimensions.
Size
S
M
L
L1
6.7mm
7.7mm
9.2mm
L2
23mm
25mm
29mm
Figure 2 The dimensions of the nasal pillows
Fitting the Willow™
1
Insert the rectangular block
at the smaller end of the
panel into the headgear ring
on the frame. Make sure the
rectangular block is inserted
into the correct side.
4
Put the headgear on your
head and Insert the nasal
pillows into your nostrils.
Make sure the top strap
passes over the top of your
head.
2
3
Rotate the panel to a proper
position. Fix the other panel
in the same way.
Thread the top and back
straps through the gaps in
panels separately, then fold
back over to secure.
6
5
Gently tighten the top strap
(overtighting may cause
excess pressure on your
nose).
3
Adjust each end of the back
strap (overtighting may
cause excess pressure on
upper lips).
Willow™ Nasal Pillows System User Manual V4
7
Alternate the adjustment of
headgear straps until they
rest comfortably and rotate
pillow sleeve assembly
to adjust nasal pillows
angle to insure that they
fit comfortably inside your
nostrils.
8
9
Connect one end of the
main air tubing to your flow
generator and the other end
to the swivel. Turn your flow
generator on.
Take time to adjust the
headgear straps, angle of
the pillow assembly and
position of the short tube
assembly to achieve a
secure and comfortable fit.
Note: Refer to your flow generator manual for details on setting and operational information.
If you feel an air leak, readjust the angle of the nasal pillows to get a better seal. If you are unable to resolve any leaks, you may need an alternative pillow sleeve size.
Using Tube Retainer (Optional)
1
Wrap tube retainer over
the short tube. Make sure
smooth surface faces
outward.
2
3
Thread one end of the tube
retainer into the gap of the
other end.
Attach both ends of the tube
retainer onto the top strap.
Removing the Willow™
To remove the WillowTM, pull the pillow sleeve assembly away from your nose
and lift the headgear off your head. You do not need to loosen the headgear
straps.
4
Willow™ Nasal Pillows System User Manual V4
Disassembling for Cleaning
1
2
Disconnect the flow
generator tubing. Hold the
swivel and pull it away from
the flow generator tubing.
3
Detach the panels from the
pillow sleeve assembly.
Rotate the panel until the
rectangular block lies in
parallel with the gap in the
frame. Simply pull the panels
from the frame.
Detach the short tube
assembly. To do this, hold
the elbow and pull it away
from the frame.
5
4
Remove clip from frame.
Disassemble the pillow
sleeve assembly. To do this,
detach the clip and peel the
pillow sleeve off the frame.
Note: The short tube assembly cannot be taken apart.
CAUTION
• Do not pull on the short tube or the flow generator tubing as they may get damaged.
To disassemble the WillowTM for daily cleaning, follow steps 1–3.
To disassemble the WillowTM for weekly cleaning, follow steps 1–5.
Cleaning the Willow™ in the Home
Notes:
•
•
•
Wash your hands before cleaning the mask.
Wash the headgear before first time use, as the dye may run. It is important to always handwash the headgear.
The headgear may be washed without being disassembled.
5
Willow™ Nasal Pillows System User Manual V4
Daily
Handwash the pillow sleeve assembly, short tube assembly and cap in
warm (approx. 30°C), soapy water for one minute. Use pure soap. Rinse the
components well with drinking quality water and allow to air dry out of direct
sunlight and heat.
Note: Insure that the vent holes are not blocked. Use a soft bristle brush to
clean the vent.
Weekly
Gently handwash the headgear and all components in warm, (approx. 30°C)
and soapy water. Use only pure soap and water. Rinse the components well and
allow them to air dry out of direct sunlight.
CAUTION
• Do not use solutions containing bleach, chlorine, alcohol, aromatics, moisturizers,
antibacterial agents, or scented oils to clean any part of the system or air tubing.
These solutions may cause damage and reduce the life of the product.
• Exposing any part of the system or tubing to direct sunlight or heat may cause
deterioration.
• If any visible deterioration of a component is apparent (cracking, crazing, tears
etc), the component should be discarded and replaced.
Reassembling the Willow™
1
Wrap the pillow sleeve
around the frame in the
correct position. Make
sure the nasal pillows are
pointing upwards.
2
3
Insert the pillow sleeve edges
into the groove of the frame.
Make sure assemble it in the
right side, or it can not be
attached tightly to the frame.
6
Hold the clip and align the
circle in its middle with the
one on the frame. Gently
push the clip onto the frame
to secure the pillow sleeve
in place.
Willow™ Nasal Pillows System User Manual V4
4
Attach the short tube
assembly to the pillow
sleeve assembly. To do this,
push the elbow into the seal
ring until it clicks into place.
6
5
Check positioning markers
on frame and panels are on
the same side. Make sure the
headgear panels are facing
out.
7
8
Attach the panels to the
pillow sleeve assembly.
To do this, insert the
rectangular block at the
smaller end of the panel into
the headgear ring on the
frame. Rotate the panel to a
proper position. Fix the other
panel in the same way.
9
Thread both ends of top
Fold back the straps over to
strap and back strap through secure.
the gaps in the panels.
Make sure rough surface of
straps sits outside.
Slip the headgear on your
head and adjust the position.
Additional Information
Note: For additional instruction, please visit our website at www.3Bproducts.com.
An instructional video is available for viewing under the Willow tab
Reassembling the Headgear
When disassembled, the headgear consists of four components:
A: Left strap; B: Right strap; C: Back strap; D: Top strap.
The left and right straps are bonded and are labeled “L” and “R”. The top and back
straps may be distinguished by size. The top strap is the shorter of the two straps.
Thread the back strap and top strap through the gaps of the panels and secure them
with the Velcro™ tabs.
Disposal
The WillowTM Nasal Pillows System does not contain any hazardous substances
and may be disposed of with your normal household refuse.
7
Willow™ Nasal Pillows System User Manual V4
Technical Specifications
Pressure–Flow Curve
Mask Pressure (cmH20)
Dead Space Information
Dead space is the empty volume of the pillow sleeve and
short tube assembly up to the swivel. The dead space of
the WillowTM for all pillow sleeve sizes is 96 mL.
Therapy Pressure
4 to 20 cmH2O.
Resistance
Drop in pressure measured (average for three pillow
sleeve sizes) at 50 L/min: 1.0 cmH2O at 100 L/min: 3.1
cmH2O.
Sound
DECLARED DUAL-NUMBER NOISE EMISSION VALUES
in accordance with ISO 4871 . The A-weighted sound
power level of the mask is 25 dBA, with uncertainty 3 dBA.
The A-weighted sound pressure level of the mask at a
distance of 1m is 18 dBA, with uncertainty 3 dBA.
Environmental
Conditions
Operating temperature: +5°C to +40°C
Operating humidity: 10%–93 % relative humidity noncondensing
Storage and transport: - 20°C to + 55°C
Storage and transport humidity: 10%–93% relative
humidity non-condensing.
Symbols
System and Packaging
Caution, consult accompanying documents
LOT
Lot Number
User Guide
Indicates a Warning or Caution and alerts you to a possible injury or explains special
measures for the safe and effective use of the device.
8
Willow™ Nasal Pillows System User Manual V4
Limited Warranty
It is warranted that the WillowTM Nasal Pillows System, including its components,
frame, pillow sleeve, headgear, tubing and other accessories shall be free from
defects in material and workmanship for a period of ninety (90) days from the date of
purchase by the initial consumer.
To exercise the rights under this warranty, contact the local, authorized dealers or:
3B Medical, Inc.
1142 N. Scenic Highway
Lake Wales, FL 33844 USA
Email: [email protected]
Tel: (863) 226-6285 Fax: (863) 226-6284
9
3B Medical, Inc.
1142 N. Scenic Highway
Lake Wales, FL 33844 USA
Email: [email protected]
Tel: (863) 226-6285 Fax: (863) 226-6284