1
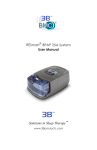
RESmart® nPAP Data Statistics Software User Manual Solutions in Sleep Therapy™ www.3bproducts.com RESmart® nPAP Data Statistics Software User Manual Page 1 of 27 RESmart® nPAP Data Statistics Software User Manual Content 1 2 3 Introduction ................................................................................................................................. 3 1.1 Function ......................................................................................................................... 3 1.2 Software Environment ................................................................................................... 3 1.3 Software Installation ...................................................................................................... 3 1.3.1 Install Software ...................................................................................................... 3 1.3.2 Install the USB Driver ........................................................................................... 5 1.4 Introduction to the User Interface .................................................................................. 6 1.4.1 Shortcut Operation................................................................................................. 6 1.4.2 Toolbar ................................................................................................................... 7 1.4.3 Help Menu ............................................................................................................. 7 1.4.4 Quit the Software ................................................................................................... 8 Software Operation ..................................................................................................................... 8 2.1 File Operation ................................................................................................................ 8 2.1.1 New Patient Record ............................................................................................... 8 Note: This function is not applicable if using an SD card to access user data. .................. 8 2.1.2 Open Patient Files................................................................................................ 15 2.1.3 Print and Print View ............................................................................................ 15 2.2 Using the Software with a Device Connected to the Computer .................................. 16 2.2.1 Download Data .................................................................................................... 16 2.2.2 User Information ................................................................................................. 18 2.2.3 Clock Synchronization ........................................................................................ 18 2.2.4 Registering a New User....................................................................................... 19 2.3 Setup............................................................................................................................. 20 2.3.1 Language ............................................................................................................. 20 2.3.2 Log ....................................................................................................................... 21 2.3.3 Setup .................................................................................................................... 21 2.3.4 Email .................................................................................................................... 24 Glossary..................................................................................................................................... 26 Page 2 of 27 RESmart® nPAP Data Statistics Software User Manual 1 Introduction 1.1 Function The RESmart® nPAP Data Statistics Software is designed to be used with a RESmart® device. It is intended to download, save, display, and analyze device data and print reports. Data can be organized into graphs with this software, making it easier and more efficient to analyze patient data. 1.2 Software Environment Item Content Software Language Chinese, English, French, Russian, German, Italian, Polish, Portuguese, Spanish, Turkish Operating System Windows XP Windows 7 Windows 8 1.3 Software Installation 1.3.1 Install Software Insert the software CD to your disk drive. The Software Installation Wizard will automatically start (figure1-1) and guide you through the installation process. RESmart® nPAP Data Statistics Software User Manual Figure 1-1 You will see intallation prompts on the left side of the screen. On the right side, you will find a list of software available for installation: RESmart® nPAP Data Statistics Software, RESmart® iCode, RESmart® Control Panel, BMC Tools for Upgrade, and the USB driver. Select “RESmart®” to begin installation of the RESmart® nPAP Data Statistics Software (figure 1-2), and follow the on-screen instructions. Page 4 of 27 RESmart® nPAP Data Statistics Software User Manual Figure 1-2 Click to quit the installer. The icon will appear on the desktop. Double-click the shortcut icon to run RESmart® nPAP Data Statistics Software. 1.3.2 Install the USB Driver Note: If using an SD card to collect user data, you should skip this section. Select “Driver for USB” to initiate the USB driver installer. The installation wizard will appear (figure 1-3) and walk you through the installation process with a series of prompts. Page 5 of 27 RESmart® nPAP Data Statistics Software User Manual Figure 1-2 Once you have completed installation by clicking “Finish” on the installation wizard screen, connect the device to your computer with the USB cable. Right-click the shortcut icon on the desktop and select “properties.” Click “Device Manager” on the “Hardware” page to find the Serial Bus controllers.” If under “Universal appears, it suggests the USB driver failed to install properly, and you should reinstall. 1.4 Introduction to the User Interface 1.4.1 Shortcut Operation Note: Not applicable if using an SD card to collect user data. Connect the device to the computer with the USB cable, and open the software. Shortcut icons allow you to download and save data quickly and easily (figure 1-4). Simply click the “download data” icon to download and save the patient’s data. Page 6 of 27 RESmart® nPAP Data Statistics Software User Manual Figure 1-3 1.4.2 Toolbar On the toolbar (figure 1-5), you will find icons for (from left to right): new patient folder, open patient folder, data download, system settings, email report, and online help functions. Figure 1-4 1.4.3 Help Menu In order to find software version information, select “help” from the toolbar at the top of the screen. In the help drop-down menu, select “About Us” (figure 1-6). Figure 1-5 To access the help feature, select “Help Online” from the “Help” menu in the toolbar. You will be redirected to BMC Medical’s main help page, where you can search the full range of help information (figure 1-7). Page 7 of 27 RESmart® nPAP Data Statistics Software User Manual Figure 1-6 1.4.4 Quit the Software To exit the software, click “Exit” under the ”File” tab in the toolbar. Alternatively, you can click the “x” icon in the upper right corner. 2 Software Operation 2.1 File Operation 2.1.1 New Patient Record Note: This function is not applicable if using an SD card to access user data. Select “new patient archive” from the “File” drop-down menu (figure 2-1). Page 8 of 27 RESmart® nPAP Data Statistics Software User Manual Figure 2-1 A dialogue will pop up, asking whether you wish to create a new patient archive (figure 2-2). Select “yes” to create a new patient record. Figure 2-2 Enter the new patient’s information in the appropriate fields (figure 2-3), and select “OK” to access the patient’s user data. Page 9 of 27 RESmart® nPAP Data Statistics Software User Manual Figure 2-3 A pop-up window will display the number of records available (figure 2-4). Select “Ok” to prompt the record download window. Figure 2-4 Select “Ok” to download the available records (figure 2-5). Figure 2-5 A bridge has been built between your computer and the device. Patient information is now registered in the device and saved in your computer. The following main interface displaying patient data is now available (figure 2-6). Page 10 of 27 RESmart® nPAP Data Statistics Software User Manual Figure 2-6 On the left side of the screen you will find: Start Time: Select the start time of the displayed record End Time: Select the end time of the displayed record Last: Display the data recorded from last day to recent days Data Display: display valid data Display Type: You can display data in four ways, including data list, bar chart, line chart, and raw statistics. Click any point on the corresponding graph, and corresponding data will be shown on the right. Right-click any point on the graph (figure 2-7) to open a drop-down menu. “Select All” displays all treatment data in the chart. “Clear All” clears all treatment data. “List,” “Bar Chart,” and “Statistics” are alternative ways to choose the display types shown on the left. “P95, Mean Tendency Chart” is the same as “Line Chart.” ”Delete” eliminates the deleted data from the right of chart. “Restore” restores anew the deleted data to the chart. Page 11 of 27 RESmart® nPAP Data Statistics Software User Manual Figure 2-7 On the left you will also find User Information, designed to display patient information. Click “detailed information” for more detailed patient information. Device Information displays basic device information. On the right side of the screen, you will find the Pressure Diagram. As the key above the diagram shows, pressure values are expressed by a color gradiant. Each color is pegged to a numerical value where 1 = 1 cmH2O (figure 2-8). Figure 2-8 Page 12 of 27 RESmart® nPAP Data Statistics Software User Manual At the far right of the screen you will find the data list (figure 2-9). It includes the parameters of initial pressure, mean pressure, therapy pressure, leak, use time, AHI, and SNI. Figure 2-9 Page 13 of 27 RESmart® nPAP Data Statistics Software User Manual On the pressure diagram, you will find the dates on the left (figure 2-10). The symbol indicates that the waveform of raw data is available for that date. Note: Raw waveform is available only before midnight of the following day. At that time the data is erased when the device is turned on. Figure 2-10 Statistical trend charts (figure 2-11) are accessible by double-clicking any point recorded on the pressure diagram. Available statistical trend charts include: Pressure (cmH2O) trend chart Leak level trend chart Apnea/hypopnea trend chart Flow level trend chart Tidal volume (mL) Page 14 of 27 RESmart® nPAP Data Statistics Software User Manual Respiration Rate (BPM) Figure 2-11 On the left side of the statistical trend charts, you will find a zoom feature, the date, the patient’s information, the parameter being charted, and the basic device information. You may read the synchronous data by moving the cursor over any point in the trend chart. The scroll bar at the bottom of the screen allows you to view detailed trend data over long periods of times. 2.1.2 Open Patient Files Select “Open patient archive” from the “File” menu at the top left corner of the screen. Select the required patient file from the dialog box that opens and click “Open.” Click 2.1.3 in the top right corner to return to home screen at any time. Print and Print View In the “File” drop-down menu at the top left corner of the screen, you will find print setup, print preview, and print features. You can also print the statistical trend waveform charts. To do so, select “Waveform Print Page 15 of 27 RESmart® nPAP Data Statistics Software User Manual Setup” in the “File” drop-down menu at the top left corner of the screen. In the dialog box that appears, select the waveform charts you wish to print and select “OK” (figure 2-12). Figure 2-12 2.2 Using the Software with a Device Connected to the Computer Note: This section is not applicable, if using an SD card to collect user data. 2.2.1 Download Data Note: Before beginning the download, confirm that “Automatic connection” is selected in "Settings." Connect the device to the computer with the USB cable and turn the device on. Download the patient data by either clicking “download data” in the “Download” menu or clicking the “download” shortcut directly. A dialog box will pop up asking you to create a new patient archive. Follow the steps reviewed earlier in Section 2.1.1 for setting up a new patient file. If this box does not appear, the software failed to match the device with the computer. Make sure the device is on and properly connected to the computer. If there still is no match, disconnect the device and reinstall the USB driver. Once you have successfully set up the new patient file, the software will store the patient information in the device (figure 2-13). Figure 2-13 Page 16 of 27 RESmart® nPAP Data Statistics Software User Manual Once complete, you will see the prompt below (figure 2-14). Figure 2-14 Click “OK” to access data from the device (Figure 2-15). Figure 2-15 A dialog box will appear telling you the total number of records available for download (figure 2-16). Figure 2-16 Click “OK” to prompt the download window to appear (figure 2-17). Figure 2-17 Page 17 of 27 RESmart® nPAP Data Statistics Software User Manual Click “Yes” to download the patient data. The pressure graph will appear when the download is complete (figure 2-18). Figure 2-18 2.2.2 User Information Access user information in the “Download” menu at the top of the screen. Here, you can pull up dialog boxes containing “User Information” (patient information) and “Device time” (the date-time setting on the device). 2.2.3 Clock Synchronization Note: This function is not applicable if using SD card to collect user data. This function is used to correct an incorrect time setting on a device. Select “Clock Synchronization” under the “Download” menu at the top of the screen. Synchronization is complete when the dialog box pictured in figure 2-19 appears. Click “OK” to return to the home screen. Figure 2-19 Page 18 of 27 RESmart® nPAP Data Statistics Software User Manual 2.2.4 Registering a New User Note: This section is not applicable if using SD card to collect user data. Register a new patient by selecting “User Register” in the “Download” menu at the top of the screen. A dialog box (figure 2-20) will appear, allowing you to fill in or modify the patient’s information. Click “Ok” when finished. Figure 2-20 You will be prompted to confirm that you wish to make changes to the patient information (figure 2-21). Click “OK” to confirm. Figure 2-21 Page 19 of 27 RESmart® nPAP Data Statistics Software User Manual You will see a window displaying an information update progress bar (figure 2-22), followed by a confirmation dialog box (figure 2-23). Figure 2-22 Click “OK” to complete the process. Figure 2-23 2.3 Setup 2.3.1 Language In the “View” menu at the top of the screen, move your cursor over “Language” to view the language options and select English (figure 2-24). Figure 2-24 Page 20 of 27 RESmart® nPAP Data Statistics Software User Manual 2.3.2 Log The software offers an operation log (figure 2-25). You can access the log in the “View” menu at the top of the screen. Search the log by entering parameters into the appropriate date fields and clicking “Search.” Figure 2-25 2.3.3 Setup In the “View” menu at the top of the screen, choose “Setup” to access the setup function. There are 6 setup modules provided: System Setup, File Parameter Setup, Parameter Display Setup, Custom Setup, Device Setup, and Waveform Setup. System Setup (figure 2-26): Figure 2-26 Serial Port: Serial number of system Baud rate: Rate of data transmitted Auto Connect: Auto Connect Method Time Out: Delayed time Page 21 of 27 RESmart® nPAP Data Statistics Software User Manual File Parameters Setup (figure 2-27): you can select the save location by clicking “Browse.” Figure 2-27 Parameter Display Setup (figure 2-28): Figure 2-28 Select to hide or show deleted records. Custom Function Setup (figure 2-29): Figure 2-29 Page 22 of 27 RESmart® nPAP Data Statistics Software User Manual Select to hide or display scrollbars, and select the conversion unit used in the software. Device setup (figures 2-30 and 2-31): Here you can calibrate the treatment settings of the RESmart® device. Note: This feature is compatible only with devices with SD card capability. Figure 2-30 Page 23 of 27 RESmart® nPAP Data Statistics Software User Manual Figure 2-31 Waveform Setup (figure 2-32): Figure 2-32 Calibrate which waveform charts display. 2.3.4 Email In the “View” menu at the top of the screen, select “Email” and “Send Emails” to open the email interface (figure 2-33). Page 24 of 27 RESmart® nPAP Data Statistics Software User Manual Figure 2-33 By choosing system default, your email will be sent by operating system default mailbox. If you select RESmart mail client, your email will be sent by the RESmart mailbox (figure 2-34). Figure 2-34 Set the parameters of the RESmart® mailbox by entering the username (the sender’s email address), password (the corresponding password), host (the email server address), Page 25 of 27 RESmart® nPAP Data Statistics Software User Manual and port (will match the email server). Click “Save” or, alternatively, it will save after successfully sending an e-mail. Add attachment files by clicking “Add”. 3 Glossary Terms Explanation Snore Snore is the sound resulting from obstructed air movement, created when a breath of air passes through a narrowed airway. Sleep apnea Apnea during sleep in which airflow decreases by 90% the normal level for at least 10 seconds. Hypopnea Airflow decreases by more than 50%, accompanied by an associated decrease in oxygen saturation by more than 4%. Obstructive Sleep Apnea Syndrome (OSA) A condition in which an adult patient experiences at least 30 apnea events of a minimum 10 second interval between breaths during a 7 hour period of sleep. Or, a condition in which a patient has AHI > 5. Apnea Index (AI) The average number of apnea events per hour, calculated by dividing the number of events during the sleep period by the number of hours of sleep. Hypopnea index (HI) The average number of hypopnea events per hour, calculated by dividing the number of hypopnea events during the sleep period by the number of hours of sleep. Apnea-Hypopnea Index (AHI) The average number of apnea-hypopnea events per hour, calculated by dividing the number of apnea-hypopnea events during the sleep period by the number of hours of sleep. Snore Index (SI) The average number of snores per hour, calculated by dividing the number of snores during the sleep period by the number of hours of sleep. Continuous Positive Airway Pressure Therapy to maintain an open airway for OSA patients via the delivery of continuous positive pressure from a flow generator to the patient’s airway through tubing and a mask. Page 26 of 27