1
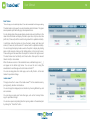
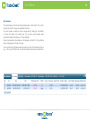
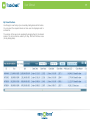
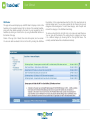
User Manual
Version: 1.5.0.2 Date: April 2010
User Manual
1
Contents
2
Currency Rates Boxes
13
Dock tabs
2
Deal Tracker
14
Layouts
4
inside viewer™
14
Apps
6
Limit Order
15
Background
7
My Positions
16
Preferences
7
My Closed Positions
17
8
RSS Reader
18
Opening a Deal
8
Reuters News
19
Day Trade Ticket
8
Visual Financial Calendar
20
One Click Trade
8
Notes
21
Modifying & Closing a deal
8
trade controller™
21
Placing a Limit Order
8
Web Browser
21
9
Position Calculator
22
Rate Alert
9
Deal Tester
22
Financial Calendar Alert
9
Dealers Chat
22
Deal Alert
9
Software updates
9
Dock
Trading with TradeDesk
Alerts
Available Apps
10
Chart
10
Currency Rates
11
Currency Detailed Rates
12
Disclaimer
23
User Manual
Dock
The dock is the main control unit of TradeDesk. The dock appears on the
taskbar as a separate button from the active layout and can be minimized
while working on the layout.
In addition to the tabs on the dock there are also two buttons for opening the
options menu and switching background mode.
Dock Tabs
Each of the tabs on the dock can be hidden or displayed by clicking on the
toggle button
on the right of the tab title.
1. Account Summary
This tab shows details of your account - free balance, total margins, open
positions P/L. This data is updated constantly. The “Open Positions” row
is also a quick access button for opening the My Positions app.
2. My Layouts
All layout access and management can be done through this tab which
displays a list of all of your layouts. Clicking on the active layout will toggle
its state (minimized/shown). Clicking on any other layout will set it as the
active layout. See Layouts.
3. My Apps
The list of installed apps is displayed in this tab. You can remove an app
from the list by right-clicking on the app name and select “Remove”. See
sections Apps and Available Apps.
2
User Manual
4. Financial Calendar
This tab displays the latest financial calendar indicators since midnight
today.This list is updated constantly with new indicators as well as the
actual values of indicators. Indicator times are displayed according to local
computer time. The colored dots refer to level of importance: red for high,
orange for medium, yellow for low.
5. News Headlines
The top 5 headlines from Reuters are displayed according to local computer
time. The list is updated constantly with new headlines.
6. My Alerts
When you set alerts they are displayed on this tab. This tab also contains a
button for creating new alerts. See Alerts for more details.
7. System Notifications
Notifications are displayed on this tab. Currently the only notification
displayed is “Checking for updates” when TradeDesk is opened or the
manual check is activated through the Options menu on the dock.
3
User Manual
4
Layouts
A layout is composed of one or more apps that can be saved and reloaded
each time TradeDeskTM is opened. Working with TradeDesk is done by using
existing layouts or creating new ones.
TM
To view layouts you can download go to TradeDesk layouts.
There are two types of layouts:
Readymade - layouts that are installed as part of TradeDesk. These layouts
cannot be edited; however you can change these layouts and save them by
another name.
My Layouts - custom layouts you created, received by email from other sources
or downloaded from the layouts catalog.
When TradeDesk is opened, the default layout is displayed. You can change
the default layout in the Layout Manager (see below).
To recover a deleted readymade layout and to get other layouts that are not
installed by default, visit the layout catalog on the easy-forex® site.
User Manual
5
Manage Layouts
Creating New Layouts
The layout Management window can be accessed by clicking “Manage
Layouts” on the dock (under the My Layouts tab).
In the Manage Layout window the loaded layouts are divided into two
tabs according to the layout type (readymade or custom). Each layout is
represented by a small preview of the layout and its name.
To create a new custom layout, click the “Create New” on the dock. This will
clear the screen. Afterwards start building your layout by opening apps from
the list on the dock. You can adjust the size of the apps (when possible) and
move them around to configure the layout to your needs. Apps can either by
attached or remain separated as part of a layout.
You can select any of the layouts and use one of the following options on the
layouts management window:
Auto Arrangement
1. Export to file - enables saving a selected layout to a file with an “efv”
extesion.This file can then be sent to other users that have TradeDeskTM
installed.Double clicking on an efv file will automatically load the layout
in TradeDeskTM.
The auto arrangement feature can be used to arrange the open apps in
the active layout vertically or horizontally, using a predefined algorithm for
composition. Auto arrangement can be activated by right clicking on the tray
[ ] icon at the top right of the app. After the apps are organized you can detach
them and again move or resize to further adjust the layout to your needs.
2. Set as default - set the selected layout as the default layout that will be the
first layout loaded every time TradeDeskTM is opened.
Saving Layouts
3. Delete - remove the selected layout from the layouts list.
Switching Layouts
There are several ways to switch between existing layouts:
1. Click on a layout on the dock
2. Use the Switch Layouts hotkey (CTRL+W by default)
3. Click on the “Play” button on the layout’s preview on the layout
management window
When the layout is complete click the “Save As” button on the dock, give
your layout a name and click “Save”. The layout with the name you chose will
now be on the list of layouts on the dock. You can also edit an existing custom
layout and save the changes by clicking on the “Save” button on the dock.
User Manual
6
Apps
Apps are the main building blocks of TradeDeskTM.
When you click on one of the apps on the list of apps on the dock, it will open
instantly in the currently active layout.
Each app has its own functionality and settings which can be configured and
saved as part of the layout. An app also has its own configuration regarding
resize abilities (some apps can only have their height resized, only width resized,
no resize at all or resize in all directions).
An app can be closed (without affecting the other apps around it) by clicking
on the X button on the top right corner of the app.
Many apps have a flipside where you can reconfigure some of the settings.
Click on the top right settings button to flip and ‘back’ to return to the main display.
To access apps that are not part of the default installation or to recover an app
that was removed from the list visit the apps catalog on the easy-forex® site.
Attach/detach functionality
When placing apps in close proximity to one another (without actually touching
each other) the apps will align themselves to each other and become attached
to one another. Once the apps are attached they act as one unit - they move
together and have an attached straight border. Apps that are attached
cannot be resized.
Detaching the apps is done by clicking on the detach button on the top right
corner of one of the app windows.
App Full Screen Mode
Some apps can be maximized to full screen mode (by clicking on the full
screen button on the top right corner of the app). If an app is attached to
other apps and is maximized, it will be detached for the maximize function
and reattached when you return the size to normal.
Always On Top
You can choose to set one or more apps to “Always on Top” by right clicking
on the app window and choosing the option. This will result in the app window
being on top of all other windows (not only TradeDeskTM windows) and can be
used for quick access to TradeDeskTM functionality even when you are working
on other applications.
Background Mode
Since apps are small components that can be used to create one bigger
component, they do not always take up the entire screen. The background
mode enables setting a background that covers the whole screen (or multiple
screens) behind the active layout.
The background mode can be toggled using the “Background” key on the
dock, right-clicking on the tray icon or using the hotkey (CTRL+T by default).
User Manual
Preferences
TradeDeskTM can be configured by clicking the Preferences on the Options
menu on the dock. The preferences window includes two tabs:
1. General
a. Set dock always on top - when this is checked the dock will appear on
top of all other windows
b. Launch on Start Up - checking this item will cause TradeDeskTM to launch
every time the computer starts up.
c. Turn on animations - this option enables animations (e.g. when apps
are opened, closed and flipped)
d. Turn on sound effects - this option enables sound effects (e.g. when
apps are attached/detached)
e. Default work mode - full screen - when this is checked, the bacground
mode is turned on by default
2. Hot Keys
Hot keys enable quick access to different functions of TradeDeskTM. Hot keys
can be changed or disabled completely through the Preferences window
a. Background - toggles the background mode
b. Switch Layout - switches to the next layout (the order of the layouts
is defined by theorder in which they were opened)
c. Layout Manger - opens the layout management screen
d. Day TradeDeskTM - quick access to the ticket for opening new deals
7
User Manual
8
Trading with TradeDeskTM
Opening a Deal
Opening a day trading deal can be done by accessing the day trading ticket or
by using the one-click trade functionality.
Day Trading Ticket
The day trading ticket allows you to choose the deal’s parameters (currencies,
amount and margin). Executing a deal can be done by using the Freeze option
or directly clicking the Trade Now button. Accessing the ticket can be done in
several ways:
1. Double click on a rate on one of the currency rate apps
2. Click on the current rate box on the chart app
3. Click on the “Trade Pair” button on the inside viewer™ app
4. Use the ticket hotkey (CTRL+D by default)
5. Click on the Open Deal button on a rate alert window
The default settings of the ticket (selected currencies, amount and margin)
can be configured through the “Deal Ticket Settings” on the Options menu
on the dock.
One Click Trade
On the Currency Detailed Rates and Currency Rate Boxes apps there is an
option to switch to “One Click Trading” mode. When this mode is enabled,
a single click on any rate will open a new day trading deal with the selected
rate, amount and margin.
Modifying and Closing a Deal
Modifying and closing deals can be done by accessing the modify/close mode
of the day trading ticket in one of the following ways:
1. My Position app - click on the modify/close button on the row of the deal
2. My Position app - multiple deals can be closed together by checking
the deals and clicking the “Close Selected” option
3. Deal Tracker - click on the modify/close button
4. trade controller™ - use this app to define the parameters for modifying
a deal and click the “Apply” button to open the modify ticket and
accept the changes.
Placing a Limit Order
Limit orders can be opened using the limit order ticket which appears on the
apps list on the dock.
The limit ticket can also be accessed by right-clicking on the Charts app and
selecting to set a buy or sell limit.
User Manual
9
Alerts
You can set different types of alerts through the My Alerts tab on the dock. All
the active alerts are displayed on this tab. When an alert is triggered, a small
window with the alert details will appear on the bottom right corner of the
screen. The window will automatically disappear after a few seconds or you
can close it by clicking on the X button. Also, the triggered alert line on the dock
will flash for a few seconds.
Alerts are not removed automatically from the list on the dock. Some alerts,
such as a rate alert, can be triggered more than once while they are on the list.
To remove an alert click on the X button on the relevant alert on the My Alerts
tab on the dock or use the “Remove Alert” button on the alert window (when the
alert is triggered).
Alerts are triggered only while TradeDeskTM is running. When TradeDeskTM is
closed the alerts will be saved and relevant alerts will be reloaded next time
TradeDeskTM is opened.
Rate Alert
A rate alert is triggered when the market reaches a bid or ask rate you selected.
Creating a rate alert can be done in one of two ways:
1. Click the Add Rate Alert button on the dock
2. Right-click on the Charts app and choose the Set Bid/Ask Alert option.
Financial Calendar Alert
This alert will remind you of upcoming financial indicators. To add an alert click
on the “Add Financial Calendar Alert” on the dock. In the opened window select
the indicator and the number of minutes before the indicator time to be alerted.
Deal Alert
Alerts for open deals can be set for two situations:
1. Be alerted when the market approaches the stop loss rate of the deal
2. Be alerted when the deal is closed.
To add a deal alert click on the Add Deal Alert button on the dock. In the
opened window select the deal and one or both of the options described
above. For stop loss alert you can choose to set the alert by number of pips
or by entering a specific rate.
Software Updates
TradeDeskTM has a built-in automated updates system.
Every time TradeDeskTM is opened it checks for software updates that are
published by easy-forex®. You can also manually start the check process
through the Options menu on the dock. During the check process there will
be a notification of “Checking for updates” on the System Notifications
tab on the dock.
If updates are available you will be presented with a list of mandatory and/or
optional updates. Once you accept these updates the download process
of these updates will begin in the background.
During the check process and the download stage you can continue working
normally. Once the download of all the components is completed, you will be
alerted and TradeDeskTM will be closed in order to apply the necessary changes.
User Manual
Available Apps
New apps will be added over time, go to the TradeDeskTM apps catalog to check
for new ones.
Chart
This app displays historical data for a chosen currency pair and interval. You can
switch the displayed currencies by selecting a base and non base currency in the
currency pair drop down menu or by dragging a currency pair from another app
(such as Currency Rates app) onto the chart app.
You can adjust the zoom level of the chart by using the Zoom In/Zoom Out
buttons next to the time period list or by pressing the left mouse button on one
of the axes and moving the mouse. When you zoom in to any level of the chart
you can scroll through the historical data by pressing the left mouse button on
the chart and moving the mouse or by using the middle mouse button. You can
also move the chart up or down in the window by pressing the right mouse
button on the Y axis and moving the mouse up or down.
The chart app can contain several panels. The main panel displays the
selected currency pair. When you add an indicator that isn’t overlaid on the
main panel, a new panel will be added. When you have one or more panels,
each one can be maximized within the window, minimized or resized.
You can see details of the points on the panels in the Info Panel. By default
the info panel is displayed by pressing the left mouse button on the chart. You
can choose to have the info panel displayed constantly by using the options
in the Views menu.
Adding an indicator is done by choosing an indicator and clicking on the “Add”
button. A window will open allowing you to set the indicator’s parameters and
color. You can reconfigure these after the indicator is displayed by double
clicking on the indicator line. To change the visual properties of the indicator
click on its name on the panel title.
To remove an indicator, close the panel or click on its name on the panel title.
This will open a window with a “Delete” button.
10
User Manual
11
Limit Orders: Open limit orders of the selected currency pair can be displayed on
the chart as a horizontal line on the limit rate. If you choose to delete this line
a limit ticket in close mode will be opened.
button on the top right corner of the app.
Menus: Visual characteristics of the chart can be customized through the View menu.
These options include:
To return to the front side click the “Set” button to save the changes or the Back
button on the top right corner to cancel the changes.
• Choosing which grid lines to display
• Setting or resetting bounds, location and type of Y axis
• Colors of the chart
• Configure options for displaying crosshair, panel titles, limit orders, info
panel location and style, retain zoom level when a new bar/point is added
The chart type can be changed through the Price Styles menu
The Line Studies menu can be used for adding different drawings such
as simple lines, Fibonacci lines, symbol objects, text and other types. Once
you choose a drawing type, use the mouse to determine the line settings by
pressing the left mouse button and dragging the mouse according to the
selected type. Line studies can be added to any panel.
You can move line studies or double click them to open the settings window
for configuring visual parameters or deleting the line.
All the settings (visual customization, drawings, indicators, zoom level,
currency pair and interval) will be saved when the layout that contains the
chart is saved.
Currency Rates
The currency rates app displays updated bid/ask rates and the rate direction
for selected currency pairs.
The scroll buttons on the bottom of the app can be used to navigate the list
of selected pairs.
To change the selected currency pairs and their order click on the Settings
You can select a custom list or choose the default configuration by clicking
the “Default” button on the flipside of the app.
User Manual
12
The selected list of pairs and their order will be saved when the layout that
contains the app is saved.
To return to the front side click the “Set” button to save the changes or the Back
button on the top right corner to cancel the changes.
Double clicking on a bid or ask rate will open a ticket with the selected currency
pair and direction. You can also drag a pair to other apps such as the chart, limit
ticket or inside viewer™ for quick currency change.
The selected list of pairs and their order will be saved when the layout that
contains the app is saved.
Currency Detailed Rates
This app displays the full details of the selected currency pairs: bid, ask,
direction, change percent, high, low, previous high and previous low. You can
resize this app to view only part of the details and/or the list.
To configure the list of currency pairs and their order click on the Settings
button on the top right corner of the app.
You can select a custom list or choose the default configuration by clicking
the “Default” button on the flipside of the app.
In the default mode of this app, double clicking on either the bid or ask buttons
of a pair will open the day trading ticket with the selected amount and margin.
In this mode you can also drag a currency pair to other apps such as the chart,
limit ticket or inside viewer™ for quick currency change.
The other mode of this app is One Click Trade. In One Click mode a single click
on the bid/ask buttons will immediately open a day trading deal with the
selected rate, amount and margin. To switch to this mode check the option
at the top of the app and accept the terms that appear in the popup.
In this mode dragging is disabled
User Manual
Currency Rates Boxes
The boxes app displays bid and ask rates as well as high and low values for
selected currency pairs in boxes instead of rows.
To configure the list of currency pairs and their order click on the Settings
button on the top right corner of the app.
You can select a custom list or choose the default configuration by clicking
the “Default” button on the flipside of the app.
To return to the front side click the “Set” button to save the changes or the
Back button on the top right corner to cancel the changes.
In the default mode of this app, double clicking on either the buy or sell buttons
of a pair will open the day trading ticket with the selected amount and margin.
In this mode you can also drag a currency pair (by clicking on the rate number
itself) to other apps such as the chart, limit ticket or inside viewer™ for
quick currency change.
The other mode of this app is One Click Trade. In One Click mode a single
click on the buy/sell buttons will immediately open a day trading deal with the
selected rate, amount and margin. To switch to this mode check the option at
the top of the app and accept the terms that appear in the popup. In this
mode dragging is disabled.
13
User Manual
Deal Tracker
* Note: this app is not installed by default. It can be downloaded from the apps catalog
The deal tracker can be used to visually track deals and limit orders. The green
area represents profit while the grey area represents loss.
For day trading deals there are two display modes: rates and profit/loss.In the
rates mode the tracker will display the deal’s open rate, stop loss rate, take
profit rate (if it was set) and the current closing rate which is updated constantly.
In profit/loss mode the tracker will show the deal’s margin and take profi
amount (if it was set) and the current P/L amount which is updated constantly.
You can change the display mode as well as the option to display day trading
deals or limit orders by clicking on the Settings button on the top right corner.
These settings will be saved when the layout that contains the app is saved.
The deal tracker also has Modify and Close buttons that open the relevant
ticket in modify or close mode.
When the mouse cursor is in the deal detail’s area, a dotted triangle icon [ ]
will appear on the bottom right corner. You can use this icon to drag the
selected deal to another app such as the trade controller™.
You can also drag deals from other apps, such as My Position, to the deal
tracker for quick deal change.
inside viewer™
This app shows the 3 views of the inside viewer™ for the selected currency
pair: popularity, direction and structure.
You can change the displayed pair or direction by choosing different buy and
sell currencies.
You can drag a currency pair from other apps, such as the Currency Rates
app, for quick deal change.
You can also open a day trading ticket for opening a deal on the selected pair
by clicking the “Trade Pair” button.
14
User Manual
Limit Order
Use this app to place a new limit order by selecting the buy and sell currencies,
the amount and margin, the expiry date and the limit rate.
The ticket is opened with default settings that can be configured by clicking on
the Settings button the top right corner.
If you save a limit as part of a layout the currencies and amounts saved for
that window will be saved as part of the layout, regardless of the default
settings described above.
In addition to the open mode, the limit ticket has two other modes - close and
modify. To access these modes you can drag a limit order from other apps such
as My Position or Deal Tracker. You can also access these modes by clicking on
Modify or Close buttons on other apps such as My Position and Deal Tracker.
15
User Manual
My Positions
This app displays a list of open day trading deals or limit orders. The current
closing rate and P/L values are updated constantly.
You can choose to modify or close a single deal by clicking on the Modify
or Close (X) button on the deal’s row. You can also close multiple deals
by selecting them and clicking on “Close Selected”.
Account value details (free balance, total margins and total P/L of day trading
deals) is displayed on the top of the ap.
You can sort the list of deals/orders by clicking on one of the relevant columns
(e.g. – ID, buy, sell, Profit/Loss). You can also drag the columns to reorder them.
16
User Manual
My Closed Positions
Use this app to view history of your closed day trading deals and limit orders.
You can select the required interval and also save the displayed result to
an Excel file.
The columns of the app can be reordered by dragging them to the desired
location. The list can also be sorted by ID, Buy, Sell and Profit/Loss value
(for day trading deals).
17
User Manual
RSS Reader
This app can be used to display any valid RSS feed. It displays a list of all the
headlines in the selected feed and the full article of the selected headline,
along with other details supplied by the feed. You can navigate the list of
headlines by clicking on one of them or by using the Back/Next buttons on
the bottom of the app.
Panels of the app (list of feeds, titles and article panel) can be resized.
You can also add new feeds to the list on the left by clicking the Add New
18
Feed button. In the opened window enter the URL of the new feed and an
optional display name. You can also organize the list of feeds into a tree of
categories and subcategories. To add a new category, enter the path and
name of the category in the Add New Feed dialog.
To remove a feed from the list right click on its name and select Remove.
You can also edit the details of an existing feed (or category) and move
it to a different category by choosing Edit on the right-click menu. The
currently selected feed will be refreshed automatically.
User Manual
News
* Note: this Reuters News app is not installed by default. It can be downloaded from
the apps catalog.
In addition to the latest 5 headlines displayed on the dock, this app displays
all the headlines from the last 25 hours along with the full article for
the selected headline.
The list of headlines is refreshed automatically.
19
User Manual
Visual Financial Calendar
This app displays financial calendar indicators for both historical and future
dates. You can select the dates as well as other filter conditions (location,
name, importance) for displaying a configured list of indicators.
The columns of the indicators list can be reordered by clicking on a column title
and dragging it. You can also sort the list by clicking on one of the column
titles. The numbers of the indicators will be updated on every sort. Next to the
tname of each indicator is a small button with a question mark. Clicking on this
will open a small box with the description of the indicator. The box can be
closed by clicking on the X.
Beneath the list of indicators is a currency pair chart on which the relevant
indictors are displayed by number (identical to the numbers on the indictorslist).
20
When the mouse is over the number on the chart the full details of the indicator
will be displayed. You can choose which currencies and interval this
chart displays. You can also zoom in/out and scroll through the chart.
Under the main chart is a preview bar that displays the entire chart data with a
focus on the currently displayed part. You can use this preview to zoom in/out
of the chart (by resizing the focused part) and also to scroll the chart by moving
the focused part of the preview bar.
You can also choose to display a chart of an indicator by clicking on the Draw
button on the row of the indicator. This button is enabled only if there is more
than one occurrence of the indicator in the list. Clicking this button will display
a chart panel on the bottom of the app with the selected indicator.
The main chart and the indicator chart panels can be resized.
User Manual
Notes
This app can be used to save any text with other apps in a layout. You can
write text directly or copy it from another source. The text will be saved when
the layout containing the app is saved.
Web Browser
This app allows you to include any webpage as part of your layout. Enter the
URL of a webpage in the address box at the bottom or click on a link in
the loaded webpage.
The selected address will be saved when the layout containing the app is saved.
trade controller™
This app enables visual adjustment of a deal’s stop loss and take profit. You
can select which deal to adjust by choosing a deal from the list on the right or
by dragging a deal from another app such as My Position or Deal Tracker.
Stop loss rate and take profit rate can be adjusted within the allowed range by
using the handles or the +/- buttons. The take profit handle can be added
or removed by clicking on the little green arrow button.
Clicking on Apply will open a modify ticket with the modifications made.
Further modifications can be done on the opened ticket.
21
User Manual
Position Calculator
The Position Calculator can be used to simulate closing values for each of the
open positions by entering one of the required parameters: Close Rate or P/L
or Pips and clicking on the Calculate button.
Please note:
The entered rate should reflect the rate that will be used to close the deal.
Losses do not exceed your margin.
The Position Calculator also has Modify and Close buttons that open the day
trading ticket in modify or close mode.
*This app is not installed by default. It can be downloaded from the apps catalog
Deal Tester
The Deal Tester app allows you to test a virtual deal and various scenarios of
the deal's closing values. You need to define the following fields: currencies,
buy amount or sell amount, and the open rate. Then you need to enter one of
the parameters: Close Rate or P/L or Pips and click Calculate to see the virtual
deal’s closing details.
*This app is not installed by default. It can be downloaded from the apps catalog
Dealers Chat
Dealing Room clients may use this app to chat directly with one of our Dealers.
If you are not a Dealing Room client the app displays a message regarding the
option to get Dealing Room Services.
*This app is not installed by default. It can be downloaded from the apps catalog.
.
22
User Manual
Disclaimer
easy-forex® is making the TradeDesk™ software application available, free of charge, as a service
to our customers. As such, it is your responsibility to follow the TradeDesk™ Licensing Agreement
you have agreed to when downloading the TradeDesk™ software application from the easy-forex®
Website and to comply with the terms and conditions set forth in the TradeDesk™ Licensing
Agreement and with the terms and conditions set forth on the easy-forex® Website. easy-forex®
makes no warranty, express or implied, and assumes no responsibility for damages or problems
that arise from your use of, or inability to use, the the TradeDesk™ software application provided
to you. Should the TradeDesk™ software application prove defective in any respect, you, and not
easy-forex® or the software manufacturer, assume the entire cost of any service or repair. Although
all possible care has been taken to ensure that this manual is as reliable and accurate as possible,
the diversity of environments in which it might be used means that we can accept no responsibility
for loss or damage, whether real or consequential, arising from its use. By using the manual
you explicitly agree to hold easy-forex® harmless for any such losses or damages. None of the
materials presented on the easy-forex® Website are to be regarded as investment advice. In no
event shall easy-forex®, be liable for direct, indirect, incidental, punitive, or consequential damages
of any kind whatsoever, with respect to any services, software, manuals, materials or other
products provided by easy-forex®.
23