1
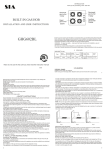
Grip Ace™ Motorcycle Lighting and Accessory Control System Operating and Programming Instructions Control Button Definitions: Right Turn Signal (RTS) Manual Cancel (CAN) Left Turn Signal (LTS) Front View High/Low Beam (HLB) Operating Mode: Pressing RTS activates Right Turn Signal. Signal will blink for user-programmed amount of time (Factory default is 10 seconds). Pressing CAN cancels active Turn Signal or Hazard Signal. Pressing LTS activates Left Turn Signal. Signal will blink for user-programmed amount of time (Factory default is 10 seconds). Pressing both RTS and LTS at the same time activates Hazard Signal. Pressing HLB activates your high beam with low beam. AUX-1 and AUX-2 are used to power your electrical accessories, up to 3amps. AUX-1 may also be used to start the vehicle, if programmed to momentary mode, through a secondary relay (not included). Press and hold CAN and RTS for 3 seconds to activate AUX-1 power, repeat to deactivate. If in MOMENTARY mode, this circuit will only activate momentarily. Press and hold CAN and LTS for 3 seconds to activate AUX-2 power, repeat to deactivate. Placing your vehicle in Neutral pauses the auto-cancel function for as long as you remain in Neutral, and Signals will continue to flash indefinitely. When vehicle is placed back in gear, auto-cancel will re-activate for half of the user-programmed amount of time. Program Mode: To enter Program Mode, press and hold both CAN and HLB for 3 seconds. Red light on if not inverted. Green light on Control Module indicates Turn Signal auto-cancel delay time in 10 second intervals; 1 blink = 10 seconds, 5 blinks = 50 seconds. Green light on constant = Manual Cancel Only (No Auto-cancel). Increase the Turn Signal cancel delay time by pressing RTS, until desired time is reached. Decrease the Turn Signal cancel delay time by pressing LTS, until desired time is reached. Red light on Control Module indicates Neutral Indicator (NI) Mode, Red light ON = Normal, Red light OFF = Inverted. You will only adjust this setting if Auto-cancel doesn’t function when vehicle is in gear but does function when in Neutral. Invert Neutral Indicator Mode by pressing both CAN and RTS while in program mode. Change AUX-1 to Momentary mode or back to ON/OFF mode, press both RTS and LTS. www.GripAce.com 323-556-0730 ©2006 Ace Rip Industries, Inc. GA-1 (7-06) Installation Instructions Items needed for installation: 1. Charged vehicle battery 2. Razor blade or sharp knife 3. Electrical tape 4. Pliers 5. Wire diagram of vehicle or the time needed to trace wires A. Refer to wire diagram supplied with Grip Ace™. Note wires are color coded B. Locate wire harness or harnesses on vehicle that house wires for turn signals and high/low beam headlights C. With razor blade or knife and at a remote location on harnesses, very carefully open wiring harness by cutting only the outer sheath of harness. Do not use excessive force to open harness. This may cause damage to wires inside. D. After wire harness is open refer to wiring diagram of vehicle. Locate the proper color coded wires to connect. Take connectors and wire harness supplied with GRIP ACE™ and wires in vehicle harness, proceed to connect to 12volt+ in lighting switch, NEG/Ground from clutch switch or horn button, the headlight power wire between lighting switch and HI/LOW beam switch, then connect to the high beam, low beam leads from Grip Ace™ to those in lighting switch on vehicle. STOP! E. Before we proceed, let’s check our installation. Connect module to GRIP ACE™ harness, use Dielectric Silchem grease to waterproof all connectors, leave grip unplugged. Turn on vehicle power. Note that the lights on GRIP ACE™ module comes on and goes out and then begins to flash on/off. Low beam should be on. If high beam comes on turn vehicle off, reverse the high and low beam connections from GRIP ACE™ wire harness., now connect grip, turn on vehicle. Test high/lo beam headlight from GRIP ACE™. Turn vehicle off. F. Connect turn signal power relay output, that goes to the turn signal switch to the signal power (SP) lead in GRIP ACE™ wire harness. NOTE: If vehicle has it’s own module connect the signal power lead to turn signal module power wire on vehicle Now connect GRIP ACE™ RT/LT signal wires to turn signal switch wires. If equipped, connect the neutral indicator wire to the neutral indicator light wire in gauges. Note: 0n bikes equipped with their own self canceling signals, do not connect neutral indicator wire. STOP! G. Disconnect the grip from the module, turn vehicle on and note after module boots up the vehicle goes into hazard mode. If vehicle does not go into hazard mode check your wire connection locations and vehicle wire diagram. H. Now turn off vehicle. Connect grip and turn on vehicle. Now test turn signals, hi/low beam headlight and hazard mode. Turn off vehicle. I. Connect auxiliary wires to the accessories 12v+ , if equipped, and test using GRIP ACE™. Remember to connect the ground for your accessories J. Use electrical tape to wrap and seal around wire harness where GRIP ACE™ harness is connected. K. Take GRIP ACE™ handgrip and the grip glue supplied, proceed to glue grip to handle bar. Once grip is in place, size of hand does not matter, rotate to comfortable riding position of primary rider, where tip of fingers are just beyond buttons in hand grip. Let glue in handlebar grip dry for minimum of 6 hours L. Now let’s saddle up and go riding. www.gripace.com 323-556-0730 ©2006 Ace Rip Industries Inc GA-1 (07-06) Grip Ace™ Wire Diagram 1. Red ----- 12v 2. Black-----Negative (Ground) 3. Yellow----Headlight Power 4. Blue------Low Beam Headlight 5. Violet-----High Beam Headlight 6. White-----Signal Power 7. Orange---Right Turn Signal 8. Brown----Left Turn Signal 9. Gray------Neutral Indicator 10. Green-----Auxiliary #1 11. Green w/ Yellow Stripe---Auxiliary #2 www.gripace.com 323-556-0730 ©2006 Ace Rip Industries Inc GA-1(07-06) Trouble Shooting 1. 2. 3. 4. 5. 6. 7. 8. Start with a charged vehicle battery If Grip Ace™ does not work properly trace your wire connections and verify that vehicle wire diagram is correct If high beam headlight comes on when unit is powered up then you must change HI/LOW beam headlight connections from Grip Ace™ to vehicle wire harness If turn signals are backwards then you must change the right and left turn signal connections from Grip Ace™ to vehicle wire harness If turn signals are erratic after vehicle is powered up, check battery voltage or start the vehicle then test again from grip If turn signals don’t cancel you must invert the neutral indicator switch program, refer back to programming If turn signals are not properly connected there will be a buzz at relay When programming Grip Ace™, if there is difficulty going into program mode then use 2 hands to hold HI/LOW beam and cancel buttons down for 3 seconds or until you see red light illuminate for longer than 2 seconds or green light flashing. www.gripace.com 323-556-0730 ©2006 Ace Rip Industries Inc GA-1 (07-06) Grip Ace™ warranty obligations are limited to the terms set forth below: Ace Rip Industries Inc warrants this product against defects in material and workmanship for the period of one (1) year. The warranty period begins with the date of original retail purchase. This limited warranty is made only to the original end user purchaser (“you”) of the product and does not extend to any subsequent purchasers or owners of the product. The “original end user” is the first user to put the product into service in any fashion. It is your responsibility to establish the warranty period by verifying the original purchase date. Accordingly, to avoid dispute you should return the warranty card to Ace Rip Industries Inc within (30) days after the date of purchase. If you discover a defect, Ace Rip Industries Inc will, at its option, repair or replace this product with a new or reconditioned product at no charge to you, provided you return it during the warranty period, with transportation charges prepaid, to Ace Rip Industries Inc. (You can obtain additional information by contacting Ace Rip Industries at the address printed on card). Please attach your name, address, telephone number, and a copy of the bill of sale as proof of date of original retail purchase, as well as detailed description of the problem for which service is requested. Prior to returning the product , you must obtain from Ace Rip Industries a Return Merchandise Authorization Number (RMA#). You are responsible for packaging the product to be returned. If the repairs are covered by the Limited Warranty and if the product was properly shipped to Ace Rip Industries, Ace Rip Industries will pay the return shipping charges. This warranty only applies to the Grip Ace™ product manufactured by Ace Rip Industries Inc identified by product marks and serial number registered with Ace Rip Industries Inc. This warranty does not cover damage resulting from accident, misuse, abuse, or neglect and/or damage during any type of transportation resulting from improper packaging, damage resulting from causes other than product defects, including and not by way of limitation, lack of technical skill, competence, or experience of the user, and/or failure to use the product in accordance with the instructions provided in the user’s manual. The remedies provided under this warranty are exclusive and in lieu of all others. Ace Rip Industries Inc hereby expressly disclaims liability and shall not be responsible for incidental, consequential and contingent damages of any kind or nature, including, without limitation: damages to or arising out of the loss of data or profits. Ace Rip Industries shall not be responsible for any damage caused by the presence of error or omission in any of its manuals, instructions or related materials.