1
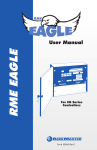
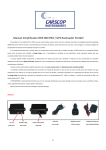
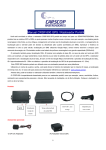
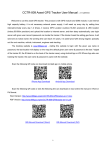
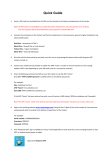
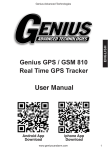
Quick Guide
1.Insert a SIM card(not included) into the SIM card slot located under the rubber
cover beside the case of the tracker (Press the yellow button to release).
Note: 4G SIM cards are acceptable to use with this device however the unit only
operates on a 2G band.
This unit requires data to be activated on your pre-paid or contract SIM card.
(Recommend order 20-30M/Month data package)
2.Charging the tracker first with AC charger or connect to other USB (Refer the
following description).
3.Turn the unit on by pressing any of the button until the green LED remains
turned on.
4.Contact your mobile service provider to obtain the APN "name" in order to view
,
,
the location on the tracking website. APNs
vary depending on your SIM cards
plan (i.e. pre-paid or contract)
5.Enter the following command via SMS on your the tracker to set the APN"name":
Send SMS "APN*123456*apnname" (123456 refers to the default password)
For example:
Plan: Vodafone Pre Paid
APN Name : live.vodafone.com
Send SMS: APN*123456*live.vodafone.com
If the APN Name has been entered correctly, you will receive a SMS
stating APN:live.vodafone.com (example)
Note: The APN name needs to be entered correctly otherwise the location
may show up in China, Africa, etc.
6.Login to the tracking website (www.responsegps.com) using the last 7 digits
of the serial number for the username and password which is located in the
battery compartment of the tracker.
App name:
For example:
ResponseGPS
Serial number: CC2014012345678
Username: 2345678
Password: 2345678
7.Free Response GPS app is available on iTunes
and www.responsegps.com tracking platform to
easily view the current tracking location on your iOS
or Android smart phone or tablet.
1
Product Picture
Solar Panel
LED Indicator
SOS Button
Charging Point
Specification
Portable design, no installation charge
Solar panel can extend battery using time
Extra big rechargeable battery (4000 mAH)
Extra power magnetic pin & water-proof design
Auto download & configuration setting for APN & GPRS
Upload & working mode can be start / stop / controlled by SMS
App (Android? & iPhone?) / WeChat / Web / SMS / Wap locate
Built in Shock Sensor to detect car movements with shock alarm
Cell ID locate when GPS is not available (Indoor or underground)
Universal 4 GSM Band & high sensitive GPS module
Before Using
1.Power ON / OFF
If the tracker is powered OFF, press and hold the Button A or B or C and
release after the GREEN LED is ON, then the tracker is powered ON.
If the tracker is powered ON, press and hold the button A or B or C until
the GREEN LED flash quickly,release the button,and press the same button 3
times quickly,then the GREEN LED will turn off and the tracker will power OFF.
LEDs
A
B
2
C
2.Install SIM card
Pulling out the long narrow rubber stopple beside the tracker, you can see
the SIM card socket, beside which, press the yellow switch button with a tool
and then the holder will come out. Pull it out and put the SIM card in the holder
and then push the holder into the tracker (Pay attention to that the SIM card
metal contact pin cannot face down to the holder), and push the long narrow
rubber stopple into the tracker to cover the SIM card socket.
SIM Room Cover
SIM Room Cover
SIM Room Cover
Note:
1) This tracker use 2G GSM network, and it upload tracking only through GPRS,
it cannot work in CDMA network or 3G(WCDMA or CDMA2000) network.
(Many 3G SIM card can use 2G GSM network, this 3G SIM card can be used
in this tracker).
2) Enable the SIM card GPRS data service, order a GPRS data package
(20-30M/month) can save data charge (Normally the tracker will use about
20M GPRS data every month)
3) Please confirm the PIN code of the SIM card is disabled.
4) Before installing or uninstalling the SIM card, please power off the tracker.
3
3.LED flash indicator
GREEN LED Flash once: GSM & GPS working well
GREEN LED Flash twice: GSM working well and no GPS signal
GREEN LED Flash three times: GSM & GPS working well but battery low
GREEN LED Flash four times: GSM working well,battery low and no GPS signal
GREEN LED ON continuously: GSM searching network
GREEN LED OFF continuously: Power off
GREEN LED Flash fast: incoming a call or sending SMS
RED LED Flash once: uploading current tracking
RED LED Flash twice: cannot upload tracking now
RED LED Flash slowly: the tracker is being charged
4.Recharge and power supply
The tracker only uses the 5V DC voltage to recharge, too high voltage or
AC voltage may damage the tracker or even cause accidents,so please check
and confirm the adapter model is suitable for this tracker.We recommend using
our OEM charger to recharge the tracker.
1)Use battery charging stand, put the CCTR-808S in the battery charging
stand,confirm the CCTR-808S charging pin is well connected to the battery
charging stand charging output pin(please refer the following diagram),and
put the battery charging stand into the AC socket(110-220V AC),the LED on
the battery charging stand will turn on to RED,it is means the it is charging,
if the LED change to Green, it means the charging is finished. The fully
charging need about 5-10 hours.
2) Use Solar Charging, Place the tracker in the sunlight, the solar battery will
recharge the tracker automatically, in the long distance transport or longtime
tracking please install the tracker in the place with sunlight, this can extend
the battery working time, but it is impossible to finished fully charging only
by solar power when working.
Note:The voltage of the charger must not be higher than 5.5V. High voltage
will damage the tracker. Please use the OEM adapter, it needs 5-10 hours to
charge the tracker fully. Place the tracker in the sunlight as far as possible
and it will extend the battery working time observably.
4
5.Low Battery Alarm:
When the tracker battery voltage is low,the GREEN LED of the tracker will
flash 3 or 4 times,and then the tracker will send battery low information SMS to
the preset phone.
Low power
Battery: 8%
6.Back to default set (Factory configuration)
Send the SMS command to the tracker can reset to the factory configuration.
The SMS command is FACTROY*123456. Please see the detail in following
description.
7.ANTENNA
The Antenna of GSM and GPS are built in the tracker. So please leave the
tracker away from big metal that will reduce the GSM and GPS signal.
8.Waterproof
The design of the tracker is IP56 level waterproof, it means the raining or
sprinkling cannot damage the tracker,but you cannot drop the tracker into water.
9.Using Condition
O
The working temperature is -20OC to 60 C, over this range the
specification cannot reach the standard level. The storage temperature can
O
O
reach to -40 C to 80 C.
5
Simply Using Step
1. First to buy a 2G GSM phone SIM card and enable GPRS service, order a
data package 20-30M (Normally tracker will use 20M data every month),
install in the tracker, please refer Before Using 2.
2. Press any SOS button till the Green LED on continuously, the tracker is
powered on; put the tracker outdoor for easy get GPS & GSM signal.
3. Check LED flash; refer Before Using 3 for detail, If Green LED flash once
means GSM and GPS signal well. And Red LED flash once means the
location has been uploaded to the server.
4. Call the tracker or send SMS LINKLOCATE*123456 to the tracker, the
tracker will reply the tracker location with Google map link by SMS.
5. Visit & login the tracking platform www.responsegps.com or
www.999gps.net, display current location, playback history tracking etc can
be operated, platform user name and password is the last 7 digital numbers
,
of the trackers
ID (for example ID is: CC8081401234567, and then the user
name is: 1234567, password is:1234567, user can change the password,
send SMS "ID*123456"or "CHECK*123456" to tracker can check tracker ID).
6. iPhone?, Android? App, Wap, WeChat also use the same user name and
password with website login, downloading & installation please refer the
platform operation guide.
7. Fleet user can be created for easy fleet management.
8. This tracker can auto download & configure APN & GPRS user name &
password, if the auto configure is not right, the Red LED will flash twice, the
tracker cannot upload location to server, then you need send SMS to tracker
to change the APN & GPRS manually, and send "CHECK*123456" to tracker
can check the APN auto configure,call the tracker SIM card supplier to
confirm the APN & GPRS is right.
Basic Locate Operation & Setting
1. Add authorized phone number
Send SMS "ADDPHONE*123456*A*number"(Not including the quotation
marks " ", Number means the telephone number you want preset, the following
is same) to tracker is OK, "ADDPHONE" is a command; "123456" is password;
"A" is authorized number location, every tracker have 3 authorized phone
number locations, A and B, and C, so you can set 3 phone numbers, if the add
operation is success, the tracker will send back the information "Add Preset
Phone OK", if the password is not right, the operation is fault, the tracker will
send back information "Wrong Password".
6
2. Making a call trigger reply Google map link SMS
(Platform is not necessary):
Call the tracker SIM card number,after ring 3 times,the tracker will hang up
the call automatically and locate immediately, a few seconds later, the tracker
will send back SMS with current location google map website link. User click
the website link to visit internet, the map will display on mobile phone. If the
tracker has set the authorized phone number, then only authorized number
calling the tracker can trigger the tracker locate and reply SMS,other phone
number calling has no response.
The SMS information sample is as follow:
https://maps.google.com/maps?q=22.67680N,114.15188E
Battery: 91%
7
3. Send an SMS trigger reply Google map link SMS
(Platform is not necessary):
Send SMS LINKLOCATE*123456 to the tracker also can trigger the
tracker locate & reply Google map link SMS, LINKLOCATE is a command,
123456 is password; if the password is not right, the operation is fault, the
tracker will send back information " Wrong Password". The SMS & map
examples are same as above.
4. Send a SMS trigger reply latitude longitude SMS
(Platform is not necessary)
Send SMS SMSLOCATE*123456 to the tracker, SMSLOCATE is a
command, 123456 is password; the tracker will locate immediately and
later send back SMS with current location latitude/longitude/speed/direction
to user.
The SMS information sample is as follow:
Latitude: 22.679675N
Longitude: 114.147141E
Speed (km/h):45.0
Direction: 303.30
GMT 2013/02/02 08:29:06
Battery 91%
NORTH
The moving
59.70
direction
303.30
EAST
The unit of latitude and longitude is 'DEG.'. The unit of direction is 'DEG.'
which means the angle between the moving direction and the due north
anticlockwise. 303.30, for example, means the car is in the northwest and the
angle between the due north is 59.70 DEG. (360-303.30= 59.70), like below.
The time and date are GMT's. For example, if in New York (USA), and receive
the SMS like above,then the right time and date in local is 03:29:06 2013/02/02
(GMT time add New York time zone -05, the 5 Western time zone).
8
5. Cell ID Locate
When user trigger tracker reply location by SMS, if the tracker is in the
place where there is no GPS signal, such as underground park, indoor room,
the tracker will reply SMS with CELL ID location to user, and the precision is
about 50-500m, according to the around mobile phone base station density.
The location SMS is like below, click the link the map is same with the above 2.
No GPS signal, just Cell ID Location
https://maps.google.com/maps?q=22.67680N,114.15188E
Battery: 91%
Senior Locate Operation & Setting
1. Add / Delete / Check authorized number:
The authorized phone number is used to send alarm information by SMS,
or use mobile phone to locate the tracker without platform, if the authorized
phone number is not set, then the alarm information can not send to user by
SMS (alarm, battery low, SOS, etc). The Add command, please see Basic
Locate Operation & Setting .
Delete authorized phone number by SMS
Send SMS "DELETEPHONE*123456*A" to the tracker, "DELETEPHONE"
is a command; "123456" is password; "A" is authorized phone number location,
there are 3 locations "A" and "B" and "C" ; if the delete operation is success,
the tracker will send back the information "Delete Preset Phone OK" , if the
password is not right, the operation is fault, the tracker will send back
information Wrong Password .
Check authorized phone number by SMS
Send SMS CHECKPHONE*123456 to tracker, CHECKPHONE is a
command; 123456 is password;if the operation is success,the tracker will
send back the information Preset Phone A:13987654321 B:13876543210
C 13765432100, the phone number is just an example. If the password is not
right, the operation is fault; the tracker will send back information or
Wrong Password .
2. Change / Check Tracker Password
The tracker password is used to protect the tracker only can be operated
by owner, every SMS command need follow tracker password, the default
tracker password is 123456, for higher security please change the tracker
password.
Change tracker password
Send SMS CHANGEPASSWORD*123456*888888 to tracker, CHANGE
PASSWORD is a command; 123456 is old password; 888888 is new
password; if the operation is success, the tracker will send the information
New Password 888888 to every preset phone number, if the password is
not right, the operation is fault, the tracker will send back information
Wrong Password .
Note: Only The authorized phone can change the password.
9
Check tracker password
Send SMS CHECKPASSWORD to the tracker, CHECKPASSWORD
is a command, if the operation is success, the tracker will send back the
information Password 888888 ; 888888 is an example.
Note: Only The authorized phone can check the password.
3. Set APN & GPRS
This tracker use GPRS to upload the information to internet server, most
mobile company SIM card need enable GPRS service first & set APN and
GPRS user name & password, please call your tracker SIM card mobile phone
company to confirm.
This tracker can download & configure APN & GPRS username password
automatically after power on according the different SIM card in the tracker, if
the APN & GPRS user name password are not right (Red LED will flash twice),
then you need sending SMS to tracker to change them manually,please confirm
the auto configuration of APN & GPRS user name password is right, call your
tracker SIM card mobile phone company to get the APN & GPRS setting,sending
SMS CHECK*123456 to tracker can check the current APN & GPRS auto
setting. If the APN & GPRS are not right, please set by the following description.
Send SMS APN*123456*apnname to the tracker, in which, APN
is the fixed command, 123456 is the password and apnname is the
APN name of a mobile phone company. Having successfully been made,
there will be a SMS APN: apnname .
Send SMS USERNAME*123456*username*password to the tracker,
USERNAME is a command, 123456 is the password of the tracker;
username is the mobile company GPRS user name, password is the
mobile company GPRS password, if the operation is success, the tracker will
send back the information Username: username, Password: password ,
please call the mobile phone service hot-line to get the GPRS username and
password,some mobile company it is not necessary to set the GPRS username
and password.If the password is not right,the operation is fault;the tracker will
send back information Wrong Password .
4. Set Website Server IP address
The tracker IP address has been set to default: 58.64.155.133,8011 in
factory. Normally this is not necessary to change, If our server IP is changed,
we will notice on the website.But if you need upload location to your own server,
send SMS IP*123456*58.64.155.133,8011 to the tracker, in which, IP
is the fixed command, 123456 is the password and 58.64.155.133,8011
is the IP address & port of the your own server. Having successfully been set,
there will be a SMS IP: 58.64.155.133,8011 .
10
5. Set the system GSM work mode
The tracker has 3 GSM work modes.
Mode 1 (Factory Mode) ------ Shock control standby
Send SMS MODE*123456*1 to the tracker, MODE is a command,
123456 is password, 1 is the mode 1. If the operation is success, the
tracker will send back the information SET MODE 1 OK .
This mode is the default GSM work mode. Under this mode, when the car
begins to move, the track will turn on GPS & GPRS and upload the location to
the server. When car stop moving or turn off 5 minutes, the GSM is standby
(GPRS off, SMS & voice ready) and the GPS is off, at this moment, the GSM
can receive SMS and calling, and can be triggered locating by SMS or calling.
Mode 2 ------ Shock control ON/OFF
Send SMS MODE*123456*2 to the tracker, MODE is a command,
123456 is password, 2 is the mode 2. If the operation is success, the
tracker will send back the information SET MODE 2 OK .
Under this mode, when the car begins to move, the track will turn on GPS
& GPRS and upload the location to the server. when car stop moving or turn
off 5 minutes, the GSM & GPS all are off (GPRS off, no SMS & voice), at this
moment, the GSM cannot receive SMS and calling, and cannot be triggered
locating by SMS or calling. Only shock sensor can trigger the tracker wake up.
This mode can save battery power than mode 1, if the tracker stop moving,
standby time can reach over 40 days (different according the GSM signal and
working condition).
Mode 3 ------ Timing Periodical ON/OFF
Send SMS "MODE*123456*3*xx" to the tracker, "MODE" is a command,
"123456" is password, "3" is the mode 3, "xx" is the sleep time from 01-99, unit
is hour. If the operation is success, the tracker will send back the information
SET MODE 3 OK . The sleep time can be set from 01 hour to 99 hours.
Under this mode, the GSM and the GPS are both controlled by timer
(interval time). The tracker GSM and GPS will power on and upload the current
location to server, and then turn off the GSM and the GPS (no SMS or voice
service or GPRS), and the timer will begin to count, after the time is up (for
example the above is 24 hours), the tracker will turn on the GSM and the GPS
automatically, then upload the current location to server, and then turn off the
GSM and the GPS again, and the timer will begin to count again and repeat the
above process. The mode 3 is lowest power cost. In this mode, the solar battery
(in the sunlight) can meet the demand of the power cost; the tracker could work
very long time and is very suitable for longtime transportation tracking.
Note: In the mode 3, if you need change the set or operate other function, you
can send the SMS command and wait for response, the tracker will receive
SMS and operate the command when the tracker weak up after the setting
interval time. Or you can press the button A or B or C to start the tracker
immediately.
11
6. Set the upload time interval
In the GSM work mode 1, the GPS location information upload time can
be set from 30 to 999 seconds.
Send SMS "INTERVAL*123456*yyy" to tracker, INTERVAL is a
command, 123456 is password, yyy is the interval time from 30 to 999,
unit is second. The tracker will send back information Set Interval yyy OK ,
if the password is not right, the operation is fault, the tracker will send back
information Wrong Password . 30 seconds is the default interval time.
Longer upload interval time can save battery and GPRS data cost, but this
will make the total mileage to more error.
Note: Only in the GSM work mode 1, this setting is available.
7. Set the LEDs ON or OFF
The tracker has two LEDs, green LED and red LED, which indicate
different working situation. And the LEDs can be set always OFF to save the
battery power or to be easy hidden.
Send SMS LEDOFF*123456 or LEDON*123456 to tracker,
LEDOFF or LEDON is a command, 123456 is password. The
tracker will send back information Set LEDOFF OK or Set LEDON OK ,
if the password is not right, the operation is fault, and the tracker will send back
information Wrong Password . And then the LEDs turn off immediately. And
the LEDs can t indicate the working situation, but when charge the tracker
with an adapter, the red LED will be on in all the charging process.
Note: Default the LEDs will be ON.
8. Check tracker setting
Send SMS "CHECK*123456" to tracker, "CHECK" is the fixed command,
123456 is password. The tracker will send back information including
software version, ID S/N number, IP address, authorized phone number, GPS
and GSM signal etc. if the password is not right, the operation is fault, and the
tracker will send back information Wrong Password . The following is an
example:
808S,V Mar 03 2014,CC8081400820800,MODE 1,58.64.155.133,8011,
30, A:13987654321 B:13876543210,GPS OK,GSM:-95dBm,CMNET,88%
808S,: Product Model
V Mar 03 2014: Software version date
CC8081400820800: ID S/N number
MODE 1: GSM Working Mode
58.64.155.133,8011: Server IP and Port
30: Upload Interval Time
A:13987654321: Authorized number (A/B/C)
GPS OK: GPS status
GSM:-95dBm: GSM signal strength
CMNET: APN name
88%: Battery
12
Note: This command is usually used to check the tracker current status &
configuration, if the tracker cannot work well, this command can check what
the problem is.
9. Re-power On & Reset Tracker
Send SMS "RESET*123456" to tracker, "RESET" is a command, "123456"
is password. The tracker will send back information "Reset Tracker and cancel
all alarm setting", if the password is not right, the operation is fault, the tracker
will send back information "Wrong Password".
The tracker will power off and then power on automatically, this will take a
few minutes,and then cancel all the alarm setting in the tracker, including shock
alarm, move alarm, geo-fence alarm, over speed alarm, etc.
10. Back to factory configuration
Send SMS FACTORY*123456 to tracker, FACTORY is the fixed
command, 123456 is password. The tracker will send back information
Set factory setting OK , if the password is not right, the operation is fault,
the tracker will send back information Wrong Password .
After this, The tracker will cancel all the alarm setting in the tracker, including
shock alarm, move alarm, geo-fence alarm, over speed alarm, delete all the
authorized phone number,delete the APN and GPRS user name and password,
change the tracker password to 123456,reset the IP address,reset the system
working mode and the interval time, and so on.
1)If forgot the password, you cannot reset by the SMS command.
2)After back to default set, if the IP/APN/GPRS name & password are changed
manually, you need set these again by sending SMS.
11. SMS Start/Stop (Enable / Disable) Uploading Location to Server
The uploading location to internet server can be enabled(Start)or disabled
(Stop) by SMS, if the uploading location to server is disabled, the tracker will
not upload location to server unless user enable (Start) the uploading location
to server function again, at this condition it still can be used as a personal
tracker without platform.
Send SMS START*123456 or STOP*123456 to tracker, START
or STOP is a command, 123456 is password. The tracker will send back
information Set upload start OK or Set upload stop OK ,if the password is
not right, the operation is fault, the tracker will send back information Wrong
Password . After stop uploading location to server, the tracker is just like a
personal tracker.
Note:the default setting is:the uploading location to server function is enabled.
13
12. Enable And Disable Shock Alarm
Send SMS SHOCKALARMON*123456 or SHOCKALARMOFF*123
456 to the tracker, SHOCKALARMON or SHOCKALARMOFF is a
command, 123456 is password, the tracker will send back the information
Set Shock Alarm On or Set Shock Alarm Off to indicate the operation
is success, if the password is not right, the operation is fault, the tracker will
send back information Wrong Password .
After enable shock alarm,the system will check shock sensor,if the shock
sensor is trigger, the tracker will send alarm and location information by SMS
to the preset phone, and also send the alarm information to the website server.
If the tracker shock is triggered continually, every authorized phone number
will receive max 3 alarm SMS per hour.
The shock alarm SMS is as follow:Shock Alarm
https://maps.google.com/maps?q=22.67680N,114.15188E
Battery: 91%
In the default, the shock alarm is OFF.
13. Enable And Disable Overspeed Alarm:
Send SMS OVERSPEEDALARMON*123456*xxx or OVERSPEEDA
LARMOFF*123456 to tracker, OVERSPEEDALARMON or OVERSPE
EDALARMOFF is a command, 123456 is password, xxx is the preset
max speed, unit is km/hour. The tracker will send back the information
Set Overspeed Alarm On or Set Overspeed Alarm Off to indicate the
operation is success, if the password is not right, the operation is fault, and the
tracker will send back information Wrong Password .
After enable overspeed alarm, the system will check the real time speed when
the car is running. If the current speed is higher than the preset speed, the
tracker will send alarm and location information by SMS to the preset phone,
and also send the alarm information to the website server. Every preset phone
will receive max 3 alarm SMS per hour.
The overspeed alarm SMS is as follow:Overspeed Alarm
80km/H
https://maps.google.com/maps?q=22.67680N,114.15188E
Battery: 91%
In the default, the overspeed alarm is OFF.
14. Enable And Disable Move Alarm
Send SMS MOVEALARMON*123456 or MOVEALARMOFF*123456
to tracker, MOVEALARMON or MOVEALARMOFF is a command,
123456 is password, the tracker will send back the information Set Move
Alarm On or Set Move Alarm Off to indicate the operation is success,if the
password is not right, the operation is fault, the tracker will send back
information Wrong Password .
After enable move alarm, the tracker would get the current location as
original location, and it will check the real time location, if the change of the
location distance between the current location and the original location is
14
greater than 1000 meters, the alarm will trigger and the tracker will send alarm
and location information by SMS to the preset phone, and also send the alarm
information to the website server. If the change are not canceled, every
authorized phone would receive max 3 alarm SMS per hour.
The move alarm SMS is as follow:Move Alarm
https://maps.google.com/maps?q=22.67680N,114.15188E
Battery: 91%
In the default, the move alarm is OFF.
15. Enable And Disable Geo-fence Alarm
Send SMS GEOFENCEALARMON*123456*zzz or GEOFENCEALAR
MOFF*123456 to the tracker, GEOFENCEALARMON or GEOFENCEA
LARMOFF is a command, 123456 is password, zzz is the radius of
the geo-fence circle, unit is km. The tracker will send back the information
Set Geofence Alarm On or Set Geofence Alarm Off to indicate the
operation is success,if the password is not right,the operation is fault,and the
tracker will send back information Wrong Password . The radius of the
fencerow can be set from 001 to 999 kilometers.
After enable geo-fence alarm, the tracker would get the current location,
point A for example, and it would check the real time location, if the change of
the location distance between the current location and the pre-set location was
greater than the radius,the alarm was trigged and the tracker would send alarm
and location information by SMS to the preset phone, and also send the alarm
information to the website server. If the tracker is not back to geo-fence, every
preset phone would receive max 3 alarm SMS per hour.
The geo-fence alarm SMS is as follow:Geofence Alarm
https://maps.google.com/maps?q=22.67680N,114.15188E
Battery: 91%
Note: In the default, the geo-fence alarm is OFF.
16. Cancel All Alarm Setting
Send SMS CANCELALARM*123456 to tracker, CANCELALARM
is a command, 123456 is password, the tracker will send back information
All Alarm Cancel ,and cancel all the shock alarm setting in the tracker.If the
password is not right, the operation is fault; the tracker will send back
information Wrong Password .
Note: RESET and FACTORY also can cancel all alarm setting,please see above.
17. SOS Emergency
In the normal mode press the button A or B or C and don t not release
(Press button over 6 seconds), the GREED LED will flash quickly, a few
seconds later the GREEN LED will turn OFF, then release the button, the
tracker will send SOS help information to all 3 preset phone.
The SOS SMS information sample is as follow: HELP!
https://maps.google.com/maps?q=22.67680N,114.15188E
Battery: 91%
15
Platform Operation
The platform operation please refer the platform operation guide, scan the
following QR code or click the website link to download the platform manual,
visit website www.responsegps.com or www.999gps.net and click the
Manual icon also can download the platform manual.
Platform User Guide
Word Version
Platform User Guide
Word Version
iPhone iOS App
Download & Install
Android App
Download & Install
16
Notes:
1. This tracker use 2G GSM network, and it upload tracking only through 2G
GPRS, it cannot work in CDMA network or 3G (WCDMA or CDMA2000)
network, Some 3G card can work in 2G GSM network, then this kind of 3G
SIM card can be used in this tracker, please call mobile phone company to
confirm the SIM card support 2G GSM network or not.
2. Please confirm that the SIM card PIN code has been disabled,otherwise the
tracker cannot find GSM network, and the Green LED will keep ON.
3. Also please confirm the SIM card has enable GPRS service(Some SIM card
need send SMS to enable the GPRS data service), the tracker will cost 2030M GPRS data every month, order a GPRS data package can save money.
4. The antenna of GSM and GPS is built in tracker, please note that the install
location of the tracker must can receive the GPS signal, normally the back of
the seat or arm rest box or under the back window or room on the panel etc.
please leave away the tracker from big metal, and keep away from the
magnetic components.
5. The tracker built in high capacity Li battery,recharge one time can use about
30 days (No sunlight standby), please use our OEM DC adapter for charging,
change the working mode can extend the working time longer, place the
tracker in the sunlight can extend the working time.
6. The tracker built in GSM and GPS module,so please power off the tracker at
the special place that restrict using mobile phone, such as on the plane, etc.
7. The GPS need 10-200 seconds to locate the position, when the GSM signal
is weak or the network is very busy,the SMS maybe delay to send by the
GSM network, this is normal.
8. The tracking data on our server will keep 6-12 months; the old data will be
deleted.
Trouble Shooting:
1. The tracker auto power off: please confirm the tracker battery have enough
power, and try to recharge it; and confirm the adapter is working well (When
charging the LED on the adapter is RED, if the LED is GREEN means the
charging is finished, the charging process will cost 5-10 hours ).
2. After power on the tracker, the tracker GREEN LED keep on, and it has not
any repose, and no ring, please confirm the SIM card has been installed
properly, the SIM card PIN code is disable, and the SIM card has enough
charge,and the mobile phone can work well in that place.If the tracker work
well the Green LED will flash once every 4 seconds.
3. If the tracker cannot upload location to website,please confirm the SIM card
has GPRS function,and the APN or GPRS auto configure is right,(Send SMS
CHECK*123456 to check auto configure, and call the mobile phone hot
line to confirm APN & GPRS). if the tracker do not move, the tracker will not
upload tracking, try moving the tracker.
17
4. If the tracker cannot send back information by SMS, please confirm the SIM
card has ID caller display function and SMS service function, and please
read the SMS information of the tracker sending back, and check the
instruction & password is right or not.
5. When call the tracker,it has ringing,but it will not hang up the calling, please
check the tracker has set the authorized phone number, use the authorized
phone call the tracker, or delete the authorized phone number.
6. Cannot login the platform: send SMS to check the ID of the tracker, then try
again, if not success please contact your supplier.
7. After go out the underground park, some tracking maybe lost, the GSM and
GPS module will take a few minutes to receive signal and re-locate, some
tracking maybe lost, this is normal.
8. Some time some location point is lost, this is normal, in the transmit process,
some point maybe lost, but this will not happen very often.
Specifications:
GSM Module
SIMCOM 800
GPS Module
Sirf-Star or MTK
GSM Frequency
850/900/1800
/1900 MHz
GPS channel
32 channels
GSM / GPS
Antenna
Built in
Locate precision
10-20 Meters
Working Current
<200mA
GPS Hot Start Time
1 second
Standby Current
< 1.5 mA
GPS Cold Start Time
36 seconds
4000mAh
Recharging Current
< 5.5V/500mA
Battery
Working
Temperature
O
O
-20 C to +55 C
Storage Temperature -40 OC to +80OC
Packing list:
The main unit
1 pcs
The user manual
1 pcs
CD or Print
Battery Charging Stand
1 pcs
Input 110-220V, Output >1A, 5V
Car Charger
1 pcs
Input 10-30V, Output >1A, 5V
The USB wire
1 pcs
18